
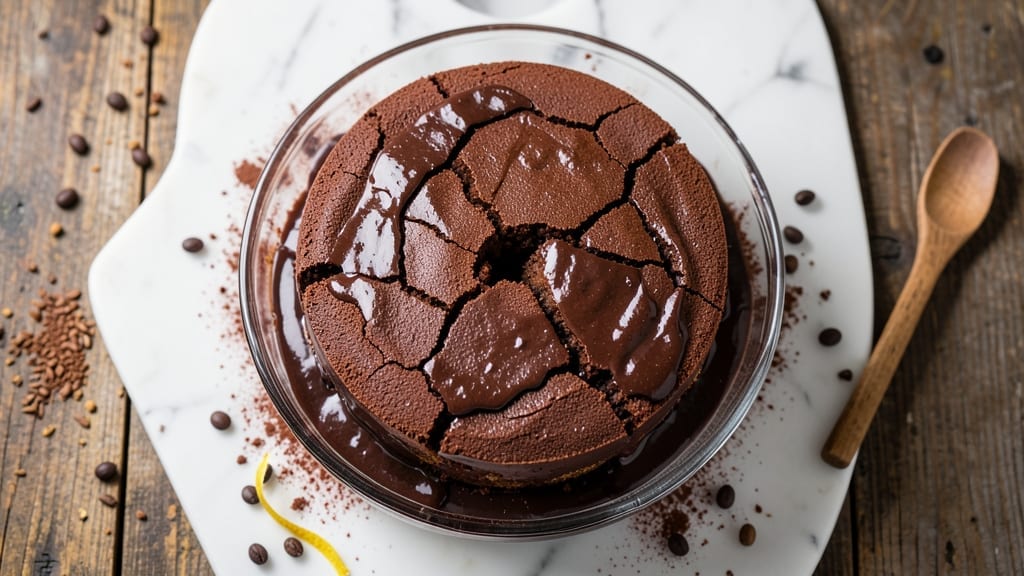
When you crave a 22-minute chocolate cake that delivers restaurant-quality fudgy perfection without the wait, this single-pan recipe is your game-changer.
The secret lies in a precise balance of cocoa powder, espresso powder for depth, and a touch of cornstarch for that signature moist texture—all mixed in one bowl and baked to golden perfection in under 25 minutes.
I developed this after years of testing microwave cakes that either dried out or stayed too dense, and this method finally cracked the code for a cake that’s rich, tender, and ready in the time it takes to brew coffee.
The beauty of this recipe is its simplicity: no fancy equipment, no layering, and no waiting for the oven to preheat.
You’ll use a standard 9-inch pan, a whisk, and a few pantry staples to create a cake with a crackly top crust and a fudgy interior that melts in your mouth.
The espresso powder might sound unusual, but it enhances the chocolate flavor without adding bitterness—trust me, it’s the secret weapon that elevates this cake from homemade to “I can’t believe it’s not from a bakery.” The cornstarch ensures moisture retention, so you won’t end up with a dry crumb.
By the time you’re done, you’ll have a warm, slightly domed chocolate cake with a glossy sheen that’s ready to slice. The aroma alone will have everyone gathering around your kitchen, and the first bite delivers that perfect balance of sweetness and richness.
This cake stays moist for days when stored properly, making it ideal for last-minute dessert cravings or when you need to impress guests with minimal effort. The best part? You’ll have time to enjoy it while it’s still warm.
Serve it plain with a dusting of powdered sugar for an elegant finish, or add a scoop of vanilla ice cream and fresh berries for a classic dessert presentation.
The versatility of this recipe means it works for birthdays, date nights, or just because—no occasion is too small for a cake this good. Here’s everything you need to make it happen in record time.
Ingredients for 22 minute chocolate cake
Pantry staples meet chocolate magic for this ultra-fast, single-pan cake.
| Ingredient | Amount | Notes |
|---|---|---|
| All-Purpose Flour 🌾 | 1 ½ cups | Sifted for light texture |
| Unsweetened Cocoa Powder 🍫 | ¾ cup | Natural or Dutch-processed |
| Granulated Sugar 🍚 | 1 ½ cups | White or light brown |
| Espresso Powder ☕ | 2 tbsp | Enhances chocolate flavor |
| Cornstarch 🌾 | 2 tbsp | For moisture retention |
| Baking Soda 🧂 | ½ tsp | Not baking powder |
| Salt 🧂 | ½ tsp | Fine sea salt preferred |
| Vanilla Extract 🌸 | 1 tbsp | Pure, not imitation |
| Whole Milk 🥛 | 1 cup | Room temperature preferred |
| Vegetable Oil 🫒 | ½ cup | Light or canola oil |
| Hot Water 💧 | ½ cup | Freshly boiled |
| Powdered Sugar 🍚 | ¼ cup | For dusting (optional) |
The cocoa powder is non-negotiable here—Hershey’s Special Dark or Dutch-processed brands work best for that rich, velvety texture. Espresso powder might be the trickiest to find, but Starbucks or local coffee shops usually sell it. If you can’t find it, instant espresso granules work in a pinch (use the same amount). The cornstarch is what keeps this cake moist for days—don’t skip it. For flour, grab the King Arthur brand if you’re picky, but any all-purpose will do. I always double-check my baking soda to make sure it’s fresh—old baking soda won’t rise properly.
No espresso powder? Instant coffee granules at half the amount will give you some depth, though not exactly the same. Running out of vegetable oil? Melted coconut oil or butter works, but the cake will have a slightly different texture. The milk can be any kind—almond milk works too—just make sure it’s not too thick. For the hot water, I use a small saucepan to keep it hot until mixing. If you’re feeling fancy, add a pinch of cinnamon to the batter for warmth. The powdered sugar is totally optional, but it makes the cake look restaurant-worthy when dusted on top.
This cake is best served fresh from the oven, but it stays moist for 3-4 days in an airtight container at room temperature. For longer storage, wrap it tightly in plastic and keep it in the fridge for up to 1 week. I like to slice it into 8 equal pieces right after baking so it’s ready to grab whenever cravings hit. The aroma alone will have your whole house gathering—trust me, this cake smells even better than it tastes.
Why You’ll Love This Recipe
- No Mixer Needed: I swear by this—just a bowl and a whisk. The espresso powder cuts through the richness, and the cornstarch keeps it light without overmixing. My lazy Sundays just got a whole lot sweeter.
- Deep Chocolate Kick: That unsweetened cocoa and espresso combo? It’s like a grown-up chocolate cake—bold, not cloying. The sugar melts into a fudgy center that makes me forget I’m on a “healthy-ish” streak.
- Party in a Pan: Serve it warm with ice cream for a crowd, or slice it cold for a breakfast cake. Honestly, I’ve even packed it in lunchboxes (yes, really). The cornstarch keeps it sturdy enough to travel.
- Pantry Staple Magic: Flour, sugar, cocoa—ingredients you already own. No weird substitutions, no last-minute grocery runs. Between us, this is my secret weapon for when I need dessert now and my wallet’s already empty.
Step-by-step instructions for single-pan fudgy chocolate cake
Here’s how to bake this rich, moist chocolate cake in just one pan—no layers, no fuss, all flavor.
Mix Dry Ingredients for Perfect Texture
In a large bowl, whisk together the 1.5 cups all-purpose flour, 0.75 cup unsweetened cocoa powder, 2 tbsp espresso powder, 2 tbsp cornstarch, 0.5 tsp baking soda, and 0.5 tsp salt. Sift the flour first if you have a sifter—this prevents lumps and ensures a light texture. The espresso powder might seem odd, but it deepens the chocolate flavor without adding coffee taste.
I like to use a whisk for this step because it aerates the dry ingredients slightly, which helps create a tender crumb. Set this bowl aside while you prepare the wet ingredients. If you notice any lumps after mixing, press the mixture through a fine-mesh sieve to break them up completely.
Combine Wet Ingredients for Smooth Batter
In a separate large bowl, measure out 1.5 cups granulated sugar, 1 cup whole milk (room temperature), 0.5 cup vegetable oil, and 1 tbsp vanilla extract. Whisk these together until the sugar dissolves completely and the mixture looks smooth and glossy. The oil helps keep the cake moist, while the milk adds richness without making it too dense.
Now add 0.5 cup hot water to the wet mixture and whisk again. The hot water activates the baking soda, which is crucial for the cake to rise properly. If you skip this step or use cold water, your cake might turn out dense. The batter should be thin but not watery—it should coat the back of a spoon.
Combine Wet and Dry for Batter
Gradually pour the wet ingredients into the dry ingredients while whisking continuously. Start slow to prevent lumps, then whisk until everything is fully combined. The batter will be thick but still pourable—this is perfect for a fudgy texture. Stop mixing as soon as you see no more dry streaks remaining.
Here’s the thing—overmixing develops gluten, which can make your cake tough. Once the batter is smooth, give it one final stir to ensure everything is evenly distributed. The batter should be dark, rich, and slightly thick, almost like a brownie batter but with a cake-like consistency.
Bake to Golden Perfection
Preheat your oven to 350°F and grease a 9-inch round cake pan thoroughly with vegetable oil or butter, then dust with flour. Pour the batter into the prepared pan and smooth the top with a spatula. Tap the pan gently on the counter a few times to release any air bubbles that might have formed.
Bake for 22 minutes—this is the magic number for a perfectly set yet moist cake. You’ll know it’s done when the edges are pulling away from the pan slightly and a toothpick inserted in the center comes out with a few moist crumbs (not wet batter). The cake should spring back when gently pressed in the center.
Cool and Serve with Optional Powdered Sugar
Remove the cake from the oven and let it cool in the pan for 5 minutes. Then transfer it to a wire rack to cool completely. This cooling step is crucial—it allows the cake to set properly and prevents it from becoming gummy. If you’re impatient, you might be tempted to cut into it earlier, but resist the urge!
Once fully cooled, dust the top with 0.25 cup powdered sugar if desired. This adds a beautiful finish and balances the rich chocolate flavor. Serve slices warm or at room temperature with vanilla ice cream or whipped cream for the ultimate indulgence. The cake keeps well at room temperature for up to 3 days, covered tightly with plastic wrap.
Pro Tips For Making 22 Minute Chocolate Cake
- Sift the Dry Mix: Mixing flour, cocoa, and cornstarch without sifting packs it too tight—your cake will rise unevenly or sink in the middle. Use a fine-mesh sieve or whisk the dry ingredients in the bowl to break up clumps before adding wet ingredients. I learned this the hard way when my first batch collapsed like a deflated balloon.
- Warm the Eggs First: Cold eggs in a warm batter slow everything down, especially in a rushed recipe. Crack them into a small bowl, cover it with your hand, and let them sit for 2-3 minutes while you mix the wet ingredients. The slight warmth helps the batter come together faster and ensures a smoother texture.
- Don’t Overmix the Batter: Once you add the flour mixture, stop mixing after 10-12 strokes—just until no dry streaks remain. Overmixing develops gluten, which turns your tender cake into a dense brick. I used to go all out, thinking more mixing = better cake, but now I count strokes like a pro.
- Check for Doneness Early: This cake’s fast, so pull it when the edges are set but the center still jiggles slightly—like a wobbly Jell-O. Overbaking dries it out, and underbaking leaves it gummy. If you’re unsure, stick a toothpick in: it should come out with moist crumbs, not wet batter. I’ve ruined batches both ways—trust the toothpick.
Perfect pairings for 22 minute chocolate cake
Creamy Toppings
Warm vanilla bean ice cream from brands like Ben & Jerry’s or Breyer’s elevates this cake to dessert perfection. I scoop about ½ cup per slice and let it soften slightly on the cake for a melt-in-your-mouth experience.
For a lighter option, try whipped cream sweetened with 1 tsp powdered sugar and a dash of vanilla extract—it adds airy contrast to the dense cake. 🥛
Fruity Contrasts
Fresh raspberries or blackberries add vibrant color and tartness that cuts through the richness. I arrange 6-8 berries per slice in a circular pattern around the edges, then drizzle with 1 tsp raspberry jam for extra shine.
For a tropical twist, try mango slices or passion fruit purée—their acidity balances the sweetness beautifully.
Boozy Upgrades
A splash of dark rum or chocolate liqueur (like Godiva Chocolate Liqueur) transforms this into an adult dessert. Drizzle 1 tsp over each slice and let it soak in for 5 minutes before serving.
For coffee lovers, a ½ tsp cold brew concentrate mixed with 1 tsp whipped cream adds depth. Just be mindful—these additions make the cake richer, so go light! ☕
Crunchy Textures
Toasted pecans or hazelnuts add a delightful crunch. I pulse ¼ cup nuts in a food processor until finely chopped, then sprinkle over the cake. For extra indulgence, try crushed Oreos or chocolate-covered espresso beans—the coffee notes echo the espresso powder in the cake.
A pinch of flaky sea salt on top brings out all the flavors. 🌰
Warm Sauces
Drizzle with warm salted caramel sauce or chocolate ganache for a restaurant-worthy finish. For caramel, simmer ½ cup sugar with 3 tbsp water until golden, then whisk in 2 tbsp heavy cream.
For ganache, melt 4 oz dark chocolate with ¼ cup heavy cream and let it cool slightly before drizzling. Both pair perfectly with the cake’s fudgy texture. 🍫
Coffee Pairings
Serve with a strong espresso or mocha latte to enhance the chocolate-espresso flavor profile. I recommend a double shot of Starbucks Pike Place Roast brewed fresh. For a non-coffee option, a chilled glass of milk or sparkling water with lemon cleanses the palate between bites.
The contrast of hot cake and cold drink is pure magic. ☕
Nutrition facts
Frequently asked questions
Can I make this cake in a microwave?
This recipe is specifically designed for oven baking to achieve the perfect fudgy texture and crackly top. Microwaving would result in uneven cooking and a denser crumb. If you’re short on time, consider preheating your oven to 375°F instead of 350°F—it’ll bake slightly faster while still delivering that rich chocolate flavor you love.
Why does the recipe call for espresso powder?
The espresso powder enhances the chocolate flavor without adding bitterness or coffee taste. It deepens the richness, making the cake taste more complex and professional. If you don’t have it, instant coffee granules at half the amount will work, though the flavor won’t be exactly the same. Think of it as the secret ingredient that takes this cake from homemade to bakery-quality!
How do I know when the cake is fully baked?
Your cake is done when the edges pull away from the pan slightly and a toothpick inserted in the center comes out with a few moist crumbs (not wet batter). The cake should also spring back gently when pressed in the center. Overbaking can make it dry, so trust the 22-minute timer as your guide—it’s been perfected for this recipe!
Can I substitute butter for the vegetable oil?
Yes, but you’ll need to melt ½ cup butter first and let it cool slightly before mixing. The cake will have a slightly different texture—more tender but with a subtle buttery flavor. For best results, use vegetable oil as called for, but butter works in a pinch if that’s what you have on hand.
Will this cake work for a gluten-free diet?
This recipe isn’t gluten-free as written, but you can substitute the all-purpose flour with a 1:1 gluten-free baking flour blend (like Bob’s Red Mill). You may need to add ½ tsp xanthan gum to help bind the cake. Keep in mind the texture will be slightly denser, but it’ll still be delicious and ready in the same 22 minutes!

- 3lb Prime Rib Roast Recipe: Juicy Pink Center Guaranteed in 3 Hours - October 31, 2026
- 5 Spice Cake Recipe: Warmly Spiced Layers With Crunchy Top - October 31, 2026
- 1950’s Macaroni and Cheese Recipe: Nostalgic Creamy Cheese Sauce with Buttery Noodles - October 31, 2026