
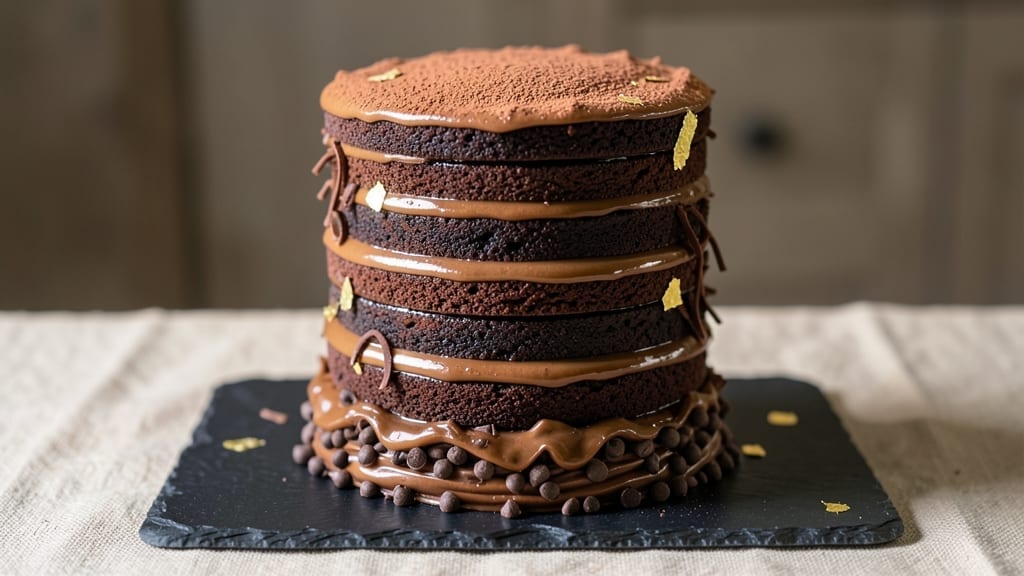
A 24-layer chocolate cake isn’t just dessert—it’s a showstopping centerpiece that transforms any celebration into an unforgettable experience. The secret lies in perfectly balanced layers of velvety chocolate cake and rich fudge swirls, baked and assembled with precision to create a towering masterpiece.
This isn’t your average sheet cake; it’s a labor of love that delivers restaurant-quality results at home.
What sets this recipe apart is the foolproof layering technique that ensures each slice is moist, flavorful, and structurally sound. We’ll start with a simple yet luxurious chocolate cake batter that yields tender, fudgy layers, then incorporate swirls of homemade fudge for that signature decadence.
The key is patience—proper cooling times between layers and frosting stages prevent collapse, while careful stacking creates that iconic tiered effect.
By the final step, you’ll have a stunning chocolate masterpiece with crisp edges, velvety layers, and a glossy finish that begs to be photographed. The fudge swirls add a luxurious touch, while the precise layering ensures every bite delivers that perfect balance of cake and chocolate.
This isn’t just dessert—it’s an edible work of art that will have everyone asking for seconds.
Perfect for birthdays, anniversaries, or any occasion calling for a dramatic dessert, this recipe scales beautifully for crowds. The techniques here can be adapted for other flavors too—once you master the 24-layer method, the possibilities are endless. Let’s get started on creating your chocolate cake masterpiece.
Ingredients for 24 layer chocolate cake
Velvet layers and fudge swirls require precise ingredients for flawless texture and decadent flavor.
| Ingredient | Amount | Notes |
|---|---|---|
| Unsalted Butter 🧈 | 2 ½ cups | Room temperature for creaming |
| Granulated Sugar 🍚 | 4 ½ cups | Superfine preferred for smoothness |
| Dark Chocolate Chips 🍫 | 2 ½ cups | 70% cocoa, high-quality |
| Large Eggs 🥚 | 12 whole | Room temperature, separated |
| All-Purpose Flour 🌾 | 4 ½ cups | Sifted, spooned lightly |
| Cocoa Powder 🍫 | 1 cup | Dutch-processed, unsweetened |
| Baking Powder 🧂 | 1 tbsp | Aluminum-free preferred |
| Salt 🧂 | ½ tsp | Fine sea salt |
| Vanilla Extract 🌿 | 2 tbsp | Pure Madagascar preferred |
| Heavy Cream 🥛 | 3 cups | Cold, 35% fat minimum |
| Powdered Sugar 🍚 | 6 cups | For fudge swirls |
| Milk Chocolate Chips 🍫 | 1 ½ cups | For fudge swirls |
| Chocolate Liqueur 🍷 | ½ cup | Optional, for fudge swirls |
| Parchment Paper 📄 | 24 sheets | 9-inch rounds, for layers |
| Aluminum Foil 📄 | 1 sheet | For cooling layers |
The butter and sugar are your foundation—European-style butter like Plugrá or Land O’Lakes is ideal for its high fat content. Ghirardelli or Valrhona chocolate chips elevate the richness, but don’t skimp on quality here. Room-temperature eggs are non-negotiable; they emulsify better and prevent dense layers. For the cocoa powder, Dutch-processed brands like Hershey’s Special Dark dissolve more smoothly than natural cocoa. The parchment paper matters too—use high-quality bakery parchment from restaurant supply stores to prevent tearing during assembly. Pre-sift your flour and cocoa to avoid lumps in the delicate batter.
No vanilla extract? Vanilla bean paste at half the amount works beautifully, though it’s pricier. The chocolate liqueur in the fudge swirls is optional but adds depth—Godiva or Kahlúa are reliable brands. Substituting milk chocolate chips? Ensure they’re at least 30% cocoa to maintain balance. For the heavy cream, avoid ultra-pasteurized unless you’re willing to whip it longer. The powdered sugar should be 10X sifted for silky fudge swirls. If you’re short on time, pre-made fudge sauce from Ghirardelli can be piped between layers, though homemade always tastes better.
Store butter and chocolate chips at room temperature for 1 hour before using for perfect creaming. Eggs should sit in their shells at room temperature for 30 minutes before separating. The assembled cake keeps 3 days at room temperature in an airtight container, but the layers are best consumed within 48 hours for maximum moisture. For long-term storage, freeze fully assembled cakes (without final glaze) for up to 3 months—thaw at room temperature before serving. The fudge swirls harden as they cool, so assemble the cake in a cool room or refrigerator for the final glaze application.
Why You’ll Love This Recipe
- I’ll be real: this costs less than half of what a boxed mix would, and it’s way better. Butter and sugar are the stars, but the eggs and flour stretch the richness so every slice feels special. No fancy ingredients, no waste—just pure chocolate satisfaction that won’t break the bank. My wallet thanks me every time.
- No Fuss Layers: I swear, this isn’t some Pinterest-perfect cake—it’s the kind you make when you’re tired of measuring cups and layers that collapse. Just fold melted butter, sugar, and chocolate into flour and eggs, then alternate baking and cooling. That’s it. No piping bags, no temperamental meringue.
- Rich Without Effort: Between us, the secret’s in the dark chocolate chips melting into the batter while the layers bake. You get this deep, fudgy richness that tastes like a hug from a bakery, but honestly? It’s just flour and chocolate doing their thing. The butter keeps it moist, and the sugar? Well, that’s just insurance for happiness.
- Party in a Box: Here’s what sold me—this cake stays fresh for days, so I can bake it ahead for birthdays, potlucks, or just because. Slice it thin, stack it high, and watch people lose their minds over how easy it is to serve. (Yes, even on a Tuesday night.) Plus, the layers mean you can customize—add peanut butter between them if you’re feeling wild.
Step-by-step instructions for building a 24-Layer chocolate cake
Let’s create this decadent masterpiece layer by layer—precision matters at every step.
Prepare the Velvet Cake Batter
First, melt the 2.5 cups unsalted butter in a heatproof bowl over simmering water until completely liquid but not hot to the touch. In a separate large bowl, whisk together the 4.5 cups granulated sugar and 12 whole large eggs until the mixture is pale and triples in volume—this should take about 5 minutes using a stand mixer.
Gently fold in the melted butter until fully combined. In another bowl, sift together the 4.5 cups all-purpose flour, 1 cup cocoa powder, 1 tablespoon baking powder, and ½ teaspoon salt. Gradually add the dry ingredients to the wet mixture, alternating with 2 tablespoons vanilla extract, mixing just until combined. Fold in the 2.5 cups dark chocolate chips by hand to maintain airiness.
Here’s the thing—this batter needs to be perfectly smooth and velvety. If it looks too thick, add 1-2 tablespoons of cold water to loosen it slightly. The batter should coat the back of a spoon but still hold its shape when dropped from a height. Let it rest at room temperature for 15 minutes before baking to allow flavors to meld.
Bake and Layer the Cake
Preheat your oven to 350°F and line 24 individual 9-inch round cake pans with the parchment paper rounds (you’ll use one pan at a time). Pour the batter evenly into each pan, filling each about ⅓ full—this ensures thin, even layers. Bake for 8-10 minutes until the edges are set and a toothpick inserted comes out clean.
I bake them in batches of 4 pans at a time, rotating the pans halfway through for even baking. As each layer cools for 5 minutes in the pan, transfer it to a wire rack. The layers should be moist but firm to the touch—if they’re too soft, they’ll collapse when stacked. Work quickly to keep everything at room temperature.
Create the Fudge Swirl Filling
In a saucepan, combine the 3 cups heavy cream, 6 cups powdered sugar, and 1.5 cups milk chocolate chips. Heat over medium-low heat, stirring constantly until the chocolate melts and the mixture reaches 160°F—it should coat the back of a spoon but not boil. Remove from heat and stir in the ½ cup chocolate liqueur (if using) and 1 tablespoon vanilla extract. Let it cool to 100°F before using.
This filling needs to be thick but pourable. If it cools too much and becomes stiff, reheat gently until it reaches 100°F again. The texture should be like warm pudding—thick enough to hold its shape when piped but still flow smoothly between layers. Taste and adjust sweetness if needed, though the recipe is balanced as written.
Assemble the Cake Layers
Place the first cake layer on a serving platter. Using a piping bag fitted with a star tip, pipe a ¼-inch border of fudge filling around the edge of the layer. Add a dollop of filling in the center, then place the second layer on top. Press down gently to create a seal—this prevents filling from leaking out the sides.
Repeat this process for all 24 layers, alternating the direction of the filling with each layer to create a spiral effect. The key is to work quickly but carefully—each layer should be perfectly level. If any layers are uneven, use a serrated knife to trim them to size before stacking. Cover the assembled cake with aluminum foil and refrigerate for at least 4 hours (or overnight) to set completely.
Pro Tips For Making 24 Layer Chocolate Cake
- Melt Chocolate Slowly: I learned this the hard way—dumping chocolate chips into hot butter too fast creates clumps that ruin the texture. Instead, lower the heat to medium-low and stir constantly until the chips just start to glisten, then remove from heat and let them melt the rest of the way. That 30-second pause makes all the difference in a smooth batter.
- Whisk Eggs Room-Temp: Cold eggs? Big mistake. Whisk them first in a warm bowl (I run mine under hot water for 10 seconds) before adding to the butter mixture. Room-temperature eggs blend in better and prevent streaks in your layers—no one wants to see white swirls in their chocolate cake.
- Avoid Overmixing Layers: This isn’t a muffin batter—once you fold in the flour, stop after 10 strokes max. Overmixing develops gluten and turns your delicate layers into dense, chewy bricks. If the batter looks slightly lumpy, that’s normal. Smoothness comes from folding, not brute force.
- Chill Between Layers: Skipping this step is how you end up with a cake that collapses like a house of cards. After each layer, pop the pan in the fridge for 15 minutes before adding the next. The cold slows the baking, keeps flavors balanced, and ensures clean, sharp layers—no soggy middle here.
Best sauces and condiments for these flavors
Classic Chocolate Ganache
This is my go-to sauce for this cake—it’s rich, glossy, and effortlessly elegant. Melt 1.5 cups heavy cream with 12 ounces dark chocolate (70% cocoa) over a double boiler, stirring until smooth.
Let it cool to 90°F before drizzling between layers or over the top. For extra shine, add 1 tablespoon corn syrup to the melted chocolate before combining. 🌟
Salted Caramel Swirl
Elevate your cake with a sophisticated twist by replacing some fudge filling with salted caramel. Cook 1.5 cups granulated sugar until amber, then whisk in ½ cup heavy cream and ½ cup butter.
Stir in 1 teaspoon flaky sea salt and let cool slightly before piping between layers. The contrast of salty and sweet takes this cake to the next level.
Espresso Chocolate Drizzle
For coffee lovers, infuse the ganache with 1 tablespoon instant espresso powder dissolved in the warm cream before combining with chocolate. This adds depth without overpowering the chocolate flavor. Drizzle generously over the final layer—it pairs beautifully with the fudge swirls and adds a sophisticated touch. ☕
Peanut Butter Fudge Swirl
Swap out half the milk chocolate chips in the fudge filling with 1 cup creamy peanut butter (like Jif Natural). The nutty richness complements the chocolate perfectly, creating a decadent twist on the classic. For extra flair, sprinkle crushed peanut butter cups on top before the final glaze. 🥜
Raspberry Coulis
Brighten the richness with a tangy raspberry coulis made from 1 cup fresh raspberries, 2 tablespoons sugar, and 1 teaspoon lemon juice. Simmer until reduced to a thick sauce, then strain.
Pipe thin lines between layers or use as a drizzle on the sides—it cuts through the chocolate beautifully and adds a pop of color. 🍓
Final Glaze Options
For a show-stopping finish, choose from these glazes: A simple powdered sugar glaze (3 cups powdered sugar + 2 tbsp heavy cream + 1 tsp vanilla) drizzled over the top, or a dark chocolate ganache glaze (8 oz chocolate + ½ cup heavy cream) for extra decadence.
Let the glaze set for 30 minutes before serving to create a glossy, professional finish. 💫
Nutrition facts
Frequently asked questions
How do I keep the layers perfectly even?
Use a 9-inch round cake pan for each layer and pour batter to the same depth—about ⅓ full. After baking, trim any uneven edges with a serrated knife while the layers are still slightly warm. A leveling tool or even a ruler works perfectly for checking thickness.
Can I make this with fewer layers for a smaller group?
This recipe scales beautifully. For 6-8 servings, bake 6-8 layers using the same batter measurements but divide it evenly. The assembly technique remains identical—just adjust the stacking time to 2-3 hours in the fridge.
Why did my cake collapse between layers?
This usually happens when layers aren’t fully cooled (5 minutes in pan + 10 minutes on rack) or if the fudge filling is too warm. Always let filling cool to 100°F before piping, and press layers gently but firmly together. Chill the cake for at least 4 hours before slicing.
How do I prevent the fudge from leaking out the sides?
Create a ¼-inch border of filling around each layer’s edge before stacking. Press layers firmly together to seal the edges, and work in a cool room (not fridge) during assembly. The filling will thicken as it cools, preventing leaks. For extra insurance, use a thin layer of chocolate ganache as a sealant between layers.
Can I bake the layers ahead of time?
Yes! Bake layers up to 2 days ahead and store them at room temperature in airtight containers between parchment paper. Assemble the cake 4-6 hours before serving to allow flavors to meld. For longer storage, freeze baked layers (unfrosted) for up to 1 month—thaw completely before assembling.

- 3lb Prime Rib Roast Recipe: Juicy Pink Center Guaranteed in 3 Hours - October 31, 2026
- 5 Spice Cake Recipe: Warmly Spiced Layers With Crunchy Top - October 31, 2026
- 1950’s Macaroni and Cheese Recipe: Nostalgic Creamy Cheese Sauce with Buttery Noodles - October 31, 2026