
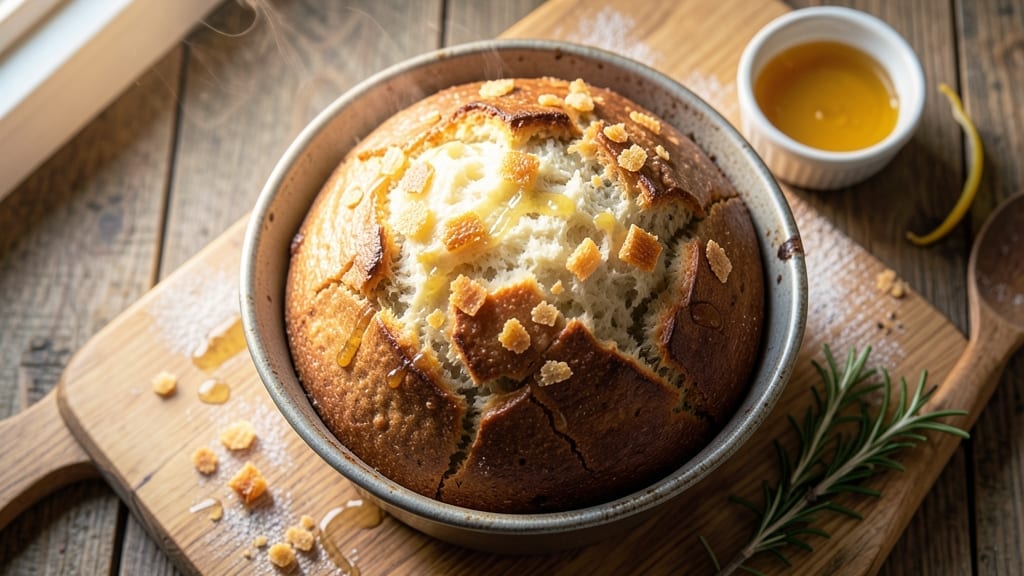
A 2.5 lb bread machine recipe that delivers a crusty crust and soft crumb is the secret to homemade bread that rivals artisanal loaves. This method transforms simple ingredients into a loaf with a golden, crackling exterior and tender interior—no baking skills required.
The bread machine does all the heavy lifting while you focus on perfecting the dough consistency and timing.
The key to success lies in precise ingredient ratios and the right machine settings. Warm milk replaces water for a richer flavor, while a touch of honey adds subtle sweetness without overpowering the wheat.
The dough cycle creates the ideal texture: a crisp shell that snaps satisfyingly while the interior remains pillowy. This recipe is designed for reliability, ensuring consistent results every time you load the pan.
What you’ll end up with is a 2.5 lb loaf that’s perfect for sandwiches, toast, or serving warm with butter. The crust develops a deep golden hue with visible cracks, while the crumb stays soft for days.
No more store-bought bread—just fresh, homemade loaves with a professional finish. Ready to bake?
This method works with any standard bread machine, and the recipe scales easily for larger batches. Whether you’re feeding a family or prepping for meal prep, the technique remains the same. Let’s get started on your first perfect loaf.
Ingredients for 2.5 lb bread machine
Simple ingredients transformed by precise ratios into artisanal-style bread machine loaves.
| Ingredient | Amount | Notes |
|---|---|---|
| All-Purpose Flour 🌾 | 3 ½ cups | Unbleached preferred for better texture |
| Warm Whole Milk 🥛 | 1 cup | 110°F for optimal dough development |
| Granulated Sugar 🍚 | ¼ cup | White or light brown preferred |
| Salt 🧂 | 1 tsp | Kosher or sea salt preferred |
| Active Dry Yeast 🍞 | ¼ oz | 1 packet (2 1/4 tsp) |
| Honey 🍯 | 1 tbsp | Light or wildflower variety |
| Unsalted Butter 🧈 | 2 tbsp | Softened, not melted |
| Large Eggs 🥚 | 2 whole | Room temperature for even mixing |
| Water 💧 | ½ cup | Warm, 110°F |
| Cornmeal 🌽 | 1 tbsp | For dusting bread pan |
Flour quality matters most here—King Arthur or Bob’s Red Mill are my go-tos for consistent results. The whole milk should be warm but not hot (110°F is ideal)—this activates the yeast perfectly while adding richness. Honey adds subtle sweetness without overpowering the wheat flavor. For the yeast, check the expiration date—Fresh yeast from the refrigerated section works better than old packets. The butter should be softened but not melted; if it’s too warm, the dough will become sticky and hard to handle.
No whole milk? Warm water plus 1 tbsp powdered milk works in a pinch. Short on honey? Maple syrup at the same amount gives similar sweetness. The eggs can be substituted with 2 tbsp flaxseed meal plus 6 tbsp water for a vegan version, though texture may vary slightly. For a more artisanal touch, add 1 tbsp olive oil to the dough for extra tenderness. If your bread machine has a ‘crust’ setting, use it—this creates that perfect crackly exterior without extra effort.
Store the loaf in a paper bag at room temperature for up to 3 days to maintain freshness. For longer storage, freeze slices wrapped in plastic—they’ll toast beautifully after thawing. The dough can be mixed ahead and refrigerated for up to 12 hours before baking. For a crispier crust, brush with melted butter right after baking. This recipe scales perfectly for larger batches—just double the ingredients and use a larger pan.
Why You’ll Love This Recipe
- No-Knead Magic: The bread machine does all the work—just toss in the flour, milk, sugar, and yeast, then walk away. Honestly, I’ve made this while scrolling through my phone; the dough rises and kneads itself.
- Golden Crust Promise: That warm whole milk and sugar combo? It delivers a crust so tender yet crisp you’ll want to eat it straight from the pan. (Yes, even on a Tuesday night.)
- Everyday Hero: Freeze half the loaf for toast later or pack slices for lunches—this bread keeps perfectly. Between us, it’s my go-to for sandwiches, garlic toast, or just buttered slices when I’m too tired to cook.
- Pantry Staple: Flour, milk, sugar, yeast—you’ve got this. No fancy ingredients, no last-minute grocery runs. I’ll be real: this recipe saved me during my college years, and it still does the trick now.
Step-by-step instructions for a crusty-crusted bread machine loaf
Master this bread machine technique for a loaf with a satisfyingly crisp crust and tender crumb.
Prepare Ingredients for Optimal Dough Development
Combine the 1 cup warm whole milk and 0.5 cup warm water in a measuring cup, then stir in the 1 tbsp honey and 0.25 cup granulated sugar until fully dissolved. The mixture should feel slightly syrupy—this helps create a tender crumb. In a separate small bowl, whisk together the 2 whole large eggs until smooth and frothy. This step ensures even distribution of moisture and sugar throughout the dough.
While the liquids warm, soften the 2 tbsp unsalted butter to room temperature by letting it sit at room temperature for 15-20 minutes. You’ll know it’s ready when it spreads easily but isn’t melted. Measure out the 3.5 cups all-purpose flour and 1 tsp salt in your bread machine’s mixing bowl. The yeast (0.25 oz active dry yeast) should be added last—it activates immediately upon contact with liquid, so we’ll add it during the machine’s mixing cycle.
Combine Wet and Dry Ingredients in the Bread Machine
Pour the milk mixture into the bread machine’s mixing bowl, followed by the egg mixture. Add the softened butter and mix with a wooden spoon until the butter is fully incorporated. Sprinkle the flour and salt evenly over the wet ingredients, creating a well in the center. This prevents the flour from forming a barrier that could inhibit yeast activation.
Start your bread machine on the basic white bread setting for a 2.5 lb loaf. Once the machine begins mixing, add the yeast directly to the center of the well. The machine’s paddle will quickly distribute it. Close the lid and let the machine do its work—this ensures even kneading and proper gluten development for that perfect crumb structure.
Monitor Dough Development for Ideal Texture
After the initial kneading phase, the dough should appear smooth and slightly tacky, clinging to the sides of the bowl. If it looks dry or crumbly at this stage, add 1-2 teaspoons of water through the machine’s feed tube. The dough should pass the “windowpane test”—stretch a small piece between your fingers, and if it’s thin enough to see light through it, it’s properly developed.
During the rising phase, you’ll notice the dough nearly double in size. This is when the yeast ferments the sugars, creating gases that expand the gluten network. The machine will automatically switch to kneading again to redistribute these gases evenly. If the dough doesn’t rise significantly after 30 minutes, your kitchen might be too cold—try moving the machine to a warmer location.
Shape and Bake for Crusty Exterior and Soft Interior
When the machine signals the baking cycle, carefully remove the dough and place it on a lightly floured surface. Gently shape it into a loaf by folding the sides toward the center and rolling it toward you. This creates surface tension that helps develop the crust. Place the shaped loaf seam-side down into a 9×5-inch loaf pan that’s been lightly dusted with 1 tbsp cornmeal to prevent sticking.
Return the dough to the bread machine and let it bake according to the machine’s settings. The ideal internal temperature is 190-210°F, which the machine will automatically monitor. The crust should emerge with a deep golden-brown color and visible cracks, while the interior should spring back slightly when pressed—indicating a properly baked loaf. Avoid opening the lid during baking, as escaping steam is essential for proper crust formation.
Cool and Enjoy for Maximum Freshness
Once the bread machine signals the baking cycle is complete, remove the loaf from the pan and place it on a wire rack to cool completely. This step is crucial—cooling prevents the crust from becoming soggy and allows the crumb to fully set. For the best texture, let it cool for at least 1 hour before slicing. The contrast between the crisp exterior and soft interior will be most pronounced when served fresh.
To enhance the crust further, you can brush the warm loaf with melted butter while still in the pan. This adds richness and creates a shinier, more appetizing appearance. Store any leftovers wrapped in plastic at room temperature for up to 3 days, or freeze for longer storage. The flavor actually improves slightly overnight as the starches retrograde, creating a more satisfying bite.
Pro Tips For Making 2.5 Lb Bread Machine
- Weigh Your Flour: I learned this the hard way—scooping flour from the bag packs it too loosely, and your bread turns out denser than a brick. Use a kitchen scale for the 2.5 lbs of all-purpose flour; aim for 3 cups by weight (about 1,360 grams), not volume. The difference in texture is night and day.
- Warm the Milk Properly: Your bread machine’s yeast needs milk at yeast-friendly temps—between 105°F and 115°F. Microwave the whole milk for 30 seconds, then let it sit for 2 minutes before adding it to the dough. Cold milk kills the yeast; boiling it turns the milk into glue.
- Skip the Extra Yeast: The recipe already accounts for the yeast’s activity. If you’re worried about altitude or cold kitchen temps, resist the urge to double the active dry yeast—it’ll make your bread rise too fast, then collapse like a sad soufflé. Trust the recipe’s measurements unless you’re baking in the Rockies.
- Knead the Dough Manually: Some bread machines mix the dough but don’t knead it enough for a light, airy loaf. After the initial kneading cycle, use a wooden spoon to fold the dough over itself 10 times in the machine pan. This develops gluten without overworking it—your bread will have that professional bakery chew.
Pro cooking tips for this recipe
Dough Consistency
Your dough should feel slightly tacky but not sticky—like a well-played piano key. If it’s too dry after mixing, add 1-2 teaspoons of water through the feed tube during the kneading cycle. Too sticky?
Sprinkle ½ cup extra flour and let the machine mix it in. I always check by stretching a small piece: if it’s thin enough to see light through (windowpane test), it’s perfect. 🌾
Machine Settings
Always use the basic white bread setting for this recipe—it gives the best balance of crust and crumb. Avoid the “quick” setting; it skips proper gluten development. If your machine has a crust option, enable it for that artisanal crackly exterior.
For older models without settings, 2.5 hours total cycle time works well. Pro tip: Place your bread machine in a warm spot (like near the oven) if your kitchen runs cold.
Yeast Activation
Add the yeast after the machine starts mixing—this prevents premature activation. If your kitchen is below 70°F, warm the milk and water to 110°F before mixing. I’ve ruined dough by using cold liquids, so always test temperature with a thermometer.
Fresh yeast from the refrigerated section works best—check expiration dates! For extra insurance, dissolve the yeast in 1 tbsp warm water first, then add to the machine.
Pan Preparation
Lightly dust your 9×5-inch loaf pan with 1 tbsp cornmeal (not flour) for easy release. Cornmeal creates better separation and prevents sticking. If you’re using a metal pan, preheat it in the machine for 5 minutes before adding dough.
For a rustic look, try baking on a parchment-lined baking sheet—just reduce bake time by 10 minutes and brush with melted butter after baking. 🧈
Baking Troubleshooting
If your crust isn’t golden enough, cover the loaf with foil during the last 15 minutes of baking, then uncover to crisp. For a denser crumb, reduce flour by ¼ cup—over-kneading is a common mistake. If the bread smells yeasty, it didn’t bake long enough.
The internal temp should reach 190-210°F—use an instant-read thermometer if your machine lacks one. Never open the lid during baking; steam is crucial for proper crust formation.
Cooling Matters
Resist slicing warm bread—it releases starches that make the crust soggy. Let it cool 1 hour on a wire rack before cutting. For extra crispiness, brush the warm loaf with melted butter while still in the pan.
Store leftovers in a paper bag at room temp for up to 3 days—plastic traps moisture and makes bread stale faster. Freeze slices wrapped in plastic for up to 3 months; they toast beautifully after thawing. 💡
Nutrition facts
Frequently asked questions
Why does this recipe use warm milk instead of water?
Warm milk (around 110°F) activates the yeast more efficiently while adding richness to the bread. The fat in milk also creates a softer crumb compared to water-based doughs. For a quick substitute, use warm water plus 1 tbsp powdered milk—just don’t skip the warmth!
Can I make this loaf without eggs?
Yes! Replace the 2 eggs with 2 tbsp flaxseed meal + 6 tbsp water (mix and let sit for 5 minutes). The flax creates a gel that mimics eggs’ binding properties. For a more neutral flavor, use 2 tbsp unsweetened applesauce instead. The texture will be slightly denser but still excellent.
What if my bread machine doesn’t have a crust setting?
No problem! Use the basic white bread setting for 2.5 hours total instead. For extra crustiness, cover the loaf with foil during the last 15 minutes of baking, then uncover to crisp. If your machine has a “light crust” option, skip it—this recipe needs maximum heat for that artisanal crackle.
How do I know when the dough is ready for shaping?
The dough is ready when it nearly doubles in size and feels smooth with a slight tackiness. Perform the “windowpane test”: stretch a small piece between your fingers—if it’s thin enough to see light through (like a window), it’s perfect! If it tears easily, let it rise 10-15 minutes longer. Never over-knead—this makes bread dense.
Can I add seeds or nuts to this recipe?
Add ½ cup seeds (sunflower, pumpkin) or chopped nuts during the last 5 minutes of kneading. For even distribution, mix them with 1 tbsp flour first. Avoid adding too many—excess can make the bread gummy. Toast seeds/nuts first for better flavor!

- 6 Egg Cake Recipe with Oil: Light as Air With Buttery Moisture - October 4, 2026
- 4 Bean Casserole Recipe: One-Pan Heartiness With Smoky Paprika Depth - October 4, 2026
- 3-Ingredient Keto Mug Cake Recipe: Microwave Magic in 2 Minutes - October 4, 2026