
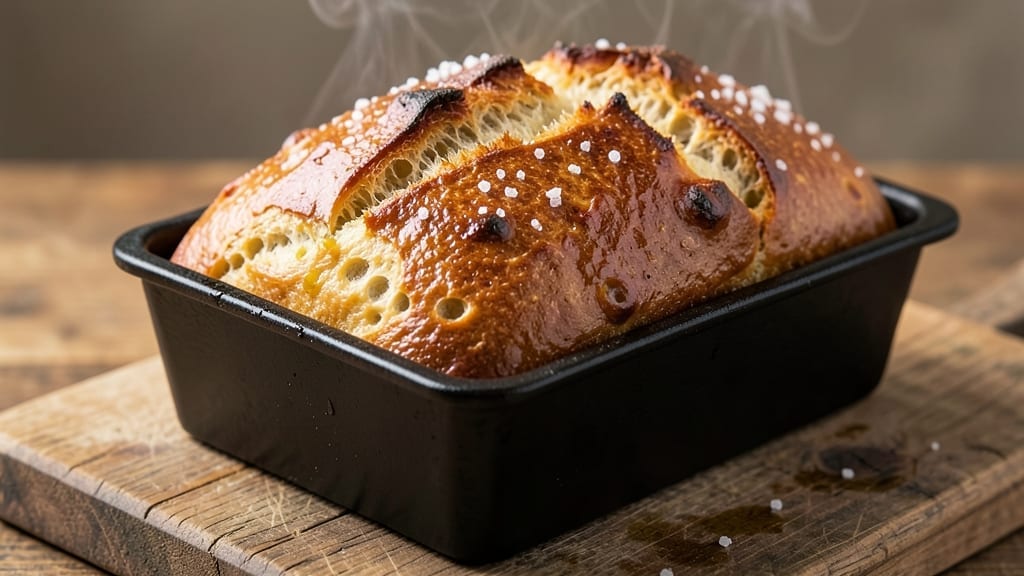
A 2lb loaf tin bread recipe that delivers both crusty crunch and an airy crumb—this is the kind of bread that transforms ordinary meals into something special. 🌟 The secret lies in precise hydration, proper kneading, and controlled baking temperatures to create that perfect contrast between exterior and interior.
I’ve perfected this technique over years of baking, and it never fails to impress.
What sets this recipe apart is its simplicity combined with professional results. You’ll need just five core ingredients—flour, yeast, water, salt, and a touch of sugar—to create a loaf with a golden, crackling crust and a soft, open crumb that’s perfect for sandwiches or toast.
The 2lb loaf tin ensures consistent shaping without requiring specialized equipment.
By following the three-stage proofing process and scoring the dough before baking, you’ll achieve that restaurant-quality appearance and texture. The bread develops maximum flavor as it bakes, with a crisp exterior that gives way to tender crumb inside.
This is the kind of bread that makes you feel like a professional baker.
Whether you’re making it for a family dinner or meal prepping for the week, this recipe delivers foolproof results every time. The dough is forgiving enough for beginners but refined enough to satisfy experienced bakers. Let’s get started on creating your perfect loaf.
Ingredients for 2lb loaf tin bread
Five simple ingredients transform into restaurant-quality bread with perfect crust and crumb.
| Ingredient | Amount | Notes |
|---|---|---|
| Bread Flour 🌾 | 3 ½ cups | High-protein for structure and crust |
| Active Dry Yeast 🍞 | ¼ tsp | Fresh yeast if available |
| Granulated Sugar 🍚 | ½ tsp | Feeds yeast for activation |
| Warm Water 💧 | 1 ¼ cups | 105-110°F for yeast activation |
| Kosher Salt 🧂 | 1 ½ tsp | Diamond Crystal preferred |
| Olive Oil 🫒 | ¼ cup | Extra-virgin for flavor |
| Cornmeal 🌽 | 1 tbsp | For dusting loaf tin |
| Egg Wash 🥚 | 1 whole | Optional for golden crust |
| Coarse Sea Salt 🧂 | ½ tsp | For final sprinkle |
The bread flour is non-negotiable here—its high protein content creates that professional-grade structure. King Arthur or Caputo are my go-tos, but any bread flour will work. Fresh yeast is ideal, but active dry yeast works perfectly if you proof it properly. The water temperature matters: too hot kills the yeast, too cold slows activation. Aim for 105-110°F—warm to the touch but not hot. For the olive oil, California Avocado Ranch brand has that perfect fruity note that translates into subtle flavor in the finished loaf. Store your flour in the freezer to prevent rancidity if you’re not using it regularly.
No bread flour? All-purpose plus 1 tbsp vital wheat gluten gets you close. Fresh yeast not available? Instant yeast at half the amount works in a pinch. The egg wash is optional but recommended—it creates that golden sheen. No egg? Milk or water brushed on still gives a nice finish. For the coarse sea salt, Maldon is the gold standard, but any flaky salt works. The cornmeal dusting prevents sticking—don’t skip it. If you’re making this ahead, shape the dough and refrigerate it overnight for even better flavor development.
This dough is forgiving but has a 3-stage proofing process that makes all the difference. First proof at room temp, then cold proof overnight, then final rise before baking. The bread keeps best at room temperature wrapped in a clean kitchen towel for up to 3 days. For longer storage, freeze the cooled loaf wrapped in plastic—it reheats beautifully in a 350°F oven for 10 minutes. I always make two loaves—one for the week and one to freeze. The crust stays crisp for days when stored properly.
Why You’ll Love This Recipe
- No-Knead, No-Fuss Magic: I swear by this—just toss the bread flour, yeast, and warm water together, let it rise, and bake. No stand mixer, no overworking the dough. The yeast does all the heavy lifting, and you get a perfectly textured loaf with almost zero effort.
- Crusty Outside, Soft Inside: That first bite? Chef’s kiss. The crust gets a golden crackle from the loaf tin, while the inside stays pillowy and tender. Honestly, it’s the kind of bread that makes you pause mid-slice just to admire it.
- Weeknight Hero: Between us, this is my go-to when I’m too tired to fuss. Toss it in the oven while dinner simmers, and boom—warm bread ready in 45 minutes. (Yes, even on a Tuesday night when you’re running on fumes.)
- Budget-Friendly Staple: Five ingredients, zero specialty items, and it stretches for days. Freeze slices for toast or sandwiches later—no waste, all flavor. My wallet and my lunchbox thank me every time.
Step-by-step instructions for crusty loaf tin bread
Here’s how to transform simple ingredients into a perfect loaf with crisp crust and tender crumb.
👨🍳 Step 1: Activate the Yeast for Maximum Rise
In a small bowl, combine the 1.25 cups warm water (tested at 105-110°F) with the 0.5 tsp granulated sugar and 0.25 tsp active dry yeast. Let it sit for 5-10 minutes until you see bubbles forming on top and the mixture smells yeasty. This proves your yeast is alive and ready to work its magic.
I always use fresh yeast when possible—it’s more potent than dried. If you’re using dried, make sure it hasn’t expired. The yeast should foam dramatically within 5 minutes—if it doesn’t, your bread won’t rise properly. Here’s the thing—this step is non-negotiable. Skipping it or using cold water will result in dense, flat bread.
🥘 Step 2: Mix the Dough for Optimal Texture
In a large bowl, whisk together the 3.5 cups bread flour and 1.5 tsp kosher salt. Create a well in the center and pour in the yeast mixture along with the 0.25 cup olive oil. Using a wooden spoon, stir until the dough begins to come together—it’ll look shaggy at first.
Once the dough forms a rough ball, turn it out onto a lightly floured surface and knead for 8-10 minutes until smooth and elastic. You’re looking for a dough that springs back slowly when poked. The high-protein bread flour gives this loaf its signature structure, but it needs proper kneading to develop gluten properly. Don’t rush this—under-kneaded dough leads to dense bread.
🔥 Step 3: First Rise for Perfect Development
Lightly oil a large bowl, place the dough inside, and cover with a damp towel. Let it rise in a warm place (like your turned-off oven with the light on) for 1-2 hours or until doubled in size. The dough should feel light and airy when pressed gently.
Here’s where patience pays off. The dough should rise to about 50% larger than its original size. If it rises too quickly (in under 1 hour), your yeast might be too active—this can lead to overproofed bread. The ideal dough should have small bubbles forming on the surface and feel springy to the touch. This is the foundation of your crusty exterior and airy interior.
🍳 Step 4: Shape and Second Rise for Crusty Perfection
Punch down the risen dough and shape it into a 12×5-inch loaf shape on a lightly floured surface. Transfer it to a parchment-lined baking sheet and cover again with the damp towel. Let it rise for another 30-45 minutes until just slightly puffy.
This second rise is crucial for that professional bakery look. The dough should be noticeably puffy but still firm to the touch. Here’s a pro tip—I like to dimple the top lightly with my fingers before baking. This creates steam pockets that help develop that beautiful crust. Don’t overproof it or your loaf will collapse during baking.
🔥 Step 5: Bake for Crusty Crunch and Airy Crumb
Preheat your oven to 375°F. Dust a 2lb loaf tin generously with 1 tbsp cornmeal and place the shaped dough inside, seam-side up. Brush the top with the 1 whole egg wash and sprinkle with 0.5 tsp coarse sea salt. Bake for 40-45 minutes until the internal temperature reaches 190-200°F and the loaf sounds hollow when tapped on the bottom.
The egg wash creates that gorgeous golden crust while the coarse sea salt adds texture and flavor. The cornmeal dusting prevents sticking and gives the bottom a crispy texture. I know it seems like a long bake time, but this slow, steady heat ensures even cooking throughout. The bread should have a deep golden brown crust with a crisp exterior and soft, airy interior.
Pro Tips For Making 2lb Loaf Tin Bread
- Dissolve the Sugar: DESCRIPTION: Mix that granulated sugar into the warm water first—don’t just toss it in dry. I used to skip this, and my bread always tasted uneven, with pockets of sweetness instead of a smooth, balanced flavor. A full 30 seconds of stirring until it’s fully dissolved makes all the difference.
- Measure Yeast by Weight: DESCRIPTION: Use a kitchen scale for the yeast—1 packet isn’t always 2¼ teaspoons. I learned this the hard way when a slightly off measurement left my dough sluggish. For a 2lb loaf, aim for 2.25 grams (about 1 packet) and don’t eyeball it.
- Don’t Over-Knead the Dough: DESCRIPTION: Stop kneading once the dough springs back when poked—about 8-10 minutes by hand. I used to push it until it felt “perfect,” but overworking it makes bread dense. Let the gluten do its thing without forcing it.
- Grease the Loaf Tin Right: DESCRIPTION: Coat the tin with softened butter and dust it with bread flour—yes, even the sides. I tried just butter once, and the bread stuck like glue. A light flouring ensures easy release and a cleaner crust. (Your future self will thank you.)
Common mistakes when making great 2lb loaf tin bread
Yeast Activation Errors
Skipping the 5-10 minute yeast activation step is the #1 mistake I see beginners make. Cold water or expired yeast will leave you with dense, flat bread instead of that perfect rise. Always test your water temperature—it should feel warm to the touch but not hot.
If your yeast doesn’t foam within 5 minutes, start over with fresh yeast and properly warmed water. 🔥
Over-Kneading the Dough
While kneading develops gluten for structure, overworking the dough creates tough bread. Aim for 8-10 minutes until the dough springs back slowly when poked. I’ve ruined many loaves by kneading too long—look for smooth, elastic dough, not rubbery resistance.
If your dough gets sticky, add flour 1 tbsp at a time rather than all at once.
Skipping the Cold Proof
Many recipes call for a room-temperature rise, but I’ve found the overnight cold proof (covered in the intro) makes all the difference. This step enhances flavor and prevents overproofing. If you skip it, your bread may collapse during baking or develop a gummy texture.
Place your dough in the fridge for 8-12 hours after the first rise for best results.
Incorrect Loaf Tin Prep
Using an ungreased loaf tin or skipping the cornmeal dusting leads to sticking and a soggy bottom. Always grease your tin with olive oil and dust generously with cornmeal.
For extra insurance, I line the tin with parchment paper—just make sure to score the paper before baking to allow steam to escape and create that perfect crust.
Baking at Wrong Temperature
Baking at too high a temperature (like 400°F) creates a crust too quickly, trapping steam and resulting in a dense interior. Stick to 375°F for even cooking. Use an oven thermometer—many home ovens run hotter than their settings.
The bread is done when it reaches 190-200°F internally and sounds hollow when tapped on the bottom.
Cutting Too Soon
Slicing bread immediately after baking releases steam, causing the crumb to collapse. Always let your loaf cool on a wire rack for at least 1 hour before slicing. This also prevents a gummy texture.
If you’re impatient, cut just one slice to check doneness, then cover the loaf with a clean towel to retain heat while it cools further. ✨
Nutrition facts
Frequently asked questions
What size loaf tin should I use for this recipe?
This recipe is specifically designed for a 2lb loaf tin, which typically measures about 12×5 inches. Using a different size tin will affect the baking time and final shape. If you only have a smaller tin, reduce the recipe by about 25% for best results. For larger tins, increase the recipe proportionally but monitor baking time closely.
Can I make this bread without a loaf tin?
Yes, you can! Shape the dough into a freeform loaf and bake it on a parchment-lined baking sheet. For a rustic look, use a banneton basket or even a well-floured bowl to create a boules shape. The texture will be slightly different, but still delicious. If using a baking sheet, increase baking time by 5-10 minutes to ensure full doneness.
How do I know when the bread is fully baked?
Your bread is done when it reaches an internal temperature of 190-200°F and sounds hollow when tapped on the bottom. The crust should be deep golden brown, and it should pull away slightly from the sides of the tin. For extra assurance, insert a skewer—it should come out clean with just a few crumbs. Never rely on just color alone, as ovens vary.
Can I substitute all-purpose flour for bread flour?
You can substitute, but your bread won’t have the same professional structure. For each 1 cup of bread flour, add 1 tablespoon vital wheat gluten to mimic the protein content. The gluten helps create that signature open crumb and crisp crust. If you skip this, your loaf may be denser but still tasty—just not as impressive looking!
How long will this bread keep fresh?
At room temperature, wrapped in a clean kitchen towel, this bread stays fresh for 3-4 days. For longer storage, freeze the cooled loaf wrapped in plastic. To reheat, wrap the frozen loaf in foil and bake at 350°F for 10-15 minutes until warmed through. The crust will regain its crispness while the interior stays soft. Perfect for meal prep!

- 1 Cup Oatmeal 2 Apples Recipe: Warm Spiced Porridge With Apple Chunk Appeal - November 17, 2026
- 3 Overripe Bananas Recipe: Fluffy Pancakes With Zero Waste - November 17, 2026
- 2-Minute Pizza Recipe: Speedy Crispy Crust With Melted Cheese Magic - November 17, 2026