
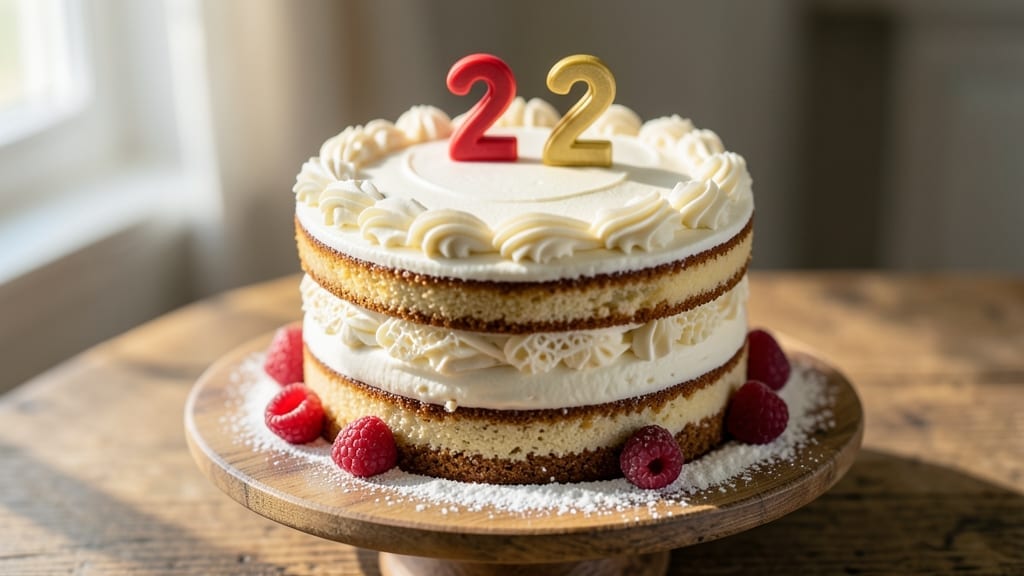
Celebrating a 2nd birthday cake recipe calls for something magical—and these mini fondant towers deliver exactly that. ✨ Designed for tiny hands and big smiles, this recipe balances soft textures with edible glitter that sparkles like a toddler’s imagination.
The secret lies in a foolproof vanilla sponge cake base, rolled fondant that stays pliable, and decorations that are as safe as they are stunning.
What makes this cake special is its versatility—build towers in bright colors (think rainbow or pastel) or themed shapes (dinosaurs, cars, or animals). The fondant is easy to shape, even for beginners, and the edible glitter adds a touch of celebration without the mess.
Plus, the mini size means less waste and more smiles around the table.
By the time you’re done, you’ll have a showstopping centerpiece that’s as fun to assemble as it is to eat. The cake stays soft and moist, perfect for tiny teeth, while the fondant holds its shape beautifully. Every bite feels like a little adventure—just like turning two!
Serve with vanilla ice cream for dipping or fresh berries for a pop of color. The best part? These towers can be made a day ahead, so you’re free to focus on the party. Let’s make a cake that steals the show!
Ingredients for 2nd birthday cake
Bright colors, edible glitter, and tiny towers that sparkle like a toddler’s dreams. Here’s what you’ll need to make magic happen.
| Ingredient | Amount | Notes |
|---|---|---|
| All-Purpose Flour 🌾 | 2 cups | Sifted for light texture |
| Granulated Sugar 🍚 | 1 ½ cups | White sugar preferred |
| Unsalted Butter 🧈 | 1 cup | Room temperature, full-fat |
| Large Eggs 🥚 | 2 whole | Room temperature for blending |
| Vanilla Extract 🌿 | 1 tbsp | Pure vanilla, not imitation |
| Baking Powder 🧂 | 1 tsp | Aluminum-free preferred |
| Salt 🧂 | ¼ tsp | Fine sea salt |
| Milk 🥛 | ½ cup | Whole milk for richness |
| Rolled Fondant 🎨 | 1 lb | Pastel or bright colors |
| Edible Glitter ✨ | ¼ cup | Fine, non-toxic glitter |
| Vanilla Ice Cream 🍦 | 1 cup | For serving, optional |
| Fresh Berries 🍓 | ½ cup | For garnish, optional |
| Food Coloring 🎨 | 1 tbsp | Gel-based for vibrant colors |
| Powdered Sugar 🍚 | 1 cup | For dusting towers |
| Parchment Paper 📄 | 1 sheet | For shaping fondant |
The fondant is where the magic happens—Wilton or Premier are my go-tos for smooth, pliable sheets. Grab a 1-pound block in pastel or rainbow colors (the grocery store’s fondant is fine, but craft stores have way more fun options). If you’re feeling fancy, pick up a gel food coloring kit—liquid colors bleed through fondant. The edible glitter? Amazon or baking supply stores carry the non-toxic kind, and trust me, it’s worth the extra sparkle. For the cake base, Bob’s Red Mill flour gives the best texture, but any all-purpose will work.
No fondant? Marshmallow fondant (melted marshmallows + powdered sugar) is a kid-friendly swap—just know it won’t hold shapes as well. Short on glitter? Luster dust or sprinkles add a similar pop. The vanilla extract can be swapped for vanilla bean paste, but pure extract is cheaper and just as effective. For the cake, if you’re avoiding dairy, coconut oil replaces butter 1:1, but the texture gets denser. And if you’re making these a day ahead (highly recommended), skip the berries until serving—they’ll get mushy.
Fondant keeps 2-3 days in an airtight container at room temp, but it dries out fast. Wrap it in plastic wrap with a damp towel, and it’ll stay soft longer. The cake stays moist for 3 days, covered tightly. For the towers, build them on parchment-lined trays***, and they’ll hold their shape perfectly. Store leftovers in the fridge (fondant gets gummy when cold) and bring to room temp before serving. Pro tip: Dust with powdered sugar right before gifting—it looks chef’s kiss and keeps the glitter from sticking to everything.
Why You’ll Love This Recipe
- No Mixer Needed: I swear by this recipe when my mixer’s on the fritz—just cream butter and sugar by hand until it’s light and fluffy. The eggs and vanilla fold in like a dream, and honestly? The texture’s so tender it feels like cheating.
- Butter-Sugar Magic: That rich butter-sugar combo? It’s what makes this cake melt-in-your-mouth good. The vanilla extract ties it all together with warmth that lingers—perfect for a toddler’s first real taste of cake (or your sneaky second slice).
- Double-Duty Cake: Make it once, celebrate twice. The same batter works for a simple vanilla layer cake or cupcakes—just divide it up. I’ve even used leftover crumbs for a quick bread pudding when the kids begged for more.
- Budget-Friendly Luxury: Five ingredients, zero shortcuts. This cake tastes like a bakery showstopper but costs pennies per serving. The butter and eggs make it feel special, while the flour and sugar keep it simple—no fancy add-ins needed.
Step-by-step instructions for mini fondant towers with edible glitter magic
Here’s how to build these sparkly, show-stopping towers that’ll make a 2-year-old’s eyes light up.
👨🍳 Step 1: Bake the Perfect Cake Base
Preheat your oven to 350°F and grease a 9-inch round cake pan. In a large mixing bowl, combine the 2 cups all-purpose flour, 1.5 cups granulated sugar, 1 tsp baking powder, and 0.25 tsp salt. Whisk until evenly distributed—no lumps!
In a separate bowl, cream together the 1 cup room-temperature butter and 2 whole eggs until light and fluffy. Gradually add the dry ingredients while mixing on low speed. Pour in the 0.5 cup milk and 1 tbsp vanilla extract, mixing just until combined. Pour the batter into the prepared pan and bake for 25-30 minutes until a toothpick comes out clean. Let cool completely before frosting.
👨🍳 Step 2: Prepare the Fondant Dough
Unroll the 1 lb rolled fondant on a clean surface and divide it into 4 equal pieces (about 4 ounces each). Knead each piece separately, adding 1 tbsp food coloring to each for vibrant colors. I like to use pastel pink, baby blue, mint green, and soft yellow for a cheerful birthday look.
Roll each colored fondant piece into a ¼-inch thick sheet using a rolling pin. Dust with powdered sugar to prevent sticking. Cut each sheet into 4 equal squares—you’ll have 16 fondant pieces total for your towers. Wrap them tightly in plastic wrap to keep them soft and pliable.
🥘 Step 3: Assemble the Fondant Towers
Line a baking sheet with the parchment paper and dust it with 1 cup powdered sugar to prevent sticking. Take one fondant square and roll it tightly into a cone shape, sealing the bottom. Repeat with all 16 pieces—you’ll need 4 cones per color.
Place the cones on the prepared baking sheet and let them chill in the refrigerator for 10 minutes to firm up. While they’re chilling, sprinkle 0.25 cup edible glitter onto a small plate. Once the cones are firm, carefully press them together in stacks of 3, using a tiny dab of water to help them adhere. Let the towers dry completely for 1 hour at room temperature.
🍽️ Step 4: Decorate and Serve
Once the towers are completely dry, carefully place them on top of the cooled cake. For extra sparkle, dust the towers with additional edible glitter using a fine-mesh sieve. Arrange 0.5 cup fresh berries around the base for a pop of color.
Serve the cake immediately with 1 cup vanilla ice cream on the side. The towers will stay crisp and colorful for about 2 hours before they soften slightly. This cake is perfect for a 2nd birthday celebration—it’s festive, fun to eat, and guaranteed to impress little ones (and big ones too!).
Pro Tips For Making 2nd Birthday Cake
- Weigh Your Butter: Butter is the cake’s backbone—don’t eyeball it. I used to scoop by the tablespoon and wondered why my layers were dense. Now I weigh it (225g for this recipe) for perfect crumb and rise. Cold butter makes flaky layers, but don’t let it sit in the fridge too long—soften it to room temp first.
- Mix Dry Ingredients First: Sift the flour and sugar together before adding wet ingredients. I learned this after a lumpy disaster—those eggs and butter need a smooth base. A quick pulse in a stand mixer or even a whisk will save you from scraping the bowl later. Less cleanup, lighter texture.
- Don’t Overbake the Layers: The second a toothpick comes out mostly clean (with a few crumbs), pull it. I’ve ruined cakes waiting for “perfect” cleanliness—this one’s forgiving, but overbaking turns it dry. If your oven runs hot, check at 28-30 minutes instead of blindly following the recipe.
- Use Room-Temp Eggs: Cold eggs create air pockets that sink, leading to uneven baking. Pop them in a bowl of warm water for 10 minutes before cracking—just enough to make them yield like honey. No one notices the extra step, but the cake’s structure will thank you.
Regional styles of this 2nd birthday cake
Classic American Pastel
This is the crowd-pleaser I grew up with—soft pastel towers in pink, blue, and yellow that scream “birthday joy.” 🎀 Use Wilton pastel fondant sheets (they’re pre-colored and foolproof) and keep the cake base vanilla-flavored. Top with edible glitter in silver or gold for that extra sparkle.
I like adding tiny fondant flowers around the base for a whimsical touch. Serve with vanilla ice cream and let the kids dig in!
Rainbow Mexican Fiesta
For a vibrant twist, go full rainbow with colors inspired by Mexican fiesta themes. Use bright red, green, and yellow fondant (like Premier brand’s vibrant colors) and add tiny fondant chili peppers or cacti as decorations.
A cinnamon-sugar dusting on the towers adds a sweet-spicy kick. Pair with horchata ice cream for a cultural nod that kids love.
Dinosaur Adventure Theme
Turn the towers into dinosaur eggs by shaping the fondant into bumpy, textured cones. Use green, brown, and gray fondant and add fondant “scales” or tiny dinosaur footprints at the base.
A green glitter drizzle makes it look like they’re glowing. Serve with chocolate pudding for dipping—it’s like a dinosaur dig!
Japanese Cherry Blossom
For an elegant touch, create delicate cherry blossom-inspired towers. Use pink and white fondant and roll the cones into soft, tapered shapes. Add edible gold leaf flakes for a luxurious finish.
Serve with matcha green tea ice cream for a sophisticated yet kid-friendly treat. The contrast of colors is stunning and feels special.
Dinosaur Adventure Theme
Turn the towers into dinosaur eggs by shaping the fondant into bumpy, textured cones. Use green, brown, and gray fondant and add fondant “scales” or tiny dinosaur footprints at the base.
A green glitter drizzle makes it look like they’re glowing. Serve with chocolate pudding for dipping—it’s like a dinosaur dig!
Tropical Luau Vibes
Bring the beach party to the cake with tropical colors like turquoise, coral, and lime green. Add fondant palm trees or tiny fondant pineapples as decorations.
A coconut flake sprinkle on top gives it that island feel. Serve with mango sorbet for a refreshing finish that’s perfect for warm weather celebrations. 🌺
Nutrition facts
Frequently asked questions
Can I make this cake gluten-free for a child with allergies?
Swap the all-purpose flour for a 1:1 gluten-free baking flour blend, like Bob’s Red Mill or King Arthur. Use 1 cup plus 2 tablespoons, as gluten-free flours absorb more liquid. Replace the milk with a dairy-free alternative like coconut or almond milk, and ensure your vanilla extract is gluten-free. The fondant remains safe to eat as long as it’s made with gluten-free ingredients.
How do I keep the fondant from sticking to my hands?
Dust your hands with powdered sugar, cornstarch, or a tiny bit of shortening before handling the fondant. Work on a clean, smooth surface like parchment paper or a silicone mat, and keep a small bowl of powdered sugar nearby to dust between steps. Wetting your fingers slightly can also help prevent sticking when shaping the cones.
Is edible glitter safe for toddlers to eat?
Yes, but only if it’s labeled non-toxic and food-safe. Avoid craft glitter or anything with metallic particles. Brands like Wilton or Luster Dust, sold in baking supply stores, are specifically designed for food. Always supervise young children while eating, and consider using a small amount of glitter—it’s decorative, not essential for flavor.
Can I make these towers ahead of time?
Assemble the fondant towers 1 day in advance, but store them in an airtight container at room temperature. Wrap them individually in plastic wrap and place a damp towel in the container to keep the fondant soft. Assemble the cake base the morning of the party and place the towers on top just before serving. The towers will stay crisp for 2-3 hours, then soften slightly.
What if my fondant cracks while drying?
This happens when the fondant dries too quickly. Slow down the process by keeping the towers in a cool, dry place, not the fridge. If cracks appear, gently press them back together with a tiny bit of water or edible glue. For extra durability, chill the fondant for 10-15 minutes***, then let it dry at room temperature. Dusting with powdered sugar before drying also helps prevent cracks.

- 3lb Prime Rib Roast Recipe: Juicy Pink Center Guaranteed in 3 Hours - October 31, 2026
- 5 Spice Cake Recipe: Warmly Spiced Layers With Crunchy Top - October 31, 2026
- 1950’s Macaroni and Cheese Recipe: Nostalgic Creamy Cheese Sauce with Buttery Noodles - October 31, 2026