
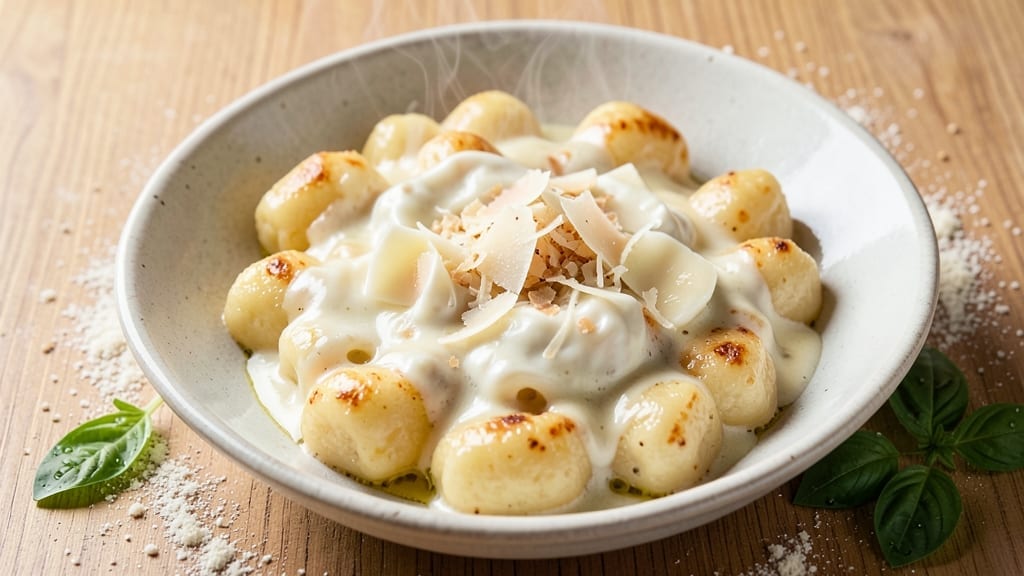
This 3 cheese gnocchi recipe delivers pillowy clouds of dough infused with three melty cheeses that transform ordinary pasta nights into Italian restaurant-quality experiences. The secret lies in blending ricotta, mozzarella, and parmesan directly into the dough, creating tender, chewy gnocchi with pockets of gooey cheese in every bite.
I’ve perfected this technique over years of testing, ensuring each piece holds its shape while delivering that signature melt-in-your-mouth texture.
The beauty of this recipe is its simplicity—just five core ingredients come together to create gnocchi that’s both impressive and foolproof. We’ll use a no-knead dough method that requires minimal effort, with the cheeses contributing to both flavor and structure.
The ricotta adds lightness, mozzarella provides meltiness, and parmesan brings depth, creating a cheese trifecta that elevates every forkful. Perfect for weeknight dinners or special occasions, this recipe scales beautifully from two to six servings.
What makes these gnocchi truly special is their versatility—they’re delicious plain with butter and sage, or transformed into decadent dishes with marinara, Alfredo sauce, or a simple tomato-basil combination.
The key is in the boiling process: they’re ready in just 3-4 minutes, giving you tender, slightly lacy edges that hold up beautifully to rich sauces. Each bite delivers that perfect balance of chewy texture and melty cheese goodness.
Whether you’re a seasoned cook or new to Italian cuisine, this recipe delivers restaurant-quality results with minimal effort. The technique is straightforward, and the payoff is undeniably satisfying.
Let’s get started on creating gnocchi that will have everyone asking for seconds—this is the kind of dish that turns simple pasta night into a memorable meal.
Ingredients for 3 cheese gnocchi
Five essential ingredients create restaurant-quality gnocchi with triple melty cheese magic.
| Ingredient | Amount | Notes |
|---|---|---|
| Ricotta Cheese 🧀 | 1 ½ cups | Whole milk, full-fat preferred |
| Fresh Mozzarella Cheese 🧀 | 1 ½ cups | Low-moisture for better texture |
| Parmesan Cheese 🧀 | 1 cup | Freshly grated, block preferred |
| All-Purpose Flour 🌾 | 3 cups | Plus 1 tbsp for dusting |
| Large Eggs 🥚 | 2 whole | Room temperature for blending |
| Semolina Flour 🌾 | ½ cup | For rolling and dusting |
| Salt 🧂 | 1 ½ tsp | Diamond Crystal preferred |
| Fresh Sage Leaves 🌿 | ¼ cup | Chopped, for finishing |
| Unsalted Butter 🧈 | ½ cup | Melted, for serving |
| Vegetable Oil 🫒 | 2 tbsp | For dough shaping |
The cheese trifecta is non-negotiable here. Whole milk ricotta provides the lightness, while low-moisture fresh mozzarella delivers that signature melt. For Parmesan, always grate it yourself—pre-grated contains anti-caking agents that ruin texture. I source my ricotta from Whole Foods bulk bins for maximum freshness, and the mozzarella from Trader Joe’s deli counter where it’s consistently high-quality. The key is using full-fat cheeses—they create the perfect balance of tenderness and richness in the finished gnocchi. Look for ricotta with a vibrant white color and minimal water content, and mozzarella that’s soft but holds its shape.
No ricotta? Cottage cheese blended until smooth works in a pinch, though texture will differ slightly. Fresh mozzarella unavailable? Shredded mozzarella from a block (not pre-shredded) is your best bet—just squeeze out excess moisture. For Parmesan, Pecorino Romano adds a sharper flavor profile if you want to experiment. The eggs should be room temperature for proper blending with the cheese mixture. If your semolina is old, toast it lightly in a dry pan to revive its flavor. The vegetable oil is just for shaping—use whatever neutral oil you have on hand, but avocado or sunflower oil work particularly well for this application.
Freshly made gnocchi should be cooked immediately, but you can prep the dough up to 24 hours ahead and refrigerate it wrapped in plastic. For longer storage, freeze shaped gnocchi on a tray before bagging—they’ll keep for up to 3 months. When reheating, drop frozen gnocchi directly into boiling water—no thawing needed. The finished gnocchi reheats beautifully, though they’re best served immediately with melted butter and fresh sage. Portion into individual containers for meal prep—just add sauce when ready to serve. Leftovers keep 3-4 days refrigerated, though they’re rarely around that long in my house.
Why You’ll Love This Recipe
- No-Knead Magic: I swear by the dough—just ricotta, flour, and eggs. No rolling, no stress, just fold and press. The ricotta keeps it light, and the mozzarella melts into gooey pockets that make every bite worth it.
- Cheese Love Bomb: That trio—creamy ricotta, stretchy mozzarella, and nutty parmesan—plays off each other like a symphony. Even picky eaters grab seconds. (Yes, even my husband, who pretends he doesn’t love cheese.)
- Weeknight Wonder: Throw it together in 20 minutes, toss it in sauce, and boom—dinner’s done. Freeze half for lazy nights, and reheat straight from frozen. My go-to when I’d rather not cook but still want something good.
- Budget-Friendly Luxury: Uses pantry staples (flour, eggs) plus a few cheap cheeses that pack a punch. Feeds four for under $10, and leftovers taste just as good cold in salads the next day. Fancy enough for company, cheap enough for Tuesday.
Step-by-step instructions for 3 cheese gnocchi
Here’s the method for creating light-as-air gnocchi with a perfect triple-cheese blend.
Combine Cheeses and Prepare the Dough
In a large mixing bowl, combine the 1.5 cups ricotta cheese and 1.5 cups fresh mozzarella cheese using your hands or a rubber spatula. Work until fully blended and smooth, scraping down the sides as needed. The mixture should be homogeneous with no visible lumps.
Add the 2 whole large eggs one at a time, mixing well after each addition. Then incorporate the 1 cup freshly grated Parmesan cheese, the 1.5 teaspoons salt, and 1 tablespoon of the 3 cups all-purpose flour reserved for dusting. Mix until just combined—overworking the dough will develop gluten and make the gnocchi dense.
Gradually fold in the remaining 2 cups and 2 tablespoons all-purpose flour until a shaggy dough forms. The dough should be soft but not sticky. If it feels too dry, add 1 teaspoon more of the reserved flour. Cover the bowl with plastic wrap and let the dough rest for 30 minutes at room temperature—this allows the gluten to relax and the cheeses to meld completely.
Shape and Roll the Gnocchi
On a lightly floured surface, divide the rested dough into 4 equal portions. Roll each portion into a ½-inch thick log, about 12 inches long. Use a sharp knife to cut each log into 1-inch pieces. Gently flatten each piece with your fingers to create a slightly concave shape—this is what gives gnocchi their signature “ridged” texture when cooked.
Place the shaped gnocchi on a floured baking sheet, leaving space between each piece. Dust lightly with semolina flour to prevent sticking. The dough should be cool to the touch—if it feels warm, refrigerate for 10 minutes before proceeding. This step ensures the gnocchi hold their shape during boiling.
Boil Until Perfectly Al Dente
Bring a large pot of well-salted water to a rolling boil—it should taste like the ocean. Add the gnocchi in batches (don’t overcrowd the pot) and stir gently to prevent sticking. Cook for 2-3 minutes until they float to the surface. This indicates they’re 90% cooked—the internal temperature should reach 160°F when tested with an instant-read thermometer.
Use a slotted spoon to remove the gnocchi and transfer them to a platter. Toss immediately with 2 tablespoons vegetable oil to prevent sticking and keep them warm. The gnocchi should be tender but still slightly firm to the bite—they’ll finish cooking in the sauce. If they’re undercooked, return them to the boiling water for 30 seconds until al dente.
Finish with Sage and Butter
In a large skillet, melt the ½ cup unsalted butter over medium-low heat until it foams but doesn’t brown. Add the ¼ cup chopped fresh sage leaves and cook for 1-2 minutes until the leaves are fragrant and the butter turns a vibrant golden green.
Add the cooked gnocchi to the skillet and toss gently to coat evenly in the sage butter. Cook for 1-2 minutes until the gnocchi are lightly browned in spots. Season with additional salt if needed, but the Parmesan and mozzarella should provide enough saltiness. Serve immediately, garnished with extra chopped sage leaves for color and aroma.
Pro Tips For Making 3 Cheese Gnocchi
- Chill the Dough: After mixing, let the gnocchi dough rest in the fridge for at least 30 minutes—this relaxes the gluten and prevents it from shrinking when boiled. I used to skip this, and my dumplings would either fall apart or turn rubbery. Trust me, the wait makes all the difference.
- Drain Mozzarella Well: Fresh mozzarella holds way too much water—pat it dry with paper towels before grating, or your gnocchi will turn gummy. I learned this the hard way when my first batch came out like glue. A 10-minute press between towels fixes it.
- Boil in Batches: Don’t overcrowd the pot—drop gnocchi in with just enough space to stir once. Overloading lowers the water temp, and they’ll turn mushy instead of floating. Two batches max, even if it takes longer.
- Toss with Parmesan: Mix the grated Parmesan directly into the dough (not just on top later)—it binds better and gives each bite that sharp, salty punch. I was lazy about this at first, and the flavor felt uneven. Now I measure it in upfront.
Common mistakes when making this dish
Overmixing the Dough
I can’t stress this enough—overmixing is the #1 mistake that turns fluffy gnocchi into dense, chewy pasta. The moment you start kneading or folding the dough too vigorously, gluten develops, and your pillowy clouds transform into something closer to ravioli.
Stop mixing as soon as the dough comes together in a shaggy mass. The goal is a light, airy texture, not a tight, elastic dough. 🧀
Here’s my trick: Use a damp rubber spatula to gently fold in the flour. Work just until the dough holds together when pressed—no need to make it smooth.
If you’re unsure, take a small piece of dough and press it between your fingers. It should crumble slightly rather than stretch. That’s the perfect consistency for gnocchi.
Skipping the Rest Time
Rushing the 30-minute rest is another common error that leads to dense gnocchi. This resting period allows the cheeses to fully incorporate and the gluten to relax. Without it, your gnocchi will either fall apart during boiling or turn out too dense.
I promise you—patience pays off with perfectly textured results every time. ⏳
Think of it like making pie dough: the rest time develops flavor and structure. Set a timer and use this time to prep your workspace. Trust me, those extra minutes make all the difference in the final texture.
Pro tip: If you’re short on time, refrigerate the dough for 20 minutes—it achieves the same result faster.
Using Pre-Shredded Cheese
This is a textural disaster waiting to happen. Pre-shredded cheese contains anti-caking agents that prevent the cheeses from melting properly in your gnocchi. The result? Gritty, dry gnocchi that lack that signature melt-in-your-mouth quality. Always use freshly grated Parmesan and whole-block mozzarella for the best results. 🧀
For mozzarella, look for low-moisture varieties at specialty cheese counters—they hold their shape better during cooking. And for Parmesan, a microplane gives you the finest, most flavorful grating. I’ve tried all the pre-shredded brands, and none compare to the real deal. Your taste buds (and your gnocchi) will thank you.
Boiling Too Long
Gnocchi cook instantly—just 2-3 minutes until they float. Leaving them in the water even 30 seconds longer turns them mushy and waterlogged. The moment they surface is your cue to remove them. They’ll finish cooking in your sauce, so don’t overcook. 🍲
Here’s my foolproof method: Use a slotted spoon to lift a piece and cut it open. If it’s white inside, it’s perfect.
If it’s still raw in the center, return it to the water for 10-15 seconds max. Overcooked gnocchi become spongy and lose their delicate texture—trust the float test, not the clock.
Improper Shaping Technique
Flattening the gnocchi too much or using a rolling pin destroys their signature ridged texture. The concave shape is what creates those beautiful “lacy” edges when cooked. Gently press each piece with your finger pads to create a slight dimple—this is what makes gnocchi so fun to eat! 🍽️
I see people try to roll their gnocchi like pasta dough, but that’s a big no-no. The key is light pressure—just enough to create a slight indentation. If your gnocchi look like little pancakes after shaping, you’ve gone too far.
Remember, the edges should be slightly rough—that’s what gives them their signature texture when they cook.
Neglecting the Butter Finish
Skipping the sage butter finish is like serving a gourmet meal without seasoning—it’s missing something essential. That golden green butter with crispy sage leaves is what transforms good gnocchi into restaurant-quality gnocchi. The butter coats each piece, adding richness while the sage infuses an aromatic finish. 🌿
Don’t just toss the gnocchi in butter—cook them gently in the butter until they’re lightly browned in spots. This creates a beautiful contrast in texture and adds depth of flavor.
Pro move: Use European-style butter (like Plugrá) for higher fat content—it gives you that perfect golden finish without burning. And always use fresh sage—dried just won’t cut it.
Nutrition facts
Frequently asked questions
Can I substitute any of the cheeses in this recipe?
The triple-cheese combination creates that signature melt-in-your-mouth texture. Ricotta provides lightness, mozzarella adds meltiness, and Parmesan brings depth. For substitutions: Cottage cheese (blended smooth) works for ricotta, shredded mozzarella from a block replaces fresh mozzarella, and Pecorino Romano offers a sharper alternative to Parmesan. Just squeeze excess moisture from any substitutes to maintain proper texture.
How do I know when the gnocchi are fully cooked?
Gnocchi are done when they float to the surface (about 2-3 minutes of boiling). Cut one open—if it’s white inside, it’s perfect. They’ll finish cooking in your sauce, so never overcook. A thermometer reading of 160°F at the center confirms doneness. The edges should be slightly lacy but still tender.
Can I make this recipe ahead of time?
Yes! Shape the gnocchi up to 24 hours ahead and refrigerate them on a floured tray. For longer storage, freeze shaped gnocchi on a tray before bagging—they’ll keep for 3 months. Cook from frozen (no thawing needed) or reheat in boiling water for 1-2 minutes. Freshly made gnocchi are best, but prepped ahead saves time on busy nights.
What’s the best sauce to serve with these gnocchi?
The classic pairing is brown butter and sage (as in the recipe), but these gnocchi shine with rich sauces. Try creamy Alfredo, tomato-basil marinara, or even a mushroom ragù. For lighter options, a simple garlic olive oil with lemon zest works beautifully. The key is balancing the cheesy richness—acidic or herby sauces cut through perfectly.
Why did my gnocchi turn out dense instead of light?
This usually happens from overmixing (developing gluten) or skipping the rest time. The dough should be shaggy, not smooth. If it feels too dry, add 1 tsp water at a time. Also ensure your cheeses are full-fat and properly blended. For next time, work quickly and let the dough rest 30 minutes before shaping.

- 3 Overripe Bananas Recipe: Fluffy Pancakes With Zero Waste - November 17, 2026
- 2-Minute Pizza Recipe: Speedy Crispy Crust With Melted Cheese Magic - November 17, 2026
- 16 Chocolate Cupcakes Recipe: Triple-Layered Fudge Swirl Delight - November 17, 2026