
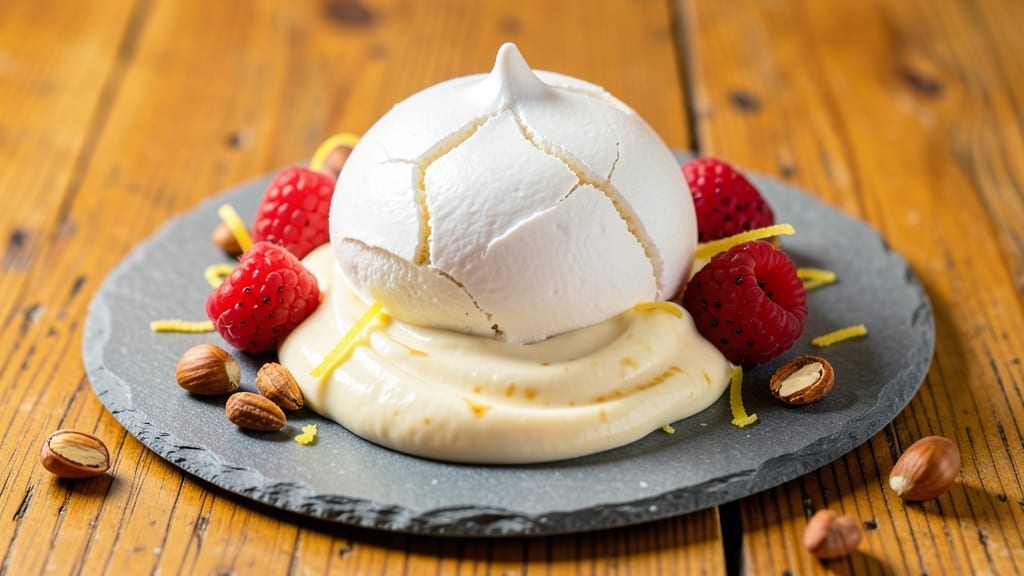
This 3 egg pavlova recipe delivers the perfect balance of a crispy shell and marshmallow center that’s impossible to resist. 💛 The secret lies in precise egg whites, sugar ratios, and a low-temperature bake that creates that signature crack—without collapsing the meringue.
I’ve perfected this technique after years of trial and error, ensuring every bite offers both texture contrast and delicate sweetness.
The magic begins with whipping egg whites to stiff peaks while gradually adding sugar to create a glossy, stable meringue. Baking at 250°F for 1 hour ensures even drying without over-browning, while rapid cooling on a wire rack locks in that signature crisp shell.
This method transforms a simple dessert into something restaurant-worthy with minimal effort.
Once baked, the pavlova’s exterior stays crispy while the center remains light and airy—like a cloud you can eat. Topped with whipped cream and fresh berries, it becomes a showstopper for dinner parties or summer gatherings.
The key is patience: letting the meringue set fully before decorating guarantees it holds its shape.
This recipe serves 6-8 and requires just 30 minutes of active prep, followed by baking time. Perfect for special occasions or when you want to impress without stress. Let’s create a dessert that’s both elegant and foolproof.
Ingredients for 3 egg pavlova
Three eggs, precise sugar ratios, and a low-temperature bake create restaurant-quality pavlova magic.
| Ingredient | Amount | Notes |
|---|---|---|
| Large Egg Whites 🥚 | 3 whole | Fresh, room temperature for best stability |
| Granulated White Sugar 🍚 | 1 ¼ cups | Superfine preferred for even dissolving |
| Cornstarch 🌾 | 2 tbsp | For structural stability and crispiness |
| White Vinegar 🍶 | ½ tsp | Ensures meringue stability and volume |
| Vanilla Extract 🌸 | ½ tsp | Pure, high-quality for authentic flavor |
| Unsalted Butter 🧈 | ½ cup | Softened, for topping (optional) |
| Heavy Whipping Cream 🥛 | 1 ½ cups | Cold, for whipped topping |
| Powdered Sugar 🍚 | 1 cup | For sweetening whipped cream |
| Fresh Berries 🍓 | 2 cups | Raspberries or strawberries, sliced |
| Lemon Juice 🍋 | 1 tsp | Freshly squeezed, for acid balance |
The egg whites are non-negotiable—use the freshest possible, straight from the fridge, and let them sit at room temperature for 30 minutes before whipping. Pasture-raised eggs from Whole Foods or local farmers’ markets yield the most stable meringue. The sugar must be superfine or finely ground—regular granulated won’t dissolve properly, leading to grainy texture. If you can’t find superfine, pulse regular sugar in a food processor for 30 seconds. The cornstarch is your secret weapon for crispiness; it prevents the meringue from collapsing while baking.
No vanilla extract? Vanilla bean paste works beautifully, or a 1/4 tsp vanilla sugar in a pinch. For the berries, frozen works perfectly—thaw and pat dry before using. The vinegar and lemon juice are critical for stability, but if you’re avoiding them, cream of tartar at 1/4 tsp will do the trick. The butter and cream should be cold but not icy—whip the cream to stiff peaks before folding in powdered sugar. For a lighter texture, whip the cream with 1 tsp cornstarch mixed into the powdered sugar.
Once baked, let the pavlova cool completely on the wire rack—this is non-negotiable for that signature crack. Store in an airtight container with parchment between layers for up to 3 days. For longer storage, freeze the baked pavlova (without toppings) for up to 2 months. Thaw at room temperature before adding fresh toppings. The meringue’s crispiness diminishes with humidity, so avoid storing in damp environments. Toppings should be added just before serving to maintain freshness.
Why You’ll Love This Recipe
- Just Three Eggs: I swear, this recipe is my go-to when I’ve got nothing but time and a grocery bag full of eggs. Three whites, a splash of vinegar, and a handful of sugar—no yolks to fuss with, no extra bowls to wash. The vinegar trick? It’s the secret that keeps the meringue light as air, and honestly, I’ve tried fancier recipes that still collapse.
- Crispy-Creamy Magic: That first bite—crunchy outside, marshmallow soft inside—is what makes this worth the wait. The vanilla extract ties everything together, but here’s what sold me: the sugar doesn’t just caramelize, it sings when you toast it lightly. (Yes, even on a Tuesday night.)
- Any Occasion, Any Topping: Throw it together for a holiday dessert, dress it up with berries for a brunch crowd, or keep it simple with whipped cream for lazy Sundays. Between us, I’ve even used it as a base for a savory cheese topping—don’t judge. It’s the blank canvas that never lets you down.
- No Waste, All Win: Three eggs mean less mess, less cost, and no sad leftovers taking up space. The meringue holds up for days if you store it right (airtight container, cool spot), so you’re not stuck scrambling last-minute. Plus, the cornstarch? It’s my insurance policy—no weeping, no soggy disasters. Reliable as they come.
Step-by-step instructions for crispy pavlova with marshmallow center
Master this delicate balance of crispy shell and light interior with precision timing and technique.
🍳 Step 1: Whip Egg Whites to Stiff Peak Stage
In a spotlessly clean, grease-free mixing bowl, combine the 3 whole Large Egg Whites and the 0.5 tsp White Vinegar. I use a stand mixer with the whisk attachment for this step—it gives you more control than hand whisks. Start on low speed and gradually increase to medium-high as the whites begin to foam.
Whip for 5-7 minutes until soft peaks form when you lift the whisk. You’ll notice the mixture thickens dramatically and clings to the whisk in glossy strands. This acidification from the vinegar stabilizes the meringue, preventing weeping later. If you see any liquid pooling at the bottom of the bowl, whisk that back into the mixture immediately.
👨🍳 Step 2: Gradually Add Sugar for Maximum Volume
With the mixer still running on medium-high, slowly sprinkle in the 1.25 cups Granulated White Sugar over 2-3 minutes. Add it gradually—this prevents grainy texture and ensures even distribution. The sugar should dissolve completely before adding the next ingredient.
After all sugar is incorporated, add the 2 tbsp Cornstarch and the 0.5 tsp Vanilla Extract. Continue whipping for another 3-5 minutes until the meringue forms stiff peaks that hold their shape when the whisk is lifted. The bowl should feel cool to the touch, and the meringue should be glossy with no visible streaks of white.
🥘 Step 3: Shape and Bake for Crispy Shell
Transfer the meringue to a piping bag fitted with a large star tip. Pipe an 8-inch circle onto a parchment-lined baking sheet, creating a ½-inch thick base with slightly higher edges. Use the back of a spoon to smooth the top while still wet.
Bake immediately at 250°F for 1 hour, then increase heat to 300°F for another 15-20 minutes until the exterior is deep golden brown and crisp to the touch. The center should still feel slightly soft—this is where the magic happens. Open the oven door slightly during the last 5 minutes to release any steam that might cause the shell to weep.
🍽️ Step 4: Create the Whipped Cream Topping
While the pavlova bakes, chill the 1.5 cups Heavy Whipping Cream and 1 cup Powdered Sugar in the refrigerator for 15 minutes. Whip the cream on medium-high speed until soft peaks form, then gradually add the powdered sugar and whip for another 2-3 minutes until stiff peaks form. Fold in the 1 tsp Lemon Juice for brightness.
Spread the whipped cream evenly over the cooled pavlova base. The cream should be smooth and hold its shape when piped. For extra stability, chill the assembled pavlova for 30 minutes before adding the berries to prevent sinking.
🍓 Step 5: Assemble and Serve Immediately
Arrange the 2 cups Fresh Berries (raspberries or strawberries) on top of the cream in an attractive pattern. The berries should be chilled and dry to prevent the meringue from absorbing moisture. Serve immediately while the shell is still crisp and the center maintains its delicate structure.
For the perfect slice, use a sharp knife and dip it in hot water between cuts to prevent crumbling. The contrast of crispy shell, marshmallow center, and fresh berries makes this dessert unforgettable—just don’t cut it too soon after baking or you’ll lose that signature texture.
Pro Tips For Making 3 Egg Pavlova
- Whip Slow to Start: First, beat the egg whites on medium speed until soft peaks form—no need to rush. I learned this the hard way: jumping to high speed too soon just traps air unevenly, and you’ll end up with a pavlova that collapses like a sad soufflé.
- Cold Bowl, Cold Whites: Chill your mixing bowl and beaters in the freezer for 10 minutes before starting. Egg whites whip up stiffer and more stable when they’re cold, and this makes the difference between a crisp meringue and a sticky mess.
- Sugar Gradually or Regret It: Add the sugar one tablespoon at a time, waiting until the previous amount is fully dissolved before adding more. Dumping it all in at once? You’ll end up with grainy sugar crystals ruining your meringue’s texture—trust me, I’ve seen it.
- Vinegar First, Then Vanilla: Mix the white vinegar into the egg whites before adding vanilla extract—it stabilizes the meringue better. Then fold in the vanilla at the very end; adding it early can make the meringue taste harsh and metallic. (Yes, even if you’re impatient like me.)
Best sauces and condiments for this recipe
Classic Whipped Cream
Start with cold heavy whipping cream—I always chill mine in the fridge for 15 minutes before whipping. Beat to soft peaks first, then gradually fold in powdered sugar and lemon juice for brightness.
For extra stability, add 1 tsp cornstarch mixed into the powdered sugar. This creates a light, airy topping that contrasts perfectly with the pavlova’s crisp shell. 🥛
Citrus Curd Swirl
Replace the standard whipped cream with a homemade citrus curd—I love using lemon or orange zest for a tangy twist. Whisk ½ cup butter, 2 egg yolks, ½ cup sugar, and ¼ cup fresh lemon juice until thickened, then strain.
Spread a thin layer on the cooled pavlova and swirl with a knife before adding berries. The acidity cuts through the sweetness beautifully. 🍋
Honey-Drizzled Cream
For a gourmet touch, fold 2 tablespoons honey into the whipped cream before spreading. Use wildflower honey for floral notes or clover honey for a milder sweetness.
Drizzle lightly over the berries to enhance their natural flavors. This adds a subtle depth that elevates the dessert without overpowering it. 🍯
Caramelized Berry Sauce
Simmer 1 cup mixed berries (raspberries, blackberries) with 2 tablespoons sugar and 1 tsp lemon juice until thickened. Strain and drizzle over the whipped cream. The warm, jammy texture complements the pavlova’s crispness perfectly. For extra richness, add a splash of vanilla bean paste. 🍓
Chocolate Ganache Drizzle
Melt ½ cup dark chocolate (70% cocoa) with ¼ cup heavy cream, then cool slightly before drizzling over the whipped cream. The bitter contrast balances the sweetness of the berries and meringue.
Use a spoon or squeeze bottle for an elegant finish. This works especially well with strawberries for a red-and-brown color contrast. 🍫
Spiced Whipped Cream
Infuse the whipped cream with ½ tsp cinnamon or ¼ tsp cardamom while whipping. The warmth of the spices pairs beautifully with warm spices like nutmeg or ginger.
This variation feels festive and aromatic, perfect for holiday desserts. Keep the spices light—just enough to hint at their presence. 🌶️
Nutrition facts
Frequently asked questions
Why does my meringue collapse during baking?
The most common causes are humidity or improper whipping. Meringue absorbs moisture from the air, so bake on a low, dry rack and avoid opening the oven door during the first 30 minutes. Also, ensure your egg whites are at room temperature and whipped to stiff peaks—if they’re under-whipped, the sugar won’t stabilize them properly. A clean, grease-free bowl is critical too!
Can I make pavlova ahead of time?
Bake the meringue base 1 day ahead and store it in an airtight container with parchment between layers. The shell stays crisp, but the center may dry out slightly—add a splash of water to the whipped cream when assembling to revive it. Never add toppings until serving, though, as they’ll make the meringue soggy.
What’s the secret to that perfect crack?
The signature crack forms when the meringue cools rapidly after baking. After removing from the oven, immediately transfer to a wire rack and let it cool completely (at least 2 hours). The contrast between the hot oven and cool air creates the crack—don’t rush this step! Also, avoid high humidity during cooling, as moisture prevents the crack from forming.
Can I substitute cornstarch with something else?
Cornstarch is ideal for stability, but you can use powdered sugar in a pinch by adding 1 extra tablespoon to the meringue mixture. For a gluten-free option, try arrowroot powder at the same ratio. Just know these substitutes may make the shell slightly less crisp—cornstarch is the gold standard for that signature texture.
How do I fix weeping meringue?
Weeping happens when meringue absorbs moisture, causing syrup to leak out. The fix? Bake at a slightly lower temperature (225°F instead of 250°F) next time, and add 1 extra tbsp cornstarch to the recipe. For existing weeping, place the meringue on a wire rack over a baking sheet and bake at 200°F for 15-20 minutes to dry it out—just watch closely to avoid over-browning!

- 3lb Prime Rib Roast Recipe: Juicy Pink Center Guaranteed in 3 Hours - October 31, 2026
- 5 Spice Cake Recipe: Warmly Spiced Layers With Crunchy Top - October 31, 2026
- 1950’s Macaroni and Cheese Recipe: Nostalgic Creamy Cheese Sauce with Buttery Noodles - October 31, 2026