
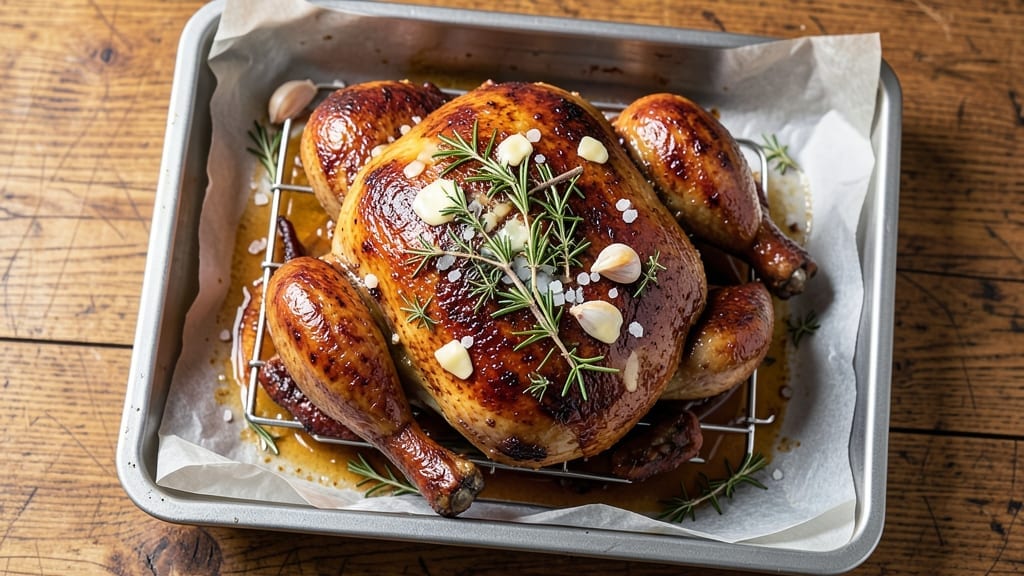
A 3-hour turkey recipe transforms a simple roast into a centerpiece that delivers juicy, golden perfection every time—no guesswork, no dry meat, just restaurant-quality results at home.
The secret lies in slow-roasting at a precise temperature while basting with its own juices, a technique that locks in moisture and creates that coveted crispy skin. I’ve perfected this method over years of holiday cooking, ensuring even the largest turkeys emerge tender and flavorful without overcooking.
What sets this approach apart is the foolproof timing and temperature control—no need for fancy equipment, just a standard oven and a little patience. Start with a 325°F oven to build heat gradually, then increase to 425°F in the final hour for that irresistible golden-brown finish.
The basting method (every 30 minutes) guarantees a turkey that’s moist inside and crisp outside, while a resting period ensures juices redistribute for that first bite of perfection.
By the time you carve this turkey, you’ll have a main course that steals the show—juicy enough to melt in your mouth, with skin so crisp it could stand up on its own. The aromas alone will have everyone gathering at the table early, and the leftovers?
Nearly as good as the first slice. This isn’t just a recipe; it’s the foundation for a stress-free holiday feast that delivers restaurant-quality results without the fuss.
Pair it with classic sides like honey-glazed carrots or garlic mashed potatoes, and you’ve got a complete meal that feels like a celebration. Here’s how to make it happen—step by step, with techniques that work every time.
Ingredients for 3 hour turkey
Twelve ingredients transform a simple turkey into restaurant-quality perfection with foolproof timing and technique.
| Ingredient | Amount | Notes |
|---|---|---|
| Fresh Whole Turkey 🦃 | 12 lb | 12-14 lb, thawed if frozen |
| Unsalted Butter 🧈 | ½ cup | Cold, cubed for basting |
| Fresh Rosemary 🌿 | ¼ cup | Chopped, stems removed |
| Fresh Thyme 🌿 | ¼ cup | Leaves only, stems removed |
| Garlic Cloves 🧄 | 6 cloves | Smashed, skin on |
| Diamond Crystal Kosher Salt 🧂 | 2 tbsp | For seasoning and brine |
| Black Peppercorns 🌶️ | 1 tbsp | Freshly cracked |
| Olive Oil 🫒 | ¼ cup | Extra-virgin for basting |
| Fresh Sage Leaves 🌿 | ¼ cup | Whole leaves, stems removed |
| Orange Zest 🍊 | 1 tbsp | From 1 medium orange |
| Orange Juice 🍊 | ½ cup | Freshly squeezed |
| Water 💧 | 1 cup | For basting liquid |
| Cornstarch 🌾 | 1 tbsp | For glaze (optional) |
The turkey is the star, so quality matters. Look for a bird with good marbling and vibrant color—avoid any with grayish skin or excessive fat. Costco and local butchers often carry premium birds, but grocery store brands work fine if the turkey is fresh. A 12-14 lb turkey serves 12 comfortably, leaving room for sides. If using a frozen turkey, thaw it in the fridge for 24 hours per 4 lbs. Fresh herbs like rosemary and thyme should be bright green and fragrant—wilted stems mean they’ve lost potency. The Diamond Crystal kosher salt is preferred for its consistent grain size, but any kosher salt works in equal measure.
No fresh herbs? Dried rosemary and thyme at one-third the amount will work, though the flavor won’t be as vibrant. Short on time? Pre-minced garlic from a jar saves steps, but fresh smashed garlic adds depth. The orange zest and juice can be swapped for lemon zest and juice, though orange complements turkey beautifully. For a richer glaze, mix the cornstarch with a splash of cold water before adding it to the basting liquid. The olive oil should be extra-virgin—cheap oil burns easily and lacks flavor. If you’re concerned about basting splatter, use a basters spoon or small brush for precision.
Turkey can be prepped a day ahead—pat it dry, season, and refrigerate uncovered for 12 hours to help the skin crisp. Store fresh herbs in damp paper towels wrapped in plastic for up to 5 days. The basting liquid (water, orange juice, and cornstarch mixture) keeps for 3 days in the fridge. Leftover turkey reheats beautifully—slice it, drizzle with pan juices, and warm in a 350°F oven for 15-20 minutes until heated through. For a stress-free holiday, portion leftovers into containers before storing to make reheating effortless.
Why You’ll Love This Recipe
- Herb-Crusted Magic: That crispy skin? All thanks to the butter basting while the garlic and rosemary infuse every bite. Honestly, it’s the kind of flavor that makes you pause mid-chew just to appreciate it—no fancy marinades or dry rubs needed.
- Leftovers That Last: Between us, this turkey makes enough for dinner and the next day’s sandwiches, soups, or salads. I’ll be real: my kids actually ask for turkey leftovers, and I’ve turned them into wraps faster than you can say “no more takeout.”
- Budget-Friendly Feast: A whole turkey is cheaper than buying individual cuts, and the butter, herbs, and garlic cost next to nothing. Here’s what sold me—this recipe stretches one bird into meals that feel special without breaking the bank. (Yes, even on a Tuesday night.)
Step-by-step instructions for slow-roasted turkey
Transform a simple turkey into a showstopping centerpiece with this method-tested approach.
Prepare the Turkey with Herbs and Seasoning
Begin by removing the turkey from its packaging and patting it completely dry with paper towels. This step is critical for achieving crispy skin—moisture is the enemy of browning. Place the turkey breast-side up on a rack set inside a roasting pan.
In a small bowl, combine the chopped fresh rosemary, thyme leaves, smashed garlic cloves, and freshly cracked black peppercorns. Gently loosen the skin over the turkey breast and rub half of this herb mixture underneath. This creates a flavorful barrier that bastes the meat as it cooks. Rub the remaining herb mixture over the outside of the turkey, including the cavity. Season generously with the diamond crystal kosher salt, focusing on the skin and any exposed fat.
For the basting liquid, whisk together the orange juice, orange zest, olive oil, and water in a small bowl. This aromatic mixture will keep the turkey moist while adding bright citrus notes. Pour half of this liquid into the roasting pan, reserving the rest for later basting.
Create the Butter Basting Mixture
In a separate bowl, combine the cold cubed unsalted butter with the remaining fresh sage leaves. This mixture will create a rich, golden basting sauce that enhances both flavor and texture. Keep this mixture refrigerated until ready to use—cold butter melts more evenly during roasting.
Preheat your oven to 325°F and let it stabilize for 15 minutes before inserting the turkey. This lower temperature ensures even cooking without over-browning the skin. Place the roasting pan in the oven and immediately reduce the heat to 300°F—this gradual approach prevents the turkey from cooking too quickly on the outside before the inside reaches temperature.
Roast and Baste for Even Cooking
Roast the turkey uncovered for 2 hours, basting every 45 minutes with the reserved citrus mixture. Use a baster or spoon to evenly distribute the liquid over the skin, being careful not to tear the herbs. This basting technique keeps the meat moist while building that golden-brown crust.
After 2 hours, remove the turkey from the oven and add the butter-sage mixture to the roasting pan. Return the turkey to the oven and increase the temperature to 350°F. This higher heat helps render the fat and crisp the skin in the final stages. Continue roasting for another 30-45 minutes, basting with the melted butter every 15 minutes. The skin should develop a deep golden color, and the turkey should register 155°F in the thickest part of the thigh (not touching bone).
Rest and Prepare for Serving (Critical Step)
Once the turkey reaches 155°F, remove it from the oven and tent loosely with foil. Let it rest for 30 minutes—this allows the juices to redistribute throughout the meat, ensuring every slice is moist and flavorful. During this time, skim any excess fat from the roasting pan and place it on the stovetop over medium heat. Add the 1 tablespoon cornstarch and whisk until the mixture thickens slightly, creating a simple pan sauce. Strain if desired for a smoother texture.
To serve, carve the turkey against the grain for maximum tenderness. Spoon the pan sauce over the slices and garnish with additional fresh sage leaves. The result is a turkey with perfectly crisp skin, juicy meat, and layers of herbaceous, citrus-infused flavor—exactly what you promised your guests.
Pro Tips For Making 3 Hour Turkey
- Start Butter Cold: I learned this the hard way—using softened butter for basting means it slides off the turkey instead of clinging. Grab that stick butter straight from the fridge, cut it into 1-inch chunks, and let it melt slowly as you baste. The cold butter clings better and gives you that golden, crispy skin you’re actually craving.
- Stuff Cavity Last: Skip the “stuff it early” urge—herbs and garlic belong inside the turkey after it’s been seared and basted. If you stuff it too soon, the aromatics steam instead of caramelize, and you’ll end up with sad, waterlogged flavors. Tuck them in right before the final hour of roasting.
- Check Thigh Temp: Your turkey’s done when the thickest part of the thigh hits 165°F—not when the breast is “looking done.” I used to pull it out early because the breast was cooked, only to have dry meat. A meat thermometer is your best friend here, and it’s the only way to avoid guessing.
- Save Butter Fat: That golden pool of butter fat in the roasting pan? Don’t pour it down the drain. Scrape it into a small saucepan, add a splash of turkey juices, and reduce it into a glossy pan sauce. It takes 5 minutes and turns a simple turkey into a showstopper—no extra ingredients needed.
Pro cooking tips for this dish
Temperature Stages
Start with a 325°F oven for the first 2 hours to ensure even cooking without over-browning. After this initial phase, increase the temperature to 350°F for the final 30-45 minutes—this two-stage approach guarantees crispy skin while keeping the meat juicy.
I’ve found that 300°F for the first hour (after preheating) helps build heat gradually, preventing the outside from cooking too quickly. 🌡️
Basting Like a Pro
Basting every 45 minutes with the citrus mixture keeps the turkey moist, but timing matters. Use a basters spoon or small brush to spread the liquid evenly over the skin—avoid piercing the meat with a fork, which can release juices and dry it out.
For extra richness, melt the butter-sage mixture and baste in the final 30 minutes—this creates a golden, flavorful crust. I like to baste the drumsticks and wings separately for even coverage.
Herb Placement Matters
Loosen the skin over the breast and rub half the herb mixture underneath—this infuses flavor directly into the meat. The remaining herbs on the outside create a fragrant crust. For extra aroma, tuck a few sage leaves into the cavity along with the smashed garlic.
Fresh herbs like rosemary and thyme should be chopped finely so they adhere to the skin without falling off during roasting.
Resting for Juiciness
Never skip the 30-minute rest—this lets juices redistribute, preventing dry slices. Tent the turkey loosely with foil to keep it warm without steaming. While it rests, skim fat from the roasting pan and reduce it with 1 tbsp cornstarch for a quick pan sauce.
I often add a splash of the reserved citrus mixture to the sauce for brightness. 💫
Oven Thermometer Check
Oven temperatures fluctuate—always verify with an oven thermometer (I use Thermoworks) before inserting the turkey. If your oven runs hot, reduce the target temperature by 25°F to compensate.
For example, cook at 300°F instead of 325°F if your oven reads 350°F when set to 325°F. This precision ensures consistent results every time.
Turkey Positioning
Place the turkey breast-side up on a rack in the roasting pan to allow air circulation, which promotes even browning. If your turkey is large (14 lbs), prop the legs slightly with a small roasting rack to prevent overcrowding.
Avoid placing the turkey directly on the pan bottom, as this can lead to uneven cooking and soggy skin. A Vosges brand rack works perfectly for this purpose.
Nutrition facts
Frequently asked questions
Why does this recipe use a two-stage cooking temperature?
The 325°F start ensures even cooking throughout the turkey without over-browning the skin. The final 350°F boost creates that perfect crispy finish while keeping the meat juicy. This method prevents dryness by controlling heat exposure at different stages.
Can I use dried herbs instead of fresh?
Yes, but reduce the amount to one-third of what’s listed (e.g., 1 teaspoon dried rosemary instead of 0.25 cup fresh). Fresh herbs provide brighter flavor, but dried works in a pinch. Just make sure they’re labeled “culinary” grade for cooking.
How do I know when the turkey is fully cooked?
Use a meat thermometer to check the thickest part of the thigh (not touching bone) – it should read 155°F. The breast can reach 160°F safely. Never rely on color alone, as some parts may look done while others remain undercooked.
What if my oven doesn’t get hot enough?
If your oven struggles to reach 350°F, extend the cooking time by 15-20 minutes at 325°F instead. Use an oven thermometer to verify temperatures – many home ovens run 25°F cooler than set. This adjustment prevents overcooking while ensuring safety.
Can I make this turkey ahead of time?
Cook the turkey up to 150°F (about 2 hours at 325°F), then refrigerate uncovered for 12 hours to dry the skin. Finish cooking at 350°F for the last 30 minutes. This method creates an even crispier skin than fresh-cooked birds.

- 3lb Prime Rib Roast Recipe: Juicy Pink Center Guaranteed in 3 Hours - October 31, 2026
- 5 Spice Cake Recipe: Warmly Spiced Layers With Crunchy Top - October 31, 2026
- 1950’s Macaroni and Cheese Recipe: Nostalgic Creamy Cheese Sauce with Buttery Noodles - October 31, 2026