
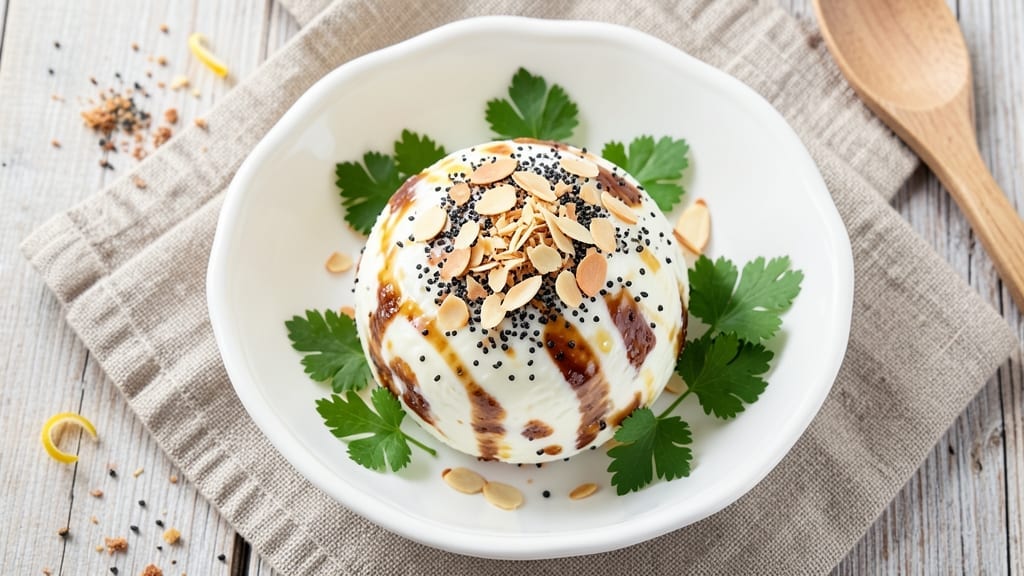
This 3-ingredient cheese ball recipe is the ultimate no-bake party staple that delivers restaurant-quality flavor with minimal effort. The secret lies in combining sharp cheddar with cream cheese and a simple seasoning blend, then shaping it into a crowd-pleasing ball that requires no baking.
I developed this recipe during a last-minute holiday gathering when I realized I needed an appetizer that could be made quickly but still impress guests.
The beauty of this recipe is its simplicity—just three core ingredients (plus optional toppings) come together in 15 minutes of prep time, followed by 30 minutes of chilling.
The combination of sharp cheddar and cream cheese creates a creamy, melt-in-your-mouth texture that’s perfect for snacking, while the seasonings add depth without overpowering. The cheese ball holds its shape beautifully, making it easy to slice and serve.
What you’ll end up with is a foolproof appetizer that’s perfect for parties, game days, or holiday gatherings. The cheese ball can be rolled in crushed nuts, herbs, or even everything bagel seasoning for added texture and flavor.
Serve it with crackers, sliced apples, or fresh bread for a complete snack spread that disappears quickly.
This recipe is especially useful when you need a no-bake option that still feels special. The cheese ball keeps well in the fridge for up to a week, making it ideal for meal prep or last-minute entertaining.
Whether you’re hosting a small gathering or a large party, this simple yet impressive appetizer will be a hit with everyone.
Ingredients for 3 ingredient cheese ball
Three core ingredients plus a few finishing touches—this cheese ball delivers restaurant-quality flavor with zero baking.
| Ingredient | Amount | Notes |
|---|---|---|
| Sharp White Cheddar Cheese 🧀 | 16 oz | Block form, freshly grated |
| Cream Cheese 🧈 | 8 oz | Full-fat, room temperature |
| Everything Bagel Seasoning 🌾 | 2 tbsp | Or sub garlic powder + sesame seeds |
| Unsalted Butter 🧈 | 2 tbsp | Softened for binding |
| Fresh Parsley Leaves 🌿 | ¼ cup | Chopped, for garnish |
| Almond Flakes 🥜 | ½ cup | Crushed for coating |
| Kosher Salt 🧂 | ½ tsp | Diamond Crystal preferred |
| Black Pepper 🌶️ | ¼ tsp | Freshly cracked |
The cheddar is where all the magic happens—sharp white cheddar has that perfect balance of tang and creaminess. Trader Joe’s or Whole Foods carry excellent blocks, but any good-quality cheddar works. Room-temperature cream cheese mixes better, so take it out 15 minutes before mixing. The butter acts as a binder, so don’t skip it—it keeps everything cohesive. For the seasoning, everything bagel seasoning is ideal, but if you’re feeling adventurous, mix 1 tbsp garlic powder, 1 tsp onion powder, and 1 tsp sesame seeds for a custom blend.
No everything bagel seasoning? Garlic powder plus sesame seeds is a solid swap—just add 1 tbsp garlic powder and 1 tsp sesame seeds. Want extra crunch? Roll the cheese ball in crushed nuts like pecans or walnuts instead of almond flakes. The parsley is purely decorative but adds that fresh pop of green—skip it if you’re in a rush. For a spicy kick, add a pinch of cayenne or red pepper flakes. And if you’re making this ahead, the cheese ball actually tastes better after sitting overnight as the flavors meld together.
This cheese ball keeps beautifully for up to 1 week in the fridge, wrapped tightly in plastic wrap. For parties, I like to portion it into small containers so guests can grab individual servings. If you’re prepping ahead, the cheese ball can be shaped and chilled for 24 hours before rolling in your chosen coating. The longer it chills, the easier it is to slice cleanly. And if you have leftovers? It reheats perfectly in the oven at 350°F for 10 minutes—great for a quick snack later in the week.
Why You’ll Love This Recipe
- No-Fuss Assembly: I swear by this recipe because it’s the kind of dish where you don’t even need a mixing bowl—just mash the sharp cheddar and cream cheese with your hands, fold in that buttery everything seasoning, and roll it out. No measuring cups, no fancy tools, just pure, satisfying hands-on simplicity.
- Salty-Savory Magic: That sharp cheddar’s tang cuts through the cream cheese’s richness, while the everything seasoning adds a bright, herby crunch with every bite. Honestly, the first time I made it, I kept going back for more because it’s that good—no fancy plating, just pure flavor.
- Game for Any Gathering: This cheese ball is my go-to for game day, holiday parties, or even a lazy Sunday with friends. It holds up for hours (yes, even in summer heat) and pairs perfectly with crackers, pretzels, or fresh veggies. Between us, it’s the kind of snack that disappears fast, so make two.
- Budget-Friendly Crowd-Pleaser: Sharp cheddar and cream cheese are pantry staples, and a little butter and parsley won’t break the bank. I’ve made this for 10 people for under $15, and it’s the kind of dish where leftovers turn into breakfast the next morning—just slice it up and toast it. Win-win.
Step-by-step instructions for 3-Ingredient cheese ball
Here’s how to create a crowd-pleasing cheese ball that requires no oven and comes together faster than you can say “party snack.”
Combine Cheeses and Create the Base
In a medium mixing bowl, combine the 16 oz Sharp White Cheddar Cheese and 8 oz Cream Cheese. I always use a bowl that’s large enough to accommodate the mixture without overflowing—this ensures we have enough room to work without making a mess. Use your hands to break up the cheddar cheese into smaller, more manageable pieces, making it easier to mix thoroughly.
Add the 2 tbsp Everything Bagel Seasoning and 2 tbsp Unsalted Butter to the bowl. Using a wooden spoon or rubber spatula, mix everything together until the mixture is completely smooth and homogeneous. This is where the magic begins—you’re essentially creating a creamy, spreadable cheese base that will hold together beautifully. If the mixture seems too thick, don’t worry; it will soften as you work with it.
Incorporate Seasonings and Achieve Perfect Texture
Now it’s time to add the finishing touches. Sprinkle in the 0.5 tsp Kosher Salt and 0.25 tsp Black Pepper over the cheese mixture. Using your hands, knead the cheese for about 2-3 minutes until it becomes smooth and pliable. The texture should be firm enough to hold its shape when rolled but still soft enough to mold easily. This kneading process ensures that all the seasonings are evenly distributed throughout the mixture.
Here’s a pro tip: If the cheese starts to feel too sticky, chill it in the refrigerator for 5-10 minutes before proceeding. This helps the mixture firm up and makes it much easier to handle and shape. The goal is to achieve a consistency similar to playdough—firm enough to hold together but still malleable.
Form and Coat the Cheese Ball
Once your cheese mixture is perfectly smooth and firm, it’s time to shape it into a ball. Take the cheese in your hands and gently roll it between your palms, applying even pressure to create a round shape. I like to aim for a ball that’s about 3-4 inches in diameter—this size is perfect for serving and easy to handle. Place the cheese ball on a parchment-lined plate or a piece of plastic wrap.
In a separate shallow dish, combine the 0.5 cup Almond Flakes with the 0.25 cup Fresh Parsley Leaves. Gently press the almond flakes and parsley into the mixture to create a flavorful coating. Now, roll the cheese ball in this mixture, pressing gently to ensure the coating adheres evenly. The parsley adds a fresh touch and a pop of color, while the almond flakes provide a delightful crunch and nutty flavor that complements the creamy cheese perfectly.
Chill and Set for Serving
Place the coated cheese ball in the refrigerator and let it chill for at least 1 hour. This chilling time is crucial—it allows the cheese to firm up and the coating to set, making it easier to slice and serve. The longer it chills, the better it holds its shape, so if you have time, you can refrigerate it overnight. This step also enhances the flavors, allowing them to meld together beautifully.
When you’re ready to serve, remove the cheese ball from the refrigerator and let it sit at room temperature for 5-10 minutes before slicing. This brief warm-up makes it easier to cut clean slices without the cheese sticking to your knife. Use a sharp knife to slice the cheese ball into wedges or rounds, and serve immediately. The contrast of the creamy cheese with the crunchy almond flakes and fresh parsley is simply irresistible.
Pro Tips For Making 3 Ingredient Cheese Ball
- Chill the Cheese First: Take your sharp white cheddar and cream cheese out of the fridge 20 minutes before mixing—cold cheese gets greasy and clumps like a science experiment gone wrong. Room temperature means smoother blending and a creamier texture that holds shape better.
- Pulse the Butter: Add the unsalted butter in small batches while pulsing in the food processor—dumping it all at once turns your cheese ball into a sad, oily lump. A few tablespoons at a time keeps it emulsified and prevents a greasy mess.
- Skip the Overmixing: Once the cheese and cream cheese combine, stop mixing the second everything bagel seasoning is evenly distributed—overworking it makes the mixture warm and sticky, turning your perfect ball into a sticky disaster. Test with a quick taste before calling it done.
- Roll in Parsley Last: Save the fresh parsley leaves for the very end—rolling them into the warm cheese ball keeps them vibrant and crisp, not wilted. Tuck a few into the center before final rolling so every bite has that bright pop. (Yes, even if it looks weird.)
Serving suggestions for this recipe
Classic Cracker Spread
This cheese ball shines when served with a selection of crunchy crackers like water crackers, triscuits, or pretzel crisps. I always keep a mix of round and rectangular crackers on hand—they provide different textures for each bite.
For a gourmet touch, pair with baguette slices or rosemary flatbread for dipping. The contrast of crispy crackers with creamy cheese is what makes this appetizer irresistible. 🥖
Sweet Pairings
Balance the savory cheese with sweet accompaniments like apple slices or pears. The natural sweetness of fruit cuts through the richness beautifully. I like to arrange thin apple slices on a platter alongside the cheese ball for a refreshing contrast.
For a festive touch, add dried apricots or candied pecans—their sweetness pairs surprisingly well with the salty cheese. 🍎
Beverage Pairings
Serve with iced tea or sparkling water to cleanse the palate between bites. A dry white wine like Sauvignon Blanc or Pinot Grigio complements the cheese’s richness without overpowering it.
For a non-alcoholic option, cucumber-mint infused water adds a refreshing contrast. I always keep a pitcher of lemonade on hand during parties—it’s simple and crowd-pleasing. 🍷
Party Platter Ideas
Create a charcuterie-style platter by arranging the cheese ball alongside prosciutto, fig jam, and marinated olives. The combination of salty, sweet, and tangy flavors makes for a well-rounded appetizer spread.
For a holiday twist, add cranberry sauce or pomegranate seeds to the platter. The cheese ball becomes the star of the show, surrounded by complementary flavors. 🎉
Individual Serving Tips
For easy serving, portion the cheese ball into small disposable cups or mini loaf pans before chilling. This makes it effortless for guests to grab individual servings without slicing. I also like to wrap slices in parchment paper with a twist tie for a polished look.
Label them with the occasion—“Game Day Bites” or “Holiday Cheese Ball”—to add a festive touch. 🎁
Make-Ahead Serving
Prep the cheese ball a day ahead and store it in the fridge wrapped tightly in plastic wrap. When ready to serve, slice it into wedges and arrange on a platter with herb garnishes like rosemary sprigs or edible flowers.
The longer it chills, the easier it is to slice cleanly. For a warm serving option, reheat slices in the oven at 350°F for 5-7 minutes—they become slightly gooey and irresistible. 🔥
Nutrition facts
Frequently asked questions
Can I use cream cheese substitutes like dairy-free cheese?
For the best texture, stick with full-fat cream cheese—it’s essential for that classic creamy consistency. However, you can try dairy-free cream cheese (like Kite Hill) for a vegan version, though the result may be slightly less rich. If substituting, add 1 extra tablespoon of butter to help bind the mixture. For a non-dairy cheddar, use a firm vegan cheddar that melts well when grated.
Why does my cheese ball keep falling apart when I try to shape it?
This usually happens when the mixture is too warm or lacks proper binding. Chill the cheese for 5-10 minutes before shaping, and make sure you’ve included all 2 tbsp of butter—this is key for holding the ball together. If it’s still too sticky, knead in 1 extra tablespoon of flour or 1 teaspoon of cornstarch to absorb excess moisture.
What’s the best way to store leftovers?
Wrap the cheese ball tightly in plastic wrap or place it in an airtight container to prevent drying. It keeps well in the fridge for up to 1 week, but for longer storage, freeze it for up to 3 months. To reheat, bake at 350°F for 10 minutes—this makes it slightly gooey and irresistible for sandwiches or toast.
Can I make this cheese ball spicy or smoky?
For a spicy kick, add ½ teaspoon of cayenne pepper or 1 teaspoon of smoked paprika to the cheese mixture. For smokiness, swap the everything seasoning for 1 tbsp garlic powder + 1 tsp onion powder + ½ tsp smoked salt. Roll it in crushed pepperoni or smoked almonds for extra depth.

- 3lb Prime Rib Roast Recipe: Juicy Pink Center Guaranteed in 3 Hours - October 31, 2026
- 5 Spice Cake Recipe: Warmly Spiced Layers With Crunchy Top - October 31, 2026
- 1950’s Macaroni and Cheese Recipe: Nostalgic Creamy Cheese Sauce with Buttery Noodles - October 31, 2026