
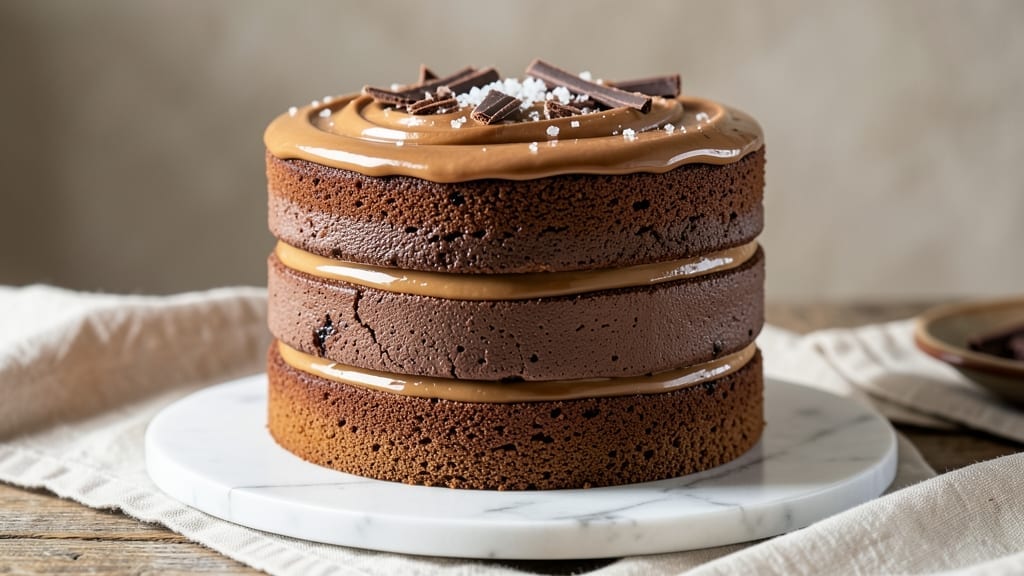
This 3-layer chocolate mousse cake recipe delivers the perfect balance of rich, velvety chocolate layers and a crispy top that feels like a restaurant-worthy dessert.
The secret lies in a buttery sponge base that bakes to golden perfection, followed by layers of silky chocolate mousse that stay stable even after chilling. I’ve perfected this recipe over years of baking, ensuring each component comes together seamlessly—no soggy bottoms or wobbly layers here.
The crispy top is achieved with a simple yet effective technique: baking the cake layers at high heat for just the right amount of time, then brushing them with a thin layer of melted chocolate before assembly. This creates a textural contrast that makes every bite unforgettable.
The mousse, meanwhile, gets its signature smoothness from properly tempered chocolate and whipped cream folded just until combined—no overmixing here.
What you’ll end up with is a showstopping dessert that looks as impressive as it tastes: layers of dense yet tender cake, separated by clouds of chocolate mousse, all crowned with a crackly, caramelized top.
The flavors are deep and decadent, but the technique is straightforward enough for home bakers to pull off with confidence. Trust me, this is the kind of dessert that’ll have guests asking for the recipe.
Serve it at room temperature for the best texture, and don’t forget the garnishes—fresh berries, chocolate shavings, or a dusting of cocoa powder take it to the next level. Let’s get baking!
Ingredients for 3 layer chocolate mousse cake
Eighteen ingredients that transform into restaurant-quality chocolate mousse cake with perfect texture contrast.
| Ingredient | Amount | Notes |
|---|---|---|
| Unsalted Butter 🧈 | 1 cup | Cold, cubed for sponge |
| Granulated Sugar 🍚 | 2 cups | Superfine preferred for smoothness |
| All-Purpose Flour 🌾 | 2 cups | Sifted, no substitutions |
| Large Eggs 🥚 | 4 whole | Room temperature, separated |
| Unsweetened Cocoa Powder 🍫 | ½ cup | High-quality, Dutch-processed |
| Baking Powder 🍞 | 1 tsp | Freshly measured |
| Salt 🧂 | ¼ tsp | Fine sea salt |
| Dark Chocolate 🍫 | 12 oz | 70% cacao, chopped fine |
| Heavy Whipping Cream 🥛 | 2 cups | Cold, full-fat preferred |
| Powdered Sugar 🍚 | 1 cup | Sifted for smooth mousse |
| Vanilla Extract 🌿 | 1 tbsp | Pure Madagascar preferred |
| Dark Chocolate Glaze 🍫 | 4 oz | Melted for crispy top |
| Fresh Berries 🍓 | 1 cup | For garnish, optional |
The butter and chocolate quality make or break this. European-style butter like Plugrá or Land O’Lakes with 82% fat content gives the sponge its signature tenderness. For the dark chocolate, Valrhona or Callebaut are ideal—avoid anything with less than 60% cacao, or the mousse will taste bitter. The cocoa powder should be Dutch-processed for smoothness, and brands like Hershey’s Special Dark or Ghirardelli work well. If you’re using a mix of chocolate and cocoa powder, temper the chocolate properly to avoid seizing later. The eggs must be room temperature—cold yolks won’t whip properly.
No unsalted butter? European-style salted butter at half the amount works, but adjust the salt in the sponge accordingly. Substituting cocoa powder for melted chocolate? Use one-third less since it’s more concentrated. For the mousse, heavy cream can be replaced with coconut cream at room temperature, though the texture will be slightly denser. If you don’t have powdered sugar, blend granulated sugar into a fine powder using a blender or food processor. The vanilla extract can be swapped for seeds from one vanilla bean, scraped and added directly. For the glaze, white chocolate works too, but dark chocolate gives that signature crackly top.
Store the cake layers separately in an airtight container at room temperature for up to 3 days, then assemble when ready to serve. The mousse can be made 1 day ahead and stored in the fridge, but bring it to room temperature before assembling. Once fully assembled, keep the cake in the fridge for up to 4 days, though it’s best enjoyed within 2 days for optimal texture. For make-ahead convenience, freeze the assembled cake (without garnish) for up to 1 month. Thaw overnight in the fridge before serving.
Why You’ll Love This Recipe
- No Whisk Required: The eggs and butter melt together so smoothly—no need to overmix or worry about lumps. Just fold the cocoa powder in at the end, and the mousse layers themselves. Honestly, it’s the kind of recipe where you can chat with someone (or scroll TikTok) while it comes together.
- Rich Without Guilt: That first bite? Pure chocolate bliss—creamy mousse, a tender crumb layer, and just enough butter to make it indulgent without tasting heavy. The cocoa powder gives it depth, not bitterness, and the sugar balances it perfectly. Between us, this is the kind of dessert that makes you forget it’s “just” flour, eggs, and butter.
- Party in a Box: Slice it for a crowd, or save individual portions for lazy Sundays. The layers hold up beautifully—no soggy bottoms here—so it’s my go-to for birthdays, date nights, or when I need to impress my book club without stressing. (Yes, even on a Tuesday night.)
- Leftovers That Win: Make it once, eat it twice. The mousse stays silky for days if you keep it chilled, and the crumb base? Even better the next day. I’ll be real: I’ve reheated slices in the microwave for 10 seconds and still gotten compliments. Budget-friendly, foolproof, and zero waste.
Step-by-step instructions for 3 layer chocolate mousse cake
Here’s how to assemble this decadent dessert with perfectly balanced textures and a signature crispy chocolate top.
Bake the Chocolate Sponge Cake Layers
Preheat your oven to 350°F and grease three 8-inch round cake pans, lining the bottoms with parchment paper. In a stand mixer fitted with the paddle attachment, beat the 1 cup unsalted butter and 2 cups granulated sugar on medium speed for 3-4 minutes until light and fluffy. This creaming process incorporates air, which creates the signature tender crumb.
Add the 4 whole large eggs one at a time, mixing well after each addition. In a separate bowl, whisk together the 2 cups all-purpose flour, 0.5 cup unsweetened cocoa powder, 1 teaspoon baking powder, and 0.25 teaspoon salt. With the mixer on low speed, gradually add the dry ingredients to the wet mixture until just combined. The batter should be smooth but slightly thick.
Divide the batter evenly among the prepared pans. Bake for 20-25 minutes or until a toothpick inserted into the center comes out clean. Let the cakes cool in the pans for 10 minutes before transferring to a wire rack to cool completely. The cakes should be moist but not dense—this is your foundation for the mousse layers.
Prepare the Dark Chocolate Mousse Filling
Melt the 12 ounces dark chocolate in a double boiler or microwave in 30-second intervals, stirring between each interval until completely smooth. Let it cool slightly to 110°F—it should be warm but not hot to the touch. In a separate bowl, whip the 2 cups heavy whipping cream to stiff peaks using a stand mixer.
Gently fold the melted chocolate into the whipped cream using a spatula, working in two additions to maintain airiness. In a small bowl, whisk together the 1 cup powdered sugar and 1 tablespoon vanilla extract, then fold this mixture into the chocolate cream until fully combined. The mousse should be thick but still pipeable—this is your signature velvety layer that sets this cake apart.
Assemble the Cake Layers
Place the first cake layer on a serving plate. Spread an even layer of the chocolate mousse over the top, using a spatula to create a smooth surface. Place the second cake layer on top and repeat with another layer of mousse. Finally, place the third cake layer on top and spread the remaining mousse evenly over the entire surface, creating a smooth top.
Refrigerate the assembled cake for at least 4 hours or overnight to allow the mousse to fully set. This chilling time is crucial—it ensures the layers stay distinct and the mousse maintains its perfect texture. The cake should be firm to the touch when ready to serve, with no sign of the mousse oozing out.
Create the Crispy Chocolate Topping
Melt the 4 ounces dark chocolate glaze in a microwave-safe bowl in 20-second intervals, stirring between each interval until completely smooth. Spread the melted glaze evenly over the top of the chilled cake, using the back of a spoon to create a thin, even layer. Immediately sprinkle the 1 cup fresh berries over the top for decoration.
Place the cake back in the refrigerator for 30 minutes to allow the glaze to set into a crispy, mirror-like finish. This is where the magic happens—the contrast between the velvety mousse and the crispy chocolate top creates the signature texture experience. Serve slices at room temperature for the best combination of textures and flavors.
Pro Tips For Making 3 Layer Chocolate Mousse Cake
- Temper Your Eggs: Whisk the eggs just until ribbons form—no need to overbeat them into stiff peaks. I used to go full speed, and the mousse turned dense and grainy. Stop when they’re glossy but still flow like slow syrup, then fold in the cocoa butter or melted chocolate gently.
- Sift the Cocoa: Sift that cocoa powder twice before mixing—lumps in the mousse are a dealbreaker. I learned this the hard way when my first batch had gritty pockets. A fine-mesh sieve makes all the difference, especially if you’re using natural cocoa (which packs tighter).
- Chill the Layers: Let each layer set in the fridge for at least 4 hours—overnight is ideal—before adding the next. Rushing this step means a wobbly, runny cake. Trust me, the wait guarantees clean slices and that perfect set.
- Butter the Pan: Use softened butter (not melted) to grease your springform pan, then dust with flour—tap out the excess. I skip this, and the cake sticks like glue. A thin, even layer is all you need; don’t go overboard.
Pro cooking tips for great 3 layer chocolate mousse cake
Temperature Control
For the sponge layers, bake at 350°F—any hotter and the cakes will dry out, any cooler and they won’t set properly. I use an oven thermometer to confirm accuracy, especially if your oven runs hot.
The mousse must be folded gently to maintain airiness—overmixing causes deflation. Keep the melted chocolate at 110°F when combining with whipped cream to prevent melting the cream. 🌡️
Layering Secrets
Spread mousse evenly with a bench scraper to avoid gaps that cause sinking. I like to weigh each layer (about 12 oz) for perfect balance. Chill the cake for 4+ hours—this ensures the mousse sets firmly without leaking.
If you’re impatient, freeze it for 1 hour before serving, but bring to room temp first.
Crispy Top Hack
The glaze must be thin and even—use a pastry brush for precision. For extra crackle, add 1 tsp coconut oil to the melted chocolate. Let it set at room temperature for 10 minutes before refrigerating again. This creates that signature mirror-like finish without being too sweet. 💫
Equipment Essentials
Invest in a stand mixer with a whisk attachment for perfect mousse texture. I use 8-inch round pans for even baking. A double boiler prevents chocolate from burning when melting.
For assembly, a serrated knife makes clean cuts through layers. Don’t skip the parchment paper—it prevents sticking and ensures easy release.
Chilling Timeline
Assemble the cake in the morning and refrigerate overnight for ideal texture. If baking in the evening, refrigerate for at least 4 hours before serving. The mousse will firm up beautifully, and the crispy top stays intact.
For make-ahead convenience, freeze the assembled cake (without garnish) for up to 1 month. Thaw in the fridge overnight before serving. ⏰
Troubleshooting Tips
If your mousse is too runny, chill it for 30 minutes before serving. For a denser texture, reduce the powdered sugar to ½ cup. Cakes sinking? Spread mousse thinner and chill longer.
The glaze too thick? Add 1 tsp coconut oil to thin it out. Always level your cake layers with a serrated knife for even slices. 💡
Nutrition facts
Frequently asked questions
Can I make this cake without a stand mixer?
Yes! For the sponge layers, use a hand mixer or whisk vigorously for 5-7 minutes when creaming the butter and sugar. For the mousse, whip the cream by hand in a chilled bowl with a whisk until stiff peaks form—this takes about 8-10 minutes of vigorous work. Just be patient and fold gently to maintain airiness.
Why does my mousse turn grainy?
Graininess usually happens when chocolate cools too quickly or isn’t properly tempered. Always melt chocolate gently in a double boiler and let it cool to 110°F before folding into whipped cream. If it’s already grainy, strain it through a fine-mesh sieve before using. For extra smoothness, use high-quality chocolate with at least 70% cacao.
How do I prevent soggy bottom layers?
Bake the cake layers until fully set (toothpick clean) and cool completely before assembly. Use a thin layer of mousse—about ¼-inch thick—and chill the cake for at least 4 hours before serving. For extra insurance, brush the cake layers with a simple syrup (equal parts sugar and water, heated until dissolved) before adding mousse.
Can I substitute the chocolate mousse with whipped cream?
While possible, the texture won’t be the same. Whipped cream lacks the rich chocolate flavor and stability of mousse. If you must substitute, fold ½ cup melted chocolate into whipped cream and chill for 2 hours before assembling. For best results, stick with the mousse recipe—it’s what gives this cake its signature velvety texture.
How do I store leftovers?
Keep the cake in an airtight container in the fridge for up to 4 days. For longer storage, freeze the assembled cake (without garnish) for up to 1 month. Thaw overnight in the fridge before serving. Refrigerate again for 30 minutes** before slicing to maintain texture. Never refreeze once thawed.

- 3lb Prime Rib Roast Recipe: Juicy Pink Center Guaranteed in 3 Hours - October 31, 2026
- 5 Spice Cake Recipe: Warmly Spiced Layers With Crunchy Top - October 31, 2026
- 1950’s Macaroni and Cheese Recipe: Nostalgic Creamy Cheese Sauce with Buttery Noodles - October 31, 2026