
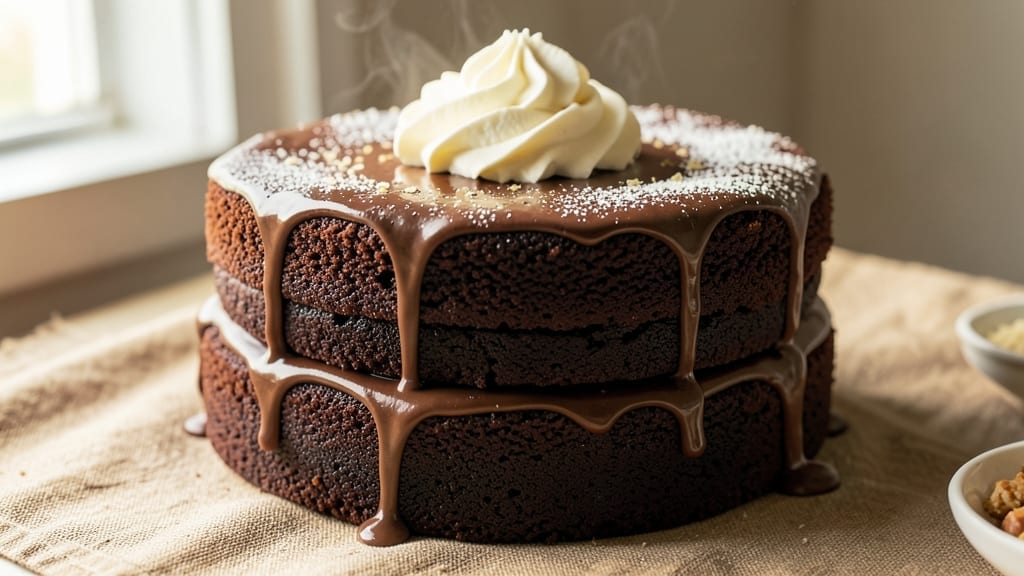
This 3-layer devil’s food cake recipe delivers the perfect balance of textures—fudgy bottom layers, light-as-air middle, and rich chocolate ganache on top. The secret lies in precise baking techniques and patience during assembly, ensuring every bite lives up to the hype.
I’ve perfected this version after years of trial and error, and it’s become a showstopper for birthdays, holidays, and special occasions alike.
The foundation starts with three distinct cake layers baked at 350°F for 25-30 minutes each, ensuring a moist yet sturdy base. Between the layers, a smooth cream cheese frosting bridges the gap between richness and lightness, while the final ganache topping adds a luxurious finish that melts into every forkful.
This isn’t your average cake—it’s a restaurant-quality dessert you can bake at home.
What sets this recipe apart is the textural contrast—the bottom layers stay dense and fudgy, the middle rises to fluffy perfection, and the ganache adds a velvety sheen that makes it look (and taste) like a professional bakery creation.
The assembly process requires chilling between layers, but the wait is worth it for that clean, professional finish that impresses every time.
Once assembled, this cake needs at least 4 hours to set properly, making it ideal for prepping ahead. Serve it with whipped cream, raspberries, or a sprinkle of powdered sugar for that classic touch.
The result? A decadent, layered masterpiece that tastes even better the next day. Let’s get baking!
Ingredients for 3 layer devil’s food cake
Precision ingredients for a restaurant-quality devil’s food cake with three distinct textures.
| Ingredient | Amount | Notes |
|---|---|---|
| All-Purpose Flour 🌾 | 4 ½ cups | Sifted for aeration, light texture preferred |
| Unsweetened Cocoa Powder 🍫 | 1 cup | Natural or Dutch-processed (adjust liquid if needed) |
| Granulated Sugar 🍚 | 2 ½ cups | Superfine for smoother texture |
| Light Brown Sugar 🍚 | 1 cup | Packed, for moisture |
| Baking Soda 🧂 | 1 ½ tsp | Freshly opened for potency |
| Baking Powder 🧂 | 1 ½ tsp | Double-acting for proper rise |
| Salt 🧂 | 1 tsp | Fine sea salt preferred |
| Instant Espresso Powder ☕ | 1 tbsp | Enhances chocolate depth |
| Vanilla Extract 🌿 | 2 tsp | Pure Madagascar bourbon preferred |
| Buttermilk 🥛 | 1 ½ cups | Room temperature for best results |
| Vegetable Oil 🫒 | 1 cup | Light, neutral flavor |
| Large Eggs 🥚 | 6 whole | Room temperature, separated for layers |
| Semi-Sweet Chocolate Chips 🍫 | 1 ½ cups | High-quality, 60% cacao |
| Heavy Whipping Cream 🥛 | 2 cups | Cold for whipping |
| Cream Cheese 🧀 | 16 oz | Room temperature, full-fat |
| Powdered Sugar 🍚 | 4 cups | Confectioners' sugar, sifted |
| Dark Chocolate Bars 🍫 | 12 oz | 70% cacao, chopped fine |
| Unsalted Butter 🧈 | 1 cup | Cold, cubed for ganache |
The cocoa powder is non-negotiable—Valrhona or Guittard deliver the richest flavor, but Hershey’s Special Dark works in a pinch. For the chocolate chips, Ghirardelli or Lindt Excellence provide superior melt-in-your-mouth quality. Eggs must be separated for the fluffy middle layer, so room temperature is critical. The cream cheese should be full-fat and at room temperature—never low-fat or cold. For the ganache, 70% cacao dark chocolate ensures a velvety finish without bitterness. Pre-sift your dry ingredients to eliminate lumps and ensure even distribution throughout the batter.
No cocoa powder? Melted dark chocolate (4 oz) + 2 tbsp cocoa powder substitutes, but the texture will differ slightly. Short on buttermilk? 1.5 tbsp vinegar or lemon juice + 1.5 cups milk works perfectly. For the ganache, heavy cream can be replaced with coconut cream for a dairy-free version, though the texture will be firmer. The semi-sweet chocolate chips can be swapped for chopped chocolate bars if you prefer a more rustic look. When measuring flour, spoon it into the cup and level off—packing compresses the cake. The instant espresso powder enhances depth, but 1 tsp strong brewed coffee works if you’re out.
Store dry ingredients like flour and cocoa powder in airtight containers away from heat sources for up to 6 months. Chocolate chips and chopped chocolate keep for 9 months in the pantry. Once the cake is assembled, it requires 4-6 hours in the fridge to set properly. The ganache can be made 2 days ahead and stored at room temperature. For the cream cheese frosting, whip it just until combined—overmixing makes it grainy. The final cake holds for 5 days refrigerated or 3 months frozen, though it’s best enjoyed fresh.
Why You’ll Love This Recipe
- No Mixer Needed: I swear by this—just a whisk and a bowl. The cocoa powder and brown sugar blend so smoothly when folded into the wet ingredients, and the layers stay light without overmixing. My hands are always cleaner this way.
- Rich Without Bitterness: That combo of granulated and light brown sugar? It balances the cocoa powder perfectly—no chalky aftertaste, just deep, fudgy flavor. Honestly, my first attempt with just cocoa powder was too intense, but this tweak made all the difference.
- Birthday Party Ready: Three layers mean you can stack it high, frost it wild, or even add a cherry layer if you’re feeling fancy. I’ve used it for everything from potlucks to my kid’s 10th birthday—no one ever guesses it’s not from a bakery.
- Budget-Friendly Luxury: A single box of cocoa powder and a bag of flour stretch for multiple cakes, and the brown sugar adds just enough caramel depth to feel special. Leftovers? They disappear faster than I can say “second slice.”
Step-by-step instructions for building a 3-Layer devil’s food cake
Mastering this layered cake requires precision in technique and patience in assembly.
Prepare the Cake Layers
Preheat your oven to 350°F and grease three 9-inch round cake pans with vegetable oil, then line the bottoms with parchment paper. Sift together the 4.5 cups all-purpose flour, 1 cup unsweetened cocoa powder, 1.5 tsp baking soda, 1.5 tsp baking powder, and 1 tsp salt in a large bowl. Set aside.
In a separate large mixing bowl, whisk together the 2.5 cups granulated sugar, 1 cup light brown sugar, 1 tbsp instant espresso powder, and 2 tsp vanilla extract until fully combined. Add the 6 whole large eggs, one at a time, beating well after each addition. Gradually pour in the 1.5 cups buttermilk and 1 cup vegetable oil, mixing until smooth.
With the mixer on low speed, gradually add the dry ingredients to the wet mixture, mixing just until combined—do not overmix. Fold in the 1.5 cups semi-sweet chocolate chips by hand. Divide the batter evenly among the prepared pans, spreading it out evenly. Bake for 25-30 minutes or until a toothpick inserted into the center comes out clean. Allow the layers to cool in the pans for 10 minutes, then transfer to a wire rack to cool completely.
Create the Chocolate Ganache Topping
While the cake layers cool, prepare the ganache by finely chopping the 12 oz dark chocolate bars and placing them in a heatproof bowl. In a small saucepan, heat the 1 cup unsalted butter over low heat until it melts completely. Pour the melted butter over the chopped chocolate and let it sit for 2 minutes to soften.
Stir the mixture gently until the chocolate melts and the ganache reaches a smooth, glossy consistency. If the ganache is too thick, add 1-2 tablespoons heavy whipping cream to loosen it. Spread the ganache evenly over the top layer of the cake once it has completely cooled. Chill the cake in the refrigerator for 30 minutes to allow the ganache to set.
Assemble the Cake Layers
Once the ganache has set, prepare the cream cheese frosting by beating the 16 oz cream cheese and 4 cups powdered sugar together in a stand mixer fitted with the paddle attachment until smooth and creamy. Gradually add the 2 cups heavy whipping cream, mixing on high speed until the frosting is light and fluffy. If the frosting is too thick, add 1-2 tablespoons cream to achieve the desired consistency.
Place the first cake layer on a serving plate. Spread a generous layer of the cream cheese frosting over the top, then place the second layer on top. Repeat this process with the third layer, ensuring each layer is evenly covered with frosting. Smooth the sides of the cake with a spatula, then use the back of a spoon to create a swirled pattern on the top layer for a professional finish.
Chill and Serve
Cover the assembled cake with plastic wrap and refrigerate for at least 2 hours to allow the frosting to set completely. This chilling time ensures the cake holds its shape and the ganache remains firm. Once chilled, slice the cake into 12 equal pieces and serve at room temperature. The contrast of the fudgy bottom layer, fluffy middle, and rich chocolate ganache top will create a decadent dessert experience.
Pro Tips For Making 3 Layer Devil’S Food Cake
- Sift That Cocoa: Don’t just dump the cocoa powder—sift it with the flour first. I learned this after my first cake turned out dense and uneven; the clumps in cocoa powder mess with the texture. A quick 30-second sift makes all the difference in a smooth, fudgy crumb.
- Measure Brown Sugar Wet: Pack that light brown sugar into the measuring cup and tap it firmly on the counter to settle. Then, level it off with a knife. I used to eyeball it, and my cake layers always ended up either too dry or too sticky—this step keeps the moisture consistent.
- Rotate Pans Mid-Bake: Swap the cake pans from front to back halfway through baking. I skipped this once and ended up with one layer slightly taller and drier than the others. A quick pan rotation ensures even baking and level layers—no guessing when you’re frosting.
- Cool Layers Properly: Let the layers cool in the pan for 10 minutes, then transfer them to a wire rack to finish cooling. I rushed this once and ended up with a soggy middle when I stacked them too soon. Patience here = no collapsed cake disaster.
Storing and reheating this recipe
Refrigerator Storage
Once fully assembled, your 3-layer devil’s food cake stays fresh in the refrigerator for up to 5 days when stored properly. I wrap mine tightly in plastic wrap first, then place it in an airtight container to prevent drying.
The ganache and cream cheese frosting actually improve overnight as flavors meld together. Let it sit at room temperature for 15-20 minutes before serving to soften slightly. 💫
Freezer Preservation
For longer storage, freeze the fully assembled cake (unwrapped) for up to 3 months. I recommend wrapping each layer individually in plastic wrap before assembling, then covering the whole cake with a second layer.
When ready to serve, thaw in the fridge overnight. The texture remains excellent, though the ganache may firm up slightly—simply let it sit at room temperature for 20-30 minutes before slicing. ❄️
Reheating Slices
Individual slices can be gently warmed in the microwave for 8-10 seconds on 50% power to restore the ganache’s velvety texture. For a more refined approach, place slices on a baking sheet and warm in a preheated 300°F oven for 3-4 minutes.
Never microwave uncovered—this causes the frosting to sweat and lose its professional finish. A quick warm-up brings back that restaurant-quality mouthfeel. 🔥
Ganache Refresh
If the ganache appears dull after storage, simply reheat it gently by placing the cake in a 250°F oven for 5 minutes. The residual heat will restore its glossy sheen.
For extra shine, brush the top with a tiny bit of heavy cream warmed to 110°F—this trick makes it look freshly made every time. Store any leftover ganache in an airtight container at room temperature for up to 1 week.
Frosting Fixes
If your cream cheese frosting develops a grainy texture after refrigeration, simply re-whip it with 1-2 tablespoons of cold heavy cream until smooth. For a softer finish, let the cake sit at room temperature for 30 minutes before serving.
The frosting should be cool but not cold—this maintains its perfect spreadable consistency. I always keep a small bowl of powdered sugar nearby to dust any crumbs from the sides. ✨
Make-Ahead Tips
Prep the cake layers and frosting 2 days ahead—this is my secret for stress-free baking. Store the layers wrapped in plastic at room temperature, and keep the frosting refrigerated. Assemble just before serving to maintain that fresh-baked look.
The ganache can be made 3 days ahead and stored at room temperature, though it sets more firmly after 24 hours. A quick 30-second microwave reheat brings it back to perfection. 💡
Nutrition facts
Frequently asked questions
Why does this recipe use both granulated and brown sugar?
The combination creates the perfect texture contrast: the granulated sugar ensures a tender crumb, while the light brown sugar adds moisture and depth of flavor. The brown sugar also helps create that signature fudgy bottom layer while keeping the middle light and airy.
Can I substitute buttermilk in the cake batter?
Yes! Mix 1.5 tbsp vinegar or lemon juice with 1.5 cups milk and let it sit for 5 minutes to curdle. This works just as well and adds a subtle tang that enhances the chocolate flavor. For dairy-free, use 1.5 cups coconut milk (full-fat) instead.
How do I fix cracked cake layers during assembly?
Cracks happen when layers aren’t fully cooled or frosting is too thick. First, chill the cake 10 minutes longer between layers. For cracks, spread a thin layer of warmed ganache over the crack, then press the next layer gently. The ganache acts as a glue while maintaining the professional look.
Is it better to bake all three layers at once?
No—baking them one at a time ensures even baking and prevents oven temperature fluctuations. Your oven may not be able to maintain 350°F consistently with three pans. If you’re short on time, bake two layers first, then the third while the first two cool.
Can I make this cake without a stand mixer?
Use a hand mixer for the batter and frosting—just mix on medium speed for 2-3 minutes at a time to avoid overheating. For the ganache, a double boiler works perfectly. The key is patience: whip the cream cheese frosting until it’s light and fluffy, even if it takes longer by hand.

- 5 Lb Eye Round Roast Recipe: Slow-Braised to Melt-in-Mouth Tenderness - November 3, 2026
- 3-Hour Ciabatta Bread Recipe: Crusty Chews and Airy Holes Mastered - November 3, 2026
- 5 Fruit Salad Recipe: Vibrant Rainbow Layers With No Brown Spots - November 3, 2026