
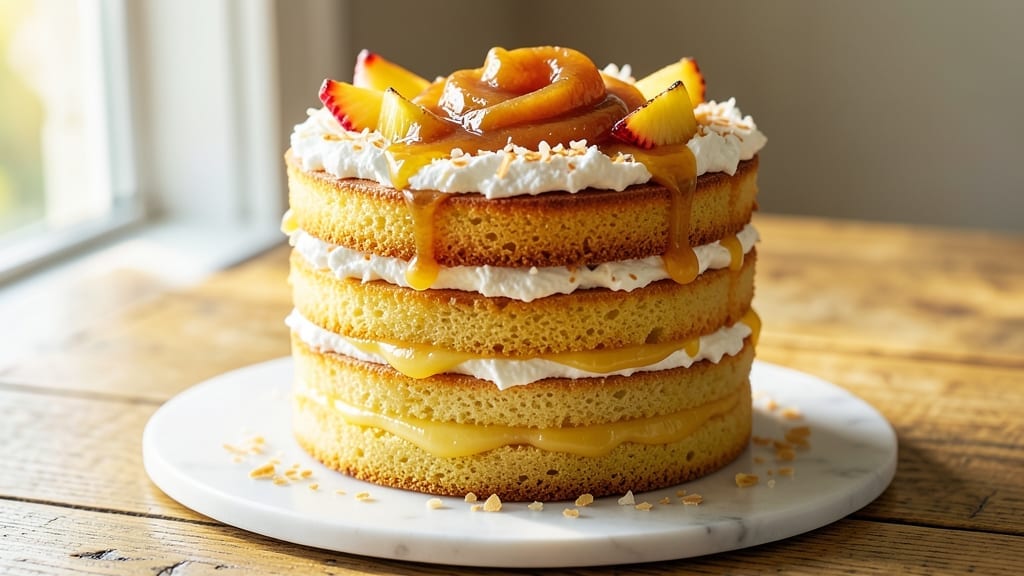
This 3-layer pineapple cake recipe delivers the perfect balance of tropical sweetness and velvety cream cheese—every slice is a celebration of texture and flavor. 🌟 The secret lies in perfectly baked layers, a luscious pineapple jam filling, and a vanilla cream cheese frosting that ties it all together with silky smoothness.
After years of baking, I’ve refined this recipe to ensure moist cake, no soggy layers, and a finish that looks as impressive as it tastes.
The foundation starts with tender cake layers infused with pineapple puree, giving each bite that signature tropical brightness. Between the layers, a homemade pineapple jam—sweetened just right—adds a burst of fruity flavor without overwhelming the delicate vanilla cream cheese frosting.
The frosting, whipped to the perfect consistency, creates a glossy finish that makes this cake look like it belongs in a bakery display.
What makes this recipe truly special is the foolproof layering technique—no cracks, no crumbs, just clean slices that reveal the vibrant filling and creamy frosting. Baking each layer to the exact right doneness ensures they stay moist without turning gummy, while the frosting holds its shape even in warm rooms.
The result? A cake that’s as beautiful as it is delicious, perfect for birthdays, holidays, or whenever you want to impress.
Ready to bake? This recipe walks you through every step, from mixing the batter to assembling the layers with confidence. Whether you’re a seasoned baker or trying your hand at a multi-layer cake for the first time, the clear instructions and pro tips ensure success.
Let’s get started on creating your showstopping pineapple cake.
Ingredients for 3 layer pineapple cake
Tropical flavors meet velvety cream cheese in this showstopping 3-layer cake—every ingredient is key to perfect layers and glossy frosting.
| Ingredient | Amount | Notes |
|---|---|---|
| All-Purpose Flour 🌾 | 3 ½ cups | Sifted for light texture |
| Granulated Sugar 🍚 | 2 ½ cups | Divided for layers and frosting |
| Unsalted Butter 🧈 | 1 ½ cups | Room temperature, softened |
| Large Eggs 🥚 | 6 whole | Room temperature, separated |
| Pineapple Puree 🍍 | 1 cup | Fresh or canned, unsweetened |
| Vanilla Extract 🌿 | 2 tbsp | Pure, high-quality extract |
| Baking Powder 🍞 | 2 tsp | Aluminum-free preferred |
| Salt 🧂 | ½ tsp | Fine sea salt |
| Fresh Pineapple 🍍 | 2 cups | Diced, for jam filling |
| Lemon Juice 🍋 | 2 tbsp | Freshly squeezed |
| Cream Cheese 🧀 | 16 oz | Full-fat, room temperature |
| Heavy Whipping Cream 🥛 | 2 cups | Cold, for frosting |
| Powdered Sugar 🍚 | 3 cups | For frosting, sifted |
The pineapple puree is non-negotiable for that signature tropical flavor—fresh is best, but canned works in a pinch (just drain well). For the flour, King Arthur or Gold Medal brands bake up lightest. The cream cheese? Philadelphia is my go-to, but any full-fat brand will work. Room temperature butter and eggs are critical—no one likes lumps in their cake batter. Pro tip: Toast your flour and sugar together for 5 minutes to deepen flavors and prevent sinking layers.
No fresh pineapple? Canned crushed pineapple, drained works for the jam, but add an extra tablespoon of lemon juice to balance sweetness. Out of vanilla extract? Vanilla bean paste gives more flavor for the same amount. The frosting can be made ahead—just whip it up and refrigerate for up to 3 days. For a richer frosting, add 1 tbsp pineapple puree to the cream cheese mixture. And if your frosting isn’t coming together? Your bowl might be too warm—chill it for 10 minutes before whipping again.
This cake keeps beautifully—covered at room temp for 2 days or fridge for 5 days. The layers stay moist thanks to the pineapple jam, but if you’re making it ahead, wrap each layer separately in plastic to prevent drying. For the frosting, use a piping bag with a star tip for that bakery-worthy finish. Leftovers? Store in the fridge and bring to room temp before serving—it’s worth the wait for that perfect slice.
Why You’ll Love This Recipe
- Pantry-Friendly Magic: I swear, this cake uses stuff you already have—no specialty ingredients, no last-minute grocery runs. That pineapple puree? It’s the secret weapon turning basic flour and sugar into something that tastes like a tropical vacation.
- Butter-Soft Layers: The moment I cut into the first slice, I knew—this isn’t your average dense cake. The butter and eggs create layers so tender they melt in your mouth, while the pineapple puree keeps it moist without being soggy. (Yes, even my picky husband asked for seconds.)
- Birthday to Brunch: Honestly, this cake works everywhere. Frost it with cream cheese for a crowd-pleasing dessert, slice it thin for breakfast toast, or pack it in the fridge for a no-fuss office snack. My kids beg for it at school lunches—no one suspects it’s just flour, sugar, and a little pineapple love.
- Budget Win: Between us, this recipe stretches further than you’d think. A single batch feeds six, and leftovers? They disappear faster than I can reheat them. Plus, using pineapple puree instead of fresh fruit cuts costs without sacrificing flavor. My wallet and my taste buds thank me.
Step-by-step instructions for 3 layer pineapple cake
Let’s bake this tropical masterpiece—moist layers, tangy filling, and velvety frosting that’ll wow everyone.
🍳 Step 1: Prepare the Cake Layers and Pineapple Filling
Preheat your oven to 350°F and grease three 8-inch round cake pans, lining the bottoms with parchment paper. In a large bowl, cream together the 1.5 cups unsalted butter and 1 cup granulated sugar from the 2.5 cups total until light and fluffy—about 3-4 minutes with an electric mixer. This step is crucial for creating those airy, tender layers.
Add the 6 whole eggs, one at a time, beating well after each addition. Mix in the 1 cup pineapple puree, 2 tbsp vanilla extract, and 1.5 cups all-purpose flour (sifted first for a lighter texture). Fold in the 2 tsp baking powder and 0.5 tsp salt until just combined—don’t overmix or your cake will be dense.
For the filling, combine 2 cups fresh pineapple (finely diced) with 2 tbsp lemon juice in a small saucepan. Simmer over medium heat for 5-7 minutes until the pineapple softens and releases its juices. Strain through a fine-mesh sieve to remove any excess liquid, leaving you with a thick, flavorful jam. Let it cool completely before using.
🔥 Step 2: Bake the Layers to Perfect Doneness
Divide the cake batter evenly among the three prepared pans. Bake for 25-30 minutes or until a toothpick inserted in the center comes out clean. Here’s the thing—pineapple cake can dry out if overbaked, so watch closely after 25 minutes. The edges should pull away slightly from the pan, and the tops should spring back when gently touched.
Let the cakes cool in their pans for 10 minutes before transferring to a wire rack to cool completely. This gradual cooling prevents cracking. While they cool, make the cream cheese frosting by beating the 16 oz cream cheese (at room temperature) and 1 cup granulated sugar (remaining from the 2.5 cups total) until smooth and creamy.
🥘 Step 3: Assemble the Layers with Confidence
Once completely cooled, level the tops of each cake layer if needed. Place the first layer on a cake stand or plate, then spread a thin layer of the pineapple jam filling over the top. This ensures every bite has that bright tropical flavor. Add the second layer, repeating with another layer of jam, and top with the final layer.
Here’s where it gets fun—whip the 2 cups heavy whipping cream (chilled) to stiff peaks, then gradually fold in the 3 cups powdered sugar until smooth and fluffy. Spread this frosting over the entire cake, then use the remaining frosting to create swirls or rosettes on the sides. Chill the cake in the refrigerator for at least 1 hour before serving to let the frosting set properly.
⏰ Step 4: Serve and Savor the Tropical Bliss
Slice the cake with a sharp, hot knife (dip the knife in hot water and wipe dry between cuts) for clean, professional-looking slices. The layers should be moist, the pineapple filling tangy-sweet, and the frosting light yet rich. Serve at room temperature for the best texture—this cake tastes even better as it warms up slightly.
This tropical masterpiece keeps well in the fridge for 3-4 days, though I promise it won’t last that long. The cream cheese frosting adds a luxurious touch that balances the bright pineapple perfectly. Trust me, your guests will be asking for this recipe!
Pro Tips For Making 3 Layer Pineapple Cake
- Whisk Butter First: Before adding sugar or eggs, beat the butter until it’s pale and fluffy—about 3-5 minutes with a mixer. I learned this the hard way: skipping this step makes the cake dense and heavy, especially with pineapple puree’s natural moisture. The butter’s airiness is what keeps those layers light.
- Strain That Puree: Run your pineapple puree through a fine-mesh sieve before mixing it into the batter. Fibers clog the sieve but leave you with a silky-smooth puree that blends better and won’t make the cake gummy. Trust me, your layers will thank you—no one wants a pineapple cake that tastes like pulp.
- Bake in Stages: Bake the first two layers at 325°F (165°C) for 20-22 minutes, then lower the oven to 300°F (150°C) for the third. The third layer often dries out faster because it’s the last in the pan. This two-tier approach keeps all layers evenly moist without overbrowning.
- Cool Layers Flat: Place baked layers on a wire rack immediately after removing them from the pan, but leave them flat until fully cooled. Stacking warm layers traps steam, which turns your cake into a soggy mess. Patience here means clean layers for filling and frosting—no one likes a collapsed tower.
Wine and beer pairings for this recipe
White Wine Pairings
For this tropical cake, a dry Riesling from Germany or Alsace is my go-to choice—its crisp acidity and subtle fruit notes complement the pineapple’s brightness without overpowering the cream cheese frosting.
Look for a Keller Riesling or Dr. Loosen Blue Slate for that perfect balance. The slight minerality in these wines actually enhances the cake’s tropical flavors, creating a harmonious pairing. 🍷
Sparkling Wine Options
A demi-sec Champagne or Prosecco adds a celebratory touch to your pineapple cake, especially for special occasions. The bubbles and slight sweetness mirror the cake’s creamy texture while the acidity cuts through the richness.
I recommend Moët Impérial for its elegant balance or La Marca Prosecco for a more affordable option. Serve chilled to highlight the effervescence.
Beer Pairings
For beer lovers, a crisp Belgian witbier like Hoegaarden or Stella Artois Wit works beautifully—its citrusy notes and light effervescence echo the pineapple’s tropical vibe. If you prefer something darker, a light lager such as Heineken or Corona provides a clean, refreshing contrast to the cake’s sweetness.
Serve both beer and wine slightly chilled to enhance their flavors.
Coffee or Tea Pairings
If alcohol isn’t your thing, a lightly sweetened chai latte or vanilla-flavored coffee pairs wonderfully with the cake’s tropical and creamy elements. The warmth of the spices in chai complements the pineapple, while the vanilla in coffee mirrors the frosting’s flavor.
For a non-caffeinated option, hibiscus iced tea adds a fruity contrast that enhances the cake’s tropical notes.
Flavor Harmony Tips
To elevate your pairing experience, consider adding a pineapple-infused syrup to your wine or beer—simmer ½ cup pineapple juice with 1 tbsp honey for 5 minutes and strain. This enhances the tropical theme and creates a cohesive tasting experience.
For a dessert wine twist, try a Moscato d’Asti—its light sweetness and bubbles make it a perfect match for the cake’s cream cheese layers. 🍹
Nutrition facts
Frequently asked questions
Can I substitute fresh pineapple with canned for the filling?
Yes, but you’ll need to adjust the texture. Use 1 can (20 oz) crushed pineapple, drained and add 1 extra tablespoon lemon juice to balance the sweetness. Simmer for 3-5 minutes longer to thicken it properly. Fresh pineapple gives a brighter flavor, but canned works in a pinch—just strain well to avoid soggy layers.
How do I prevent the cake layers from cracking when assembling?
Let layers cool completely before assembling, and level the tops perfectly with a serrated knife. Spread a thin layer of frosting between layers instead of jam—it acts as a “glue” that prevents crumbling. Chill the cake for 1 hour before slicing to help the frosting set and hold the layers together. Patience here makes all the difference!
Can I make this cake gluten-free or vegan?
For gluten-free, swap the all-purpose flour for a 1:1 gluten-free baking flour blend (like Bob’s Red Mill) and add ½ tsp xanthan gum. For vegan, replace butter with vegan butter or coconut oil, eggs with flax eggs (1 tbsp ground flax + 3 tbsp water per egg), and cream cheese with a vegan cream cheese alternative (like Kite Hill). Adjust liquid measurements as needed—these cakes may bake slightly differently.
Why did my frosting turn grainy?
Grainy frosting usually means the cream cheese wasn’t soft enough or the powdered sugar was added too quickly. Always use room-temperature cream cheese and whip it first until completely smooth before adding sugar. Sift the powdered sugar to avoid lumps, and fold it in gradually while mixing on low speed. Chill your mixing bowl beforehand to keep ingredients cold.
How can I make this cake ahead of time?
Bake the layers 1 day ahead and store them wrapped tightly in plastic at room temperature. Assemble the cake 24 hours before serving—this gives the filling time to absorb and the frosting to set properly. Keep it refrigerated until 1 hour before serving to let it come to room temperature. The flavors actually improve overnight!

- 3lb Prime Rib Roast Recipe: Juicy Pink Center Guaranteed in 3 Hours - October 31, 2026
- 5 Spice Cake Recipe: Warmly Spiced Layers With Crunchy Top - October 31, 2026
- 1950’s Macaroni and Cheese Recipe: Nostalgic Creamy Cheese Sauce with Buttery Noodles - October 31, 2026