
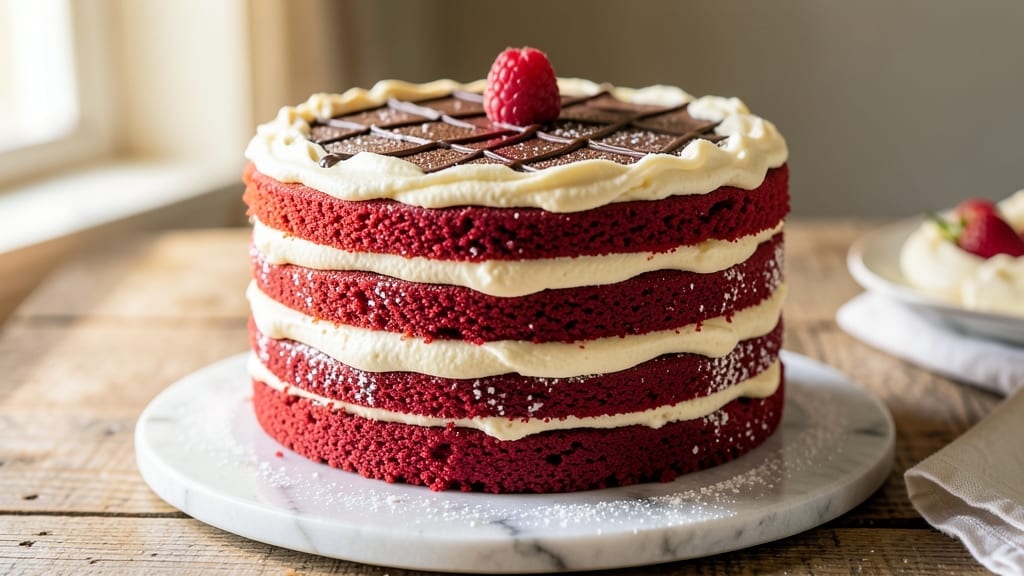
A 3-layer red velvet cake from scratch delivers that perfect combination of tender crumb, subtle cocoa depth, and velvety cream cheese swirls that make it a crowd favorite. The secret lies in precise baking techniques and a foolproof frosting recipe that stays smooth and creamy.
I’ve baked this cake countless times for celebrations, and every slice gets rave reviews—no one believes it’s homemade.
This recipe starts with a moist cake batter that bakes up with a fine crumb and just the right amount of cocoa richness. The cream cheese frosting is the star, swirled between layers for that signature marbled effect, and it stays lusely spreadable without being too sweet.
With three layers and a final coat of frosting, this cake looks impressive but comes together with straightforward steps.
By the time you’re done, you’ll have a cake that’s tender, moist, and perfectly balanced—no dry layers or overly sweet frosting here. The layers stay fresh for days, making it ideal for parties or special occasions.
Whether you’re a beginner or an experienced baker, this recipe delivers professional-quality results every time.
Ready to impress your guests? Let’s get started with the ingredients and step-by-step instructions that guarantee a showstopping dessert. The key is patience—letting the cake cool completely before frosting ensures clean layers and a flawless finish.
Ingredients for 3 layer red velvet cake recipe from scratch
These 15 ingredients create a showstopping red velvet cake with velvety layers and creamy swirls.
| Ingredient | Amount | Notes |
|---|---|---|
| All-Purpose Flour 🌾 | 3 ½ cups | Sifted for light texture |
| Granulated Sugar 🍚 | 2 ½ cups | Superfine preferred for smoothness |
| Unsalted Butter 🧈 | 1 ½ cups | Room temperature, cubed |
| Natural Red Food Coloring 🎨 | ½ tsp | For classic red velvet hue |
| Unsweetened Cocoa Powder 🍫 | ¾ cup | Dutch-processed for rich flavor |
| Buttermilk 🥛 | 1 ½ cups | Room temperature for best blend |
| Large Eggs 🥚 | 4 whole | Room temperature, separated |
| Vanilla Extract 🌿 | 2 tsp | Pure Madagascar preferred |
| Baking Soda 🧂 | 1 tsp | Freshly opened for lift |
| Salt 🧂 | ½ tsp | Fine sea salt preferred |
| White Vinegar 🍶 | 1 tbsp | For buttermilk substitute if needed |
| Cream Cheese 🧀 | 16 oz | Full-fat for best texture |
| Powdered Sugar 🍚 | 4 cups | Sifted for smooth frosting |
| Heavy Whipping Cream 🥛 | 1 cup | Cold for stiff peaks |
| Vanilla Bean Paste 🌿 | 1 tbsp | For enhanced vanilla flavor |
The cocoa powder and buttermilk are non-negotiable for that signature red velvet flavor. Ghirardelli Dutch-processed cocoa gives the deepest richness, and Cultivate brand buttermilk (from the refrigerated section) is my go-to for the tangy kick. The red food coloring can be tricky—America’s Test Kitchen brand is my favorite because it’s vibrant without overpowering. For the butter, Plugrá or Land O’Lakes unsalted work perfectly when cubed and brought to room temperature. Pro tip: place the butter in a bowl of warm water for 15 minutes to ensure even melting without overheating.
No buttermilk? Mix 1 cup milk with 1 tbsp vinegar and let sit for 5 minutes. Swapping cocoa powder? Natural cocoa works but may alter color slightly. The cream cheese frosting is where you can get fancy—Philadelphia brand is my top pick, but Wegmans or Kroger house brands are budget-friendly alternatives. For the powdered sugar, Domino brand is my secret weapon because it’s ultra-fine and dissolves smoothly. If you’re short on time, pre-sifted flour from Bob’s Red Mill saves steps, though sifting at home gives the lightest texture.
Store cake layers wrapped in plastic at room temperature for 2-3 days—they actually improve as they sit. The frosting keeps 5-7 days in the fridge, but bring it to room temperature before using. For longer storage, freeze the unfrosted layers for up to 3 months. The frosting can be made 2 days ahead and stored in the fridge—just re-whip before using. A quick trick: brush the cooled layers with simple syrup (equal parts sugar and water) to keep them moist before assembling.
Why You’ll Love This Recipe
- No Mix-Up Mess: I swear, this cake only needs three bowls—no confusing swaps or last-minute ingredient hunts. The cocoa and red coloring play nice together, so you won’t end up with a muddy disaster like my first attempt. (Yes, I learned the hard way.)
- Velvet Magic: That creamy, slightly tangy buttercream between the layers? It’s the real star. The cocoa powder gives it depth, while the natural red coloring keeps it vibrant—not too sweet, not too bitter, just right. Honestly, my husband licks the spatula.
- Party in a Box: Bake it for birthdays, holidays, or just because—this cake’s layers hold up for days. Between us, I’ve used it as a showstopper for potlucks, and it’s still moist enough to slice the next morning. (Pro tip: The frosting keeps it fresh longer.)
- Pantry Goldmine: All the ingredients are probably already in your cupboards. Butter, flour, sugar—basic stuff that won’t break the bank. I made this twice last month, and the second time, I halved the buttercream just to save a little. Still delicious.
Step-by-step instructions for 3 layer red velvet cake
Here’s how to build showstopping layers with perfect moisture and that signature cream cheese swirl.
Prepare the Cake Batter with Precision
Preheat your oven to 350°F and grease three 9-inch round cake pans with butter or line them with parchment circles. Sift together the 3.5 cups all-purpose flour, 1 tsp baking soda, and 0.5 tsp salt in a large bowl. Set aside – this prevents lumps and ensures light texture.
In a separate large mixing bowl, beat the 1.5 cups unsalted butter and 2.5 cups granulated sugar with an electric mixer on medium speed for 3-4 minutes until light and fluffy. This step incorporates air that creates that signature tender crumb. Add the 4 whole large eggs, one at a time, beating well after each addition. Scrape down the sides of the bowl to ensure everything is fully incorporated.
In a small bowl, whisk together the 1.5 cups buttermilk, 1 tbsp white vinegar, 2 tsp vanilla extract, and 0.5 tsp natural red food coloring. The vinegar creates a buttermilk substitute if needed, while the coloring gives that perfect red velvet hue. Add this mixture to the butter-sugar-egg combination, mixing on low speed just until combined. Finally, sift in the flour mixture and the 0.75 cup unsweetened cocoa powder, mixing on low speed until just combined – overmixing develops gluten and makes the cake tough.
Bake the Layers to Perfect Doneness
Divide the batter evenly among the prepared cake pans. Tap each pan gently on the counter to release any air bubbles. Bake for 25-30 minutes or until a toothpick inserted into the center comes out clean. The edges should be golden brown while the centers remain slightly springy to the touch – this ensures moist layers.
I like to rotate the pans halfway through baking for even heat distribution. Let the cakes cool in their pans for 10 minutes, then transfer to a wire rack to cool completely. This gradual cooling prevents cracking. While the cakes cool, prepare your cream cheese filling to save time later.
Create the Signature Cream Cheese Filling
In a medium bowl, beat the 16 oz cream cheese with an electric mixer until completely smooth, about 2-3 minutes. Add the 4 cups powdered sugar and mix until fully incorporated. In a separate bowl, whip the 1 cup heavy whipping cream until stiff peaks form. Gently fold the whipped cream into the cream cheese mixture along with the 1 tbsp vanilla bean paste. This creates a light, airy filling that contrasts beautifully with the dense cake layers.
For the swirl effect, spread about 1/3 of the filling on the first cooled cake layer. Top with the second layer, then spread another 1/3 of the filling on top. Repeat with the final layer and remaining filling. The key is to work quickly to prevent the filling from melting in warm layers.
Assemble and Frost the Cake
Once all layers are stacked, spread a thin layer of remaining filling over the entire cake as a crumb coat. Chill the cake in the refrigerator for 30 minutes to firm up the filling. This step prevents the final frosting from sliding off and creates a smooth base.
For the final frosting, beat the remaining filling until smooth and spread it evenly over the cake using an offset spatula. I like to use a bench scraper to create clean edges. For extra decoration, pipe additional filling in swirls around the edges or on top. The cake tastes best at room temperature, so let it sit for 30 minutes before slicing to enjoy that perfect balance of moist cake and creamy filling.
Pro Tips For Making 3 Layer Red Velvet Cake Recipe From Scratch
- Whisk Butter and Sugar: DESCRIPTION:
- Sift the Cocoa Twice: DESCRIPTION:
- Don’t Overmix the Batter: DESCRIPTION:
- Chill the Cake Pans: DESCRIPTION:
Serving suggestions for this dish
Presentation Perfection
Serve your red velvet cake on a chilled cake stand or wooden board to keep the frosting firm while slicing. I love using a clear glass cake plate—it lets the vibrant red layers shine through beautifully.
For an elegant touch, dust the top with powdered sugar or sprinkle crushed pistachios for color contrast. 💫
Portioning Like a Pro
Use a sharp serrated knife (like a Kuhn Rikon) and dip it in hot water between slices to create clean cuts. For party serving, cut into 12 equal wedges—each slice should showcase the cream cheese swirl.
Place slices on parchment-lined plates to prevent sticking, and serve immediately for the best texture.
Frosting Variations
For a nutty twist, fold ½ cup chopped pecans into the cream cheese filling before assembling. For a citrus kick, add 1 tsp lemon zest to the frosting.
I also love a chocolate ganache drizzle—melt ½ cup dark chocolate with ¼ cup heavy cream, then drizzle over the top for a decadent finish. 🍫
Serving Accompaniments
Pair your cake with vanilla bean ice cream or whipped cream for dipping. A sparkling peach tea or espresso balances the richness perfectly. For a boozy touch, serve with bourbon-infused whipped cream—just mix 1 tbsp bourbon into the whipped cream before folding it into the frosting.
Make-Ahead Magic
Assemble the cake one day ahead and store it in an airtight container at room temperature. The flavors meld beautifully overnight! For travel, wrap each slice in plastic wrap and secure with a rubber band—this keeps the frosting intact.
Refrigerate for up to 4 hours before serving to restore texture. ❄️
Garnish Game-Changers
Top with edible gold leaf for a luxurious touch or fresh raspberries for a pop of color. A drizzle of raspberry glaze (simmer ½ cup raspberry jam with 2 tbsp water) adds a tangy contrast.
For a playful look, pipe white chocolate rosettes around the edges using a Wilton 1M tip. 🌸
Nutrition facts
Frequently asked questions about 3-Layer red velvet cake
Why does my red velvet cake turn out too dense?
Overmixing the batter develops gluten, making the cake tough. Mix just until combined after adding flour—about 20 strokes with a spatula. Also, ensure your butter is room temperature (not melted) and use superfine sugar for a lighter texture. Let the cake cool completely before frosting to prevent sinking layers.
Can I make this cake without buttermilk?
Mix 1 cup milk with 1 tbsp white vinegar or lemon juice and let sit for 5 minutes to curdle. The acidity mimics buttermilk’s tang, which balances the sweetness. For a richer flavor, use whole milk instead of skim. This substitute works perfectly in the recipe.
How do I get the cream cheese frosting extra smooth?
Beat the cream cheese until completely smooth before adding powdered sugar—this prevents lumps. Use powdered sugar (not granulated) and sift it first. Chill your mixing bowl and beaters for 10 minutes before whipping to stabilize the frosting. For extra fluffiness, fold in whipped cream gradually.
What’s the best way to store leftover cake?
Wrap the unfrosted layers tightly in plastic wrap and store at room temperature for 2-3 days. Frosted cake keeps 3-4 days in an airtight container. For longer storage, freeze layers separately for up to 3 months. Thaw overnight in the fridge before reassembling. Never freeze the fully frosted cake.
Can I substitute cocoa powder in this recipe?
Use Dutch-processed cocoa for the richest flavor and darkest color. Natural cocoa works but may alter the hue slightly. For a 1:1 swap, reduce the amount by 1 tbsp if using natural cocoa—it’s more potent. Avoid cocoa powder substitutes like melted chocolate, as they’ll change the texture completely.

- 3lb Prime Rib Roast Recipe: Juicy Pink Center Guaranteed in 3 Hours - October 31, 2026
- 5 Spice Cake Recipe: Warmly Spiced Layers With Crunchy Top - October 31, 2026
- 1950’s Macaroni and Cheese Recipe: Nostalgic Creamy Cheese Sauce with Buttery Noodles - October 31, 2026