
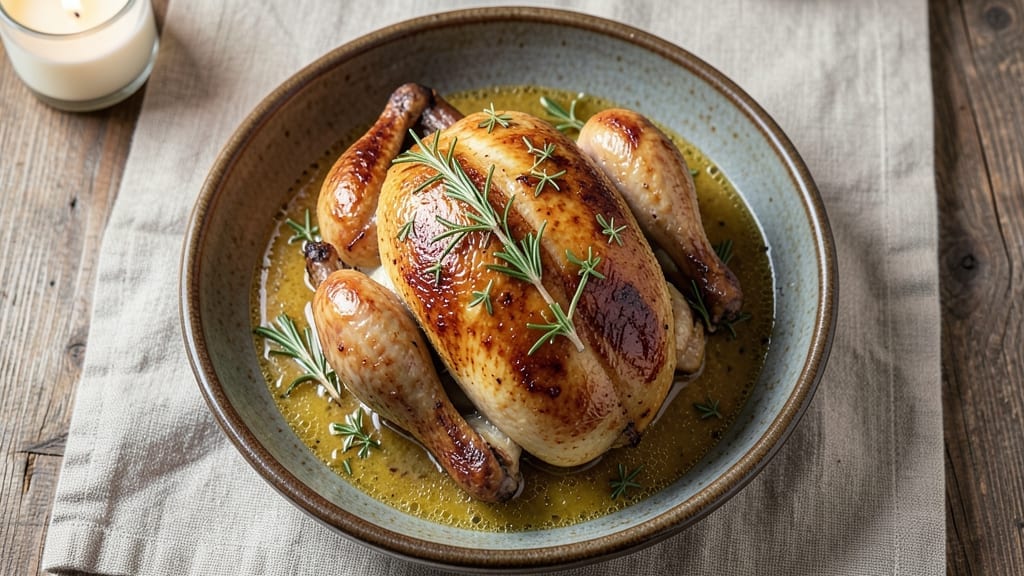
A 3 lb roast chicken recipe that delivers perfectly juicy meat and crispy golden skin without a single dry bite is the holy grail of home cooking—one I perfected after years of trial and error.
The secret lies in a precise technique that balances moisture and heat, ensuring every slice stays tender while the skin achieves that coveted restaurant-quality crunch. This isn’t just another roast chicken; it’s a method that transforms a simple bird into a showstopping centerpiece with minimal effort.
The foundation starts with a dry brine (salt the chicken overnight) that locks in flavor and moisture, followed by a high-heat roast that crisps the skin before the internal temperature reaches the safe zone.
I use a simple seasoning of salt, pepper, and butter under the skin for extra richness, but the real magic happens in the timing—45 minutes at 425°F for maximum crispiness, then a gentle finish at 375°F to cook through.
No basting required; this method guarantees results every time, even for beginners.
What you’ll end up with is a chicken that’s juicy from edge to edge, with skin so crisp it shatters like glass and meat that falls apart at the bone. The aroma alone will have everyone gathering at the table, and the first bite proves it’s worth the wait.
This isn’t just dinner—it’s a meal that feels like a celebration, no matter the occasion.
Serve with classic sides like roasted potatoes or a fresh salad to let the chicken shine, or use the leftovers for sandwiches and soups. The technique scales perfectly for larger birds too, making it your go-to for holidays or family dinners.
Let’s get started—your crispy, juicy roast chicken is just one oven rack away.
Ingredients for 3 lb roast chicken
These core ingredients transform a simple chicken into a restaurant-worthy centerpiece with crispy skin and juicy meat.
| Ingredient | Amount | Notes |
|---|---|---|
| Whole Chicken 🍗 | 3 lb | Fresh, preferably organic, giblets removed |
| Kosher Salt 🧂 | 1 ½ tbsp | Diamond Crystal preferred for precise measurement |
| Freshly Ground Black Pepper 🌶️ | 1 tsp | Coarsely ground for texture |
| Unsalted Butter 🧈 | ½ cup | Cold, cut into 1-inch pieces |
| Fresh Rosemary 🌿 | 1 tbsp | Chopped sprigs, not dried |
| Fresh Thyme 🌿 | 1 tbsp | Leaves only, stems removed |
| Garlic Cloves 🧄 | 4 cloves | Peeled, smashed lightly |
| Extra-Virgin Olive Oil 🫒 | 1 tbsp | For drizzling under skin |
| Lemon Juice 🍋 | 1 tbsp | Freshly squeezed |
| Fresh Parsley 🌿 | ¼ cup | Chopped, for garnish |
| Water 💧 | 1 cup | For dry brine solution |
The chicken is non-negotiable—look for a 3 lb bird with good marbling and vibrant color. Local butchers often carry higher-quality birds than grocery stores, but Whole Foods or Costco are solid options if you’re shopping conventionally. Avoid birds with yellowish skin or overly strong odors. For the salt, Diamond Crystal kosher salt dissolves more easily than table salt, which is crucial for even seasoning. The butter should be cold when you use it—pull it from the fridge 30 minutes before prepping. Fresh herbs make all the difference here: Trader Joe’s sells pre-chopped rosemary and thyme if you’re short on time, but fresh is always better.
No kosher salt? Substitute fine sea salt at a 1:1 ratio, but taste as you go—sea salt can vary in intensity. Running out of fresh herbs? Dried works at one-third the amount, but the texture won’t be as vibrant. The olive oil is optional but recommended—it adds richness under the skin. If you’re avoiding oil, just skip it. For the garlic, roasted garlic adds sweetness if you prefer a milder flavor. The lemon juice can be swapped for apple cider vinegar in a pinch, though it’ll have a slightly different tang. And if you’re prepping ahead, the herbs can be chopped the night before and stored in airtight containers.
The chicken needs 24 hours of dry brine time—plan accordingly. Store the raw chicken in its original packaging in the fridge, covered loosely with plastic wrap. The herbs and garlic can be prepped a day ahead and kept in the fridge for up to 3 days. Once roasted, the chicken reheats beautifully—cover with foil and warm at 325°F for 20 minutes. Leftovers keep for 3-4 days in the fridge and freeze for 3 months. For maximum crispiness, serve immediately after roasting—skin loses its crunch as it cools. The drippings make an excellent pan sauce—just deglaze with a splash of water and reduce by half.
Why You’ll Love This Recipe
- Foolproof Timing: I swear by this 3-lb roast—just 1.5 hours in the oven, and you’re done. No brining, no fussing with herbs in a bag; just salt, pepper, and butter rubbed right on the skin. That’s it. The chicken practically cooks itself while you sip wine and pretend you’re not waiting for dinner.
- Rosemary-Butter Magic: Honestly, the flavor is what makes this recipe my secret weapon. That crispy, golden skin? All thanks to the butter basting while it roasts. And the rosemary? It infuses just enough to make every bite taste like you slaved over it—even though you didn’t.
- Leftovers for Days: Between us, this chicken is that good that you’ll have leftovers before you even finish eating. Shred it for sandwiches, toss it into salads, or reheat slices for breakfast. I’ve turned cold cuts into a full meal just because I couldn’t resist.
- Budget-Friendly Crowd-Pleaser: A 3-lb chicken feeds four easily, and the ingredients cost less than takeout. No fancy cuts, no specialty items—just a whole bird, a stick of butter, and a sprig of rosemary. It’s the kind of meal that makes you feel like you’re treating people without breaking the bank.
Step-by-step instructions for juicy roast chicken
This method guarantees crispy skin and succulent meat every time—no dryness, no guesswork.
Dry Brine the Chicken for Maximum Flavor and Juiciness
Remove the whole chicken from its packaging and place it breast-side up in a large bowl. Dissolve the 1.5 tbsp kosher salt in the 1 cup water to create a dry brine solution. This step is crucial—it seasons deeply and helps retain moisture during cooking. Gently pour the saltwater mixture over the chicken, making sure it coats all surfaces, including the cavity. Let the chicken sit uncovered in the refrigerator for 12 to 24 hours—this allows the salt to penetrate evenly and the skin to dry slightly, which is key for crispiness.
Here’s the thing—don’t skip this step. Many home cooks overlook dry brining, and it makes a world of difference in texture and flavor. After brining, pat the chicken completely dry with paper towels, inside and out. You want the skin to be bone-dry before roasting, which ensures that golden, crackling crust we’re after.
Prepare the Herb Butter and Season the Chicken
In a small bowl, combine the 0.5 cup cold unsalted butter, 1 tbsp chopped fresh rosemary, 1 tbsp fresh thyme, 4 smashed garlic cloves, and 1 tsp freshly ground black pepper. Mix until the herbs are evenly distributed throughout the butter. This herb butter will infuse the chicken with incredible flavor while also promoting that perfect golden-brown skin. Keep this mixture cold until ready to use.
Next, season the chicken generously with the remaining 1 tbsp kosher salt and 1 tsp freshly ground black pepper, focusing on the skin. Use your fingers to press the seasoning into the meat, especially on the breast and thighs. This ensures even flavor distribution. Now, carefully loosen the skin over the breast and thighs by gently sliding your fingers between the skin and meat. This creates a pocket where we’ll tuck the herb butter later.
Roast the Chicken at High Heat for Crispy Skin
Preheat your oven to 425°F—this high temperature is essential for achieving that crispy skin. Place the whole chicken breast-side up on a rack set inside a rimmed baking sheet. The rack allows hot air to circulate underneath, preventing soggy skin. Pour the 1 tbsp lemon juice into the cavity and stuff it with the remaining 0.25 cup chopped fresh parsley. This brightens the flavor and adds a beautiful presentation touch.
Now, spread the herb butter mixture evenly under the loosened skin, pressing it gently into the meat. Drizzle the 1 tbsp extra-virgin olive oil over the skin, then rub it in with your hands. This oil helps create that perfect crust. Roast the chicken for 60 minutes, then reduce the oven temperature to 350°F and continue roasting for another 20 to 30 minutes, or until the internal temperature reaches 165°F when measured in the thickest part of the thigh.
Rest and Serve for Perfect Juiciness
Once the chicken reaches 165°F, remove it from the oven and transfer it to a cutting board. Tent loosely with aluminum foil and let it rest for 15 to 20 minutes before carving. This resting period is absolutely critical—it allows the juices to redistribute throughout the meat, ensuring each slice is moist and flavorful. If you skip this step, you’ll end up with dry chicken, and that’s something we’re definitely avoiding.
After resting, carve the chicken into serving pieces, discarding the skin if desired. The meat should be tender enough to pull apart easily with a fork, with no pink remaining in the thickest parts. Serve immediately with pan juices spooned over the top, and garnish with additional fresh parsley if you like. The result should be a perfectly juicy, golden-skinned roast chicken that’s worthy of any dinner table.
Pro Tips For Making 3 Lb Roast Chicken
- Pat the Chicken Dry: This isn’t just about looks—wet skin steams instead of crisps. Grab paper towels and really work the surface, especially under the wings and around the neck cavity. I used to skip this, and my butter would just melt into a sad, greasy mess instead of forming that golden, shatterable crust.
- Start High, End Low: Roast the chicken at 425°F for the first 20 minutes to kickstart the browning, then drop to 375°F. After burning three batches trying to “save time” by low-and-slowing from the start, I learned: high heat first = better flavor, not faster cooking. The internal temp will still hit 165°F—just more efficiently.
- Salt the Butter: Toss that unsalted butter with at least ½ teaspoon of kosher salt before rubbing it under the skin. I was skeptical until I tried it—now it’s non-negotiable. The salt dissolves into the fat as it melts, seasoning the meat from the inside out. (Yes, even if you’re using salted butter elsewhere, this isn’t the place to skimp.)
- Skip the Rosemary Sprigs: Whole sprigs burn before they infuse. Instead, finely chop 2-3 stems and mix them into the softened butter before spreading it under the skin. This isn’t the prettiest method, but it’s the tastiest—no bitter, charred stems to pick out. (Your future self will thank you when you’re not fishing for herbs mid-bite.)
Flavor customization for this 3 lb roast chicken
Herb-Forward Variations
Swap the rosemary and thyme for 1 tbsp each of fresh sage and marjoram for a more Mediterranean vibe. The sage adds earthy depth, while marjoram brings a citrusy brightness that pairs beautifully with the lemon juice.
I find this combo especially great for holiday meals—just increase the roasting time by 10 minutes to let the flavors meld. 🌿
Spicy Kick Options
For heat lovers, add ½ tsp smoked paprika and ¼ tsp cayenne pepper to the herb butter, or stuff the cavity with 2-3 sliced jalapeños and 1 tsp chipotle powder.
The smoky heat from the paprika and chipotle complements the crispy skin perfectly. Serve with cooling sides like avocado slices or a creamy cilantro-lime dip to balance the heat.
Citrus Infusions
Boost brightness by adding 1 tbsp grated orange zest to the herb butter or drizzling 2 tbsp fresh orange juice over the skin before roasting. The citrus oils caramelize beautifully, creating a golden-brown crust with a subtle tang.
I especially love this variation for spring dinners—it feels fresh and celebratory without overpowering the chicken’s natural flavor.
Garlic Lover’s Upgrade
Double the garlic to 8 cloves and roast them whole with the chicken for 30 minutes before removing. The concentrated garlic flavor becomes rich and mellow, perfect for spreading on crusty bread.
For extra drama, add 1 tsp garlic powder to the seasoning mix on the skin. This version is a crowd-pleaser at game day gatherings—just be prepared for requests to make it again!
Sweet and Savory Balance
Add 1 tbsp honey or maple syrup to the herb butter for a sweet-savory twist. The caramelization enhances the skin’s crispiness while adding a subtle depth. I recommend using local wildflower honey for a floral note that pairs wonderfully with the herbs.
This variation works especially well with apple or pear sides for a cozy fall menu.
Global Flavor Twists
For a French-inspired touch, replace half the butter with ¼ cup duck fat (rendered and chilled) and add 1 tsp dried tarragon1 tbsp soy sauce and 1 tsp grated ginger** before roasting—this adds umami and warmth that complements the crispy texture beautifully.
Nutrition facts
Frequently asked questions
Can I use a frozen 3 lb chicken for this recipe?
Fresh is ideal, but if you must use frozen, thaw it completely in the refrigerator (about 24 hours for a 3 lb bird). Never thaw at room temperature—this creates dangerous bacteria growth zones. Pat the skin completely dry after thawing to ensure crispiness, just like with fresh chicken. The dry brine will still work, but expect slightly longer roasting time (about 10-15 minutes extra).
What’s the best way to check if the chicken is fully cooked?
Use a meat thermometer to check the thickest part of the thigh—it should read 165°F. The breast will naturally cook faster, so focus on the thigh. If you don’t have a thermometer, cut into the thickest part of the thigh: the juices should run clear, not pink. The leg should also move freely at the joint when lifted. Never rely on color alone—some chicken can appear cooked but still be underdone.
Why did my chicken skin turn pale instead of golden?
This usually happens when the skin isn’t dry enough before roasting or the oven temperature fluctuates. Make sure to pat the chicken completely dry after brining and use a rack in your pan for proper air circulation. Also, avoid opening the oven door during the first 45 minutes of cooking—temperature drops cause steam buildup that prevents browning. If your oven runs hot/cold, consider using an oven thermometer to verify the actual temperature.
How much time should I plan for this recipe?
Plan for about 3 hours total: 12-24 hours for dry brining, 1 hour for prep (including herb butter and seasoning), and 1.5-2 hours for roasting plus resting. The brining can be done the night before, and you can prep the herb butter up to 2 days ahead and store it in the fridge. This makes it perfect for holiday meals where you want to spend minimal time in the kitchen on the actual cooking day.
Can I make this recipe in a convection oven?
Yes, but reduce the temperature by 25°F (so 375°F instead of 425°F initially) and check for doneness 10-15 minutes earlier than the instructions. Convection ovens circulate air more efficiently, which can dry out the skin faster. If you notice the skin browning too quickly, tent the chicken loosely with foil after the first 30 minutes to prevent over-browning while the meat finishes cooking.

- 6 Egg Cake Recipe with Oil: Light as Air With Buttery Moisture - October 4, 2026
- 4 Bean Casserole Recipe: One-Pan Heartiness With Smoky Paprika Depth - October 4, 2026
- 3-Ingredient Keto Mug Cake Recipe: Microwave Magic in 2 Minutes - October 4, 2026