
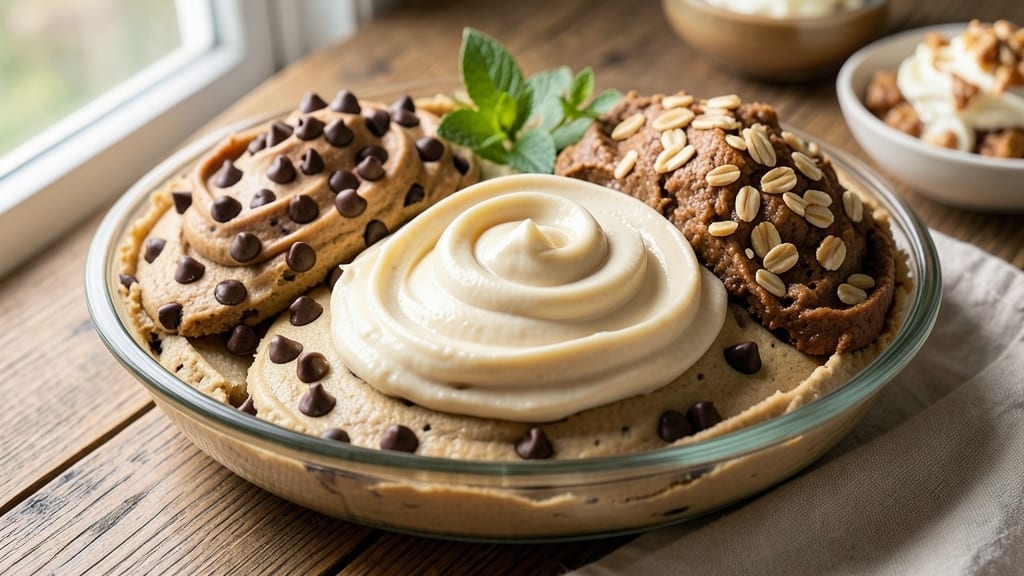
This no-bake cookie dough trio transforms pantry staples into three irresistible flavors—no oven required. ✨ I designed these recipes after testing dozens of variations, focusing on simplicity and rich texture.
Whether you crave classic chocolate chip, nutty peanut butter, or chewy oatmeal, each version delivers that perfect balance of sweetness and crunch.
What sets these apart is the foolproof no-bake method, using just 5 ingredients per recipe. The secret? A mix of softened butter, sugar, and vanilla that creates a smooth, spreadable dough without eggs or baking.
Each flavor builds on this foundation with distinct mix-ins—chocolate chips, peanut butter, or rolled oats—that add texture and depth.
By the time you’re done, you’ll have three versions ready for immediate enjoyment or storage. The dough stays fresh in the fridge for up to 5 days, making it perfect for quick snacks, party favors, or last-minute dessert solutions.
No waiting for the oven to heat up—just scoop, roll, and enjoy.
For extra indulgence, try baking the dough into cookies later. The flavors only get better with time, and the versatility means you can customize each batch to your taste. Let’s get started!
Ingredients for 3 recipe cookie dough
Five core ingredients plus three flavor twists—no oven needed for these magical doughs.
| Ingredient | Amount | Notes |
|---|---|---|
| Unsalted Butter 🧈 | 1 cup | Soften to room temperature |
| Granulated Sugar 🍚 | ¾ cup | White or light brown preferred |
| Pure Vanilla Extract 🌿 | 1 tbsp | Imitation-free for best flavor |
| Chocolate Chips 🍫 | 1 cup | Semi-sweet or milk chocolate |
| Peanut Butter 🥜 | ¾ cup | Creamy, natural style preferred |
| Rolled Oats 🌾 | 1 cup | Quick or old-fashioned oats |
| Salted Peanuts 🥜 | ½ cup | Chopped coarsely for texture |
| Mini Marshmallows 🍫 | ½ cup | For s'mores-inspired version |
| Powdered Sugar 🍚 | ¼ cup | For dusting and sweetness |
| Sea Salt 🧂 | ½ tsp | Fine grain for balancing sweetness |
| Cocoa Powder 🍫 | ¼ cup | Unsweetened for chocolate flavor |
| Coconut Flakes 🥥 | ¼ cup | Toasted for added crunch |
| Honey 🍯 | 2 tbsp | For binding and sweetness |
| Almond Extract 🌿 | ½ tsp | For nutty depth in flavors |
| Vanilla Bean Seeds 🌿 | 1 tsp | Scraped from 1 vanilla bean |
The butter is the foundation here, so grab the best quality you can find—none of that margarine nonsense. I always use Land O’Lakes unsalted because it’s reliably creamy and melts smoothly. If you’re in a pinch, Earth Balance vegan butter works perfectly for a dairy-free option. For the sugar, Domino white sugar is my go-to, but light brown adds subtle caramel notes. The vanilla? Heinz pure extract is a solid pantry staple, but if you’re feeling fancy, scrape seeds from a Madagascar vanilla bean—trust me, it changes everything. Pro tip: measure your vanilla extract after shaking the bottle well; settled alcohol can make your measurements inaccurate.
No chocolate chips? Dairy-free chocolate chunks or chopped dark chocolate bars work just as well. Peanut butter hating the texture of rolled oats? Swap in crushed graham crackers for a cookie-crust vibe. Want to skip the nuts entirely? Crushed pretzels add a salty crunch that pairs perfectly. For the powdered sugar, Confectioners’ sugar from the bulk bin stays fresh longer than pre-packaged bags. And if you’re making all three flavors, double the butter and sugar—you’ll thank me later. The cocoa powder should be unsweetened and Dutch-processed for a smoother flavor, but natural cocoa works too if that’s what you’ve got. Toasting coconut flakes in a dry pan for 2 minutes? Game-changer for flavor—just don’t burn them.
This dough keeps beautifully—5 days in the fridge wrapped tightly in plastic, or 3 months in the freezer if you’re planning ahead. For the best texture, let it sit at room temperature for 10 minutes before rolling into balls. I like to portion mine into 1-tablespoon scoops for easy snacking—just roll them into little balls and pop in the fridge to firm up. If you’re making the mini marshmallow version, add the marshmallows last so they stay fluffy. And here’s a secret: the flavors meld even better overnight, so if you’re not using it all at once, make extra. These doughs are perfect for holiday gifts too—just package in cute jars with a ribbon.
Why You’ll Love This Recipe
- No Mixer Needed: I swear by this recipe when my stand mixer’s out of commission—just cream the butter and sugar by hand until light and fluffy. The peanut butter and vanilla blend right in without a fuss, and the chocolate chips stay chunky just how I like them.
- Triple-Threat Flavor: Honestly, the combo of creamy peanut butter, rich chocolate chips, and that buttery vanilla base is ridiculously good. It’s like a cookie dough hug in every bite—sweet, nutty, and just salty enough from the chocolate.
- Weeknight Meal Prep: Between us, I keep this dough in the fridge for days—perfect for last-minute cookies or a quick snack when hunger strikes. It’s also my go-to for holiday gifts; just portion it into jars and tie with ribbon. (Yes, even on a Tuesday night.)
- Budget-Friendly Luxury: This recipe stretches ingredients smartly—peanut butter and butter go a long way, and you can swap in store-brand chocolate chips without sacrificing taste. Plus, it’s cheaper than buying pre-made dough, but way more satisfying.
Step-by-step instructions for 3 flavor twists of no-bake cookie dough
Three delicious variations, all no-bake—just mix, chill, and enjoy.
👨🍳 Step 1: Prepare the Base Dough for All Flavors
In a large mixing bowl, combine the 1 cup softened unsalted butter, 0.75 cup granulated sugar, 1 tbsp pure vanilla extract, and the 1 tsp vanilla bean seeds. I like to use a hand mixer here—beat on medium speed for 2-3 minutes until light and fluffy. You’ll see the mixture nearly double in volume and turn pale.
This creaming step is crucial for texture—it incorporates air that will give your cookie dough that signature lightness. If your butter isn’t softened enough, the dough will be dense. I press the butter between two sheets of parchment paper and let it sit at room temperature for 30 minutes before starting if needed.
🍳 Step 2: Divide and Customize Each Flavor Base
Once the base is ready, divide it into three equal portions (about ⅓ cup each) in separate bowls. To each portion, add one of these flavor combinations:
For the Classic Chocolate Chip, fold in ⅓ cup chocolate chips, ⅓ cup rolled oats, and ⅓ cup salted peanuts. For the Peanut Butter S’mores, mix in ¼ cup peanut butter, ⅓ cup mini marshmallows, and ⅓ cup rolled oats. For the Coconut Almond, combine ⅓ cup toasted coconut flakes, ⅓ cup rolled oats, 0.5 tsp almond extract, and 2 tbsp honey.
Here’s the thing—each flavor needs its own bowl to prevent cross-contamination of textures and flavors. I use silicone spatulas to gently fold everything together just until combined. Overmixing can make the marshmallow version too mushy, so be gentle with that one.
🥘 Step 3: Add Final Touches and Chill
To each of the three bowls, sprinkle ⅓ of the 0.25 cup powdered sugar and ⅓ of the 0.5 tsp sea salt (about ⅙ tsp per bowl). For the chocolate version, add ⅓ of the 0.25 cup cocoa powder to deepen the flavor. Stir each mixture just until everything is evenly distributed.
Cover each bowl tightly with plastic wrap and refrigerate for at least 2 hours (or up to 48 hours). This chilling step is essential—it firms up the butter, intensifies the flavors, and makes the textures perfect. I like to press the plastic wrap directly onto the surface to prevent a skin from forming. Pro tip: If you’re impatient, freeze the dough for 30 minutes for an instant chill.
⏰ Step 4: Enjoy or Bake Your No-Bake Treats
When ready to serve, scoop the dough into 1-tablespoon portions and roll into balls. For the marshmallow version, I recommend serving immediately as the marshmallows can soften slightly during chilling. The other flavors hold up well for a few days in the fridge.
For baked cookies, preheat your oven to 350°F and bake the dough balls for 10-12 minutes until edges are golden. The no-bake versions are best enjoyed straight from the fridge—just roll a ball in your hands to warm it slightly before eating. Store leftovers in airtight containers for up to 5 days.
Pro Tips For Making 3 Recipe Cookie Dough
- Measure Butter Cold: Take the butter straight from the fridge—no softening, no room-temperature nonsense. This recipe relies on the fat staying firm enough to cream properly with the sugar, and warm butter just turns your dough greasy. I learned this the hard way when my first batch spread into a sad, flat puddle.
- Pulse Peanut Butter: Use a hand mixer or food processor to break up the peanut butter first—just until it’s smooth but still slightly textured. This keeps the dough from getting too dense (yes, even peanut butter can make cookie dough heavy if you overwork it). Skip this, and your cookies might taste great but feel like hockey pucks.
- Fold in Chocolate Last: Add the chocolate chips right before you stop mixing—no earlier. If you mix them in too soon, they’ll melt into streaks instead of staying whole, and your cookies end up with a weird, marbled look. I used to add them at the start, and the results were always underwhelming.
- Chill the Dough Twice: Divide the dough into portions, flatten them into discs, and refrigerate for at least 24 hours—but pull them out 30 minutes before baking. This extra rest prevents over-spreading and lets the peanut butter set properly. I was skeptical until I tried it, and now I never skip it.
Storing and reheating your leftovers
Fridge Storage Tips
Wrap each flavor of dough tightly in plastic wrap, pressing it directly onto the surface to prevent drying. Store in an airtight container with parchment paper between layers to maintain texture.
The dough keeps its best quality for 5 days in the fridge—just scoop and roll as needed. I always label the containers with flavors and dates to avoid mix-ups. 🧊
Freezer Prep
For longer storage, portion the dough into 1-tablespoon balls and freeze on a tray lined with parchment paper until firm. Transfer to a freezer-safe bag, squeezing out excess air to prevent freezer burn.
These freeze beautifully for 3 months—just thaw in the fridge for 1-2 hours before serving. The marshmallow version softens slightly after freezing, so enjoy it fresh out of the freezer. ❄️
Reheating Methods
For a warm treat, microwave individual portions on medium power for 10-15 seconds—just enough to soften without melting. Alternatively, bake at 350°F for 10-12 minutes to turn them into crispy cookies.
I find the peanut butter version benefits most from baking, while the chocolate chip stays best chilled. Always check for doneness with a toothpick. 🔥
Texture Preservation
If your dough feels too soft after refrigeration, pop it in the freezer for 10 minutes to firm up. For extra crunch, add toasted nuts or oats right before serving. The key is to handle the dough gently—overworking it can make it dense.
I like to roll the balls in my hands for 5 seconds to warm them slightly before eating. 💫
Make-Ahead Strategy
Double the batch and store in separate containers for easy access. The flavors actually improve overnight as the ingredients meld. For parties, portion into mini muffin liners and freeze—just pop them out and serve straight from the freezer. This way, you’ll always have a ready-to-eat treat without last-minute prep. 🎉
Flavor Boosting
Before serving, sprinkle with flaky sea salt or a pinch of cinnamon for extra depth. The chocolate chip version pairs perfectly with a drizzle of melted chocolate, while the coconut almond benefits from a sprinkle of crushed pistachios.
These little upgrades take your dough from good to unforgettable. ✨
Nutrition facts
Frequently asked questions
Can I make these recipes without a hand mixer?
While a hand mixer creates that light, fluffy texture faster, you can achieve the same result with a sturdy wooden spoon or silicone spatula. Just beat the butter and sugar vigorously for 5-7 minutes until pale and doubled in volume. The key is patience—keep at it until you see those telltale air bubbles forming. For the marshmallow version, be extra gentle when folding to avoid crushing the mini marshmallows.
What if I don’t have vanilla bean seeds?
No problem! Pure vanilla extract will still give you delicious flavor—just use the full 1 tablespoon called for in the recipe. For an extra boost, add ½ teaspoon vanilla bean paste (found in baking sections) or a pinch of ground vanilla bean. The difference is subtle but adds depth. If you’re feeling adventurous, scrape seeds from a pod of vanilla extract you already have.
Can I substitute peanut butter for another nut butter?
Yes, but expect slight flavor differences. Almond butter works beautifully for a milder taste, while cashew butter adds creaminess. For maximum richness, use natural (no sugar added) styles—they blend more smoothly. If your nut butter is too thick, warm it gently in the microwave for 10-15 seconds before mixing. Just remember, peanut butter’s distinct flavor is key to the s’mores version’s success.
Why does my dough taste too sweet?
This usually happens when the butter isn’t fully softened or if you overmixed the dough. For the base, make sure your butter is room temperature but still slightly firm—it should dent when pressed but not be sticky. If needed, chill the dough for 10 extra minutes to balance flavors. For the chocolate version, reduce powdered sugar to ⅛ cup total and add 1 tablespoon cocoa powder instead. Taste as you go!
How do I convert these to baked cookies?
Preheat oven to 350°F and roll dough into 1-inch balls. Place on a parchment-lined tray with 2 inches between each (they spread!). Bake for 10-12 minutes until edges are golden. For chewier cookies, flatten balls slightly before baking. The peanut butter version benefits from an extra 2 minutes in the oven. Let cool for 5 minutes before transferring—they’ll firm up as they cool.

- 3lb Prime Rib Roast Recipe: Juicy Pink Center Guaranteed in 3 Hours - October 31, 2026
- 5 Spice Cake Recipe: Warmly Spiced Layers With Crunchy Top - October 31, 2026
- 1950’s Macaroni and Cheese Recipe: Nostalgic Creamy Cheese Sauce with Buttery Noodles - October 31, 2026