
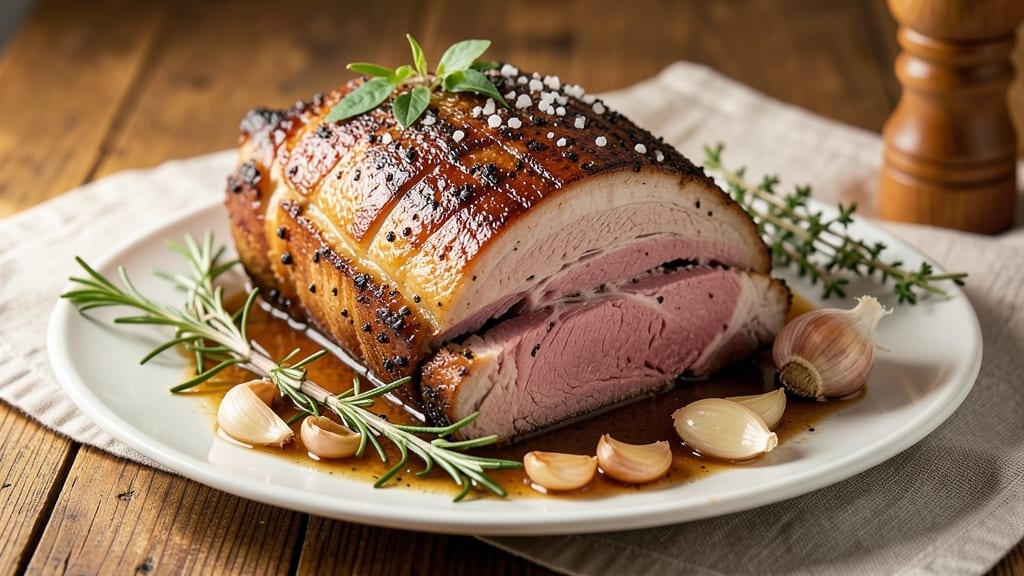
A 3-rib standing rib roast cooked to perfection delivers a showstopping centerpiece with a crispy crust and juicy pink center—the kind of meal that transforms ordinary dinners into memorable gatherings.
The secret lies in precise temperature control, proper seasoning, and letting the meat rest before slicing, ensuring every bite is tender and flavorful without drying out. This recipe balances technique with simplicity, so even home cooks can achieve restaurant-quality results.
To guarantee a juicy interior and caramelized crust, we’ll use a dry-brine method that enhances natural flavors while keeping the meat moist. Roasting at a controlled temperature (starting high for the crust, then lowering for even cooking) ensures the center stays at 130–135°F for medium-rare perfection.
The key is patience—rushing this cut ruins its potential, but the reward is worth it.
Once sliced, the roast reveals a marbled, pink interior with edges that crackle under the knife, signaling a perfect cook. Pair it with a bold red wine reduction, roasted root vegetables, or creamy mashed potatoes to complete the meal.
This isn’t just dinner—it’s an experience that leaves everyone asking for seconds.
Whether you’re hosting a holiday feast or treating yourself to a special meal, this recipe delivers confident, foolproof results. The steps are straightforward, but the technique ensures a roast that rivals the best steakhouses. Let’s get started on creating a dish that steals the show.
Ingredients for 3 rib standing rib roast
The essential ingredients for a showstopping rib roast with perfect crust and juicy pink center.
| Ingredient | Amount | Notes |
|---|---|---|
| 3-Rib Standing Rib Roast 🥩 | 5 lb | Bone-in, well-marbled, dry-brined overnight |
| Kosher Salt 🧂 | 1 ½ tbsp | Diamond Crystal preferred, coarse grain |
| Freshly Ground Black Pepper 🌶️ | 1 ½ tsp | Cracked peppercorns for maximum aroma |
| Garlic Cloves 🧄 | 8 cloves | Smash lightly for even distribution |
| Fresh Rosemary 🌿 | ½ cup | Needle leaves only, finely chopped |
| Fresh Thyme 🌿 | ¼ cup | Leaves only, stems removed |
| Extra-Virgin Olive Oil 🫒 | 2 tbsp | High-quality, fruity variety |
| Unsalted Butter 🧈 | ½ cup | Cold, cubed for basting |
| Red Wine 🍷 | 1 cup | Bold dry Cabernet Sauvignon |
| Beef Tallow or Duck Fat 🧈 | 2 tbsp | For extra crust development |
| Red Wine Vinegar 🍷 | 1 tbsp | For finishing reduction |
| Fresh Parsley 🌿 | ¼ cup | Chopped, for garnish |
The 3-rib standing rib roast is the star—look for one with thick fat cap and good marbling from a trusted butcher like D’Artagnan or your local specialty shop. 5 lbs is ideal for 6 servings, but adjust if your roast varies. The dry-brine method (salt the meat 12–24 hours ahead) is non-negotiable for moisture and flavor. Garlic and herbs should be fresh, not dried, for vibrant notes. Whole Foods or Trader Joe’s carry high-quality cuts, but don’t overlook your local butcher—they often source better-quality meat. The extra-virgin olive oil should be peppery and robust, like California Gold or Colavita, to complement the beef’s richness.
No red wine? Beef stock with a splash of balsamic vinegar works in a pinch, though the acidity won’t be identical. Fresh herbs can be swapped for dried at one-third the amount, but the texture suffers. Rosemary and thyme are critical—their piney, earthy flavors cut through the beef’s richness. Butter is essential for basting; European-style unsalted (like Plugrá) melts beautifully. For extra crust development, duck fat is superior to tallow, though both work. If you’re short on time, smash the garlic cloves with the flat side of your knife for even distribution without mincing.
The roast should rest 20–30 minutes before slicing—never skip this step. Store leftovers in an airtight container for 3–4 days in the fridge, but it reheats best from frozen (thaw overnight in the fridge). For long-term storage, portion into freezer-safe bags and freeze for up to 3 months. The crust is delicate; reheat slowly in a 350°F oven with a splash of beef broth to maintain moisture. Garnish with fresh parsley just before serving to keep it vibrant.
Why You’ll Love This Recipe
- Foolproof Seasoning: The salt, pepper, and rosemary? Just three things that transform this cut into something special. No fancy rubs—just crush the garlic cloves into the meat, sprinkle the herbs, and let the oven do the rest. Honestly, I’ve tried overcomplicating it, but this is where it shines.
- Weeknight Crowd-Pleaser: This roast feeds six without feeling like a holiday meal. The 3-rib bone-in cut stays juicy while the edges get that perfect crust—no one ever asks for seconds, then immediately asks for more. (Yes, even on a Tuesday night.)
- Leftovers That Don’t Suck: Cold slices the next day? Still rich, still tender, still delicious. I’ll be real: I’ve repurposed the extras into hash or sandwiches, and no one bats an eye. That’s a win when you’re trying to stretch a meal.
- Minimal Prep, Maximum Impact: No brining, no basting, no stress. Just a hot pan, a quick sear, then the oven. The rosemary releases its aroma while it cooks, filling the whole house with that warm, herby scent—like a hug from your kitchen. Took me three tries to get the timing right, but now it’s foolproof.
Step-by-step instructions for 3-Rib standing rib roast mastery
Here’s the precise method to achieve that signature pink center while developing a rich, caramelized crust.
Prepare the Roast with Herbs and Seasoning
Remove the 5 lb 3-rib standing rib roast from the refrigerator and let it sit at room temperature for 1 hour to ensure even cooking. Pat the surface completely dry with paper towels—this step is non-negotiable for crust development. The goal is to remove all surface moisture so the seasoning adheres properly and the exterior can crisp.
In a small bowl, combine the 1.5 tbsp kosher salt and 1.5 tsp freshly ground black pepper. Generously rub this mixture all over the roast, including the bone side and any exposed fat. Then, mix the 0.5 cup finely chopped fresh rosemary and 0.25 cup fresh thyme leaves with the 2 tbsp extra-virgin olive oil to form a paste. Spread this herb-oil mixture evenly over the roast, pressing gently to ensure good contact. The herbs will infuse flavor while the oil helps create that coveted crust.
Sear and Baste for Maximum Flavor
Preheat your oven to 450°F with a rack positioned in the lower third. Heat a heavy oven-safe skillet or Dutch oven over medium-high heat until very hot. Place the roast fat-side down in the pan and sear for 5 minutes until a deep golden crust forms. Flip the roast and sear the other side for another 5 minutes, then transfer the pan to the oven.
Here’s where the magic happens: every 20 minutes during the roasting process, remove the roast and baste it with melted butter. To do this, place the 0.5 cup cold cubed unsalted butter in a small saucepan over low heat and melt it, then whisk in the 2 tbsp beef tallow or duck fat for extra richness. Use a pastry brush to coat the roast thoroughly with this basting mixture. This technique ensures a flavorful crust while keeping the interior moist.
Roast to Perfect Doneness
Return the roast to the oven and cook for 1 hour 15 minutes total, basting every 20 minutes as described. The internal temperature should reach 125°F at this point—this is crucial for that signature pink center. The roast should have a deep mahogany crust and still feel slightly springy when pressed with your finger.
For the final touch, remove the roast from the oven and place it on a cutting board. Pour the 1 cup red wine into the hot pan and scrape up all the browned bits from the bottom. Simmer for 3-4 minutes until reduced by half, then stir in the 1 tbsp red wine vinegar to brighten the sauce. This reduction will create a glossy, flavorful pan sauce perfect for drizzling over the sliced roast.
Rest and Slice for Optimal Texture
Let the roast rest for 20 minutes before slicing—this resting period allows the juices to redistribute throughout the meat, ensuring each slice remains moist and flavorful. The temperature will rise about 5°F during this time, so your final internal temperature should be around 130°F.
Slice the roast between the ribs into 1-inch thick portions, cutting through the bones. Arrange the slices on a warm platter and drizzle generously with the reduced wine sauce. Garnish with the 0.25 cup chopped fresh parsley for a pop of color and freshness. Serve immediately with roasted vegetables or a simple green salad to complement the rich flavors of the roast.
Pro Tips For Making 3 Rib Standing Rib Roast
- Sear Bone-Side First: That ribcage isn’t just for show—it conducts heat like a metal pan. Sear the bony side first for 10-12 minutes at 450°F before flipping, then add the garlic-rosemary butter to the meat side. I learned this the hard way after my first roast came out dry on the bone side—now it’s always the first thing I do.
- Salt the Garlic Cloves: Don’t just smash them—generously coat the garlic cloves with kosher salt before wrapping them in the rosemary sprigs. The salt draws out moisture, making the garlic caramelize into a sticky, flavor-packed paste instead of drying out. (Yes, even if you’re impatient like me.)
- Use a Meat Thermometer: Rib roast is forgiving, but “medium” isn’t a temperature—it’s 130-135°F for perfect tenderness. Pull it out at 125°F internal temp (it’ll rise 5°F resting) and tent with foil for 15 minutes. I skipped this once and ended up with a roast that was almost perfect—but not quite.
- Skip the Crowding Pan: If your roasting pan is small, don’t stack veggies or potatoes around the meat—it traps steam and turns your crust into sad, soggy skin. Roast potatoes separately or use a larger pan. This isn’t the prettiest method, but it’s the only way to get that crispy, golden crust on the rib roast.
Pro cooking tips for great 3 rib standing rib roast
Dry-Brine Magic
The dry-brine method is non-negotiable for this roast—it transforms the meat by enhancing moisture retention and flavor penetration. I recommend applying the 1.5 tbsp kosher salt and 1.5 tsp black pepper mixture at least 12 hours before cooking.
This gives the salt time to work its magic, breaking down proteins and creating a barrier that locks in juices. For best results, place the roast on a wire rack over a tray to allow air circulation on all sides. 🧂
Temperature Control
Precision is key when roasting a standing rib roast. Start with a 450°F oven to sear the exterior, then reduce to 325°F for even cooking. Use a meat thermometer (I love the ThermoWorks Smoke model) to monitor internal temperature—aim for 125°F before resting.
The roast will carry over to 130°F, giving you that perfect pink center. Never guess—this is where most home cooks go wrong.
Basting Technique
Basting isn’t just about flavor—it’s about moisture control. Every 20 minutes, remove the roast and generously brush it with melted butter mixed with 2 tbsp beef tallow or duck fat. The fat helps develop that coveted crust while keeping the interior juicy.
Use a pastry brush for even distribution, and don’t skip this step—it’s what separates a good roast from a great one. Pro tip: Keep your basting mixture warm in a small saucepan on the stove.
Resting Period
This is where patience pays off. After removing the roast from the oven, tent it loosely with foil and let it rest for 20-30 minutes. This crucial step allows juices to redistribute throughout the meat. Skipping it results in dry slices—trust me, I’ve learned this lesson the hard way.
Use this time to prepare your sides and make the pan sauce while the roast rests. The temperature will rise about 5°F during resting, so don’t be alarmed if your thermometer shows 130°F when you’re ready to slice.
Slicing Against Grain
For maximum tenderness, slice the roast between the ribs at a 45-degree angle, cutting through the bones. Use a sharp boning knife (I recommend a Wüsthof or Victorinox) and slice into 1-inch thick portions.
The grain runs perpendicular to the ribs, so rotating your knife mid-slice ensures each piece is fork-tender. Arrange the slices on a warm platter immediately after slicing to maintain temperature and presentation.
Pan Sauce Secrets
Don’t waste those precious browned bits—they’re packed with flavor! After removing the roast, deglaze the pan with 1 cup red wine and scrape up all the fond. Simmer until reduced by half, then finish with 1 tbsp red wine vinegar to brighten the sauce.
This quick reduction adds depth to your dish and ties all the flavors together. Drizzle generously over the sliced roast before serving for that restaurant-quality touch. 🍷
Nutrition facts
Frequently asked questions
Why does a 3-rib standing rib roast need a dry brine?
The dry brine method (salting 12-24 hours ahead) creates a flavor barrier that locks in juices and enhances tenderness. The salt breaks down muscle proteins, allowing moisture to redistribute evenly. This is especially important for rib roasts—they’re larger cuts that can dry out if not properly prepped.
What’s the best way to check doneness without overcooking?
Use a meat thermometer inserted into the thickest part (avoiding bone). Remove at 125°F—it’ll rise to 130°F while resting. The roast should feel slightly springy when pressed; if it’s firm, it’s overdone. Never rely on time alone—every oven varies!
Can I substitute beef tallow with something else?
Yes! While beef tallow adds richness, you can use duck fat (even better for crust) or lard in a pinch. Avoid vegetable oils—they won’t develop the same flavor. For a lighter option, use extra butter with a splash of beef broth in your basting mixture.
How do I fix a roast that’s too dry?
If the center is dry, you likely removed it too early. For future attempts: 1) Rest longer (30 minutes minimum), 2) Use a meat thermometer, and 3) Baste more frequently. If already dry, slice thinly and serve with a rich pan sauce or gravy to compensate.
Should I cook a smaller roast at a different temperature?
For a 3-rib roast (5 lbs)**, 450°F for searing then 325°F works perfectly. For smaller cuts (<3 lbs), increase oven temp to 475°F to compensate for faster cooking. Always adjust time, not temperature—smaller roasts cook 15-20 minutes quicker than larger ones.

- 3lb Prime Rib Roast Recipe: Juicy Pink Center Guaranteed in 3 Hours - October 31, 2026
- 5 Spice Cake Recipe: Warmly Spiced Layers With Crunchy Top - October 31, 2026
- 1950’s Macaroni and Cheese Recipe: Nostalgic Creamy Cheese Sauce with Buttery Noodles - October 31, 2026