
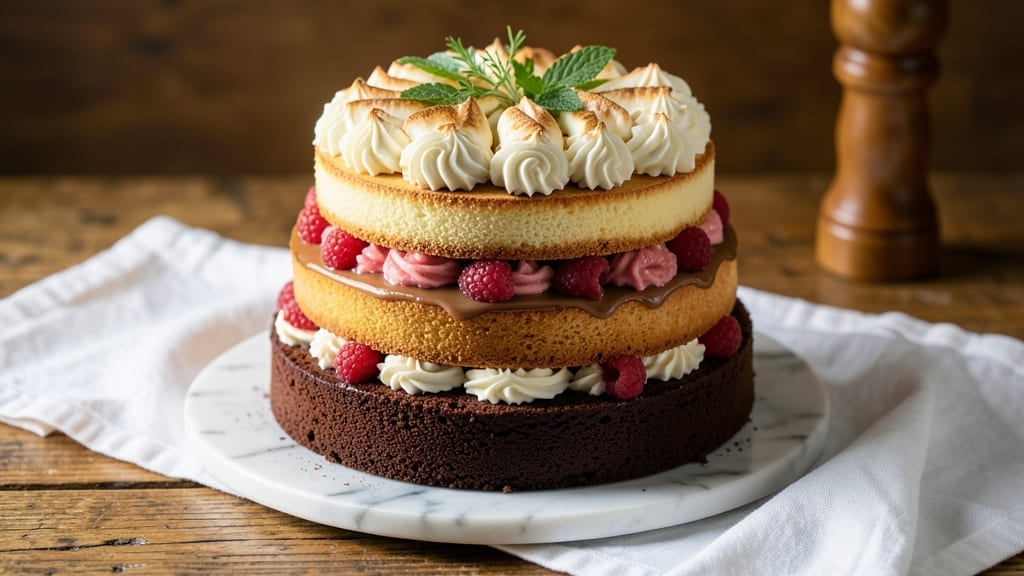
Creating a 3-tier cake recipe from scratch transforms any celebration into a showstopping centerpiece—no shortcuts, just pure homemade craftsmanship. 💛 The secret lies in baking precise layers, stabilizing the structure with dowels, and layering fillings that keep the cake light and airy for days.
I’ve perfected this technique over years of baking for weddings and birthdays, ensuring every slice delivers that perfect balance of tender crumb and rich frosting.
What sets this recipe apart is the foolproof layering method that prevents collapsing, even with three tiers. We’ll use a simple vanilla sponge cake base (light as a cloud) and build each layer with buttercream that’s thick enough to support the weight above.
The key? Chilling the cake between layers and using sturdy dowels for structural integrity—no more wobbly towers!
By the time you’re done, you’ll have a stunning three-tiered masterpiece with smooth sides, perfectly piped frosting, and a finish that rivals professional bakeries. Each layer stays moist, the fillings remain creamy, and the presentation is elegant enough for any occasion.
Whether it’s a wedding, anniversary, or just a special dessert night, this cake will be the star.
Ready to tackle this project? We’ll cover every detail—from baking the perfect layers to decorating with confidence. Let’s get started on your homemade stacked elegance.
Ingredients for 3 tier cake recipe from scratch
Twelve ingredients, three flawless tiers—this is your blueprint for showstopping homemade elegance.
| Ingredient | Amount | Notes |
|---|---|---|
| All-Purpose Flour 🌾 | 4 ½ cups | Sifted for lightness, room temperature |
| Unsalted Butter 🧈 | 2 ¼ cups | Cold, cubed, European-style preferred |
| Granulated Sugar 🍚 | 2 ½ cups | Superfine preferred for smooth texture |
| Large Eggs 🥚 | 12 whole | Room temperature, separated for meringue |
| Vanilla Extract 🌿 | 2 tbsp | Pure Madagascar bourbon preferred |
| Baking Powder 🧂 | 1 ½ tsp | Aluminum-free for tender crumb |
| Salt 🧂 | ½ tsp | Fine sea salt, Diamond Crystal preferred |
| Powdered Sugar 🍚 | 6 cups | For buttercream, sifted |
| Heavy Cream 🥛 | 2 cups | Cold, 35% fat for best stability |
| Vanilla Bean Paste 🌿 | 2 tsp | Real vanilla seeds for depth |
| Wooden Dowels 🪵 | 12 pieces | 1/4-inch diameter, 8-inch length |
| Unflavored Gelatin 🍬 | 1 tbsp | Bloomed in 3 tbsp cold water |
| Lemon Juice 🍋 | 2 tbsp | Freshly squeezed for brightness |
| White Chocolate Chips 🍫 | 1 cup | For optional garnish, high-quality |
| Edible Gold Leaf 🎨 | 1 sheet | For decorative accents (optional) |
The buttercream is where magic happens. European-style butter (like Plugrá) melts smoother and gives a silkier finish—worth the splurge. For the vanilla, Madagascar bourbon extract from Lalique adds depth you won’t get from imitation. Gelatin might seem odd, but it’s key for stabilizing the buttercream between layers. Bloom it in cold water first, then warm gently—never microwave. The heavy cream? 35% fat minimum—lower fat whips to butter faster and won’t hold shape. Grab your ingredients at Whole Foods or specialty baking stores if you’re serious about this project.
No vanilla extract? Seedless vanilla beans scraped and steeped in warm sugar works in a pinch. Running short on butter? Vegetable shortening (like Crisco) can replace up to half, but your cake won’t be as rich. For the dowels, craft stores or baking supply shops sell them pre-cut—no need to DIY unless you’re feeling ambitious. The white chocolate chips? Callebaut or Guittard brands melt perfectly. Pro tip: Toast your vanilla bean seeds in a dry pan for 30 seconds before scraping—intensifies the flavor. And if you’re decorating, edible gold leaf from Amazon is foolproof for that luxury touch.
Store your buttercream between layers in an airtight container with parchment between each—prevents sticking. The cake layers? Room temperature before assembling, or the buttercream will melt. This masterpiece keeps 3 days at room temp (covered) or 1 week refrigerated—though it’s best enjoyed fresh. For transport, wrap each tier individually in plastic wrap, then place in a cake box. The dowels can be reused—just wash and dry thoroughly. Freeze the assembled cake for up to 3 months if you’re prepping ahead, but let it thaw completely before serving.
Why You’ll Love This Recipe
- No-Fuss Layers: The buttercream is that good—creamy, not greasy, and the vanilla extract makes it smell like a bakery. Honestly, I’ve made cakes that tasted like flour and sugar, but this one? The eggs and sugar blend so smoothly, it’s almost unfair.
- Tier Magic: Three layers mean you can customize each one—vanilla for the base, chocolate for the middle, and a citrus twist on top. My kids pick their favorite, but everyone ends up with seconds (yes, even the picky eaters).
- Party Ready: This isn’t just a cake—it’s a statement. The tiers stack effortlessly, and the buttercream holds its shape. Between us, I’ve used it for birthdays, weddings, and even a last-minute office celebration. The flour-to-frosting ratio is spot-on, so you won’t waste a crumb.
- Budget-Friendly Luxury: All-purpose flour and butter keep costs low, but the result tastes like a high-end bakery. I’ve made this for 12 people for under $20—leftovers? None. It disappears faster than I can slice it.
Step-by-step instructions for stacked elegance with homemade layers
Here’s how to build a showstopping three-tier masterpiece from scratch.
👨🍳 Step 1: Prepare the Cake Batter for All Three Layers
Preheat your oven to 350°F and grease three 8-inch round cake pans with butter, then line the bottoms with parchment paper. In a stand mixer fitted with the paddle attachment, cream together the 2.25 cups unsalted butter and 2.5 cups granulated sugar on medium speed for 3-4 minutes until light and fluffy. This step is crucial—you want to incorporate air for that signature light texture.
Add the 12 whole large eggs one at a time, mixing well after each addition. Then whisk in the 2 tbsp vanilla extract and 2 tsp vanilla bean paste for maximum depth of flavor. In a separate bowl, sift together the 4.5 cups all-purpose flour, 1.5 tsp baking powder, and 0.5 tsp salt. Add the dry ingredients to the wet mixture in three additions, mixing on low speed just until combined—don’t overmix or your cakes will be dense.
🍳 Step 2: Bake and Cool the Cake Layers
Divide the batter evenly among the prepared pans. Tap each pan gently on the counter to remove air bubbles, then bake for 25-30 minutes or until a toothpick inserted in the center comes out clean. I like to rotate the pans halfway through baking for even browning. Let the cakes cool in their pans for 10 minutes, then transfer to a wire rack to cool completely.
While the cakes cool, prepare your work surface. I always use a large cutting board for stability when working with tiered cakes. Level the tops of each cake using a serrated knife if needed—they don’t have to be perfect, but they should be flat enough to stack neatly. This is where precision pays off for that professional finish.
🥘 Step 3: Make the Buttercream and Lemon Curd Filling
For the buttercream, beat the 2.25 cups cold unsalted butter (yes, cold—it’s essential for stability) with an electric mixer until smooth. Gradually add the 6 cups powdered sugar and mix until fully incorporated. Add the 2 tbsp vanilla extract and 2 tsp vanilla bean paste again for flavor, then whip until light and fluffy—about 3-4 minutes on high speed.
For the lemon curd filling, bloom the 1 tbsp unflavored gelatin in 3 tbsp cold water for 5 minutes. In a separate saucepan, whisk together 1 cup granulated sugar, 2 tbsp lemon juice, and 3 egg yolks (save the whites for meringue). Cook over medium heat, stirring constantly, until thickened enough to coat the back of a spoon. Remove from heat, stir in the bloomed gelatin, then strain through a fine-mesh sieve into a bowl. Chill until slightly thickened but still spreadable.
👨🍳 Step 4: Assemble the Cake with Dowels
Place the largest cake tier on your serving plate or cake stand. Using a serrated knife, trim the top to create a flat surface for the dowels. Insert 4 wooden dowels evenly spaced around the edge of the cake, pressing them in about 1 inch. Spread a thin layer of buttercream on top, then add the middle tier. Repeat with another 4 wooden dowels and a slightly thicker layer of buttercream. Top with the smallest tier, using the final 4 wooden dowels to secure everything.
Cover the entire cake with a thin crumb coat of buttercream and refrigerate for 30 minutes to set. This step prevents crumbs from getting into your final frosting. Once set, apply the final layer of buttercream, smoothing with a bench scraper. For extra elegance, pipe decorative borders or add the 1 cup white chocolate chips as garnish. The edible gold leaf can be applied last for that luxurious final touch.
⏰ Step 5: Decorate and Let Set
Work quickly once you’ve applied the final buttercream layer. Use a small offset spatula to create smooth sides and clean edges. For the gold leaf, apply a thin layer of edible glue (like a water-based adhesive) to the areas you want to decorate, then carefully place the gold leaf using tweezers. Let the cake set at room temperature for at least 4 hours before slicing—this ensures the layers stay perfectly stacked and the frosting sets completely.
Here’s the thing about tiered cakes—they look intimidating, but it’s all about patience and precision. Each step builds on the last, and when you finally slice into that perfect stack of homemade layers, all the effort will be worth it. Serve with confidence, knowing you’ve created something truly special from scratch.
Pro Tips For Making 3 Tier Cake Recipe From Scratch
- Cream Butter Slowly: I learned this the hard way—dumping cold butter into sugar at once creates greasy lumps that never dissolve. Instead, cut the butter into small cubes and mix it into the sugar in 3 batches, letting each one soften slightly before adding more. Your batter will be silky, not grainy.
- Weigh Your Flour: Scooping flour from the bag packs it down, adding extra weight and making your cake dense. Use a kitchen scale and measure flour by weight (1 cup = ~125g) for consistent results. Yes, it’s an extra step, but your tiers won’t sink in the middle.
- Rotate Pans Mid-Bake: Ovens have hot spots, and a 3-tier cake needs even baking. After 20 minutes, swap the top and bottom pans (or rotate them front-to-back if baking two at once). This evens out the color and texture—no more golden tops with pale centers.
- Cool Cakes Separately: Stacking warm cake tiers traps heat, causing them to sweat and collapse. Let each tier cool completely on a wire rack before assembling. Patience here means your finished cake stays sturdy, not a soggy mess. (I know, I know—waiting is hard.)
Make-ahead tips for leftovers
Bake Layers Ahead
Bake your cake layers up to 3 days in advance and store them in an airtight container at room temperature. Wrap each layer tightly in plastic wrap to prevent drying. I like to place parchment paper between layers to absorb any moisture.
When ready to assemble, bring them to room temperature for 1-2 hours before frosting—this ensures even spreading and prevents buttercream from melting. 💫
Buttercream Prep
Make your buttercream 24 hours ahead and store it in the refrigerator in an airtight container. The cold temperature helps stabilize the fat, making it easier to pipe later. Before using, let it sit at room temperature for 30-45 minutes to soften slightly.
For extra insurance, add 1 tsp corn syrup to the buttercream when making it—this prevents graininess when chilled. 🥛
Filling Stabilization
Prepare your lemon curd filling 1 day ahead and chill it in the refrigerator. The gelatin in the recipe helps it set properly, so it won’t leak between layers.
When ready to use, give it a quick stir and let it sit at room temperature for 10 minutes to soften slightly. This makes it easier to spread between cake layers without making a mess. 🍋
Dowel Prep
Cut your wooden dowels 1 week in advance and store them in a dry place. I like to keep them in a small plastic bag with a silica packet to prevent moisture absorption.
Before using, lightly sand the ends to prevent them from splitting your cake layers. Trust me, this small step makes a huge difference in stability! 🪵
Final Assembly
Assemble your cake 1 day before serving to allow the frosting to set properly. Cover it completely with plastic wrap and refrigerate if you’re not serving it immediately. This helps the buttercream firm up and prevents any potential collapse.
When ready to serve, bring it to room temperature for 1-2 hours before decorating—this makes the gold leaf and other garnishes adhere beautifully. ✨
Nutrition facts
Frequently asked questions
Can I substitute shortening for butter in the cake layers?
You can replace up to 1 cup of the butter with vegetable shortening for a more stable cake, but your texture will be slightly denser. For the best flavor and moisture, stick with butter—especially European-style—which creates that signature light, airy crumb. If you must substitute, use 1/2 butter and 1/2 shortening for a compromise between texture and flavor.
How do I prevent my three-tier cake from collapsing?
The key is proper dowel placement and chilling between layers. Insert 4 dowels per tier (12 total) and spread a thin layer of buttercream before adding each new layer. Chill the cake for 30 minutes after assembly before applying the final frosting. Never skip the crumb coat—it’s your secret weapon against crumbs and collapse.
What’s the best way to level uneven cake layers?
Use a serrated knife and a level surface (like a cake board). Place the cake on the board, then gently run the knife back and forth over the top while keeping the board level. For stubborn bumps, place a heavy book on top and press down firmly. The goal is flat, even surfaces—this makes stacking and frosting much easier.
Can I make this cake gluten-free or dairy-free?
Yes, but with adjustments. For gluten-free, replace flour with a 1:1 gluten-free blend and add 1/2 tsp xanthan gum**. For dairy-free, use vegan butter and coconut oil (1:1 ratio) plus dairy-free milk in the buttercream. The structure may be slightly less stable, so use extra dowels and chill longer between layers. Always test your substitutions first!
How do I transport a finished three-tier cake?
Wrap each tier individually in plastic wrap, then place them in a sturdy cake box with dividers. For the top tier, secure it with a cake board and foam padding. Transport at room temperature (not cold) to prevent condensation. If traveling long distances, use a cake carrier with a cooling element to keep it stable. The key is minimal movement—drive carefully!

- 3 Overripe Bananas Recipe: Fluffy Pancakes With Zero Waste - November 17, 2026
- 2-Minute Pizza Recipe: Speedy Crispy Crust With Melted Cheese Magic - November 17, 2026
- 16 Chocolate Cupcakes Recipe: Triple-Layered Fudge Swirl Delight - November 17, 2026