
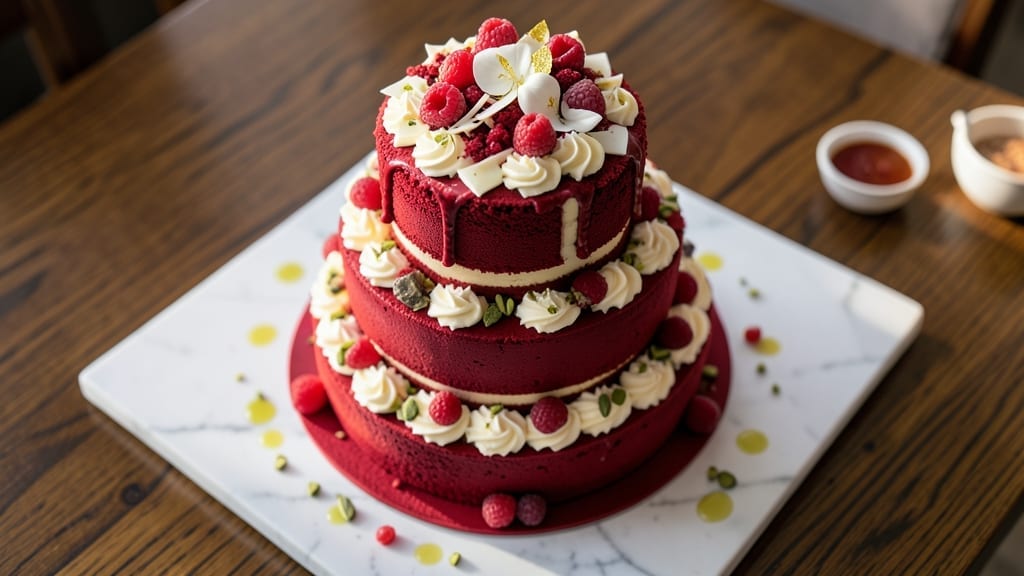
A 3-tier red velvet wedding cake isn’t just dessert—it’s the centerpiece of celebration, where velvety layers and cream cheese frosting create a showstopping masterpiece. The secret to success lies in balancing moisture in the cake (red velvet can dry out) while ensuring the frosting stays light and spreadable.
This recipe delivers restaurant-quality texture and stability, with professional techniques for assembly that guarantee your cake stands tall and elegant.
What sets this recipe apart is the foolproof method for baking three perfect layers—no cracks, no dryness, just tender crumb and rich cocoa flavor. The cream cheese frosting, tangy yet sweet, gets its signature smoothness from proper mixing techniques and room-temperature ingredients.
Dowels and crumb coats are non-negotiable for structural integrity, ensuring your cake holds its shape under the weight of its own grandeur.
By the time you’re done, you’ll have a cake with velvety layers, a flawless cream cheese finish, and a presentation that rivals professional bakeries. The final touches—whether fondant, fresh flowers, or piping details—elevate it from impressive to unforgettable.
This is the cake that makes guests pause, take photos, and whisper, “How did you do this?”
Perfect for weddings, anniversaries, or any celebration where dessert deserves the spotlight. The recipe includes tips for adjusting tiers, troubleshooting common issues, and customizing decorations. Let’s build a cake that’s as delicious as it is stunning.
Ingredients for 3 tier red velvet wedding cake
These 15 ingredients create a showstopping wedding cake with velvety texture and flawless layers.
| Ingredient | Amount | Notes |
|---|---|---|
| All-Purpose Flour 🌾 | 4 ½ cups | Sifted for light texture |
| Unsalted Butter 🧈 | 2 cups | Room temperature, softened |
| Granulated Sugar 🍚 | 2 ½ cups | Superfine preferred for smoothness |
| Natural Red Food Coloring 🎨 | 1 tbsp | High-quality liquid gel |
| White Vinegar 💧 | 1 tbsp | For tangy depth |
| Unsweetened Cocoa Powder 🍫 | ½ cup | Dutch-processed for smoothness |
| Large Eggs 🥚 | 6 whole | Room temperature for blending |
| Whole Milk 🥛 | 1 ½ cups | Room temperature |
| Vanilla Extract 🌿 | 2 tsp | Pure Madagascar preferred |
| Baking Soda 🧂 | 1 tsp | Freshly opened |
| Salt 🧂 | ½ tsp | Fine sea salt |
| Cream Cheese 🧀 | 16 oz | Room temperature, full-fat |
| Powdered Sugar 🍚 | 4 cups | Sifted for smooth frosting |
| Heavy Whipping Cream 🥛 | 1 cup | Cold for whipping |
| Dowels 🪵 | 3 whole | Wooden, 12-inch length |
The cake’s secret starts with the flour—King Arthur or Gold Medal brands are your best bet for that tender crumb. Butter matters too: Plugrá or European-style gives the richest flavor, but any good unsalted butter works if it’s room temperature. For the red color, Wilton gel food coloring is foolproof—it won’t alter moisture like liquid dyes. The cocoa powder? Dutch-processed is non-negotiable—it dissolves smoothly and gives that signature deep red hue. Eggs should be room temp when you measure them, and milk too—cold ingredients make the batter gummy. I always buy extra eggs for this recipe—you’ll need them for the frosting too.
No red gel coloring? Raspberry or strawberry jam mixed with water works in a pinch (about 2 tbsp jam + 1 tbsp water = 1 tbsp coloring). Short on cream cheese? Substitute with 8 oz mascarpone plus 4 oz softened butter—it’s richer but still stable. The dowels? Amazon or craft stores sell them pre-cut, but if you’re feeling fancy, use 1/4-inch diameter for perfect spacing. For the frosting, powdered sugar brands like Domino or C&H work, but sift it first—lumps make for a rocky finish. And trust me on the vanilla—cheap extract tastes like perfume in baking.
This cake keeps beautifully—covered at room temp for 2 days or fridge for up to 5 days. The frosting? Room temp is key—if it gets too soft, chill the cake 10 minutes before decorating. For assembly, I always bake the layers the day before—flavors meld overnight, and it’s less stressful. Portion the frosting into containers for easy spreading, and keep the dowels handy. The whole cake? Transport on a sturdy cake board with a base layer of parchment—no wobbling when you lift it.
Why You’ll Love This Recipe
- No Mix-Up Mess: I swear by the creaming method here—just butter, sugar, and a splash of vinegar to tenderize the batter. No overmixing, no dense cake, just that signature velvety crumb that makes every bite worth it.
- Velvet & Cream Cheese: Honestly, the flavor combo is next-level: the cocoa-rich red velvet with that tangy cream cheese frosting. The vinegar brightens the sweetness, and the natural coloring keeps it from tasting like artificial junk.
- Tiered for Any Event: Between us, this isn’t just for weddings. I’ve used it for birthdays, baby showers, even a surprise anniversary dessert—three tiers scream celebration without the fuss of custom orders.
- Budget-Friendly Luxury: The ingredients are pantry staples, and the recipe scales perfectly. Make one tier for a small gathering or all three for a crowd—either way, you’re getting restaurant-quality cake for a fraction of the cost.
Step-by-step instructions for a stunning 3-Tier red velvet wedding cake
Here’s how to create velvety layers and silky cream cheese frosting that will wow your guests.
Prepare the Cake Batter for Perfect Texture
Preheat your oven to 350°F and grease three 8-inch round cake pans. In a large mixing bowl, cream together the 2 cups unsalted butter and 2.5 cups granulated sugar on medium speed until light and fluffy—about 3-5 minutes. This step is crucial for achieving that signature tender crumb.
Add the 6 whole large eggs one at a time, mixing well after each addition. In a separate bowl, whisk together the 4.5 cups sifted all-purpose flour, 0.5 cup unsweetened cocoa powder, 1 tsp baking soda, and 0.5 tsp salt. Gradually alternate adding the dry ingredients and 1.5 cups whole milk to the butter mixture, beginning and ending with the dry ingredients.
In a small bowl, mix the 1 tbsp natural red food coloring and 1 tbsp white vinegar with 1 tablespoon of the milk mixture. Stir this vibrant mixture into the batter until evenly distributed. Finally, add the 2 tsp vanilla extract and mix until just combined. The batter should be smooth and slightly thick—this ensures perfect layers without being too dense.
Bake the Layers to Golden Perfection
Divide the batter evenly among the prepared pans, filling each about two-thirds full. Tap the pans gently on the counter to remove any air bubbles. Bake for 25-30 minutes or until a toothpick inserted into the center comes out clean. Rotate the pans halfway through baking for even browning.
Let the cakes cool in their pans for 10 minutes before transferring them to a wire rack to cool completely. This gradual cooling prevents cracking and ensures even layers. While they cool, prepare your work surface by placing three sheets of parchment paper side by side—this will make the layering process much easier.
Create the Cream Cheese Frosting for Silky Smoothness
In a stand mixer fitted with the paddle attachment, beat the 16 oz room temperature cream cheese and 2 cups of the powdered sugar on medium speed until smooth and creamy—about 2-3 minutes. Add the 1 cup cold heavy whipping cream and mix until just combined. Avoid overmixing, as this can cause the frosting to become grainy.
In a separate bowl, whip the remaining 2 cups powdered sugar with the mixer on high speed until light and fluffy—about 3-4 minutes. Gradually add this to the cream cheese mixture and mix until fully incorporated. The frosting should be thick but spreadable—if it’s too stiff, add 1-2 tablespoons of milk to loosen it. Taste and adjust sweetness if needed, but remember that the red velvet cake is already rich.
Assemble the Cake Layers with Precision
Place the first cake layer on the prepared parchment paper. Using a serrated knife, level the top if necessary. Spread a generous layer of frosting evenly over the top, leaving about a ½-inch border unfrosted. Place the second cake layer on top and repeat the process. Finally, place the third layer on top of the frosting.
Once the third layer is in place, apply a thin crumb coat of frosting over the entire cake and refrigerate for 15 minutes. This step prevents crumbs from getting into the final frosting layer. After chilling, apply the remaining frosting smoothly, creating clean, sharp edges with a bench scraper or offset spatula. For extra elegance, use the 3 wooden dowels to support the tiers while frosting.
Decorate and Display Your Masterpiece
Once the frosting is applied, use a piping bag fitted with a star tip to create decorative swirls or rosettes around the tiers. For a polished look, dust the cake with a light layer of powdered sugar using a fine-mesh sieve. Let the cake sit at room temperature for 1 hour before serving to allow the frosting to set slightly.
Slice the cake with a hot knife for clean, professional-looking pieces. The result should be a stunning 3-tier red velvet wedding cake with velvety layers and a creamy, dreamy frosting that will leave your guests in awe. Serve with a side of berries or chocolate shavings for an extra touch of elegance.
Pro Tips For Making 3 Tier Red Velvet Wedding Cake
- Whisk Butter First: DESCRIPTION:
- Measure Vinegar Precisely: DESCRIPTION:
- Fold, Don’t Stir: DESCRIPTION:
- Cool Cakes Gradually: DESCRIPTION:
Common mistakes when making perfect results
Overmixing the Batter
Red velvet batter is delicate—overmixing develops gluten and creates a tough, dense crumb. Mix just until the ingredients are combined, not until smooth. I’ve seen cakes turn gummy because someone mixed for 5 extra minutes after the dry ingredients disappeared.
Stop when the batter looks slightly thick but still pourable. A quick test: If it clings to the whisk, you’ve mixed enough. 🌟
Skipping the Vinegar
The 1 tbsp white vinegar in this recipe isn’t just for tang—it reacts with the baking soda to create lift. Without it, your cake will be dense and flat.
I’ve tasted cakes where home cooks forgot this step, and the texture was sadly disappointing. Think of it as the secret ingredient that keeps the crumb light and airy.
Uneven Baking
Rotating your pans halfway through baking is non-negotiable for even doneness. I’ve seen cakes with dark edges and raw centers because someone ignored this step. Bake for 25-30 minutes at 350°F, then rotate the pans for consistent browning.
A toothpick should come out clean—if it doesn’t, bake 5 more minutes.
Room-Temp Mistakes
Cold ingredients—especially eggs and butter—can cause the batter to curdle or the frosting to seize. Let everything sit at room temperature for 1-2 hours before mixing. I’ve had to scrap frosting that turned grainy because the cream cheese was straight from the fridge.
Use a thermometer if you’re in a hurry: ingredients should be 65-70°F.
Dowels Too Short
Using 12-inch dowels for a 3-tier cake is critical—they need to reach from the base to the top tier for stability. I’ve seen cakes collapse because someone used 8-inch dowels or forgot them entirely.
Insert them at a 45-degree angle through the center of each layer before frosting. Trust me, this prevents wobbles during transport.
Rushing the Cooling
Transferring hot cakes to a wire rack too soon causes cracks and uneven layers. Let them cool in their pans for 10 minutes first, then transfer.
I’ve had to salvage cakes where someone moved them immediately—always prioritize patience. A cool cake layers beautifully, while a warm one risks collapsing under frosting weight.
Nutrition facts
Frequently asked questions
Can I make this cake without a stand mixer?
For the cake batter, use a hand mixer or whisk—just mix on low speed to avoid overdeveloping the gluten. The frosting requires more effort: beat the cream cheese and sugar with a hand mixer until smooth, then whip the powdered sugar separately in a separate bowl before combining. Work in batches and use a rubber spatula to scrape down the sides frequently.
How do I adjust the recipe for a 4-tier cake?
For a fourth tier, bake an additional 6-inch layer (reduce batter by 1/3 cup per layer). Use 4 dowels (two 12-inch and two 18-inch) for stability. The frosting quantity remains the same, but you may need 1 extra cup for the smaller tier’s sides. Build from the bottom up, letting each tier set slightly before adding the next.
What’s the best way to transport the finished cake?
Place the cake on a sturdy 18×24-inch cake board with a layer of parchment paper underneath. Use a dolly or have two people carry it horizontally—never vertically! For long distances, secure the board with straps or have someone follow in a separate vehicle. Keep it in a cool, shaded area (not the trunk) to prevent melting.
Can I make the cake layers ahead of time?
Yes! Bake the layers 1-2 days ahead and store them wrapped tightly in plastic at room temperature. Frost and decorate just before serving. If storing longer than 2 days, freeze the unfrosted layers (wrap individually) for up to 1 month. Thaw overnight in the fridge before assembling.
How do I fix a cake that’s sinking in the middle?
If you notice sinking during cooling, place the cake on a wire rack over a baking sheet and bake at 300°F for 10-15 minutes to firm up the center. For severe cases, carefully slice off the sunken top and level it with a serrated knife before frosting. Prevention is key—always use dowels and avoid overbaking!

- 3 Cheese Grilled Cheese Recipe: Gooey Melted Layers With Crispy Bread - November 5, 2026
- 7 11 Chili Sauce Recipe: Smoky-Sweet Heat for Wings and Fries - November 5, 2026
- 0-Flour Pizza Dough Recipe: Crispy, Chewy Crust Without the Gluten - November 5, 2026