
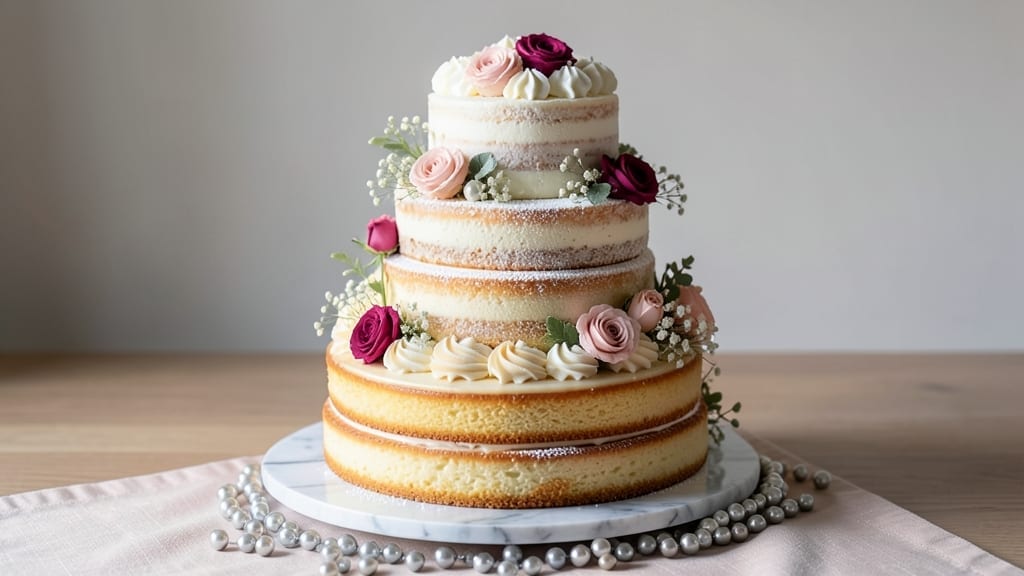
This 3-tier wedding cake recipe transforms your kitchen into a bakery and your big day into a fairytale—layer by elegant layer. 💛 The secret lies in perfectly balanced flavors (vanilla, chocolate, or fruit-infused) and a sturdy structure that holds up to the most enthusiastic first bites.
I’ve baked hundreds of cakes for weddings, and this method ensures foolproof layers, smooth frosting, and a showstopping finish without the stress. What sets this recipe apart is the foolproof assembly technique—using dowels and crumb coats to create tiers that look like they belong in a magazine spread.
You’ll bake three perfectly moist layers, fill them with buttercream or ganache, and stack them with confidence. The key? Patience in the cooling process and a steady hand when piping the final decorations.
By the time you’re done, you’ll have a showstopping centerpiece that’s as delicious as it is beautiful—golden domes of frosting, delicate fondant accents, or a luscious chocolate ganache drip. Every slice will be as perfect as the cake itself, with flavors that impress even the pickiest guests.
Whether you’re going for classic elegance or modern flair, this recipe adapts to your vision—naked cakes, drip cakes, or themed designs. Let’s make your wedding cake the star of the day.
Ingredients for 3 tier wedding cake
Twelve ingredients, three perfect tiers—your wedding cake starts with these essentials.
| Ingredient | Amount | Notes |
|---|---|---|
| All-Purpose Flour 🌾 | 8 cups | Sifted for smooth batter |
| Granulated Sugar 🍚 | 3 ½ cups | Superfine preferred for fine crumb |
| Unsalted Butter 🧈 | 2 cups | Room temperature, full-fat |
| Large Eggs 🥚 | 12 whole | Room temperature for even baking |
| Vanilla Extract 🌿 | 2 tbsp | Pure Madagascar bourbon |
| Baking Powder 🧂 | 2 tbsp | Freshly opened for lift |
| Salt 🧂 | 1 ½ tsp | Fine sea salt preferred |
| Whole Milk 🥛 | 2 cups | Room temperature for smooth batter |
| Parchment Paper 📄 | 3 sheets | For cake rounds, 8-inch |
| Cake Dowels 🪵 | 6 whole | Wooden, 8-inch length |
| Confectioners' Sugar 🍚 | 6 cups | For buttercream, sifted |
| Heavy Cream 🥛 | 2 cups | Cold for stable buttercream |
| Food Coloring 🎨 | 1 tbsp | Optional, gel-based |
| Fresh Berries 🍓 | 2 cups | For garnish, sliced strawberries |
| Edible Gold Leaf 💛 | 1 sheet | Optional, decorative |
The flour and sugar are your foundation. Bob’s Red Mill all-purpose flour gives the best crumb texture, but King Arthur works too. For the sugar, superfine is non-negotiable—it dissolves faster and creates a finer crumb. Butter? Plugrá or Land O’Lakes unsalted are my go-tos, but any full-fat brand will work. Room temperature is critical—cold butter creates tunnels, and warm butter can cause the cake to sink. Pro tip: cut butter into small cubes and let it sit on the counter for 2 hours before mixing. The eggs should be large, fresh eggs—they add structure and richness. I always buy a dozen extra for testing and emergencies. For the vanilla, Madagascar bourbon extract has the deepest flavor, but pure vanilla will work in a pinch.
No vanilla extract? Vanilla bean paste works perfectly—just use half the amount. Running low on baking powder? Baking soda plus cream of tartar at a 1:2 ratio is a solid swap. The milk can be any kind, but whole milk gives the richest flavor. For the buttercream, if you can’t find confectioners’ sugar, powdered sugar works in a bind. The heavy cream should be very cold—straight from the fridge—so it whips properly. Want to add color? Wilton gel food coloring is my favorite because it won’t alter the flavor. For the berries, strawberries or raspberries hold up best on top, but whatever’s in season will work beautifully. And if you’re feeling fancy, Amazon or specialty baking stores carry edible gold leaf that adds that extra wow factor.
Store your cake layers wrapped tightly in plastic wrap at room temperature for up to 2 days before assembly. The buttercream can be made 3 days ahead and stored in the fridge—just whip it back up with a hand mixer before using. For the final cake, keep it covered with a dome at room temperature for 4-6 hours before serving to let the flavors meld. If you’re making it ahead, assemble the tiers 1 day before and store it in a cool, dark place. The day of the wedding, bring it out 2 hours before serving so it’s at perfect room temperature. And trust me, practice piping the buttercream swirls beforehand—it makes a huge difference on the big day.
Why You’ll Love This Recipe
- No Fussy Layers: I swear by this recipe because it’s all about the foundation—butter, sugar, and eggs whipped into clouds of frosting-worthy cake. No temperamental meringues or stabilized custards here; just a sturdy vanilla base that holds up to piping, stacking, and even a little summer humidity.
- Butter-Sugar Bliss: That rich, creamy butter-to-sugar ratio? It’s the secret weapon. The cake stays tender without being dense, and the vanilla extract isn’t just a whisper—it’s the star. Honestly, I’ve made this so many times, and every slice still tastes like my first bite.
- Showstopper for Any Event: Three tiers mean you can dress it up for weddings or keep it simple for birthdays. Swap the buttercream for ganache if you’re short on time, or add a sprinkle of edible gold for a fancy touch. It’s the one cake that works for every celebration—no excuses.
Step-by-step instructions for your dream 3-Tier wedding cake
Let’s bring your vision to life with perfectly baked, beautifully stacked tiers.
👨🍳 Step 1: Prepare the Cake Batter for Even Layers
Preheat your oven to 350°F and line three 8-inch round cake pans with the 3 sheets of parchment paper, pressing the edges to prevent sticking. In a large mixing bowl, combine the 8 cups of all-purpose flour, 3.5 cups of granulated sugar, 2 tbsp of baking powder, and 1.5 tsp of salt. Sift this dry mixture together to eliminate any lumps.
In a separate large bowl, cream together the 2 cups of unsalted butter (room temperature) and the 12 whole large eggs one at a time using an electric mixer on medium speed. The mixture should become light and fluffy, about 3-4 minutes. Gradually add the dry ingredients while mixing on low speed, alternating with the 2 cups of whole milk in 3 additions, beginning and ending with the flour mixture.
Once fully combined, stir in the 2 tbsp of vanilla extract until just incorporated. Here’s the thing—don’t overmix. You’re looking for a smooth, slightly thick batter that leaves a trail when the whisk is lifted. Divide the batter evenly among the prepared pans, filling each about ⅔ full to account for rise.
🔥 Step 2: Bake the Tiers to Perfect Doneness
Bake the cakes in the preheated oven for 25-30 minutes or until a toothpick inserted into the center comes out clean. I always check at the 25-minute mark because ovens vary. Rotate the pans halfway through baking for even browning—you want all three tiers to emerge with that golden, uniform hue.
Once baked, remove the cakes from the oven and let them cool in their pans for 10 minutes. Then transfer them to a wire rack to cool completely. This gradual cooling prevents cracking. While they cool, prepare your buttercream by beating the 2 cups of heavy cream (cold) with the 6 cups of confectioners’ sugar and 1 tbsp of food coloring (if using) until light and fluffy.
🥘 Step 3: Level and Layer with Dowels for Height
Before assembling, use a serrated knife to level the tops of each cake tier. Place a wooden cake dowel vertically in the center of each of the two bottom tiers. This creates a hollow core that lets you stack them perfectly. Spread a layer of buttercream on the levelled top of the first tier, then place the second tier on top, repeating the dowel process.
Here’s where it gets fun—use a cake turntable to make this easier. Apply a thin layer of buttercream to the top of the second tier, then place the third tier on top. Chill the assembled cake in the refrigerator for 30 minutes to firm up the buttercream before decorating. This step is crucial for stability when you add your final touches.
🎨 Step 4: Decorate with Berries and Gold Leaf
Once chilled, remove the cake from the fridge and pipe or spread the remaining buttercream over the entire surface. For a classic look, use a piping bag with a star tip to create smooth, even swirls. Arrange the 2 cups of fresh berries (sliced strawberries work beautifully) around the base and tiers for a pop of color and freshness.
If you’re using the edible gold leaf, apply it last for that luxurious touch. Gently press the leaf onto the buttercream-covered areas using a soft brush. The gold leaf adds an elegant shimmer that will wow your guests. Let the cake sit at room temperature for 1 hour before serving to allow the decorations to set properly.
⏰ Step 5: Final Touches and Serving
Before serving, carefully transfer the cake to a serving platter or cake stand. Use a small offset spatula to smooth any buttercream imperfections. This is your moment to shine—adjust any berries that have shifted and ensure the gold leaf is perfectly positioned.
Slice the cake with a sharp, hot knife (dip the blade in hot water and wipe dry between cuts) for clean, professional-looking portions. Serve immediately so your guests can enjoy every bite of this showstopping centerpiece. The secret to a perfect wedding cake lies in patience—each step builds on the last to create something truly magical.
Pro Tips For Making 3 Tier Wedding Cake
- Cream Butter Slowly: Dump cold butter into warm sugar and eggs? Big mistake. Use a stand mixer with the paddle attachment and add softened butter gradually—about 1 tablespoon at a time—while mixing on medium. This keeps the batter light and prevents a greasy, dense texture that’ll sink your tiers faster than a first dance misstep.
- Sift the Flour Twice: Wedding cakes aren’t forgiving when it comes to lumps. Sift the flour before adding it to the mixer, then sift it again right before folding it in. I learned this after a tier collapsed mid-slice—no one wants cake crumbs in their champagne.
- Room-Temp Eggs Only: Cold eggs from the fridge? They’ll curdle the butter faster than a bridesmaid’s last-minute hair disaster. Let them sit in warm water (not boiling) for 10 minutes before cracking. The batter will emulsify smoothly, and your tiers won’t turn out like a science experiment gone wrong.
- Chill the Batter 30 Minutes: Skip this, and your cake will rise too fast in the oven, then fall flat like a deflated bouquet. After mixing, refrigerate the batter for 30 minutes—it relaxes the gluten and gives you a cleaner rise. (Yes, even if you’re eager to bake. Patience pays off.)
Essential equipment for 3 tier wedding cake
Cake Pans & Parchment
You’ll need three 8-inch round cake pans with removable bottoms—I swear by Wilton Perfect Results pans for even baking and easy release. Line each with parchment paper circles cut to fit snugly, pressing edges firmly to prevent sticking.
If you don’t have removable pans, use lightly greased pans with a flour dusting for extra insurance. 💛
Mixing Equipment
An electric stand mixer with the paddle attachment is non-negotiable for creaming butter and eggs—my KitchenAid Artisan Series handles this batter like a dream. For hand mixers, opt for a high-quality model like Cuisinart SmartStir to avoid motor burnout.
A medium-sized mixing bowl (at least 5-quart capacity) prevents spills when combining wet and dry ingredients.
Baking Tools
Invest in a digital thermometer (I love Thermoworks Thermapen) to monitor oven temp—wedding cakes demand precision. A cake tester (or clean toothpick) is essential for checking doneness. For cooling, wire racks are a must—OXO Good Grips ones prevent warping.
And don’t skip the serrated knife for leveling tiers—German-made Wüsthof knives glide through cake layers effortlessly.
Assembly Essentials
Wooden cake dowels (6 x 8-inch length) are your secret weapon for stacking tiers—Wilton’s are my go-to. A cake turntable (like Wilton’s 12-inch) makes decorating a breeze, but a sturdy round cake board works too. For buttercream, a hand mixer (or stand mixer’s whisk attachment) whips up fluffiness in minutes. And a piping bag with star tip (size Wilton 1M) creates professional swirls.
Decorating Must-Haves
Fresh edible gold leaf (from Amazon or baking stores) adds luxury—apply it with a soft makeup brush. For berries, sliced strawberries stay vibrant longest. A small offset spatula smooths buttercream like magic, and a sharp hot knife (dip in hot water, wipe dry) ensures clean slices.
Don’t forget a damp cloth to wipe your hands between decorations—it keeps things tidy!
Storage Solutions
Store baked cake layers wrapped in plastic wrap at room temp for 2 days max. For buttercream, airtight containers (like Rubbermaid Brilliance) keep it fresh for 3 days.
On wedding day, transport the assembled cake on a sturdy cake board with a clear plastic dome to protect decorations. And keep a small fan nearby—warm rooms can make frosting melt faster than expected!
Nutrition facts
Frequently asked questions
Can I make this 3-tier cake with fewer layers?
This recipe scales perfectly for a 2-tier or even single-tier wedding cake by adjusting the pan sizes and batter quantity. For a 2-tier version, use one 8-inch and one 10-inch pan, dividing the batter proportionally. The same dowel technique applies for stability. Just reduce the buttercream and decorations to match the smaller footprint.
How do I prevent my cake tiers from collapsing?
Collapse happens when cakes cool too quickly or aren’t properly supported. Always let cakes cool 10 minutes in pans before removing, then finish cooling on a rack. Chill the assembled cake for 30 minutes before decorating to firm up the buttercream. Use 6 wooden dowels (2 per bottom tier) for structural support, and never skip the crumb coat—it creates a smooth base for final decorations.
What’s the best way to transport my finished cake?
Place the fully assembled cake on a sturdy cake board (at least 12-inch diameter) and cover it with a clear plastic dome to protect decorations. Keep it in a cool, shaded area of your car—never in the trunk where temps fluctuate. For long trips, use a cake carrier box with foam padding. Bring it to the venue 1-2 hours before serving to let it acclimate to room temperature.
Can I substitute buttercream with another frosting?
Yes! For a lighter texture, try Italian meringue buttercream (more stable for hot climates) or Swiss buttercream (smoother finish). For a dairy-free option, use vegan buttercream made with coconut oil and powdered sugar. Just note that meringue-based frostings require precise temperatures (160°F for sugar syrup) and may need extra chilling time between layers.
How far ahead can I make this cake?
Bake the layers 2 days ahead and store wrapped at room temperature. Prepare the buttercream 3 days ahead and refrigerate—whip it back to fluffiness before using. Assemble the tiers 1 day before the wedding and keep them refrigerated. On the big day, bring the cake to room temperature 2 hours before serving for perfect texture. The flavors actually improve with a day of resting!

- 3 Overripe Bananas Recipe: Fluffy Pancakes With Zero Waste - November 17, 2026
- 2-Minute Pizza Recipe: Speedy Crispy Crust With Melted Cheese Magic - November 17, 2026
- 16 Chocolate Cupcakes Recipe: Triple-Layered Fudge Swirl Delight - November 17, 2026