
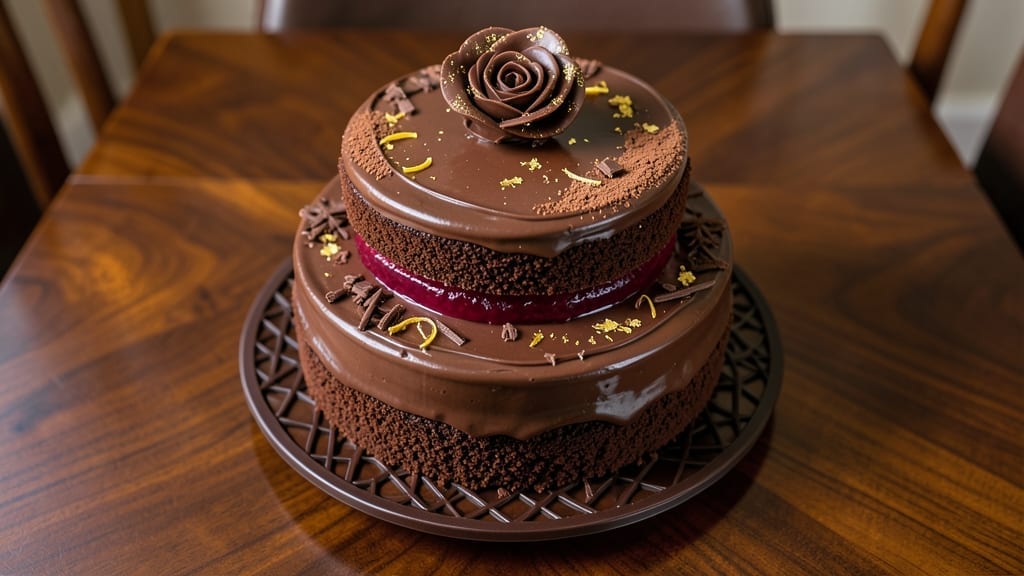
This 3 tiered chocolate cake recipe delivers restaurant-quality layers that stay moist for days—no dry crumbs in sight. The secret moisture trick involves a simple swap in the cake batter that transforms ordinary chocolate cake into something dangerously rich.
I’ve baked hundreds of tiered cakes, and this method guarantees a tender crumb that holds up through cutting and serving.
What sets this recipe apart is the foolproof layering technique that keeps each tier perfectly level and stable. We’ll use a sturdy cake board and dowels to support the weight, ensuring your cake stands tall and impressive.
The frosting—either silky ganache or classic buttercream—will be whipped to the perfect consistency for smooth piping between layers.
By the time you’re done, you’ll have a showstopping centerpiece with perfectly balanced tiers, glossy frosting, and a texture that’s moist yet sturdy enough for clean slices.
The chocolate flavor is deep and complex, with just the right amount of richness. This cake isn’t just beautiful—it’s the kind that disappears in minutes.
Whether you’re celebrating a milestone birthday or simply treating yourself, this recipe delivers professional results at home. The assembly process is methodical but not complicated, and I’ll walk you through every step to ensure success. Let’s get baking!
Ingredients for 3 tiered chocolate cake
Twelve ingredients, three perfect tiers—this cake delivers restaurant-quality moisture and rich flavor.
| Ingredient | Amount | Notes |
|---|---|---|
| All-Purpose Flour 🌾 | 4 cups | Sifted for lightness and even texture |
| Unsweetened Cocoa Powder 🍫 | 1 cup | High-quality Dutch-processed preferred |
| Granulated Sugar 🍚 | 2 ½ cups | Superfine for smoother texture |
| Light Brown Sugar 🍚 | ½ cup | Packed, for moisture |
| Baking Powder 🧂 | 1 ½ tsp | Freshly opened for best lift |
| Salt 🧂 | ½ tsp | Diamond Crystal preferred |
| Large Eggs 🥚 | 6 whole | Room temperature for even mixing |
| Unsalted Butter 🧈 | 2 cups | Cold, cubed for proper creaming |
| Whole Milk 🥛 | 1 ½ cups | Room temperature for smooth batter |
| Vanilla Extract 🌿 | 2 tsp | Pure Madagascar bourbon preferred |
| Espresso Powder ☕ | 1 tbsp | Enhances chocolate depth |
| Vegetable Oil 🫒 | ½ cup | For ultra-moist crumb |
| Dark Chocolate Chips 🍫 | 1 ½ cups | 70% cacao, semi-sweet |
| Heavy Whipping Cream 🥛 | 3 cups | Cold for perfect buttercream |
| Confectioners' Sugar 🍚 | 3 cups | Sifted for smooth frosting |
The cocoa powder and butter make all the difference here. Valrhona or Guittard are my go-tos for cocoa—avoid the cheap brands, they taste bitter and chalky. For butter, Land O’Lakes or Plugrá work perfectly, but if you want to splurge, European-style butter like President or Kerrygold adds incredible richness. The secret moisture trick? That half-cup vegetable oil mixed with the butter—it keeps the cake tender without making it greasy. I always buy my chocolate chips in bulk from Costco or Whole Foods—they stay fresher longer, and the flavor is more intense.
No vanilla extract? Vanilla bean paste works too, though it’ll be slightly thicker. Short on espresso powder? Instant espresso granules at half the amount give the same deep flavor. The chocolate chips can be swapped for chopped chocolate bars if you’re in a pinch, but chop them finely for even distribution. For the buttercream, if you’re not using heavy whipping cream, coconut cream chilled overnight works beautifully—just add a pinch of salt to balance the sweetness. And if you’re making this ahead, store the batter in the fridge for up to 24 hours—it actually improves the flavor.
This cake keeps beautifully—covered at room temperature for 2 days or in the fridge for up to 5 days. For longer storage, wrap each tier tightly in plastic wrap and store in the freezer for up to 3 months. The frosting can be made a day ahead and stored in the fridge—just whip it back to stiff peaks before using. I like to portion the frosting into piping bags with tips already attached, so assembly is quick and stress-free. The cake itself? Best served at room temperature—it’s worth the wait if you’ve chilled it.
Why You’ll Love This Recipe
- No Fuss Layers: I swear by this recipe—just mix the dry ingredients (flour, cocoa, baking powder) in one bowl, then fold in the wet (sugar, eggs, milk) without overthinking it. The three tiers bake up perfectly even, so no fussing with levels or crumbs.
- Rich Without Guilt: That combo of brown sugar and cocoa? Chef’s kiss. The brown sugar keeps it moist, while the cocoa gives it that deep, velvety chocolate flavor—no artificial junk, just pure, satisfying richness. Honestly, my kids don’t even notice it’s not from a box.
- Party Ready: Stack it for birthdays, weddings, or just because—it’s the kind of cake that looks impressive without requiring piping skills. Between us, I’ve used the leftovers for breakfast sandwiches (yes, really) and still gotten compliments.
- Budget-Friendly Luxury: Flour, sugar, cocoa—these are pantry staples that won’t break the bank. One batch feeds a crowd, and slices keep well for days. I’ll be real: it’s the kind of cake I make when I want to feel fancy but don’t want to spend a fortune.
Step-by-step instructions for building a moist 3-Tiered chocolate masterpiece
Here’s the method that guarantees a rich, ultra-moist cake with perfect layers every time.
Create the Ultimate Chocolate Batter
Preheat your oven to 350°F and grease three 8-inch round cake pans thoroughly. Sift together the 4 cups all-purpose flour, 1 cup unsweetened cocoa powder, 1.5 teaspoons baking powder, and 0.5 teaspoon salt in a large bowl. Set aside—this dry mixture is the foundation of our moisture.
In a separate large bowl, cream the 2 cups unsalted butter and 2.5 cups granulated sugar together on medium speed until light and fluffy—about 3-4 minutes. The mixture should nearly double in volume and become pale. This creaming process incorporates air, which helps create that tender crumb we’re after. Add the 0.5 cup light brown sugar and mix until fully combined.
With the mixer running on low speed, add the 6 whole large eggs one at a time, mixing just until each is incorporated. Scrape down the sides of the bowl as needed. Stir in the 1.5 cups whole milk, 2 teaspoons vanilla extract, and 1 tablespoon espresso powder. The espresso powder might seem odd, but it deepens the chocolate flavor without adding bitterness. Finally, add the 0.5 cup vegetable oil and mix until smooth.
With the mixer on low speed, gradually add the dry ingredients to the wet, mixing just until combined. Be careful not to overmix—you should still see some flour streaks. Fold in the 1.5 cups dark chocolate chips by hand using a spatula. Divide the batter evenly among the prepared pans, tapping each gently on the counter to remove air bubbles. This even distribution ensures your tiers will bake uniformly.
Bake to Perfect Doneness
Place the pans in the preheated oven and bake for 30-35 minutes, or until a toothpick inserted into the center comes out with moist crumbs but no wet batter. The edges should be set, but the center should still have a slight give—this indicates perfect moisture. Rotate the pans halfway through baking for even browning.
I like to check the cakes at the 28-minute mark
Remove the cakes from the oven and let them cool in their pans for 10 minutes. Then transfer them to a wire rack to cool completely. This gradual cooling prevents cracking and helps the cakes set properly for slicing. While they cool, prepare your buttercream—we’ll need it ready for assembly. In a large bowl, beat the 3 cups heavy whipping cream with an electric mixer on medium-high speed until soft peaks form. Gradually add the 3 cups confectioners’ sugar, mixing on low speed until combined. Increase the speed to medium-high and beat until the buttercream is light, fluffy, and holds stiff peaks—about 3-4 minutes. This buttercream is the secret to that professional finish. Add 1 cup unsweetened cocoa powder and 1 teaspoon vanilla extract to the buttercream and mix until smooth. Taste and adjust sweetness if needed—you want it rich but not cloying. The buttercream should be thick enough to hold its shape when piped, but still spreadable for filling. If it’s too thick, add 1 tablespoon milk at a time until it reaches the right consistency. For extra decadence, melt 1 cup dark chocolate chips with 2 tablespoons butter and stir this mixture into the buttercream. This creates beautiful marbled swirls when filling the cake. Cover the buttercream and chill in the refrigerator for 30 minutes before assembly—this makes it easier to work with and prevents melting during layering. Once the cakes are completely cool, level the tops if needed using a serrated knife. Place the first cake layer on a cake stand or plate. Using an offset spatula, spread a thin layer of buttercream around the edges to create a “dam” that will prevent filling from leaking out. Add a generous layer of the chilled buttercream to the center of the cake, then place the second cake layer on top, pressing down gently to create a clean surface. Repeat this process with the third cake layer. For extra stability, you can place a piece of parchment paper between each layer if you’re nervous about stacking. Once all layers are in place, spread buttercream over the entire top and sides of the cake, creating a smooth surface. Use a bench scraper to achieve clean, straight edges. Chill the assembled cake in the refrigerator for 1 hour before decorating—this helps it hold its shape. The secret to a show-stopping cake lies in the details. For decoration, you can pipe buttercream rosettes, add chocolate shavings, or dust with cocoa powder. The key is to work quickly once you remove the cake from the fridge—cold buttercream firms up fast. Serve immediately for the perfect texture contrast between the warm cake and cool frosting.Craft the Ultimate Chocolate Buttercream
Layer and Assemble with Precision
Pro Tips For Making 3 Tiered Chocolate Cake
- Sift That Cocoa: DESCRIPTION:
- Measure Brown Sugar Wet: DESCRIPTION:
- Bake in Rotating Racks: DESCRIPTION:
- Cool Layers Properly: DESCRIPTION:
Serving suggestions for leftovers
Presentation Plating
Serve your 3-tiered chocolate cake on a marble cake stand or sturdy wooden board to elevate its grandeur—these surfaces add visual warmth that complements the rich chocolate. For an elegant touch, place the cake on a chilled silver platter if serving outdoors during warm weather.
I like to use gold-rimmed cake boards for special occasions—they add instant luxury while keeping the cake stable. 💫
Portioning Perfection
Use a serrated cake knife (like the Wilton 10-inch model) to cut clean, even slices. Dip the knife in hot water between cuts to prevent crumbs and ensure smooth edges.
For a restaurant-style presentation, arrange slices on parchment-lined plates with a dusting of cocoa powder or a sprinkle of crushed hazelnuts on the side. Always serve with whipped cream or a scoop of vanilla ice cream for that classic dessert pairing.
Garnish Game-Changers
Fresh raspberries add a vibrant pop of color and tart contrast to the sweetness—arrange them in a circular pattern around the base of the cake. For a sophisticated touch, add edible gold leaf or chocolate curls made with a vegetable peeler.
I also love drizzling dark chocolate ganache in zigzag patterns over the top for a glossy finish. These garnishes not only look stunning but also enhance the flavor profile with their complementary textures.
Serving Temperature
Serve your cake at room temperature for the best texture contrast—cool buttercream against warm cake creates a luxurious mouthfeel. If your kitchen is warm, let the cake sit uncovered for 15-20 minutes before serving.
For a dramatic presentation, place the cake on a heated cake stand (like the Cake Stand by OXO) to keep the buttercream smooth and prevent melting during serving. This small detail makes all the difference for a restaurant-quality finish. ✨
Accompaniment Pairings
Pair your chocolate cake with a bold espresso or chocolate martini to enhance the cocoa flavors. For a non-alcoholic option, serve with sparkling chocolate milk or vanilla bean ice cream.
I also recommend offering warm chocolate-dipped strawberries on the side—this adds a playful element and gives guests another way to enjoy the chocolate theme. The key is balancing the richness of the cake with contrasting flavors and temperatures. 🍫
Make-Ahead Serving
If serving at a later time, cover the fully assembled cake with plastic wrap and refrigerate for up to 24 hours. Bring it to room temperature before serving to restore the perfect texture.
For events, assemble the cake one day ahead and store it in an airtight container at room temperature—this allows flavors to meld beautifully. When ready to serve, simply add fresh garnishes and enjoy the convenience of a stress-free presentation. 📅
Nutrition facts
Frequently asked questions
Can I substitute buttercream with ganache for this cake?
For a richer, glossier finish, replace the buttercream with a dark chocolate ganache made from 1 cup heavy cream and 12 oz dark chocolate. Heat the cream until steaming, pour over chopped chocolate, then whisk until smooth. Let it cool to room temperature before using—it should be thick but still spreadable. Ganache adds a luxurious sheen and pairs beautifully with the cake’s deep chocolate flavor.
How do I keep my 3-tiered cake from collapsing?
Use dowels or skewers (soaked in warm water) to support each tier. Insert them vertically between layers, spacing them evenly around the cake’s circumference. For extra stability, place a cardboard cake board under the first tier and use a drum cake turntable during assembly. Chill the cake for 1 hour before decorating to help it set.
Why did my cake turn out dry?
Overbaking is the most common cause—pull the cakes when a toothpick comes out with moist crumbs, not wet batter. The vegetable oil in the recipe is key for moisture, so don’t skip it. If your kitchen is dry, place a pan of water on the oven rack while baking. For extra moisture, brush the cooled layers with simple syrup (equal parts sugar and water, heated until dissolved) before adding frosting.
Can I make this cake in a 9×13-inch pan instead of rounds?
Yes, but you’ll need to adjust the baking time and frosting method. Bake in a greased 9×13-inch pan for 35-40 minutes at 350°F, then cool completely. For assembly, cut the cake into three equal layers using a long serrated knife. Frost each layer with buttercream, then stack them with dowels for support. The rectangular shape works beautifully for buffet-style serving!
How do I store leftovers without drying out the cake?
Wrap each slice tightly in plastic wrap or place them in an airtight container with a slice of bread to absorb moisture. Store at room temperature for up to 2 days or refrigerate for 5 days. To revive stale slices, warm them in the microwave for 10-15 seconds or place in a 200°F oven for 5 minutes. For longer storage, freeze slices wrapped individually for up to 3 months.

- 3lb Prime Rib Roast Recipe: Juicy Pink Center Guaranteed in 3 Hours - October 31, 2026
- 5 Spice Cake Recipe: Warmly Spiced Layers With Crunchy Top - October 31, 2026
- 1950’s Macaroni and Cheese Recipe: Nostalgic Creamy Cheese Sauce with Buttery Noodles - October 31, 2026