
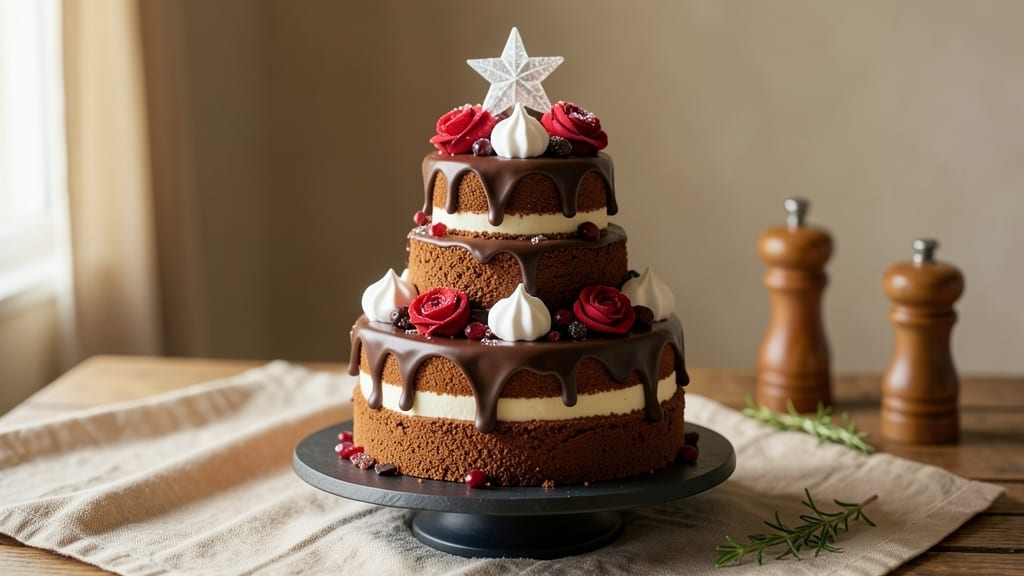
This 3D Christmas tree cake transforms holiday baking into edible artistry with stacked layers and delicate fondant decorations. 🎄 The secret lies in precise leveling of each tier and using sturdy dowels for structural support—critical for a cake that stands tall and elegant.
I’ve perfected this technique over years of holiday celebrations, ensuring your centerpiece is both stunning and stable enough to impress guests.
What sets this recipe apart is the combination of rich chocolate cake layers and smooth buttercream filling, creating a sturdy base for your edible decorations. The tree’s trunk and branches are crafted from fondant, while tiny fondant ornaments add festive charm.
Each step builds toward a showstopper that captures the magic of Christmas in every bite.
By the time you’re finished, you’ll have a three-tiered masterpiece that looks like it belongs in a holiday catalog. The cake’s sturdy construction prevents collapsing, while the fondant decorations add texture and visual appeal. This is the kind of dessert that makes your holiday table the talk of the season.
Perfect for Christmas parties, family gatherings, or as a festive centerpiece, this cake requires patience but delivers restaurant-quality results that taste as good as they look. Let’s create your edible Christmas tree!
Ingredients for 3d christmas tree cake
Twelve ingredients, three tiers, and a showstopping edible Christmas tree await your holiday table.
| Ingredient | Amount | Notes |
|---|---|---|
| All-Purpose Flour 🌾 | 4 cups | Sifted for even texture |
| Unsalted Butter 🧈 | 2 cups | Room temperature, creamed |
| Granulated Sugar 🍚 | 2 ½ cups | Superfine preferred for smoothness |
| Cocoa Powder 🍫 | ¾ cup | Dutch-processed for rich flavor |
| Large Eggs 🥚 | 6 whole | Room temperature, separated |
| Baking Powder 🍞 | 1 tbsp | Freshly measured |
| Salt 🧂 | ½ tsp | Diamond Crystal preferred |
| Vanilla Extract 🌸 | 2 tsp | Pure Madagascar bourbon |
| Whole Milk 🥛 | 1 cup | Room temperature |
| Powdered Sugar 🍚 | 6 cups | For buttercream, sifted |
| Heavy Cream 🥛 | 1 ½ cups | Cold, whipped to stiff peaks |
| White Chocolate Chips 🍫 | 1 cup | For tree trunk, chopped |
| Green Fondant 🎨 | 2 lbs | For tree branches/ornaments |
| Brown Fondant 🎨 | ½ lb | For tree trunk |
| Wooden Dowels 🪵 | 12 whole | 12-inch length for tiers |
The foundation starts with high-quality cocoa powder—Valrhona or Guittard make all the difference for that rich chocolate flavor. For the butter, Plugrá or Land O’Lakes unsalted work perfectly, but never substitute margarine. The powdered sugar? Domino or C&H brands are sifted for the smoothest buttercream. If you’re short on time, store-bought fondant from Michaels or Joann’s works fine, but homemade (flour, sugar, glycerin) gives that professional texture. The dowels? Woodcraft or Amazon sell them in bulk—measure them precisely to match your cake tiers.
No vanilla extract? Vanilla bean paste works just as well, or even a scraped vanilla bean. Out of powdered sugar? Confectioners’ sugar from the bulk bins is perfect. The fondant needs to be pliable—if it’s too stiff, knead in a tiny bit of shortening. For the white chocolate trunk, Ghirardelli chips melt beautifully, but avoid pre-melted chocolate bars. The heavy cream must be cold—let it sit in the fridge overnight if it’s warm. And if you’re worried about the cake collapsing? Chill each tier 15 minutes** before stacking.
Store the cake tiers in airtight containers between layers, separated by parchment. The fondant decorations can be wrapped in plastic wrap and kept at room temperature for up to 2 weeks—they’re not perishable. The buttercream? 3-4 days in the fridge, but bring it to room temp before using again. Pro tip: Freeze the assembled cake (without decorations) for up to 1 month—just thaw overnight before decorating. The decorations add up quickly, so make them a week ahead and store in an airtight container to prevent drying.
Why You’ll Love This Recipe
- Here’s what sold me: the cake stays tender for days, and the buttercream doesn’t dry out like store-bought frosting. I’ve packed slices in a lunchbox for work, and no one’s ever complained—just pure, rich chocolate satisfaction. Plus, the ingredients are basic, so you’re not breaking the bank for a dessert that feels special.
- No Mixer Needed: I swear by this recipe’s simplicity—just cream butter and sugar by hand, then fold in the eggs and cocoa. The layers come together faster than you can decorate a store-bought tree, and honestly? The texture is so light you’d never guess it didn’t come from a stand mixer.
- Rich Chocolate Core: That cocoa powder isn’t just for show—it’s the star. The cake layers stay moist for days, and the buttercream (made from the same butter and sugar) melts like a dream. Between us, this is the kind of chocolate cake that makes people ask for the recipe while they’re eating it.
- Showstopper for Any Gathering: Between us, this cake isn’t just for Christmas—it’s my go-to for birthdays, holidays, or even a fancy dinner. The 3D effect (thanks to those stacked layers and piped buttercream) makes it look like you hired a pastry chef, but the real magic? It’s foolproof enough to bring to a potluck without stress.
Step-by-step instructions for building a 3D Christmas tree cake
Here’s how to transform your layers into a magical, edible Christmas tree.
👨🍳 Step 1: Bake and Assemble the Cake Layers
Preheat your oven to 350°F and prepare three 8-inch round cake pans by greasing them thoroughly with the 2 cups unsalted butter (melted and cooled). Line the bottoms with parchment circles for easy removal.
In a large mixing bowl, combine the 4 cups all-purpose flour, 2.5 cups granulated sugar, 0.75 cup cocoa powder, 1 tbsp baking powder, and 0.5 tsp salt. Sift this dry mixture together to eliminate lumps. In a separate bowl, beat the 6 whole large eggs until pale and frothy, then gradually add the 2 cups unsalted butter (softened) while mixing on medium speed until light and fluffy.
Alternate adding the dry mixture and 1 cup whole milk to the wet ingredients, beginning and ending with the flour. Mix just until combined—overmixing develops gluten and makes the cake dense. Divide the batter evenly among the prepared pans and bake for 25-30 minutes or until a toothpick inserted in the center comes out clean. Let the layers cool in the pans for 10 minutes, then transfer to a wire rack to cool completely.
🥘 Step 2: Create the Tree Trunk and Branches
While the cakes cool, prepare the tree trunk using the 0.5 lb brown fondant. Roll it out to about ¼-inch thickness and cut a rectangle measuring 4 inches wide by 8 inches tall. For the tree branches, divide the 2 lbs green fondant into 12 equal portions (about 5.3 ounces each) and roll each into a 1-inch thick log. Cut each log into 3-inch lengths to create your branches.
For the tree trunk, gently shape the brown fondant rectangle into a slightly tapered cylinder by rolling it around one of the 12 wooden dowels. Secure it with a dab of water or edible glue at the seam. For the branches, use a small knife to create thin slits along the length of each piece to mimic natural branch texture. Let all fondant pieces firm up in the refrigerator for 20 minutes while you prepare the buttercream.
🍳 Step 3: Make the Buttercream and Assemble the Cake
In a stand mixer fitted with the whisk attachment, beat the 1.5 cups heavy cream (chilled) to stiff peaks. In a separate large bowl, combine the 6 cups powdered sugar and 2 tsp vanilla extract. Gradually add the powdered sugar mixture to the whipped cream while mixing on low speed until smooth and fluffy.
Level the cooled cake layers by trimming the tops if necessary. Place the first layer on a cake stand or plate, then spread about ½ cup of buttercream on top. Insert one of the 12 wooden dowels through the center of the layer. Repeat with the second and third layers, stacking them directly on top of each other with dowels aligned.
🎄 Step 4: Decorate with Fondant Branches and Trunk
Once the stacked cake is chilled for 30 minutes (to prevent slipping), begin attaching the fondant branches. Use a small amount of water or edible glue to secure each branch to the sides of the cake, starting with the largest at the bottom and working your way up. Arrange them in a natural tree shape, overlapping slightly for a fuller look.
For the tree trunk, carefully slide the brown fondant cylinder off the dowel and position it at the base of the cake. Use a bit of water to adhere it firmly. For extra stability, you can lightly brush the base of the trunk with a bit of melted white chocolate and press it into place before the fondant dries. Let the cake sit for 10 minutes to allow the decorations to set.
🎁 Step 5: Add Final Touches and Serve
Use the remaining 1 cup white chocolate chips to create decorative accents. Melt the chips in a microwave-safe bowl in 30-second intervals, stirring between each interval until smooth. Drizzle small amounts of melted chocolate along the branches or trunk to create a “snowy” effect or to highlight certain areas.
Let the cake set for at least 2 hours at room temperature before slicing to ensure the fondant decorations stay in place. Serve the cake at room temperature, and enjoy the magical 3D Christmas tree centerpiece that doubles as delicious dessert!
Pro Tips For Making 3d Christmas Tree Cake
- CHILL THE BUTTER FIRST: I learned this the hard way—room-temperature butter in a 3D cake batter is a recipe for dense, greasy layers. Whip the butter and sugar together until light and fluffy when it’s just cool to the touch (about 65°F/18°C). Cold butter incorporates air better, giving those tree layers lift and a tender crumb.
- SIFT THE COCOA POWDER: Lumpy cocoa powder ruins the texture of every layer. Sift it directly into the dry ingredients with the flour—no need to measure separately. This ensures even distribution and prevents bitter pockets in your cake. (Yes, even if you’re impatient like me.)
- BAKE IN STAGES: A full 3D tree cake won’t bake evenly if you try to do it all at once. Start with the base layer at 325°F (163°C) for 12–15 minutes, then reduce heat to 300°F (150°C) for the upper layers. The lower temps prevent over-browning while the cake sets properly—critical for clean slices and sturdy stacking.
- WEIGHT THE EGGS: Cracking eggs into a bowl and eyeballing them leads to inconsistent results. Use a kitchen scale for precision—aim for 50g per large egg (including shell). This keeps the structure consistent across all layers, especially when building the tree’s height. (Your future self will thank you.)
Serving suggestions for this dish
Presentation Plating
Serve your 3D Christmas tree cake on a rustic wooden cake stand or elegant marble slab to highlight its festive design. I love using a dark green velvet cake board for contrast—it makes the fondant branches pop like a real tree.
Place the cake on a tray lined with pine needles or mini holly sprigs for a natural woodland effect. For extra drama, add gold leaf accents along the trunk or branches. 🎄
Garnish Ideas
Enhance the tree’s realism with edible glitter dusted lightly over the branches for a snowy look. Add mini fondant ornaments in red, gold, or silver—just a few strategically placed ones create visual interest.
For a modern twist, use black fondant to create tiny Christmas lights wrapped around the trunk. A sprig of fresh rosemary tied with a ribbon adds a fragrant touch.
Serving Tools
Use a serrated cake knife to slice cleanly through the tiers without disturbing the decorations. For a dramatic reveal, place the cake on a lift-top cake stand so guests can see the intricate fondant work from all angles.
Serve with mini fondant ornaments on the side as edible favors. A cake pop stand with individual servings lets guests enjoy the cake without worrying about ruining the display.
Themed Pairings
Pair the cake with hot spiced cider or mulled wine to complement the holiday flavors. For a non-alcoholic option, serve peppermint tea or gingerbread cookies on the side. A cheese board with aged cheddar, brie, and cranberry sauce balances the sweetness beautifully.
The rich chocolate cake pairs wonderfully with espresso or dark chocolate-dipped strawberries for an after-dinner treat. ✨
Display Tips
Place the cake in a sunlit window where its colors will glow, or under warm string lights for a magical ambiance. For outdoor settings, use a heated cake display case to keep the fondant from melting in cooler temperatures.
If serving at a buffet, position the cake on a elevated pedestal so it remains the focal point. A mini wreath or candy cane garland around the base adds extra holiday charm.
Serving Etiquette
Encourage guests to admire the cake before serving by placing a sign that reads, “Please take a moment to appreciate our edible Christmas tree!” Use gold cake servers for an elegant touch.
For a fun twist, offer mini cake cutters shaped like trees or ornaments. If you’re serving multiple desserts, place the tree cake as the centerpiece—it’s too stunning to hide! 💫
Nutrition facts
Frequently asked questions
Can I make this cake without fondant?
For a simpler version, replace fondant branches with green meringue cookies or chocolate-dipped pretzel sticks shaped like branches. Use white chocolate bark for the trunk instead of brown fondant. The cake layers and buttercream will still create the stunning tiered effect—just skip the intricate 3D details.
How long does it take to assemble the cake?
Plan for 4-5 hours total: 1 hour for baking and cooling layers, 1.5 hours for fondant prep and decorating, and 1.5 hours for drying time before serving. The most time-consuming part is shaping and positioning the fondant branches—take your time for a natural look!
Will the cake collapse if I skip the dowels?
Yes, the dowels are essential for stability! Without them, the three tiers will likely topple. If you’re short on dowels, use thick wooden skewers or even popsicle sticks glued together. For extra support, chill the cake between layers for 30 minutes before decorating. A collapsed cake ruins the 3D effect!
Can I make this cake ahead of time?
Perfect for planning! Bake the layers 1-2 days ahead and store in airtight containers. Assemble the cake 24 hours before serving (without decorations) and keep it refrigerated. Decorate with fondant 4-6 hours before the party—this gives the decorations time to set properly. The flavors actually improve with time!
What if my fondant cracks or dries out?
Keep fondant covered with plastic wrap while working to prevent drying. If it cracks, knead in 1 tsp shortening or a few drops of water. For repairs, use edible glue or melted chocolate to reattach pieces. Work in a cool room** (65-70°F) to maintain pliability. A hairdryer on low heat can soften stiff fondant in a pinch!

- 3lb Prime Rib Roast Recipe: Juicy Pink Center Guaranteed in 3 Hours - October 31, 2026
- 5 Spice Cake Recipe: Warmly Spiced Layers With Crunchy Top - October 31, 2026
- 1950’s Macaroni and Cheese Recipe: Nostalgic Creamy Cheese Sauce with Buttery Noodles - October 31, 2026