
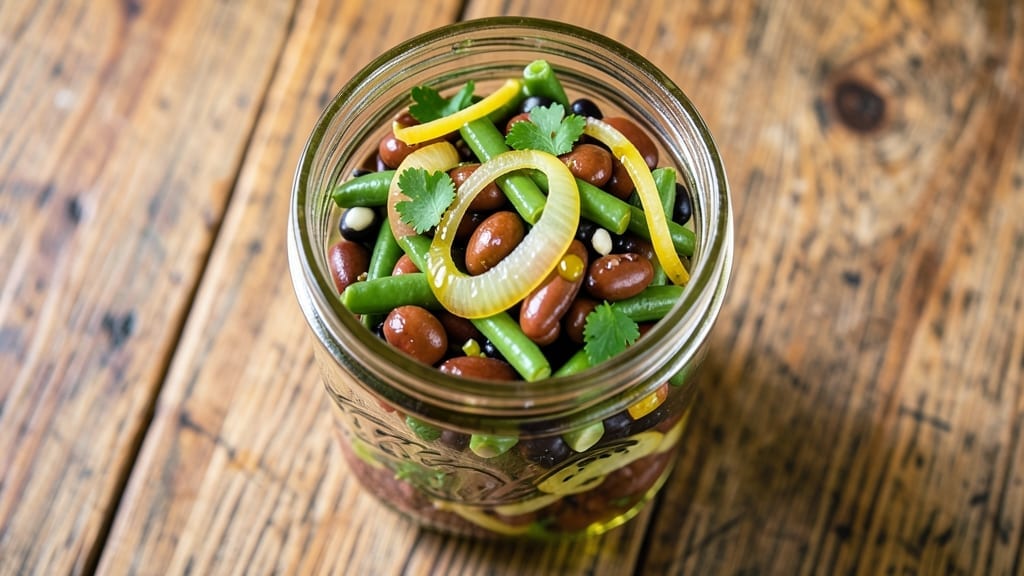
This 4 bean salad canning recipe lets you preserve summer’s freshest flavors for year-round enjoyment—crispy beans, vibrant herbs, and tangy dressing all sealed in sterilized jars. The secret lies in proper bean preparation: soaking overnight and trimming ends ensures perfect texture after canning.
Unlike store-bought versions, homemade salad maintains its crunch and freshness for months.
Pressure canning is the safest method for this recipe, as it reaches the high temperatures needed to preserve the beans’ texture and prevent spoilage. You’ll need pint jars, lids, and a pressure canner, but the process is straightforward once you follow the timing guidelines.
The salad’s bold flavors—garlicky, tangy, and slightly sweet—develop beautifully during the canning process, creating a pantry staple that’s perfect for quick meals.
What makes this recipe truly special is its versatility—use it as a side dish, stuff into sandwiches, or serve cold with crackers. The canned salad keeps its vibrant colors and satisfying crunch, making it taste almost as fresh as the day you packed the jars.
With proper storage, these jars will last up to a year, ensuring you always have a flavorful, protein-rich option on hand.
Safety is paramount when canning, so we’ll include essential guidelines for sterilizing jars, processing times, and proper storage techniques. Whether you’re a seasoned canner or trying this method for the first time, this recipe delivers professional results with a homemade touch.
Let’s get started on preserving your next batch of 4 bean salad.
Ingredients for 4 bean salad canning
Twelve jars of preserved crunchy goodness—just beans, herbs, and bold flavors sealed for months.
| Ingredient | Amount | Notes |
|---|---|---|
| Green Beans 🌿 | 2 lbs | Fresh, trimmed and blanched |
| Kidney Beans 🌱 | 1 ½ lbs | Dried, soaked overnight |
| Black-Eyed Peas 🌱 | 1 ½ lbs | Dried, soaked overnight |
| Wax Beans 🌿 | 1 ½ lbs | Fresh, trimmed and blanched |
| Yellow Onion 🧅 | 1 whole | Diced, fresh preferred |
| Garlic Cloves 🧄 | 6 cloves | Minced, fresh preferred |
| Apple Cider Vinegar 🍎 | ½ cup | For tangy dressing |
| Olive Oil 🫒 | ½ cup | Extra-virgin for richness |
| White Sugar 🍚 | ½ cup | Granulated, light brown okay |
| Salt 🧂 | 2 tbsp | Kosher or sea salt |
| Black Peppercorns 🌶️ | 1 tbsp | Freshly ground preferred |
| Fresh Dill 🌿 | ¼ cup | Chopped, stems removed |
| Pint Mason Jars 🥫 | 12 jars | With lids, sterilized |
The beans are the stars here. Green and wax beans need blanching first (3 minutes in boiling water, then ice bath)—this keeps them crispy after canning. For the dried beans, soak overnight (8 hours minimum) to soften them properly. I grab mine from Whole Foods or bulk bins at Trader Joe’s because they’re fresher and less likely to have been treated with preservatives. The onions and garlic? Fresh is non-negotiable—they make the dressing sing. If you’re short on time, the dried beans can be cooked in a pressure cooker (20 minutes on high pressure), but soaking overnight gives the best texture.
No fresh dill? Dried dill at half the amount works, but it won’t be as vibrant. Short on apple cider vinegar? White vinegar or lemon juice in a pinch (use the same amount). The sugar can be swapped for maple syrup or agave if you prefer, but white sugar gives the classic tangy-sweet balance. For the dressing, whisk everything together until the sugar dissolves completely—no graininess here. If you’re canning in a hot climate, the USDA recommends adding 1/2 tsp of citric acid per quart to prevent spoilage, but it’s optional for pint jars.
Jars need to be sterilized in boiling water for 10 minutes—don’t skip this step, even if they’re brand new. The salad keeps its crunch for up to 1 year if stored in a cool, dark place, but the flavors actually improve after the first month. I always label mine with the date and contents—Sharpie on the lid works great. Once opened, transfer to the fridge and use within 1 week. Pro tip: the first jar you open after canning is always the best—everything mellows into perfect harmony over time.
Why You’ll Love This Recipe
- No-Chop Necessary: I swear by this—just rinse the beans, toss them in, and let the jar do the work. The wax beans and green beans stay crisp, while the kidney beans and black-eyed peas soften just enough to soak up every bit of that tangy vinegar and garlic. My lazy Sundays just got a whole lot easier.
- Taste Like Summer: That first bite? Crisp, bright, and packed with texture—the wax beans snap, the onions add a sharp sweetness, and the smoky kidney beans tie it all together. Honestly, it’s the kind of salad that makes you want to eat it straight from the jar, no fuss.
- Pantry-to-Picnic Ready: This keeps for months in the pantry, so it’s my go-to for potlucks, tailgates, or when I forget to pack lunch. Just grab a jar, toss in some crackers or bread, and boom—you’ve got a meal that travels like a dream.
- Dirt-Cheap & Fills You Up: Between us, this is my budget-friendly secret weapon. A single batch costs pennies and stretches across weeks—perfect for when you’re feeding a crowd or just trying to stretch groceries. Plus, the onions and beans bulk it up enough that you’ll forget you’re eating something this simple.
Step-by-step instructions for preserving your 4 bean salad
Here’s how to transform fresh ingredients into a vibrant, crunchy salad that keeps for months.
Prepare and Blanch the Fresh Beans
Start with the 2 lbs green beans and 1.5 lbs wax beans—trim both ends and discard any damaged pods. Spread them out on a baking sheet and blanch in boiling water for exactly 3 minutes. Immediately transfer to an ice bath to stop cooking, then drain thoroughly. The beans should remain crisp with a bright green color—this preserves their texture during canning.
For the 1.5 lbs dried kidney beans and 1.5 lbs dried black-eyed peas, soak them overnight in plenty of water. Drain and rinse thoroughly before cooking. Boil in fresh water for 45-60 minutes until tender but still holding their shape. Drain and cool completely before proceeding.
Create the Flavor Base and Sterilize Jars
In a large bowl, combine the cooled beans with the 1 whole diced yellow onion and 6 minced garlic cloves. In a separate bowl, whisk together the 0.5 cup apple cider vinegar, 0.5 cup olive oil, 0.5 cup white sugar, 2 tbsp salt, and 1 tbsp freshly ground black peppercorns. Pour this dressing over the beans and toss gently to coat evenly.
While the beans marinate, sterilize the 12 pint mason jars and lids by boiling them in water for 10 minutes. Use jar lifters to transfer them to a clean towel-lined surface—this prevents cross-contamination and ensures proper sealing.
Fill Jars and Process for Long-Term Storage
Divide the bean mixture evenly among the sterilized jars, packing them firmly but leaving 1-inch headspace at the top. This space prevents the jars from bursting during processing. Add 0.25 cup chopped fresh dill to each jar for brightness and flavor.
Wipe the jar rims with a clean, damp cloth to remove any residue, then seal with sterilized lids. Place the jars in a canning pot filled with water, ensuring they’re fully submerged. Process in a boiling water bath for 90 minutes at 212°F. You’ll know they’re properly sealed when the lids pop and create a vacuum seal.
Store and Enjoy Your Preserved Salad
Remove the jars carefully using jar lifters and let them cool completely on a towel-lined surface. Check for proper sealing—lids should not flex when pressed. Store in a cool, dark place for up to 12 months. The flavors will mellow beautifully over time, making this perfect for holiday gifts or pantry staples.
When ready to serve, open a jar and give it a gentle shake to redistribute the dressing. The beans should retain their crunch and vibrant colors, with a perfect balance of tangy, savory, and slightly sweet flavors. This preserved salad makes an excellent side dish or can be enjoyed straight from the jar as a hearty meal.
Pro Tips For Making 4 Bean Salad Canning
- Parboil Beans First: Green beans and wax beans need a quick 2-minute blanch in boiling water before packing—this firms them up and prevents mushiness later. I learned this the hard way when my first batch turned to sad, limp noodles after processing. Skip this, and you’ll regret it when jars look watery.
- Trim Onions Like a Pro: Dice the yellow onion into ¼-inch pieces, but leave the root end intact—this keeps slices from bleeding and turning your salad into soup. Sounds weird, but it works: less soggy beans, more flavor where it counts.
- Don’t Overfill Jars: Pack beans loosely—they’ll expand. Fill jars to 1 inch from the top, then add the hot brine. I used to cram them in tight, and the lids would fail. Leave room, or you’ll end up with exploded jars and a messy kitchen.
- Use Vinegar in Brine: Add 2 tablespoons of vinegar (white or apple cider) to the canning liquid—it brightens the beans and fights off that metallic taste from kidney beans. I was skeptical until I tried it; now it’s non-negotiable for me.
Storing and reheating this dish
Refrigerator Storage
Once you’ve opened a jar of your homemade 4 bean salad, transfer it to an airtight container in the fridge. The dressing helps preserve freshness, but I recommend using it within 7 days for the best texture.
Store it in the coldest part of your fridge—usually the back of the bottom shelf—where temperatures stay consistently 40°F or below. If you notice the beans softening too quickly, add a splash of apple cider vinegar (just 1 tbsp) to help maintain crispness. 🥫
Freezer Preservation
For longer storage, divide the opened salad into freezer-safe containers or heavy-duty freezer bags. Press out excess air to prevent freezer burn, and label with the date. This salad keeps its quality for up to 3 months in the freezer.
When ready to use, thaw overnight in the fridge—never microwave directly from frozen. The texture will be slightly softer after freezing, but it still makes a great filling for sandwiches or wraps. ❄️
Reheating Tips
If you’ve stored your canned salad in the fridge, simply stir it gently before serving—no reheating needed. For freezer-thawed salad, warm it in a saucepan over low heat for 5-7 minutes, stirring occasionally. Add 1-2 tbsp water if it looks dry.
Avoid high heat, which can turn the beans mushy. I like to sprinkle with extra fresh dill or a drizzle of olive oil after reheating to revive the flavors. 🔥
Reviving Stale Salad
If your canned salad loses some crunch after opening, don’t toss it! Place the jar in a large pot of cold water and bring to a gentle simmer for 10-15 minutes. The heat will help restore some firmness.
Alternatively, mix in 1 tbsp cornstarch with 2 tbsp water, stir into the salad, and let sit for 10 minutes—this acts like a natural thickener to perk up the texture. 💡
Safety Reminders
Always check for proper sealing before storing opened jars. If the lid pops when pressed or doesn’t create a vacuum seal, discard the contents immediately. Never taste-test potentially spoiled food—trust your senses. For canned jars, store in a cool, dark pantry away from heat sources.
If you notice mold, off odors, or bubbles, discard the jar and its contents. When in doubt, throw it out—food safety is non-negotiable! ⚠️
Nutrition facts
Frequently asked questions
Can I use canned beans instead of dried or fresh?
While canned beans save time, they won’t give the same texture or flavor after canning. The recipe relies on fresh or properly soaked dried beans to maintain that satisfying crunch. If you must use canned, drain and rinse them thoroughly, then add an extra 1/4 cup apple cider vinegar per jar to compensate for the lack of freshness. The salad will still be tasty but may be slightly softer.
Why does my 4 bean salad turn mushy after canning?
Mushy beans usually mean overcooking during blanching or processing. For fresh beans, stick to exactly 3 minutes in boiling water—no longer! If using dried beans, ensure they’re fully soaked and cooked until tender but still firm. Also verify your processing time: 90 minutes in a boiling water bath is correct for pint jars. Check your canner’s gauge to confirm proper temperature.
What’s the best way to test if my canned salad is properly sealed?
After cooling, press the center of each lid—it should stay firmly in place with no give. Another test: lift the lid slightly and let it go. If it pops back down, the seal is intact. If it springs up or stays lifted, the jar didn’t seal properly and should be refrigerated and used within 7 days. Always check before storing long-term.
Can I adjust the spice level or add other vegetables?
For extra heat, add 1/2 tsp cayenne pepper or 1 tbsp hot sauce per jar. You can also mix in 1/2 cup diced bell peppers or 1/4 cup chopped celery with the onions. Just be mindful of headspace—don’t overfill jars. The dressing ratio should remain balanced: 1/4 cup vinegar, 1/4 cup oil, and 1/4 cup sugar per pint jar.
How do I handle high altitude when canning?
At elevations above 1,000 feet, increase processing time by 5 minutes per 1,000 feet. For example, at 5,000 feet, process pint jars for 115 minutes. Always check the USDA’s altitude adjustment chart for precise times. The extra time ensures proper heat penetration to kill bacteria. Don’t adjust headspace or jar size—just the processing duration.

- 3lb Prime Rib Roast Recipe: Juicy Pink Center Guaranteed in 3 Hours - October 31, 2026
- 5 Spice Cake Recipe: Warmly Spiced Layers With Crunchy Top - October 31, 2026
- 1950’s Macaroni and Cheese Recipe: Nostalgic Creamy Cheese Sauce with Buttery Noodles - October 31, 2026