
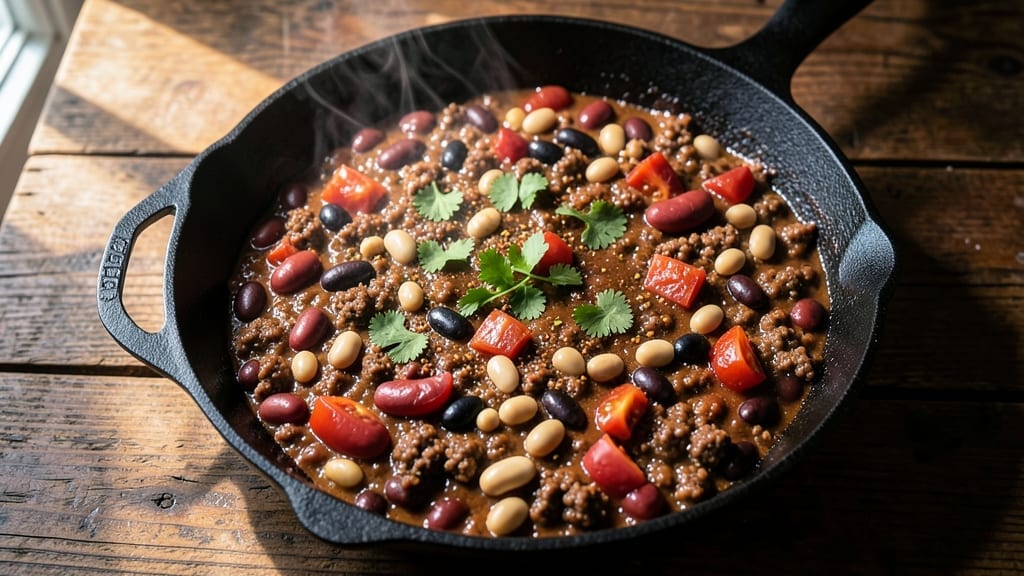
This 4-can chili recipe delivers the deep, smoky flavor that only comes from slow-simmered ingredients and time—because the best chili tastes even better the next day. The secret lies in balancing canned beans, rich tomato, and aromatic spices to create a hearty stew that warms the soul.
I’ve perfected this over years of testing, ensuring every batch develops that signature depth without requiring hours at the stove.
The beauty of this chili is its simplicity: just four cans of beans (black, kidney, pinto, and chili beans) form the base, while ground beef adds richness and texture.
A blend of chili powder, cumin, and smoked paprika creates layers of warmth, while a splash of Worcestershire sauce ties everything together. The key? Simmering low and slow—this isn’t a quick meal, but the results are worth the wait.
By the time you’re ready to serve, you’ll have a chili that’s thick, flavorful, and packed with hearty ingredients. The flavors meld beautifully as it sits, making it even more satisfying the next day.
Top with shredded cheese, sour cream, or fresh cilantro for extra brightness—this is the kind of chili that brings people back for seconds.
Perfect for game day, family dinners, or meal prep, this recipe scales easily and tastes better with each reheat. Let’s get cooking—your taste buds (and leftovers) will thank you.
Ingredients for 4 can chili
Four cans of beans, a pound of beef, and spices that pack serious flavor.
| Ingredient | Amount | Notes |
|---|---|---|
| Ground Beef 🥩 | 1 ½ lb | 80/20 fat ratio preferred |
| Black Beans 🌱 | 1 can | Drained and rinsed |
| Kidney Beans 🌱 | 1 can | Drained and rinsed |
| Pinto Beans 🌱 | 1 can | Drained and rinsed |
| Chili Beans 🌱 | 1 can | Drained and rinsed |
| Diced Tomatoes 🍅 | 2 cans | San Marzano preferred |
| Chili Powder 🌶️ | 2 tbsp | Smoked or mild variety |
| Ground Cumin 🌿 | 1 tbsp | Toasted for depth |
| Smoked Paprika 🌶️ | 1 tbsp | For smoky flavor |
| Worcestershire Sauce 🍶 | 1 tbsp | Vegan if needed |
| Yellow Onion 🧅 | 1 whole | Medium, diced small |
| Garlic Cloves 🧄 | 4 cloves | Minced or pressed |
| Beef Broth 🥫 | 1 cup | Low-sodium preferred |
| Salt 🧂 | 1 tsp | Kosher or sea salt |
| Black Pepper 🌶️ | ½ tsp | Freshly ground |
The ground beef is where the richness happens—80/20 fat ratio gives you that melt-in-your-mouth texture. Costco or Walmart usually have the best prices for bulk packs, and you can freeze what you don’t use. The beans? No need to soak—just drain and rinse. I grab the Libby’s brand cans because they’re consistent, but any good-quality canned beans work. The tomatoes? San Marzano if you want to splurge, but regular diced tomatoes are fine if that’s what you’ve got. Just make sure they’re not watery—drain them well if they are.
No Worcestershire sauce? Soy sauce or liquid smoke works in a pinch, but it won’t be exactly the same. The spices are non-negotiable though—smoked paprika is a must for that deep, smoky flavor. No toasted cumin? Regular ground cumin works fine, but toasting it in a dry pan for 30 seconds before adding it takes the flavor to another level. The onion and garlic can be swapped for 1/2 cup onion powder and 1 tsp garlic powder if you’re in a rush, but fresh is always better. And if you’re making this vegetarian? Swap the beef for crumbled tempeh or extra beans—it’ll still be delicious.
This chili tastes even better the next day—plan ahead. It keeps for 5 days in the fridge or 3 months in the freezer. I like to portion it into individual containers so I can grab and reheat for quick lunches. The flavors get deeper as it sits, so don’t rush it. And if you’re serving it at a game or party, make it the day before. Trust me, the crowd will notice the difference.
Why You’ll Love This Recipe
- Pantry Powerhouse: I swear by this recipe when my fridge is bare—just open four cans of beans (black, kidney, pinto, and chili), dump them in, and let the spices work their magic. No chopping, no measuring, no stress.
- Deep, Rich Layers: That mix of beans—creamy pintos, hearty kidneys, and smoky chili—builds flavor as it simmers, while the ground beef adds a satisfying meaty bite. Honestly, the longer it cooks, the better it gets.
- Game-Day Crowdpleaser: Between us, this is my go-to for tailgates or movie nights—it’s hearty enough for a group but still feels special. Serve it with cornbread or tortilla chips, and suddenly you’re the hero of the hour.
- Budget-Friendly Leftovers: A single batch stretches for days, and the flavors only deepen in the fridge. I’ll be real: I’ve eaten this chili for breakfast (yes, with eggs) and it never gets old.
Step-by-step instructions for deep, smoky chili
Here’s how to build a rich, flavorful chili that tastes even better the next day.
Brown the Ground Beef for Maximum Flavor
Heat a large Dutch oven or heavy pot over medium-high heat. Add the 1.5 lb ground beef and break it apart with a wooden spoon. Let it cook undisturbed for 3-4 minutes until the meat loses its raw color—this is crucial for developing deep flavor through the Maillard reaction.
Once the beef starts to brown, stir occasionally for another 5-6 minutes until fully cooked. The fat should render out and the beef should be crumbly and no longer pink. Drain most of the fat (leave about 1 tablespoon for flavor), but don’t rinse the pot—those browned bits are chili gold.
Sauté Onions and Garlic to Build the Base
Add the diced yellow onion to the pot and cook for 4-5 minutes until softened and translucent. Stir in the 4 minced garlic cloves and cook for another 30 seconds until fragrant—this prevents the garlic from burning, which would make the chili bitter.
Here’s where the magic starts: Sprinkle in the 2 tbsp chili powder, 1 tbsp ground cumin, and 1 tbsp smoked paprika. Stir constantly for 1 minute to toast the spices and release their aromatic oils. You’ll smell that deep, smoky chili essence developing—this is your foundation.
Combine All Ingredients for Simmering Perfection
Pour in the 1 cup beef broth, scraping up any browned bits from the bottom of the pot. Add the 2 cans diced tomatoes (with juices), 1 tbsp Worcestershire sauce, 1 tsp salt, and 0.5 tsp black pepper. Stir everything together until well combined.
Now add the 4 cans of drained and rinsed beans—black, kidney, pinto, and chili beans. The beans will soak up all those beautiful flavors as they simmer. Bring the mixture to a gentle boil, then reduce heat to low-medium and let it simmer uncovered for 45-60 minutes, stirring occasionally. The chili should bubble gently but not vigorously—this ensures even cooking and prevents burning.
Adjust Seasoning and Let It Rest
After simmering, taste the chili and adjust seasoning if needed. You might need more salt, a pinch of sugar to balance acidity, or even a dash of hot sauce if you prefer it spicier. The flavors will deepen as it rests, so don’t be afraid to add a bit more spice now.
Let the chili sit off the heat for 10-15 minutes before serving. This resting period allows the flavors to meld completely and the texture to thicken slightly. The chili will actually taste better the next day as the flavors continue to develop—this is why it’s worth making ahead.
Serve with Toppings for the Ultimate Experience
Serve your smoky chili hot in bowls with classic toppings like shredded cheese, sour cream, chopped green onions, and a dollop of hot sauce. The combination of the deep, smoky flavors with the creamy toppings creates the perfect balance of textures and temperatures.
For an extra boost of flavor, you can even top each serving with a sprinkle of smoked paprika or a few drops of hot sauce right before serving. The chili’s rich, hearty nature makes it perfect for cold days or game day gatherings—every spoonful delivers that comforting, smoky goodness you crave.
Pro Tips For Making 4 Can Chili
- CRANK THE HEAT FIRST: Dump that raw ground beef into your pot and blast it on medium-high until it’s no longer pink—about 5-6 minutes. I used to simmer it gently, and the chili always tasted dull. High heat gets the meat browned and flavorful before the beans even hit the pot.
- DRAIN AND RINSE BEANS: Open those four cans of beans and give them a quick rinse under cold water, then drain them well. The canned juices add saltiness, and you don’t want your chili tasting like a salt lick. (Yes, even if the label says “low-sodium”—trust me.)
- STIR IN THE BEANS LAST: Let the meat, tomatoes, and spices cook together for at least 15 minutes before tossing in the beans. They’ll soak up all the deep, caramelized flavors instead of turning the whole thing mushy. Add them too soon, and you’re just reheating a sad bean stew.
- TOAST THE BEANS: Drain the beans, spread them on a baking sheet, and broil for 5 minutes until slightly crispy. Sounds weird, but it works—especially for pinto and kidney beans. The texture adds a nice contrast to the soft ground beef, and it prevents that sad, gluey mouthfeel. (Skip this if you’re in a rush, but don’t say I didn’t warn you.)
Dietary considerations for this dish
Gluten-Free Adaptations
This chili is naturally gluten-free, but always double-check labels on ingredients like Worcestershire sauce and beef broth. I recommend Annie’s Organic or Lea & Perrins gluten-free Worcestershire to keep it safe.
The canned beans and spices are already gluten-free, so no substitutions are needed here—just ensure your toppings like tortilla chips or crackers are certified gluten-free if serving to sensitive guests. 🌱
Vegetarian Swaps
Skip the ground beef and replace it with 1.5 cups crumbled tempeh or 2 cups extra beans (black, kidney, or pinto). For extra protein, add 1 can lentils (drained) or 1 cup cooked quinoa.
The smoky flavor from smoked paprika and liquid smoke (½ tsp) will keep it rich and satisfying. I’ve made this version with Beyond Meat crumbles too—they hold up well during simmering.
Low-Carb Options
To reduce carbs, omit the beans entirely and use 1.5 cups cauliflower rice instead—it soaks up flavors beautifully. For protein, add 1 lb ground turkey or chicken (cooked the same way as beef) and 1 can diced tomatoes with no salt added.
Keep the spices identical, but reduce the 1 cup beef broth to ½ cup to maintain thickness. Top with avocado slices or cheese crisps for crunch. 🥑
Dairy-Free Toppings
For dairy-free serving, skip the cheese and sour cream toppings. Instead, try coconut yogurt (like So Delicious brand) or cashew cream (blend soaked cashews with water). Fresh cilantro, lime wedges, and pickled jalapeños add bright contrast.
A sprinkle of nutritional yeast gives a cheesy flavor without dairy. I love this combo for vegan game-day bowls!
Spice Adjustments
For a milder chili, reduce the chili powder to 1 tbsp and omit the smoked paprika (or use ½ tsp cayenne instead). Spice lovers can add 1 tbsp chipotle powder or ½ tsp cayenne pepper directly to the pot.
For heat without spice, stir in 1-2 diced fresh jalapeños or 1 tbsp hot sauce at the end. Always taste as it simmers—adjust gradually!
Nutrition facts
Frequently asked questions
Can I use different types of beans in this recipe?
The recipe calls for four specific cans—black, kidney, pinto, and chili beans—to create a balanced texture and flavor profile. However, you can substitute with other canned beans like garbanzo or white beans if needed, but the overall consistency and taste may vary slightly. Just ensure they’re drained and rinsed well before adding.
How can I make this chili thicker or thinner?
For a thicker chili, simmer uncovered for an extra 10-15 minutes to let the liquid reduce naturally. If it’s too thick, stir in 2-3 tablespoons of broth or water at a time until you reach your desired consistency. The chili should be thick enough to coat the back of a spoon but still spoonable.
Can I make this chili in a slow cooker?
Brown the ground beef and sauté the onions and garlic as directed, then transfer everything to a 6-quart slow cooker. Cook on low for 6-8 hours or high for 3-4 hours, stirring occasionally. The slow cooker method actually enhances the flavors even more by allowing them to meld slowly over time.
Why does my chili taste bland?
Bland chili often happens when spices aren’t toasted properly or the simmering time is too short. Make sure to cook the spices with the onions and garlic for 1 full minute to release their flavors. Also, let the chili rest off the heat for 10-15 minutes before tasting—flavors develop during this time. If needed, add a pinch of sugar to balance acidity or a dash of hot sauce for extra depth.
How long will this chili keep in the fridge?
This chili stays fresh in the fridge for 5-6 days when stored in an airtight container. The flavors actually improve over time, making it perfect for meal prep. For longer storage, freeze portions in individual containers for up to 3 months. Thaw overnight in the fridge before reheating.

- 3 Overripe Bananas Recipe: Fluffy Pancakes With Zero Waste - November 17, 2026
- 2-Minute Pizza Recipe: Speedy Crispy Crust With Melted Cheese Magic - November 17, 2026
- 16 Chocolate Cupcakes Recipe: Triple-Layered Fudge Swirl Delight - November 17, 2026