
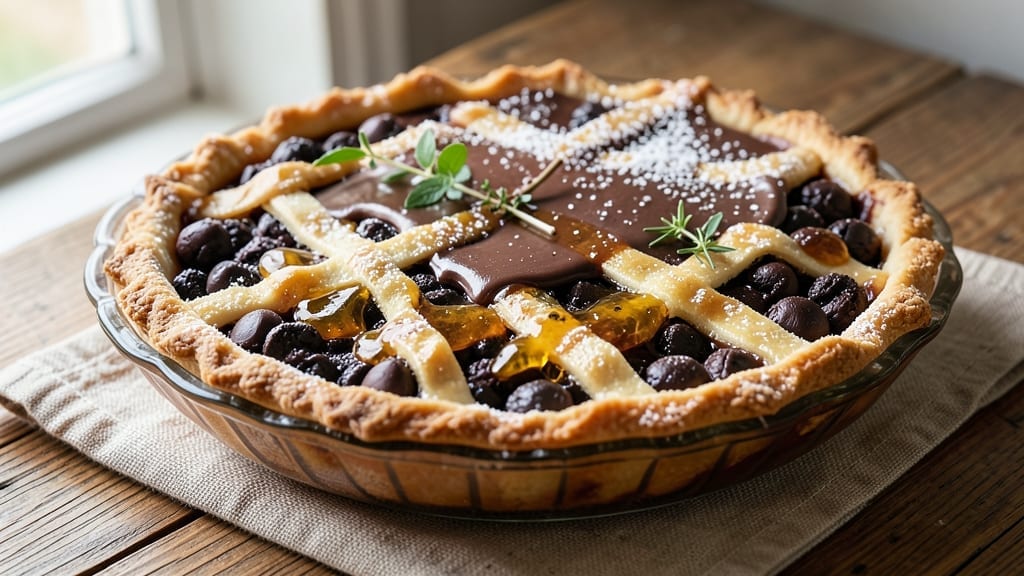
This 4 Charles chocolate pie recipe delivers the ultra-rich, velvety filling and signature crispy lattice top that makes it legendary. 💛 The secret lies in a precise balance of dark chocolate, eggs, and a touch of corn syrup for that signature glossy finish—no shortcuts, just restaurant-quality results at home.
Every layer, from the buttery crust to the perfectly set filling, comes together with professional precision.
The lattice crust isn’t just decorative—it’s the star, creating delicate, crispy windows that contrast beautifully with the dense, fudgy chocolate center. What sets this recipe apart is the foolproof technique for achieving that signature sheen without overbaking, ensuring each slice stays moist and decadent.
The filling is thickened just enough to hold its shape while maintaining that melt-in-your-mouth texture.
By the time you pull it from the oven, you’ll have a pie that looks like it belongs in a high-end bakery—golden lattice edges, a glossy chocolate surface, and a crust that’s sturdy yet tender.
The aroma alone will have everyone gathering around your kitchen, and the first bite delivers that perfect harmony of rich cocoa, buttery crust, and just the right amount of sweetness.
Serve it warm with a scoop of vanilla ice cream or let it cool slightly for clean, elegant slices. This recipe is designed for success, with clear steps and professional tips to ensure your pie turns out flawless every time. Let’s get baking!
Ingredients for 4 charles chocolate pie
Rich chocolate, buttery crust, and delicate lattice—here’s what you need for restaurant-quality 4 Charles pie.
| Ingredient | Amount | Notes |
|---|---|---|
| All-Purpose Flour 🌾 | 2 ½ cups | Sifted for lattice crust |
| Unsalted Butter 🧈 | 1 cup | Cold, cubed for crust |
| Granulated Sugar 🍚 | ½ cup | Plus 2 tbsp for crust |
| Dark Chocolate Chips 🍫 | 12 oz | 70% cocoa, high-quality |
| Large Eggs 🥚 | 4 whole | Room temperature for filling |
| Light Corn Syrup 🍯 | ¼ cup | For glossy finish |
| Salted Butter 🧈 | ½ cup | Melted for filling |
| Vanilla Extract 🌿 | 1 tsp | Pure, high-quality |
| Salt 🧂 | ½ tsp | Fine sea salt |
| Heavy Cream 🥛 | ½ cup | Whipped for lattice |
| Granulated Sugar 🍚 | ¼ cup | For lattice topping |
| Powdered Sugar 🍚 | 2 tbsp | For dusting lattice |
| Vanilla Ice Cream 🍦 | 2 cups | For serving suggestion |
The chocolate matters most here—70% cocoa dark chocolate delivers that signature depth without bitterness. Ghirardelli or Guittardnds are my go-tos, but any high-quality brand works. The chocolate chips should be semi-sweet, not milk chocolate. For the crust, European-style butter (like Plugrá) gives the best flavor, but regular unsalted butter works too. Sift your flour thoroughly to avoid dense lattice strips. The corn syrup is non-negotiable—it creates that signature glossy finish that sets this pie apart from standard chocolate pies.
No dark chocolate chips? Use chopped dark chocolate bars instead—just melt them first. Short on corn syrup? Honey or maple syrup at half the amount works in a pinch, though the texture will differ slightly. For the lattice, if you can’t find pre-cut strips, cut your own with a pizza cutter for clean edges. The heavy cream should be cold when whipping—room temperature makes it too soft. And if you’re worried about overbaking, underbake by 2-3 minutes—the filling will set as it cools. The vanilla extract should be pure, not imitation—Nestlé or McCormick are reliable brands.
Store the pie at room temperature for up to 3 days—the filling thickens beautifully as it sits. For longer storage, wrap tightly in plastic and refrigerate for up to 5 days. The lattice stays crispy for about 24 hours, so serve within that window. The ice cream suggestion isn’t mandatory, but vanilla bean ice cream elevates the experience. If you make extra filling, it freezes well for up to 3 months—just reheat gently before serving.
Why You’ll Love This Recipe
- No-Fuss Crust: I swear by the butter-and-flour crust—just mix, press, bake. No rolling pins, no stress. The secret’s in chilling the dough for 30 minutes (set a timer, really), and suddenly you’ve got a pie base that’s flaky enough to melt in your mouth.
- Rich, Melty Magic: That dark chocolate and butter filling? It’s dangerously good. The sugar caramelizes just enough to give it a glossy sheen, while the eggs bind it into a velvety layer. Here’s what sold me—when it cools, it cracks into perfect squares, but the center stays gooey like a hug.
- Weeknight or Wow Factor: Same recipe, two vibes. Slap it together for a lazy Tuesday dessert or impress guests at a dinner party. The crust holds up beautifully, and the filling stays luscious even after hours. (I’ve served it warm with vanilla ice cream—trust me, it’s a game-changer.)
- Budget-Friendly Leftovers: Uses pantry staples—flour, butter, sugar—and stretches for days. My kids actually fight over the slices (yes, even on a Tuesday night), and the pie keeps for five days in the fridge. Freeze the leftovers too—just reheat until the chocolate softens, and nobody’ll know it’s not fresh.
Step-by-step instructions for 4 Charles chocolate pie
Here’s how to create a decadent chocolate pie with a buttery lattice crust that stays crispy.
👨🍳 Step 1: Prepare the Crust and Lattice Topping
In a large bowl, combine the 2.5 cups all-purpose flour and 0.5 tsp salt. Cut in the 1 cup unsalted butter using a pastry cutter or your fingers until the mixture resembles coarse crumbs. Sprinkle in the 0.5 cup granulated sugar and mix until evenly distributed. Add 2 tablespoons cold water and mix just until the dough comes together.
Divide the dough in half. For the lattice, roll one portion between two sheets of parchment paper into a 12-inch circle, about ⅛-inch thick. Cut into 1-inch strips and set aside. Roll the remaining dough into a 9-inch pie crust and fit it into a 9-inch pie dish, trimming any excess. Chill while you prepare the filling.
🍳 Step 2: Make the Ultra-Rich Chocolate Filling
In a medium saucepan, melt the 0.5 cup salted butter over low heat. Remove from heat and whisk in the 12 oz dark chocolate chips until smooth. Return to low heat and stir in the 4 whole large eggs, one at a time, whisking constantly. Add the 0.25 cup light corn syrup, 1 tsp vanilla extract, and 0.5 cup heavy cream, mixing until fully combined.
Pour the filling into the chilled pie crust. Sprinkle the reserved 0.25 cup granulated sugar evenly over the top. This will create a beautiful caramelized crust during baking.
🥘 Step 3: Assemble the Lattice Topping
Whip the 0.5 cup heavy cream with an electric mixer until soft peaks form. Spread this over the chocolate filling. Arrange the lattice strips in a herringbone pattern, pressing gently to adhere. Brush with a little water to help them stick, then dust with 2 tbsp powdered sugar for extra crispiness.
Here’s the thing—don’t skip the powdered sugar. It creates a beautiful contrast against the dark chocolate and adds that signature crispy texture you’re after.
🔥 Step 4: Bake to Golden Perfection
Preheat your oven to 350°F. Place the pie on a baking sheet (to catch any drips) and bake for 50-55 minutes until the lattice is golden brown and the filling is set but still slightly jiggly in the center. If the edges brown too quickly, cover them with aluminum foil.
Watch for the golden brown color on the lattice—this is your signal that it’s crispy and ready. The filling should be just set in the center but still have a slight wobble, as it continues to thicken as it cools.
⏰ Step 5: Cool and Serve
Let the pie cool completely at room temperature for 2 hours before slicing. This resting period allows the filling to fully set and develop its rich texture. Serve with 2 cups vanilla ice cream on the side for the ultimate indulgence.
Real talk: If you can’t wait, go ahead and slice after 1 hour—just know the filling will be softer. For the best experience, patience is key. The contrast of warm pie with cold ice cream makes every bite unforgettable.
Pro Tips For Making 4 Charles Chocolate Pie
- MELT THE CHOCOLATE GENTLY: Use a double boiler or microwave in 20-second bursts—stirring between each—until the dark chocolate chips are just smooth. I learned this the hard way: dumping chips into hot liquid makes them seize, and you’ll end up with clumps no amount of whisking fixes.
- CHILL THE CRUST BEFORE FILLING: Pop the pie crust in the fridge for 15 minutes after pressing it into the pan. Cold butter in the filling won’t melt too fast, giving you time to pour it in without a soggy bottom. (Yes, even if you’re impatient like me.)
- WHISK EGGS UNTIL THICK: Beat the eggs and sugar until the mixture coats the back of a spoon and leaves a visible trail when you drag your finger through it. This isn’t just about sweetness—it’s what keeps the filling from separating when it bakes. Skip this, and you’ll get a grainy texture.
- USE ROOM-TEMP BUTTER: Take the unsalted butter out of the fridge 30 minutes before you start. Cold butter creates pockets of air in the filling, leading to a dense, uneven bake. Room temp butter? Creamier, smoother, and way more reliable. (Your future self will notice the difference.)
Pro cooking tips for perfect results
Chocolate Temp Control
Never let the chocolate filling exceed 160°F or it will seize and become grainy. I use a candy thermometer to monitor the saucepan temperature while melting the butter and chocolate together. If you don’t have one, watch closely—once the chocolate starts to bubble, remove it immediately from heat.
The corn syrup helps stabilize the filling, but proper temperature control is what truly makes this pie professional-quality. 🌡️
Lattice Assembly Secrets
For a perfect herringbone pattern, lay your first lattice strip horizontally across the pie, then alternate vertical and diagonal strips to create the classic design. I find using parchment paper strips as guides helps keep everything aligned.
Press gently but firmly—this ensures the lattice sticks to the filling without tearing. The powdered sugar dusting is non-negotiable; it creates that signature crispy texture that sets this pie apart. ✨
Baking Time Precision
Your oven’s hot spots will affect baking time, so rotate the pie halfway through the 50-55 minute bake. I recommend using an oven thermometer to confirm your oven actually reaches 350°F—many ovens run 25°F hotter or colder than set.
The filling should be just set in the center with a slight wobble when done. If it’s not quite there, return it to the oven for 5-minute intervals until perfect. 🔥
Crust Edge Protection
To prevent the crust edges from over-browning, I cover them with aluminum foil during the last 15 minutes of baking. For extra insurance, create a makeshift pie shield by cutting a circle of foil slightly larger than your pie dish and placing it over the top.
This maintains that beautiful golden lattice while keeping the filling perfectly set. The foil can be removed just before the final 5 minutes for that perfect finish. 💫
Cooling Strategy
Never rush the cooling process—this is where the magic happens. The filling continues to set as it cools, developing that signature ultra-rich texture. I place my pie on a wire rack to allow air circulation all around.
For the first 30 minutes, I leave it at room temperature, then transfer it to the refrigerator for the final 1.5 hours if you’re impatient to serve. This two-stage cooling prevents condensation from making the lattice soggy. 💡
Serving Presentation
For restaurant-quality presentation, dust the lattice with powdered sugar right before serving. I like to add a few chocolate curls on top and serve with a scoop of vanilla bean ice cream on the side. The contrast of warm pie with cold ice cream creates the perfect balance.
If you’re making this ahead, store it at room temperature for up to 3 days—the flavors only get better with time. 🍽️
Nutrition facts
Frequently asked questions about 4 Charles chocolate pie
Why does this recipe use both salted and unsalted butter?
The unsalted butter in the crust gives you full control over seasoning, while the salted butter in the filling adds depth of flavor without needing extra salt. This combination creates that signature rich, slightly salty-sweet balance that makes this pie so special. The salted butter’s flavor complements the dark chocolate beautifully.
Can I make this pie without a lattice top?
Yes, but you’ll miss the signature texture! If you prefer a solid top, use the full dough and roll it out to cover the pie completely. Brush it with heavy cream and sprinkle with powdered sugar for crispiness. The lattice isn’t just decorative—it creates those delicate, crispy windows that contrast perfectly with the rich filling.
What’s the best way to store leftover chocolate pie?
For short-term storage, keep it at room temperature in an airtight container for up to 3 days. The filling actually improves as it sits! For longer storage, refrigerate for up to 5 days—just let it sit at room temperature for 30 minutes before serving to restore the lattice’s crispness. Freezing isn’t recommended as it can make the filling grainy.
Can I substitute corn syrup with something else?
You can use honey or maple syrup at half the amount, but the texture will be slightly different. The corn syrup creates that signature glossy finish and helps stabilize the filling. For the best results, stick with the original recipe—it’s what gives this pie its professional-quality sheen and perfect set.
How do I fix a cracked lattice crust?
Don’t worry—it’s common! Use a small amount of apricot jam or chocolate ganache to gently press the edges back together. Brush with heavy cream and sprinkle with powdered sugar to restore crispiness. The pie will still taste amazing—it’s all about the delicious filling underneath that matters most!

- 3lb Prime Rib Roast Recipe: Juicy Pink Center Guaranteed in 3 Hours - October 31, 2026
- 5 Spice Cake Recipe: Warmly Spiced Layers With Crunchy Top - October 31, 2026
- 1950’s Macaroni and Cheese Recipe: Nostalgic Creamy Cheese Sauce with Buttery Noodles - October 31, 2026