
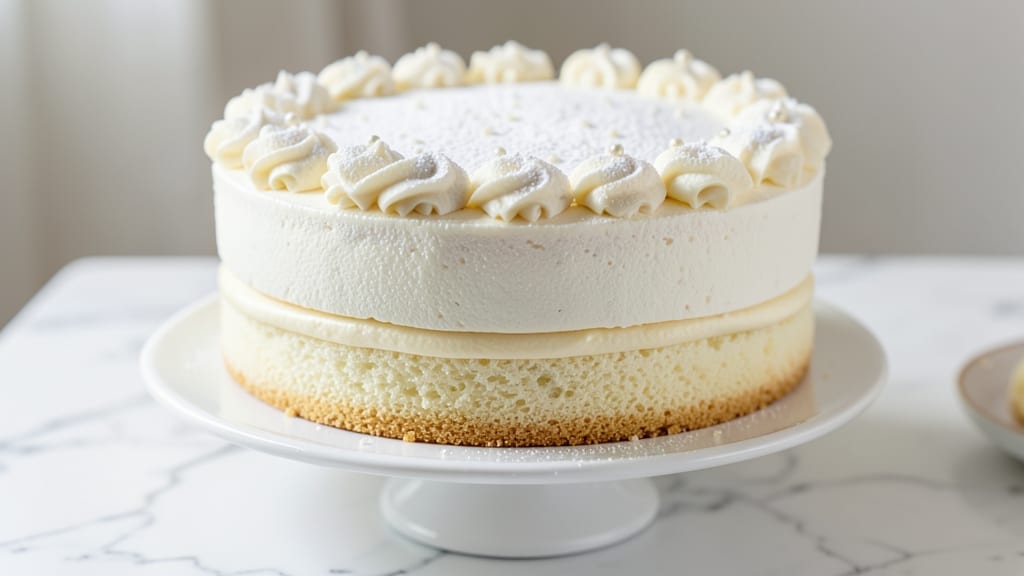
This 2-layer white cake recipe delivers the perfect balance of fluffy vanilla layers and velvety buttercream—ideal for birthdays, weddings, or any celebration that calls for elegance. The secret lies in precise measurements and gentle folding, ensuring tender crumbs and a moist texture that stays fresh for days.
I’ve baked this cake countless times, and it never fails to impress, even for beginners.
The recipe starts with a simple yet foolproof vanilla cake batter, baked at 350°F until golden and perfectly set. While the layers cool, you’ll whip up a rich buttercream filling that’s light enough to spread smoothly yet sturdy enough to hold its shape.
The key is patience—letting the cake cool completely before assembly prevents soggy layers and ensures clean slices every time.
What makes this cake truly special is its versatility. Decorate it with fresh berries, a dusting of powdered sugar, or intricate piped buttercream for a showstopping centerpiece. The buttercream filling adds a luscious contrast to the tender cake, making each bite a harmonious blend of sweetness and texture.
Whether you’re baking for a special occasion or treating yourself, this recipe delivers restaurant-quality results at home.
Ready in about 2 hours from start to finish, this cake is perfect for those who want a beautiful dessert without the fuss. The instructions are straightforward, and with a few simple tools, you’ll achieve professional-looking results. Let’s get baking—your taste buds (and guests) will thank you!
Ingredients for 2 layer white cake
Twelve essential ingredients for a showstopping white cake with velvety buttercream layers.
| Ingredient | Amount | Notes |
|---|---|---|
| All-Purpose Flour 🌾 | 3 cups | Sifted for light texture |
| Granulated White Sugar 🍬 | 2 ¼ cups | Divided for batter and buttercream |
| Unsalted Butter 🧈 | 1 ½ cups | Room temperature, softened |
| Large Eggs 🥚 | 6 whole | Room temperature, separated |
| Vanilla Extract 🌿 | 2 tsp | Pure, high-quality extract |
| Baking Powder 🧂 | 1 ½ tsp | Diamond Crystal preferred |
| Salt 🧂 | ½ tsp | Fine sea salt |
| Milk 🥛 | 1 cup | Room temperature, whole preferred |
| Powdered Sugar 🍬 | 4 cups | For buttercream, sifted |
| Heavy Whipping Cream 🥛 | 1 ½ cups | Cold, full-fat preferred |
| Vanilla Bean Paste 🌿 | 1 tbsp | For buttercream depth |
| Fresh Strawberries 🍓 | 1 ½ lb | For decoration, hulled |
The flour and butter are your foundation. King Arthur flour gives the best texture, but any all-purpose works—just sift it well to avoid dense cake. For the butter, Plugrá or Land O’Lakes brands stay soft at room temperature without melting. Eggs should be room temperature (pop them out of the fridge 30 minutes before baking), and freshness matters here—older eggs can make the cake gummy. The vanilla extract? McCormick or Nielsen-Massey are my go-tos, but any pure extract will do. Pro tip: Divide your sugar into two portions—one for the batter, one for the buttercream—so you’re not scrambling midway through.
No vanilla bean paste? Pure vanilla extract plus a pinch of ground vanilla bean works in a pinch. Running short on heavy cream? Whipped coconut cream gives a similar texture (though it’s not identical). The milk can be swapped for evaporated milk or even almond milk for a lighter touch, but whole milk keeps the crumb tender. For decoration, strawberries are ideal, but raspberries or blueberries add a pop of color. If you’re feeling fancy, add a splash of strawberry syrup to the buttercream for extra flavor. And if you’re baking in a dry climate, consider adding an extra tablespoon of milk to the batter—it helps with moisture.
Store the cake layers in an airtight container at room temperature for up to 3 days, or freeze the assembled cake for 3 months. The buttercream keeps beautifully in the fridge for 5 days—just bring it to room temperature before re-whipping. For extra freshness, wrap the cake in plastic wrap and place it in a cake carrier. The strawberries should be added just before serving, or they’ll get mushy. If you’re prepping ahead, make the buttercream a day in advance and store it in the fridge—it’ll be easier to whip later.
Why You’ll Love This Recipe
- No Mixer Needed: I swear by this recipe when my stand mixer takes a vacation. Creaming the butter and sugar by hand? Totally doable—just elbow grease and patience. The eggs come in next, and before you know it, you’ve got a smooth batter without any fancy equipment.
- Vanilla Buttercream Magic: That classic vanilla extract and butter combo in the frosting? It’s the kind of flavor that makes people pause mid-bite. Light, sweet, but not cloying—it’s the perfect neutral canvas for sprinkles, fruit, or even just a dusting of powdered sugar.
- Birthday to Brunch: This cake is my go-to for anything from a last-minute birthday surprise to a Sunday morning treat. The layers stay moist for days, so it’s great for gatherings where you don’t want to stress about freshness. (Yes, even on a Tuesday.)
- Pantry Staple Power: Honestly, what’s not to love about a cake made with ingredients you already have? Flour, sugar, butter, eggs—it’s budget-friendly and never wastes anything. Plus, leftovers? They’re always welcome around here.
Step-by-step instructions for fluffy vanilla layers with buttercream bliss
Here’s how to bake layers that rise high and hold their shape perfectly.
Prepare Cake Pans and Preheat Oven
Grease two 8-inch round cake pans thoroughly with butter, then dust with flour, tapping out any excess. Line the bottoms with parchment circles for easy removal. Preheat your oven to 350°F—this is the magic temperature for tender crumb and even baking. I always let the oven preheat for 15 minutes to ensure consistent heat distribution.
While waiting, separate the 6 whole large eggs, placing yolks in one bowl and whites in another. Room-temperature eggs whip better, so if they’re cold, let them sit at room temperature for 30 minutes. This step prevents flat, dense cake—trust me, it makes a difference.
Whip Egg Whites to Stiff Peaks
In a clean, grease-free bowl, beat the egg whites with a stand mixer on medium speed until soft peaks form. Gradually increase to high speed and continue beating until the whites form stiff, glossy peaks that hold their shape when the whisk is lifted. This takes about 3-4 minutes—don’t rush it, or the cake will collapse.
Set the whites aside and in a separate bowl, whisk together the 1.5 cups unsalted butter (softened), 2.25 cups granulated white sugar (reserved for batter), 2 teaspoons vanilla extract, 1.5 teaspoons baking powder, and 0.5 teaspoon salt until light and fluffy. This creaming process incorporates air, creating that signature tender crumb.
Combine Wet Ingredients and Fold in Egg Whites
Add the 6 egg yolks one at a time to the butter mixture, mixing well after each addition. Then gently fold in the 1 cup milk until just combined. The batter should be smooth but slightly thick—if it’s too thin, your cake will be dense.
Now, using a spatula, gently fold one-third of the whipped egg whites into the batter to lighten it. Then fold in the remaining whites in two additions, being careful not to deflate them. The goal is to maintain as much air as possible for that signature fluffy rise. Pour the batter evenly into the prepared pans, filling them about two-thirds full.
Bake Until Golden and Springy
Bake the cakes for 25-30 minutes, or until a toothpick inserted into the center comes out clean and the tops spring back when pressed gently. Rotate the pans halfway through baking for even browning. The cakes should be golden on top but not over-browned—this ensures a tender crumb.
Let the cakes cool in their pans for 10 minutes, then transfer to a wire rack to cool completely. This gradual cooling prevents cracking. While they cool, prepare your buttercream—it’s best made while the cakes are still warm so the flavors meld beautifully.
Make and Assemble the Buttercream
Beat the 1.5 cups heavy whipping cream (cold) with a stand mixer until soft peaks form. In a separate bowl, beat the 1.5 cups unsalted butter (remaining amount) until smooth and creamy. Gradually add the 4 cups powdered sugar and 1 tablespoon vanilla bean paste, mixing on low speed to avoid a sugar cloud.
Increase the speed to medium and beat for 3-5 minutes until light and fluffy. Gently fold in the whipped cream until fully incorporated. This buttercream should be smooth, spreadable, and hold its shape—if it’s too soft, chill it for 15 minutes before using.
Level the cooled cake layers if needed, then place one on a cake stand or plate. Spread a generous layer of buttercream, then place the second layer on top. Cover the entire cake with remaining buttercream, then smooth the sides with an offset spatula. Chill for 30 minutes before decorating with the 1.5 lb fresh strawberries, sliced and arranged in a fan pattern for a stunning finish.
Pro Tips For Making 2 Layer White Cake
- Whisk Eggs Until Ribbon Stage: Stop when the egg mixture holds a slow ribbon when you lift the whisk—no need to overbeat. I learned this the hard way when my cakes turned dense and rubbery; eggs have enough air when they’re just almost too thick.
- Cream Butter and Sugar Slowly: Start with room-temperature butter and mix on medium speed for 3-5 minutes until pale and fluffy. Rushing this step traps air poorly, and you’ll end up with a cake that’s more compact than light.
- Sift Dry Ingredients Together: Sift flour, baking powder, and salt before measuring—this prevents lumps and ensures even distribution. Skipping this means your cake might rise unevenly or taste slightly bitter from uneven leavening.
- Chill Batter Before Baking: Let the batter sit in the bowl for 10-15 minutes in the fridge before pouring. This relaxes the gluten, so your layers don’t collapse under their own weight when they hit the oven.
Flavor customization for this recipe
Citrus Zest Twist
Brighten your vanilla cake with a zesty twist by adding 1 tablespoon lemon or orange zest to the batter. This subtle citrus note enhances the vanilla flavor without overpowering it.
I like to use organic Meyer lemons for their natural sweetness. For extra flair, fold ½ cup white chocolate shavings into the buttercream—it pairs beautifully with citrus. 🍋
Spiced Vanilla Infusion
Warm up your cake with a pinch of spices. Add ½ teaspoon cinnamon and ¼ teaspoon cardamom to the batter for a cozy, aromatic depth. For the buttercream, stir in 1 teaspoon almond extract and a sprinkle of ground nutmeg for a sophisticated twist.
This works especially well with a caramel drizzle> on top.
Chocolate-Dipped Layers
For chocolate lovers, spread a thin layer of melted dark chocolate> (about ⅓ cup) between the cake layers and buttercream. Use 70% dark chocolate> for a rich but not overpowering flavor.
Dip the bottom of the cake in melted chocolate before adding strawberries for an elegant finish. This adds a luxurious contrast to the vanilla.
Cream Cheese Swirl
Replace the buttercream with a tangy cream cheese frosting by mixing 8 oz cream cheese> (softened), ½ cup butter, and 3 cups powdered sugar. Swirl it into the cake layers before adding the final buttercream layer.
This adds a creamy, slightly tart contrast that balances the sweetness. Garnish with raspberries> instead of strawberries for a pop of color.
Coffee-Infused Buttercream
For a sophisticated touch, steep 2 tablespoons instant espresso powder> in 2 tablespoons hot water, then cool before mixing into the buttercream. This deepens the vanilla flavor with a subtle coffee note.
Pair it with chocolate-covered espresso beans> on top for a decadent presentation. Perfect for coffee lovers or afternoon tea gatherings. ☕
Seasonal Fruit Variations
Swap strawberries for seasonal fruits: peaches or berries> in summer, cranberries> in fall, or kiwi slices> in winter. For a tropical twist, use mango and passion fruit> with a lime zest buttercream.
Adjust the sugar in the buttercream slightly if using very sweet fruits like mango. The key is balancing flavors—tart fruits need a touch more sweetness!
Nutrition facts
Frequently asked questions
Why do I need to separate the egg whites and yolks?
Separating the eggs creates two key textures: the yolks add richness to the batter while the whites provide structure through stiff peaks. When folded together gently, they create that signature fluffy crumb. Skipping this step can result in a dense cake that doesn’t rise properly—worth the extra 5 minutes!
Can I bake these layers in different-sized pans?
Yes, but adjust the baking time! For 6-inch pans, bake 20-25 minutes; for 9-inch pans, bake 30-35 minutes. The key is checking with a toothpick—it should come out clean. Just scale the batter proportionally (e.g., 1.5 cups batter per 6-inch pan).
What if my buttercream is too soft or too stiff?
If too soft, chill for 15 minutes before using. Too stiff? Add 1-2 teaspoons milk at a time until spreadable. The ideal consistency should hold its shape when piped but still be smooth enough to spread. Temperature matters—use cold cream and room-temperature butter for perfect results.
How do I prevent my cake from cracking?
Cracking usually happens from uneven cooling or overmixing. Let cakes cool in pans for 10 minutes, then transfer to wire racks. Avoid opening the oven door early, and don’t overfill pans (fill only 2/3 full). If cracks appear, simply cover with extra buttercream—they’re purely cosmetic!
Can I make this cake ahead of time?
Bake layers 1 day ahead, wrap tightly in plastic, and store at room temperature. Assemble the cake 4-6 hours before serving so the buttercream sets properly. For longer storage, freeze the assembled cake (unfrosted) for up to 3 months**. Thaw overnight in the fridge before decorating.

- 3lb Prime Rib Roast Recipe: Juicy Pink Center Guaranteed in 3 Hours - October 31, 2026
- 5 Spice Cake Recipe: Warmly Spiced Layers With Crunchy Top - October 31, 2026
- 1950’s Macaroni and Cheese Recipe: Nostalgic Creamy Cheese Sauce with Buttery Noodles - October 31, 2026