
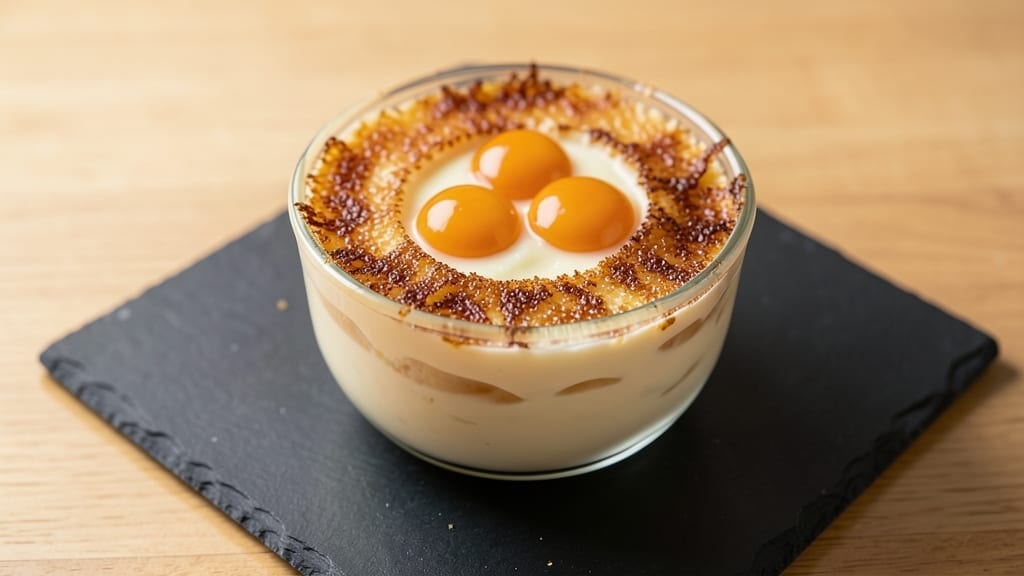
This 4 egg yolks crème brûlée recipe delivers the silkiest vanilla custard with that coveted crackly sugar crust—no fancy equipment required. I perfected this version after burning through three batches (yes, really), but now it’s foolproof.
The secret lies in tempering those yolks just right and letting the custard set overnight—patience pays off with every creamy spoonful.
What makes this recipe special is how the vanilla bean infuses the custard while it bakes, creating layers of aromatic depth. We’re talking rich, custardy perfection that melts on the tongue, topped with a caramelized sugar shell that shatters like glass.
The key technique? Using a kitchen torch (or broiler) to create that signature crisp crust without burning the custard underneath.
By the time you’re ready to serve, you’ll have a dessert that looks as impressive as it tastes—golden custard peeking through that crackly sugar lattice. The contrast of warm custard and cool caramelized sugar is pure magic, and the vanilla flavor sings through every bite.
This is the kind of dessert that makes dinner parties feel special without requiring hours in the kitchen.
Perfect for romantic dinners, holiday gatherings, or treating yourself after a long week. The recipe scales easily too—just adjust your baking dish size. Let’s make this crème brûlée that’ll have everyone asking for seconds.
Ingredients for 4 egg yolk creme brulee
Four yolks, one vanilla bean, and patience make this crème brûlée shine.
| Ingredient | Amount | Notes |
|---|---|---|
| Large Egg Yolks 🥚 | 4 whole | Separated from whites, room temperature |
| Granulated Sugar 🍚 | 1 cup | Divided: 0.75 cup custard, 0.25 cup crust |
| Heavy Cream 🥛 | 1 ½ cups | Full-fat, cold, 35% fat minimum |
| Vanilla Bean 🌿 | 1 whole | Split lengthwise, scraped seeds |
| Vanilla Extract 🍯 | 1 tsp | Pure alcohol-free preferred |
| Whole Milk 🥛 | ½ cup | Warmed, 110°F |
| Salt 🧂 | ¼ tsp | Fine sea salt |
| Unsalted Butter 🧈 | 2 tbsp | Cold, cubed, for ramekins |
| Cornstarch 🌾 | 1 tbsp | For custard stability |
The vanilla bean is non-negotiable here—Madagascar or Bourbon beans at Whole Foods or specialty markets deliver the best aroma. Split it lengthwise, scrape those tiny black seeds (they’re the magic), and toss the pod in with the custard. No vanilla bean? Double the extract, but you’ll miss that floral depth. The heavy cream needs to be cold and full-fat—none of that light cooking cream stuff. Trader Joe’s sells a great 35% fat version if your store doesn’t carry it. And grab the finest granulated sugar
No vanilla bean? Double the extract—but trust me, it’s not the same. Running short on cornstarch? Arrowroot powder at half the amount works too. The milk should be warmed to 110°F (like a warm bath, not boiling)—microwave it for 40 seconds, then check with a thermometer. If you’re in a pinch, half-and-half works, but the custard won’t be as rich. And for the sugar crust? Confectioners’ sugar makes a finer layer, but granulated gives that classic caramelized shatter. Just make sure it’s dry—humidity’s the enemy of that perfect crack. This custard needs 8-12 hours to set—overnight is ideal. Cover ramekins with foil, then plastic wrap to prevent skin. For the sugar crust, torch until golden brown (about 3-5 minutes per ramekin), or broil for 2-3 minutes—watch like a hawk. Leftovers? Store covered in the fridge for up to 5 days, but the crust gets soft. Re-torch before serving. And if you’re making ahead, add the sugar crust the day you serve—it’s worth the extra minute.
Why You’ll Love This Recipe
- Four Eggs Only: I swear by this version—no wasted yolks, no fuss. Four yolks, a splash of cream, and you’ve got the perfect custard base without overcomplicating things. The math works out cleaner than my usual six-yolk batches.
- Crispy-Creamy Magic: That caramelized sugar top? Chef’s kiss. The vanilla bean scraped into the custard while it tempers adds depth, but the real star is the contrast—silky warm center, shatteringly sweet crust. It’s the kind of dessert that makes you pause mid-bite.
- Date Night Ready: No one has to know it’s basically a fancy version of pudding. Serve it in fancy ramekins with a dusting of cocoa, and suddenly you’re the host who actually put in effort. (Between us, I’ve fooled my in-laws twice.)
- Leftovers? More Like Second Helpings: The custard thickens beautifully and keeps for days in the fridge—great for when you bake once and eat twice. (Yes, even on a Tuesday.) Just reheat gently, let the sugar harden again, and no one will guess it’s not fresh. Budget win.
Step-by-step instructions for vanilla-infused crème brûlée
Here’s how to make silky custard with a perfect crackly crust using just four egg yolks.
Infuse Cream with Vanilla and Warm the Milk
In a medium saucepan, combine the 1.5 cups heavy cream and the scraped seeds from the 1 whole vanilla bean. Bring to a gentle simmer over medium heat, then immediately remove from heat and let steep for 15 minutes. This step is crucial for deep vanilla flavor – the cream should smell intensely aromatic.
While the cream infuses, warm the 0.5 cup whole milk in a small saucepan until it reaches 110°F – it should feel pleasantly warm to the touch but not hot. Keep both liquids at this temperature for the next step. I like to use a thermometer here to ensure precision, but if you don’t have one, test the milk by sprinkling a pinch of sugar – it should dissolve completely without bubbling.
Whisk Custard Base and Temper the Eggs
In a medium heatproof bowl, whisk together the 4 whole large egg yolks, 0.75 cup granulated sugar, 1 tbsp cornstarch, 1 tsp vanilla extract, and 0.25 tsp salt until completely smooth. The mixture should be pale yellow and homogeneous – this prevents graininess in your final custard.
Gradually pour the warm milk and vanilla-infused cream into the egg mixture while whisking constantly. This tempering process is essential – it prevents the eggs from scrambling when they heat up. Return the mixture to the saucepan and place over low heat, stirring continuously with a wooden spoon or silicone spatula.
Cook Custard to Perfect Thickness
Cook the custard mixture, stirring constantly, until it thickens enough to coat the back of a spoon – this should take about 3-5 minutes. You’ll notice the mixture will go from runny to slightly glossy and begin to thicken noticeably. The moment it reaches 170°F is your target – this ensures perfect texture without cooking the eggs.
Immediately strain the custard through a fine-mesh sieve into a clean bowl to remove any potential lumps. This step guarantees ultra-smooth custard. Let it cool to room temperature, stirring occasionally to prevent a skin from forming. I like to place the bowl in an ice bath for the last few minutes to speed up cooling while maintaining texture.
Assemble and Chill Ramekins
Preheat your oven to 325°F. Lightly grease four 6-ounce ramekins with the 2 tbsp unsalted butter, rubbing it on all surfaces. Pour the cooled custard into the ramekins, filling them about ¾ full. Cover each ramekin tightly with plastic wrap and place them in a deep baking dish.
Pour hot water into the baking dish until it comes about halfway up the sides of the ramekins. This water bath ensures gentle, even cooking. Bake for 40-45 minutes until the custards are set but still slightly jiggly in the center – they’ll continue firming up as they cool. The centers should look like soft pudding when done.
Create the Perfect Sugar Crust
Remove the ramekins from the water bath and let them cool to room temperature, then refrigerate for at least 4 hours or overnight. This chilling step is crucial for developing the proper texture.
Before serving, sprinkle each custard with 0.25 cup granulated sugar, pressing it gently into the surface. Use a kitchen torch to carefully caramelize the sugar until it’s deep golden brown with crackly crystals. If you don’t have a torch, broil the ramekins for 1-2 minutes, watching closely to prevent burning. The sugar should melt and harden into a glass-like crust that snaps when tapped.
Pro Tips For Making 4 Egg Yolk Creme Brulee
- Temper the yolks: Whisk your 4 egg yolks with sugar over a double boiler until they hit 160°F (71°C)—that’s when they’ll thicken properly without scrambling. I learned this the hard way after making custard that looked like glue. A candy thermometer is your friend here.
- Scrape the vanilla: Split that vanilla bean lengthwise, scrape out every last bit of those black seeds, and toss them into the cream while it heats. The seeds pack more flavor than just dumping in extract. (Yes, even if you’re impatient like me.)
- Strain like your crust depends on it: After tempering, strain the custard through a fine-mesh sieve into the cream—no lumps, no excuses. I skipped this once and ended up with a texture like wet sand. The sieve takes 30 seconds; don’t rush it.
- Chill the ramekins first: Pop your ramekins in the fridge for 10 minutes before pouring the custard. Cold glass conducts heat better, so your custard sets evenly instead of sticking to the sides like a sad science experiment. (Your future self will thank you.)
Common mistakes when making perfect results
Overcooking Custard
I’ve seen custards turn into scrambled eggs more times than I can count—usually because someone took their eye off the pot. The custard is done when it reaches 170°F and coats the back of a spoon, not when it looks thick.
Overcooking causes the eggs to curdle, and you’ll end up with a grainy, rubbery mess. I’ve learned to set a timer for 3-5 minutes max and check constantly. If it smells cooked (like warm vanilla pudding, not burnt eggs), it’s ready. 🌡️
Skipping the Water Bath
Baking ramekins without a water bath is like trying to bake a soufflé without a blowtorch—it’s just asking for trouble. The water bath distributes heat evenly, preventing cracks or uneven cooking. If you skip it, your custard might set too quickly on the edges while staying runny in the center.
I always use a deep baking dish and fill it halfway up the ramekins with hot water. Pro tip: Use a thermometer to confirm the water stays hot but not boiling—180°F is ideal. ⚡
Not Tempering the Eggs
Pouring hot liquid directly into raw eggs is a one-way ticket to scrambled custard. Tempering—adding the warm milk and cream gradually while whisking—prevents the eggs from curdling. I’ve ruined batches by rushing this step, so I now take my time, adding the liquids in a slow stream.
If your mixture starts to thicken or turn lumpy, you’ve gone too fast. A quick fix? Strain it through a fine-mesh sieve before baking, but it won’t be as smooth as when done right. 🥚
Rushing the Chill Time
Crème brûlée needs patience—at least 4 hours in the fridge, preferably overnight. Skipping this step means the custard won’t set properly, and the sugar crust will melt into a gooey mess. I’ve tried serving it after just 2 hours, and let me tell you, it’s a disaster.
The custard stays too soft, and the crust doesn’t crackle. Trust the process: set a reminder if you have to, but don’t cut corners here. ✨
Uneven Sugar Crust
Sprinkling sugar too thickly or torching unevenly leads to a lumpy, burnt mess. I’ve seen people dump a whole cup of sugar on one ramekin and wonder why it didn’t caramelize properly. Use 1-2 tbsp per ramekin and press it lightly into the custard.
For torching, move the flame in slow, even circles—don’t hover in one spot. If you’re broiling, watch like a hawk: 1-2 minutes max, or you’ll end up with blackened sugar. A little patience here makes all the difference. 🔥
Using Old or Low-Quality Ingredients
Stale vanilla extract, old eggs, or low-fat cream can ruin your custard before you even start. I’ve used eggs straight from the fridge, and they’ve turned my custard into a sad, watery pudding. Always use room-temperature eggs and full-fat cream (35% fat or higher).
For vanilla, a fresh Madagascar or Bourbon bean beats extract every time. And check your sugar—if it’s clumped or stale, toast it in a dry pan for 2-3 minutes to revive its caramelizing power. 💛
Nutrition facts
Frequently asked questions
Why does this recipe use only 4 egg yolks instead of whole eggs?
Four yolks create the perfect balance of richness and silkiness without making the custard too heavy. Whole eggs would add too much protein, risking a grainy texture. The yolks’ natural fats and emulsifiers also help create that ultra-smooth, velvety consistency we all love in crème brûlée. Plus, it’s more budget-friendly than using full eggs!
Can I make this recipe without a vanilla bean?
Yes, but you’ll notice a big difference in flavor. Double the vanilla extract to 2 teaspoons for the best substitute. For extra depth, add a pinch of ground cinnamon or orange zest to the custard. The bean’s seeds contain unique aromatic compounds that extract better than alcohol-based extracts. If you’re serious about vanilla flavor, invest in a quality bean!
How do I know when the custard is perfectly set after baking?
The custard should be just set in the center with a slight wobble when gently shaken. It should look like soft pudding but not completely firm. If it’s too soft, bake 5-10 more minutes. If it’s completely set, it’ll be too dense. The key is removing it when it’s still slightly warm in the middle—it’ll firm up as it cools. Pro tip: The edges should be fully set while the center still jiggles slightly.
What’s the best way to store leftovers?
Cover each ramekin tightly with plastic wrap and store in the fridge for up to 5 days. The sugar crust will soften but can be re-torched before serving. For longer storage, remove the sugar crust first and store just the custard. To reheat, warm gently in a water bath until just melted. Never microwave—it ruins the texture!
Can I use a broiler instead of a torch for the sugar crust?
Place ramekins on a broiler-safe tray and broil for 1-2 minutes on high, watching constantly. Keep the oven door slightly open for better heat control. The sugar will caramelize faster than with a torch, so work quickly. For even results, rotate the tray halfway through. Just be prepared to act fast—broiling burns easily!

- 3lb Prime Rib Roast Recipe: Juicy Pink Center Guaranteed in 3 Hours - October 31, 2026
- 5 Spice Cake Recipe: Warmly Spiced Layers With Crunchy Top - October 31, 2026
- 1950’s Macaroni and Cheese Recipe: Nostalgic Creamy Cheese Sauce with Buttery Noodles - October 31, 2026