
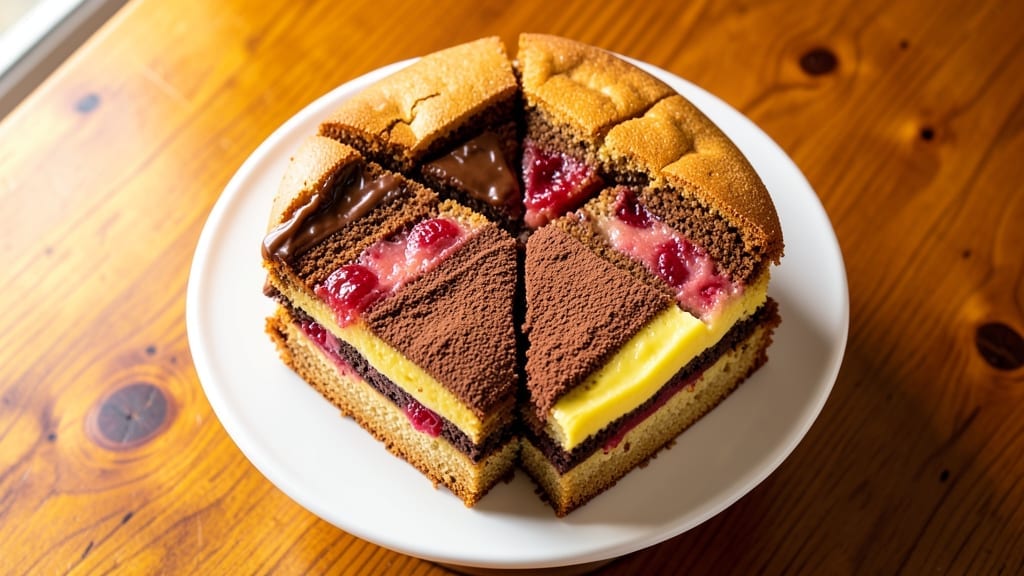
A 4 flavor pound cake recipe that layers vanilla, chocolate, spice, and citrus into one showstopping dessert is the ultimate solution for parties, celebrations, or when you simply want to impress.
The secret lies in baking four distinct cake layers separately—each infused with its signature flavor—then assembling them with a creamy filling that ties everything together beautifully. No frosting skills required, just precise layering and patience for a result that looks and tastes like a bakery masterpiece.
This recipe delivers restaurant-quality results at home with simple techniques: vanilla cake gets its signature warmth from vanilla bean paste, chocolate cake stays rich and fudgy, spice cake incorporates cinnamon and nutmeg for depth, while citrus cake bursts with lemon zest and orange extract.
The key to success is baking each layer to the same height—30 minutes at 350°F—so they stack evenly. Trust me, the effort is worth the stunning, flavor-packed finale.
By the time you slice into this cake, you’ll be rewarded with layers of contrasting textures and flavors: tender vanilla, dense chocolate, aromatic spice, and bright citrus. The filling—a velvety vanilla buttercream—binds everything together while adding a creamy contrast.
It’s the kind of dessert that disappears quickly, leaving guests asking for the recipe. Perfect for birthdays, holidays, or just because—let’s bake this showstopper.
For extra flair, dust the top with powdered sugar or garnish with fresh berries. The cake keeps well for 3 days at room temperature, making it ideal for meal prep or gifting.
Whether you’re a seasoned baker or just starting out, this recipe delivers foolproof results that will have everyone believing you’re a pro. Let’s get started!
Ingredients for 4 flavor pound cake
Four flavors, one showstopping cake—here’s what you’ll need to bake like a pro.
| Ingredient | Amount | Notes |
|---|---|---|
| All-Purpose Flour 🌾 | 4 cups | Sifted for even texture |
| Granulated Sugar 🍚 | 2 ½ cups | Divided for each flavor |
| Unsalted Butter 🧈 | 2 cups | Room temperature, full-fat |
| Large Eggs 🥚 | 6 whole | Room temperature, separated |
| Vanilla Bean Paste 🌸 | 2 tbsp | For vanilla flavor intensity |
| Unsweetened Cocoa Powder 🍫 | ½ cup | Natural for rich chocolate |
| Ground Cinnamon 🌿 | 1 tsp | Plus extra for spice layer |
| Ground Nutmeg 🌿 | ½ tsp | Freshly grated preferred |
| Lemon Zest 🍋 | 2 tbsp | Freshly grated, bright flavor |
| Orange Extract 🍊 | 1 tsp | Pure orange extract |
| Powdered Sugar 🍚 | 3 cups | For buttercream filling |
| Heavy Whipping Cream 🥛 | 1 ½ cups | Cold for buttercream |
| Salt 🧂 | 1 ½ tsp | Fine sea salt |
| Baking Powder 🍞 | 1 ½ tsp | Double-acting preferred |
| Vanilla Extract 🌸 | 1 tbsp | Pure vanilla extract |
The flour is your foundation, so grab King Arthur or Gold Medal for the best rise. Butter matters too—Plugrá or Land O’Lakes unsalted melts perfectly. Eggs should be large, not extra-large, for consistent texture. For the vanilla bean paste, Madagascar bourbon vanilla adds depth, but any quality paste works. The cocoa powder? Hershey’s Special Dark or Dutch-processed brands keep the flavor rich without bitterness. Spice layers need freshly grated nutmeg—pre-ground loses potency fast. If you’re short on time, Penzeys whole nutmeg is a game-changer.
No vanilla bean paste? Double the vanilla extract—it won’t be identical, but close. Running low on cocoa powder? Melted dark chocolate (60% cocoa) at half the amount works in a pinch. Fresh lemon zest is ideal, but bottled zest from Trader Joe’s saves time. The orange extract can be swapped for orange zest (1 tbsp) plus 1 tsp vanilla extract if you’re feeling adventurous. For the buttercream, European-style butter like President whips up fluffier than regular. No heavy cream? Whipped coconut cream gives a similar texture (though it tastes different).
Flour and sugar keep 6 months in airtight containers, while spices last 1 year if stored properly. Buttercream should be made the day of assembly—it’s best fresh, but you can prep it 1 day ahead if sealed tightly. The cake layers themselves stay moist for 3 days at room temperature, making it perfect for parties. For extra flair, store the assembled cake in a cool, dark place—it’ll hold up beautifully for 2 days before serving.
Why You’ll Love This Recipe
- No-Fuss Mixing: This cake comes together with just a bowl and a whisk—no stand mixer, no fuss. Cream butter and sugar until it’s light, crack in eggs one by one, fold in flour, and let the vanilla bean paste do the magic. That’s it. Honestly, the hardest part is deciding which flavor to bake first.
- Four Layers of Joy: Every slice delivers something different—vanilla, chocolate, lemon, and maybe even a hint of spice. The buttercream layers them like a dessert buffet, and that vanilla bean paste? It turns ordinary into ridiculously good. Between us, the chocolate one disappears fastest.
- Weekend or Weeknight: Slice it for breakfast with coffee, serve it at brunch with berries, or pack it for a picnic. The cake keeps well for days, so I often bake two pans—one for now, one for later. (Yes, even on a Tuesday night when I’m craving something sweet but don’t want to bake.)
- Budget-Friendly Luxury: Butter and eggs might sound fancy, but they stretch further than you’d think. A single cake feeds six, and leftovers turn into French toast or trifle. I’ll be real: this is the kind of treat that makes you feel special without breaking the bank.
Step-by-step instructions for creating four flavor pound cake layers
Here’s how to build four distinct cake layers that come together as one showstopping dessert.
Prepare the Base Batter for All Four Flavors
In a large mixing bowl, combine the 4 cups All-Purpose Flour, 1.5 tsp Salt, and 1.5 tsp Baking Powder. Sift this dry mixture together to remove any lumps and ensure even distribution throughout the batter. This creates a light, tender crumb that’s essential for pound cake texture.
In a separate large bowl, cream together the 2 cups Unsalted Butter and 2.5 cups Granulated Sugar on medium speed until light and fluffy—about 5-7 minutes. This step incorporates air, which helps the cake rise beautifully. Add the 6 whole Large Eggs, one at a time, mixing well after each addition. Stir in the 2 tbsp Vanilla Bean Paste and 1 tbsp Vanilla Extract for that rich vanilla flavor foundation.
Divide and Customize Each Flavor Batter
Carefully divide the base batter into four equal portions (about 1¼ cups each) in separate mixing bowls. To each portion, add the unique flavor components:
For the Vanilla Layer: Add nothing extra—just mix well to distribute the vanilla flavors evenly.
For the Chocolate Layer: Whisk in the 0.5 cup Unsweetened Cocoa Powder until completely smooth. The batter will darken noticeably, indicating proper incorporation.
For the Spice Layer: Mix in the 1 tsp Ground Cinnamon and 0.5 tsp Ground Nutmeg. The aroma will be warm and inviting—this is where the cozy spice flavor develops.
For the Citrus Layer: Stir in the 2 tbsp Lemon Zest and 1 tsp Orange Extract. The bright citrus notes will shine through in this layer, providing a refreshing contrast.
Bake Each Layer to Perfect Doneness
Preheat your oven to 350°F and grease four 9-inch round cake pans with butter or baking spray. Line the bottoms with parchment circles for easy removal. Divide the batter evenly among the prepared pans.
Bake each layer for 25-30 minutes, or until a toothpick inserted in the center comes out clean. I like to rotate the pans halfway through baking for even browning. The cakes should be golden on top with slightly domed centers—this indicates they’ve risen properly. Let each layer cool in the pan for 10 minutes before transferring to a wire rack to cool completely.
Prepare the Buttercream Filling
While the cake layers cool, prepare the buttercream by whipping together the 3 cups Powdered Sugar and 1.5 cups Heavy Whipping Cream until light and fluffy. Gradually add the 2 tbsp Vanilla Bean Paste and 1 tbsp Vanilla Extract, mixing until smooth and creamy. This buttercream should be thick enough to hold its shape but still pipeable—adjust consistency with a bit more powdered sugar if needed.
Here’s the thing—this buttercream is your glue. It’s what brings all four flavors together into one cohesive dessert. Spread a generous layer between each cake layer, making sure to cover the entire surface completely. This ensures every bite delivers that perfect balance of vanilla, chocolate, spice, and citrus.
Assemble and Chill for Maximum Enjoyment
Once all layers are completely cool, stack them with buttercream between each layer. Place the cake on a serving plate and spread the remaining buttercream over the top and sides for a smooth finish. Dust with a light layer of powdered sugar if desired, but I prefer to keep the beautiful color contrast visible.
Cover the cake and refrigerate for at least 2 hours before serving. This chilling time allows the flavors to meld together beautifully and makes the cutting experience much cleaner. When you’re ready to serve, slice into perfect squares that showcase each flavor layer—vanilla, chocolate, spice, and citrus—all in one bite.
Pro Tips For Making 4 Flavor Pound Cake
- WEIGH YOUR BUTTER: Cold butter makes a denser, richer pound cake—this isn’t a debate. Take the butter straight from the fridge, cut it into ½-inch cubes, and let it sit out for exactly 30 minutes before creaming. Any longer, and you’ll end up with melted puddles instead of fluffy peaks. (Yes, even if you’re impatient like me.)
- SCRAPE THE VANILLA: That vanilla bean paste isn’t just for scraping—it’s for every last drop. After squeezing out the seeds, slice the pod open and scrape the insides with a spoon. The leftover bits hold more flavor than you’d think, and skipping this step means you’re missing out on the real vanilla punch. (Your cake will taste it.)
- DON’T OVERMIX THE EGGS: Once your butter and sugar are light and fluffy, add the eggs one at a time—and stop mixing after each. Overworking the batter turns it gummy, and no one wants a dense brick instead of a tender crumb. Use a spatula to gently fold in the next egg, then mix just until combined. (This is where most people mess up.)
- BAKE UNTIL 200°F: Your cake’s done when the internal temperature hits 200°F—not when it springs back or looks golden. A toothpick test is useful, but it’s not foolproof—some cakes pull clean too soon. Use an instant-read thermometer for accuracy, and resist opening the oven early. (Patience here = no soggy center.)
Pro cooking tips for 4 flavor pound cake
Batter Division
Dividing the base batter evenly into four portions is where precision matters most. Use a kitchen scale for accuracy—each portion should weigh exactly 1¼ cups (about 180g batter). I swear by my OXO Good Grips scale because it’s easy to read and reliable.
If you don’t have one, use a liquid measuring cup and level off the batter with a straight edge for consistency. Uneven portions lead to uneven layers, and trust me, that’s a recipe for frustration. 🌟
Layer Height Control
For perfect stacking, bake each layer in 9-inch round pans filled only ⅔ full. Overfilling causes doming, which makes layering tricky. I tap the pans gently on the countertop after baking to loosen the cakes, then let them cool completely before stacking.
This prevents crumbling when you go to assemble. Pro tip: Use a serrated knife to level any uneven tops before adding buttercream. 🔪
Buttercream Consistency
The buttercream should be thick enough to hold its shape but still spreadable—like soft whipped cream. If it’s too stiff, add 1 tsp milk or cream at a time. Too thin? Whip in ½ cup powdered sugar gradually.
I like mine just thick enough to pipe decorative rosettes on the sides if I’m feeling fancy. The key is patience—whip it on medium speed for 3-4 minutes to avoid overmixing. 🥄
Temperature Timing
Take the cake layers out of the oven when the center tests clean with a toothpick, but don’t rush cooling. Let them rest in their pans for 10 minutes before transferring to a wire rack.
This prevents cracking when they cool too quickly. For the buttercream, chill the bowl and beaters in the freezer for 10 minutes before whipping—this helps achieve that perfect fluffy texture faster. 🌡️
Stacking Technique
Place the first layer on a cake stand or plate, then spread ½ inch of buttercream evenly. Add the next layer, press down gently, then repeat. I use a long offset spatula to smooth the buttercream between layers.
For extra stability, brush the top layer with a little simple syrup (equal parts sugar and water, heated) before adding the final buttercream coating. This keeps everything moist and prevents crumbling when slicing. 🎂
Chilling Matters
Never skip the 2-hour chill in the fridge—this is non-negotiable for clean slices and flavor melding. The buttercream needs time to set, and the layers need to relax after baking. I cover my cake with plastic wrap pressed directly onto the surface to prevent drying.
If you’re short on time, chill for at least 1 hour, but know the slices may be messier. Patience here makes all the difference. ⏰
Nutrition facts
Frequently asked questions
Can I make this cake without a vanilla bean paste?
If you don’t have vanilla bean paste, simply double the vanilla extract to 2 tablespoons for each flavor layer. The cake will still taste delicious, though the depth of flavor won’t be identical. For the best results, use high-quality pure vanilla extract.
How do I prevent the cake layers from crumbling when stacking?
Make sure each layer is completely cool before assembling. Brush the top of each layer with a light layer of simple syrup (equal parts sugar and water, heated) before adding buttercream. This keeps the cake moist and prevents crumbling. Also, chill the cake for at least 2 hours before slicing.
Can I substitute orange extract for lemon zest?
While you can use orange zest (1 tablespoon) instead of orange extract, the flavors won’t be identical. Orange extract provides a stronger, more concentrated citrus flavor. If you’re using zest, add 1 teaspoon vanilla extract to balance the flavor profile.
How long will the cake stay fresh?
The fully assembled cake stays fresh at room temperature for 3 days if stored in an airtight container. For longer storage, refrigerate for up to 5 days or freeze the layers separately (without buttercream) for up to 3 months. Thaw in the fridge overnight before reassembling.
What’s the best way to serve this cake?
Slice the cake into 1-inch squares to showcase all four flavors in each bite. Serve at room temperature for the best texture. For extra flair, dust the top with powdered sugar or garnish with fresh berries. This cake is perfect for birthdays, holidays, or any celebration where you want to impress!

- 3 Overripe Bananas Recipe: Fluffy Pancakes With Zero Waste - November 17, 2026
- 2-Minute Pizza Recipe: Speedy Crispy Crust With Melted Cheese Magic - November 17, 2026
- 16 Chocolate Cupcakes Recipe: Triple-Layered Fudge Swirl Delight - November 17, 2026