
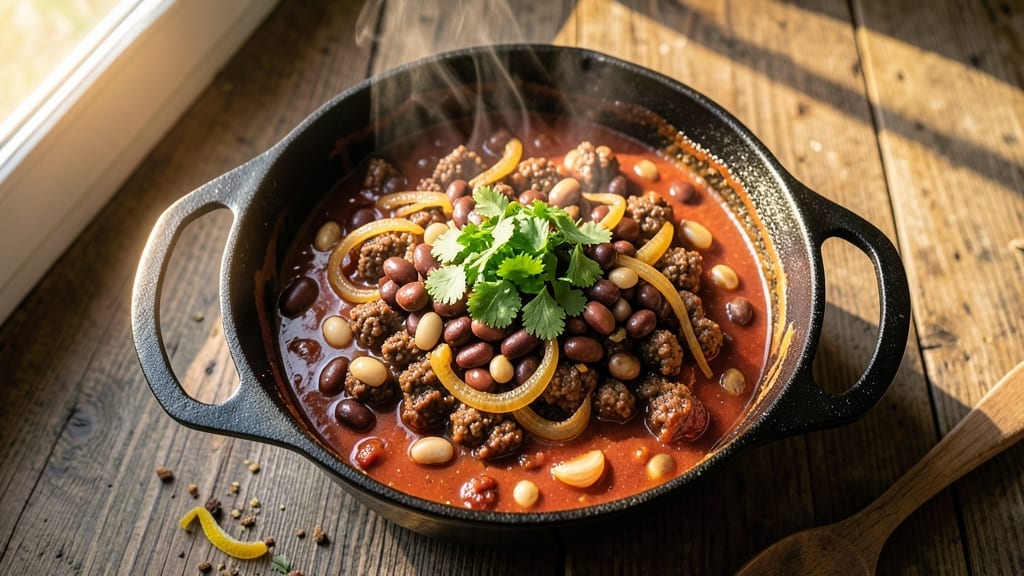
A 4-hour chili recipe transforms simple ingredients into a rich, complex stew where every layer of flavor develops through time. The slow simmer breaks down meat into tender chunks while beans absorb the deep, smoky notes of chili powder and cumin.
What starts as a basic pot of ingredients becomes something extraordinary—bold, hearty, and packed with texture. The secret lies in patience and layering. Browned ground beef forms the foundation, while onions and garlic build aromatic depth.
Beans add substance, and spices like smoked paprika and bay leaves infuse the broth with warmth. Unlike quick chili recipes, this method lets flavors meld gradually, creating a sauce that clings to every bite.
By the final hour, you’ll have a chili that’s richer, deeper, and more satisfying than anything you can make in 30 minutes. The meat falls apart at the touch of a spoon, the beans are tender but still hold their shape, and the broth has reduced to a velvety consistency.
This isn’t just chili—it’s a meal that feels like a hug in a bowl. Serve it with cornbread, shredded cheese, or sour cream to balance the heat.
The slow-cooked method makes it perfect for meal prep too—flavors only get better as it sits, making leftovers just as delicious as the first serving. Let’s get cooking.
Ingredients for 4 hour chili
Sixteen ingredients. Four hours. A chili where every layer of flavor develops into something extraordinary.
| Ingredient | Amount | Notes |
|---|---|---|
| Ground Beef 🥩 | 2 lb | 80% lean, finely ground |
| Onions 🧅 | 2 whole | Yellow or red, diced |
| Garlic Cloves 🧄 | 6 cloves | Minced, fresh preferred |
| Canned Kidney Beans 🌱 | 1 can | 15 oz, drained and rinsed |
| Canned Black Beans 🌱 | 1 can | 15 oz, drained and rinsed |
| Tomato Paste 🍅 | ½ cup | Smooth, not chunky |
| Diced Tomatoes 🍅 | 2 cups | San Marzano preferred |
| Beef Broth 💧 | 4 cups | Low-sodium preferred |
| Chili Powder 🌶️ | 2 tbsp | Smoked variety preferred |
| Ground Cumin 🌿 | 1 tbsp | Toasted for depth |
| Smoked Paprika 🌶️ | 1 tbsp | For smoky richness |
| Bay Leaves 🍃 | 2 whole | Fresh or dried |
| Salt 🧂 | 1 ½ tsp | Diamond Crystal preferred |
| Black Pepper 🌶️ | ½ tsp | Freshly ground |
| Dark Brown Sugar 🍯 | 1 tbsp | For subtle sweetness |
The ground beef is the foundation—80% lean gives you the right fat-to-meat ratio for browning without excess grease. Costco or local butchers often have the best prices for bulk ground beef, but any grocery store’s pre-packaged chuck works fine. Look for bright red color and good marbling. The onions and garlic are your aromatic base—don’t skip mincing the garlic finely, or you’ll taste individual cloves. Yellow onions add sweetness, while red onions bring a slight sharpness that balances the dish. For the beans, low-sodium canned is ideal, but rinse them thoroughly to cut back on any residual saltiness.
No ground beef? Dry-aged beef chunks or lamb shoulder work beautifully if you brown them first. Swap kidney beans for pinto or pinto beans—just adjust cooking time slightly. The tomato paste can be tricky to measure—Trader Joe’s squeeze tubes make this easy, and they keep for months. For the broth, homemade is best, but Swanson or Pacific Foods low-sodium options are solid shortcuts. If you’re avoiding sugar entirely, omit the brown sugar—it’s subtle but enhances the depth of flavor. The spices? Penzeys for the best quality, but regular grocery store brands work if they’re fresh.
This chili tastes even better the next day—4-5 days in the fridge, 3 months frozen. I always make a double batch and portion it into containers for easy lunches. Store the broth separately if you prefer thinner chili later. The beans and meat will keep their texture better that way. For reheating, low and slow is key—bring it to a simmer and let it bubble gently for 10 minutes. Never microwave, or you’ll break the emulsion and end up with a greasy mess.
Why You’ll Love This Recipe
- Deep Umami Magic: The slow cook transforms simple ground beef and onions into something rich and complex—like a secret sauce hiding in plain sight. Garlic cloves and black beans add that earthy, smoky punch, while the kidney beans keep it hearty without overpowering.
- Leftovers That Don’t Suck: Honestly, I make this on Sundays just to have chili for the week. It reheats like a dream, and the flavors actually get better the next day. Freeze half for those nights when takeout feels like too much effort.
- Budget-Friendly Powerhouse: This recipe uses pantry staples you already own—ground beef, canned beans, onions, garlic—and stretches them into a filling, satisfying dinner. No fancy ingredients, no wasted leftovers, just pure, reliable comfort food that won’t break the bank.
Step-by-step instructions for 4 hour chili recipe
This method builds deep, complex flavors through slow simmering and careful layering.
Brown the Ground Beef Thoroughly
Heat a large Dutch oven over medium-high heat until hot. Add the 2 lb ground beef in batches, breaking it up with a wooden spoon as it cooks. Don’t overcrowd the pot—this prevents proper browning. Cook for 8-10 minutes total, stirring occasionally, until the beef is deep brown and no longer pink.
This browning step is critical—it develops the Maillard reaction that creates rich, meaty depth. If the beef releases too much fat, drain all but 2 tablespoons of fat from the pot. I like to leave a little fat for flavor, but not so much that it makes the chili greasy. Once browned, transfer the beef to a plate and set aside.
Sauté Aromatics Until Fragrant
In the same Dutch oven, add the 2 whole diced onions and cook over medium heat for 5-6 minutes until softened and light golden brown. Add the 6 minced garlic cloves and cook for another 30 seconds until fragrant—don’t let the garlic burn, or it will turn bitter.
Here’s where the flavor foundation happens. The onions should caramelize slightly, adding natural sweetness that balances the chili’s heat. If you notice the onions sticking, add a splash of water and scrape up any browned bits from the bottom of the pot—these bits are packed with flavor. Once the aromatics are ready, remove the pot from heat temporarily.
Build the Chili Base with Tomato Paste
Return the pot to medium heat and stir in the 0.5 cup tomato paste, spreading it evenly over the bottom of the pot. Cook for 2-3 minutes until the paste darkens slightly and loses its raw taste. This step creates a rich, concentrated base that prevents the chili from being too watery.
Next, add the 2 cups diced tomatoes, 4 cups beef broth, 2 tbsp chili powder, 1 tbsp ground cumin, 1 tbsp smoked paprika, 2 whole bay leaves, 1.5 tsp salt, 0.5 tsp black pepper, and 1 tbsp dark brown sugar. Stir well to combine, scraping up any browned bits from the bottom of the pot. This ensures all the flavors meld together perfectly.
Simmer the Chili for Deep Flavor Development
Return the browned ground beef to the pot and add the 1 can drained and rinsed kidney beans and 1 can drained and rinsed black beans. Bring the chili to a gentle boil, then reduce heat to low and let it simmer uncovered for 3-4 hours. The chili should bubble softly, with occasional small bubbles breaking the surface.
This long simmering time is what creates the rich, layered flavors. Stir the chili occasionally to prevent sticking and ensure even cooking. The chili will reduce slightly as it simmers, becoming thicker and more concentrated. The beans will soften and absorb the flavors, while the meat will become tender and infused with the spices. Taste after 2 hours and adjust seasoning if needed—adding a pinch more salt or chili powder can help balance the flavors.
Finish and Serve with Perfect Texture
Once the chili has simmered for 3-4 hours, remove the 2 bay leaves and taste for seasoning. The chili should be rich, slightly thick, and well-balanced between sweet, smoky, and spicy notes. If the chili is too thick, add a splash of water or broth to reach your preferred consistency. If it’s too thin, simmer uncovered for another 10-15 minutes to thicken it slightly.
Serve the chili immediately, garnished with additional chili powder or chopped fresh cilantro if desired. The chili will continue to thicken slightly as it cools, so don’t worry if it looks a bit loose when you first serve it. Each bowl should be hearty and satisfying, with tender beef, soft beans, and a complex blend of spices that comes together beautifully after hours of slow cooking. Enjoy with crusty bread or over rice for the full experience.
Pro Tips For Making 4 Hour Chili
- CRISP THE ONIONS FIRST: Ditch the raw onion chunks—finely dice them and cook them in beef tallow or oil until golden brown before adding the beef. I used to skip this, and my chili always tasted dull; caramelized onions add depth that no raw onion ever will.
- BROWN THE BEEF WELL: Don’t rush this—break the beef into small pieces and let it sear until it’s no longer pink in the middle. I learned this the hard way by undercooking it, which left my chili greasy and unappetizing. High heat, 5-7 minutes, no shortcuts.
- DRAIN AND RINSE BEANS: Skip the salty, mushy canned beans—drain and rinse them thoroughly before adding to the pot. My grandmother swore by this, and she was right: it cuts the sodium and keeps the beans from turning to mush after hours of simmering.
- SIMMER LOW AND SLOW: After the first 30 minutes of active cooking, reduce to a bare simmer—just enough to keep bubbles breaking the surface. I was skeptical until I tried it; low heat builds flavor without burning the edges, and the beans stay intact.
Flavor customization for this 4 hour chili
Spice Level Control
Adjust the heat to your preference by tweaking the chili powder and adding cayenne pepper or hot sauce at the end. For mild chili, reduce the chili powder to 1 tbsp and skip the cayenne.
If you love heat, add ½ tsp cayenne with the spices and finish with 1 tbsp hot sauce (like Cholula). I like to keep it medium—1.5 tbsp chili powder plus ¼ tsp cayenne gives a balanced kick without overwhelming the dish. 🌶️
Sweet and Smoky Depth
Enhance the richness by adding 1 tbsp molasses or 1 tbsp maple syrup when you stir in the broth. This deepens the caramelized notes and balances the spices beautifully.
For extra smokiness, swap ½ tbsp smoked paprika for 1 tsp liquid smoke (like Traeger brand) during the final 30 minutes of cooking. Just be careful—liquid smoke can overpower if you use too much!
Umami Boosters
Add 1 tbsp soy sauce or 1 tbsp Worcestershire sauce when you combine the broth and spices. These ingredients add a savory depth that makes the chili taste even more complex.
For a vegetarian version, replace the beef with 1 lb mushrooms (like cremini or portobello) and add 1 tbsp miso paste for umami. Trust me, it’s a game-changer. 💡
Herb and Citrus Brightness
Finish your chili with fresh herbs and citrus for a bright, fresh contrast. Stir in 2 tbsp chopped fresh cilantro or 1 tbsp chopped parsley just before serving.
A squeeze of lime juice (about 1 tbsp) or a sprinkle of orange zest adds a zesty lift that cuts through the richness. I love this combo—it feels like a little vacation in every bite!
Texture Variations
Want extra texture? Fold in ½ cup cooked corn or ½ cup diced bell peppers during the last 30 minutes of cooking. For a heartier chili, add ½ cup cooked quinoa or ½ cup chopped jalapeños (seeds removed for less heat).
If you prefer chunkier beans, use 1 can pinto beans instead of black beans—they hold their shape better. 🌽
Dairy and Cheese Finishes
Serve your chili with a dollop of sour cream or Greek yogurt to cool the heat and add creaminess. For a cheesy finish, top each bowl with ¼ cup shredded cheddar or ½ cup crumbled queso fresco.
If you’re feeling fancy, try ½ cup guacamole on top—it’s a match made in heaven. Pro tip: Let the chili sit for 5 minutes after cooking so the cheese melts perfectly into the sauce.
Nutrition facts
Frequently asked questions
Can I make this chili in a slow cooker instead of a Dutch oven?
Brown the beef first in a skillet, then transfer everything to a 6-quart slow cooker. Cook on low for 6-7 hours or high for 4-5 hours, stirring occasionally. The slow cooker’s gentle heat will create the same deep flavors—just monitor the liquid level and add a splash of broth if needed.
Why does my chili taste watery after 4 hours?
Watery chili usually means too much liquid at the start or not enough reduction. Start with 4 cups broth and simmer uncovered—this lets moisture evaporate naturally. If it’s still thin, simmer uncovered for 10-15 extra minutes or stir in 1 tbsp cornstarch mixed with 2 tbsp water to thicken. The key is patience—don’t rush the process!
Can I substitute turkey or chicken for the beef?
Yes, but adjust the cooking time. Ground turkey (especially lean) works well—just add 1 extra tablespoon oil to prevent drying out. For chicken, use 1.5 lb finely chopped thighs (they stay juicier than breasts) and simmer for 2.5-3 hours instead. The fat content matters—leaner meats need extra care to stay tender.
How do I make this chili vegetarian?
Replace the beef with 1 lb mushrooms (cremini or portobello) and add 1 tbsp soy sauce or 1 tbsp miso paste for umami depth. Use vegetable broth instead of beef broth, and consider adding 1 cup cooked lentils or 1 can white beans for extra protein. The slow cooking method still works beautifully!
What’s the best way to reheat leftovers?
Never microwave—it breaks the texture. Instead, reheat in a pot over medium-low heat for 10-15 minutes, stirring occasionally. For even better results, transfer to an oven-safe dish, cover with foil, and warm at 300°F for 20 minutes. This keeps the chili tender and prevents a greasy texture. Leftovers actually improve overnight!

- 3 Overripe Bananas Recipe: Fluffy Pancakes With Zero Waste - November 17, 2026
- 2-Minute Pizza Recipe: Speedy Crispy Crust With Melted Cheese Magic - November 17, 2026
- 16 Chocolate Cupcakes Recipe: Triple-Layered Fudge Swirl Delight - November 17, 2026