
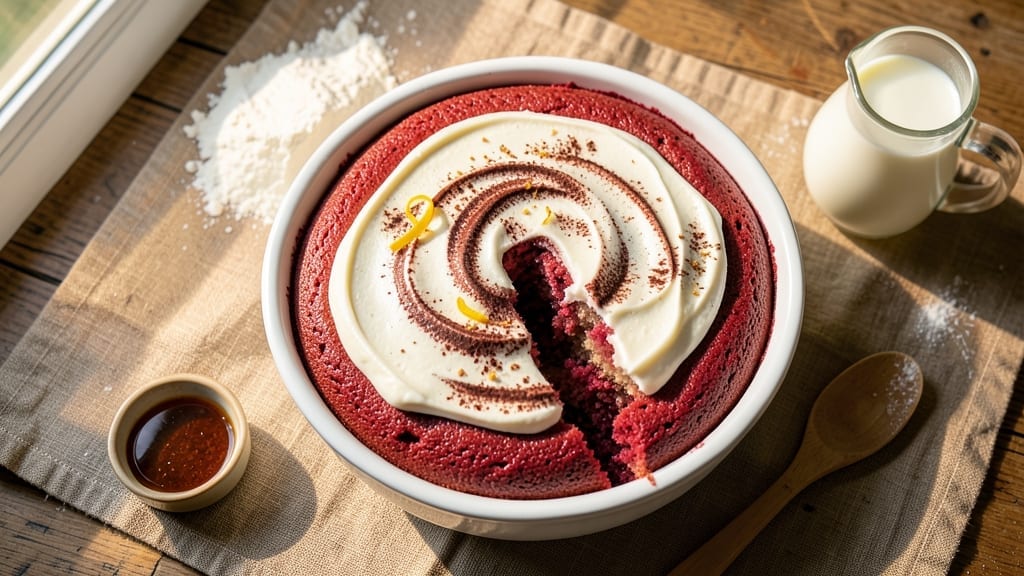
This 4-inch red velvet cake recipe delivers the perfect balance of tender crumb and rich cocoa flavor—exactly what makes it a classic. The secret lies in precise mixing techniques and a moist batter that stays soft even after slicing.
I’ve baked this recipe countless times for gatherings, and it never fails to impress with its signature texture and velvety finish.
The recipe uses a foolproof method to ensure a perfectly baked cake every time, with a creamy cream cheese frosting that complements the subtle tang of the red velvet.
Whether you’re baking for a celebration or a cozy dessert night, this 4-inch size makes it ideal for portion control without sacrificing flavor. The cake’s tender crumb and rich taste come from a carefully measured blend of ingredients, including buttermilk and cocoa powder, which create the signature moistness.
By the time you pull it from the oven, you’ll have a golden-brown cake with a crackly top and a soft, velvety interior. The cream cheese frosting adds a luscious finish, making each slice irresistible.
This recipe is designed to be reproducible and adaptable, whether you’re adding a layer of chocolate ganache or keeping it classic with just the frosting.
Perfect for small gatherings, individual servings, or even as a showstopper for a dessert table, this 4-inch red velvet cake is a crowd-pleaser that’s as beautiful as it is delicious. Let’s get started on creating your own perfect slice!
Ingredients for 4 inch red velvet cake
These 14 ingredients transform into a moist, velvety 4-inch red velvet cake with dreamy cream cheese frosting.
| Ingredient | Amount | Notes |
|---|---|---|
| All-Purpose Flour 🌾 | 1 ½ cups | Sifted for lightness |
| Granulated Sugar 🍚 | 1 cup | White or light brown |
| Cocoa Powder 🍫 | ⅓ cup | Dutch-processed for smoothness |
| Buttermilk 🥛 | 1 cup | Room temperature preferred |
| Vegetable Oil 🫒 | ½ cup | Light-tasting preferred |
| Large Eggs 🥚 | 2 whole | Room temperature for blending |
| Red Food Coloring 🎨 | ¼ tsp | Gel-based for vibrant color |
| White Vinegar 💧 | 1 tbsp | For tangy balance |
| Baking Soda 🧂 | ½ tsp | Fresh for best lift |
| Salt 🧂 | ½ tsp | Fine sea salt preferred |
| Vanilla Extract 🌿 | 1 tsp | Pure alcohol-free preferred |
| Cream Cheese 🧀 | 8 oz | Room temperature for frosting |
| Powdered Sugar 🍚 | 2 cups | Sifted for smooth frosting |
| Heavy Whipping Cream 🥛 | ½ cup | Cold for stiff peaks |
The cocoa powder and buttermilk are non-negotiable for that signature moist crumb. Dutch-processed cocoa from Ghirardelli or Hershey’s Special Dark gives the smoothest texture—avoid natural cocoa, which can be bitter. Buttermilk’s tang keeps the cake tender, so substitute 1 cup milk + 1 tbsp vinegar if you’re out. The red food coloring? Gel-based (like Wilton) won’t bleed like liquid dyes. For the cream cheese frosting, Philadelphia brand melts perfectly—no lumps, ever. Room temperature is key: let it sit for 30 minutes before whipping.
No buttermilk? Plain yogurt or sour cream works in a pinch—just thin with a splash of milk. Swapping cocoa? Hershey’s Cocoa Powder is the closest match, but Navajo or Maya cocoa adds depth. The frosting can be made ahead: whip the cream cheese and powdered sugar, then fold in the cream right before serving. Whipped cream instead of heavy cream? Add 1 tsp powdered sugar to stabilize it. For extra richness, fold in 1 oz melted white chocolate—trust me, it’s a game-changer. And if you’re feeling fancy, dust the top with edible gold leaf for a showstopper finish.
Batter keeps for 24 hours in the fridge—perfect for making ahead. Wrap the cake tightly in plastic wrap and store at room temp for up to 3 days or freeze for 3 months. The frosting? Whip it up to 2 days ahead and store in an airtight container—just re-whip with cold cream before serving. For serving, slice with a hot knife (dip in hot water, wipe dry) for clean cuts. Leftovers? Reheat slices for 10 seconds in the microwave to revive the softness.
Why You’ll Love This Recipe
- Mini Magic: I swear, these 4-inch cakes are the perfect size for one person—or two, if you’re sharing. No giant pans, no waiting for a whole sheet tray to bake. Just one small cake at a time, and no one’s left wondering if they’ll get seconds.
- Velvet Secret: That cocoa powder and buttermilk combo? It’s what turns this into something special. The cake’s got this subtle tang and a hint of chocolate depth, but it’s not too heavy—just rich enough to make you want to bake another one right away. Honestly, it’s the kind of flavor that sneaks up on you.
- Party in a Pan: Need a dessert for a small gathering? Forget the fuss of a big cake. These little guys are perfect for potlucks, baby showers, or even just treating yourself after a long week. Stack them, slice them, or serve them whole—no one will complain.
- Budget Bake: Flour, sugar, cocoa, buttermilk, oil—these are all pantry staples that won’t break the bank. And because they’re small, you’re not wasting ingredients on a cake that might end up half-eaten. Plus, leftovers? They’re rare, but if they happen, they’re just as good the second day.
Step-by-step instructions for 4-Inch red velvet cake
Here’s how to bake a perfectly moist red velvet cake with that signature tender crumb.
Prepare the Cake Batter for Maximum Moisture
Preheat your oven to 350°F and grease two 4-inch round cake pans with vegetable oil, then line the bottoms with parchment paper. In a medium bowl, whisk together the 1.5 cups all-purpose flour, 0.5 tsp baking soda, and 0.5 tsp salt. Sift this dry mixture directly into a large mixing bowl to aerate it—this prevents dense cake.
In a separate bowl, combine the 1 cup granulated sugar, 0.33 cup cocoa powder, 0.5 cup vegetable oil, 2 whole large eggs, and 1 tsp vanilla extract. Whisk until smooth, then stir in the 1 cup buttermilk and 1 tbsp white vinegar—this creates a tangy balance. Add the sifted dry ingredients and mix on low speed until just combined, being careful not to overmix.
Here’s the secret: fold in the 0.25 tsp red food coloring last, mixing just until evenly distributed. The batter should be thick but pourable. If it looks too stiff, add 1-2 tablespoons of buttermilk to ensure a tender crumb. Real talk: don’t skip the vinegar—it reacts with the baking soda to create lift and moisture.
Bake for Even Doneness
Divide the batter evenly between the prepared pans. Tap each pan gently on the counter to remove air bubbles, then smooth the tops with a spatula. Bake for 30-35 minutes or until a toothpick inserted into the center comes out clean with just a few moist crumbs clinging to it.
Here’s where precision matters: the cake should be fully set but still slightly springy to the touch. If you pull it out too early, the center might stay underdone. If it browns too quickly, tent the pans with aluminum foil to prevent over-browning. I like to rotate the pans halfway through baking for even heat distribution—this ensures consistent rise.
Let the cakes cool in their pans for 10 minutes before transferring to a wire rack to cool completely. This gradual cooling prevents cracking and helps set the structure for that perfect slice. Don’t skip this step—rushing it leads to crumbly layers.
Prepare the Cream Cheese Frosting
While the cakes cool, beat the 8 oz cream cheese and 2 cups powdered sugar together in a large bowl using an electric mixer until smooth and creamy. This is where the magic happens: add the 0.5 cup cold heavy whipping cream gradually, mixing on high speed until stiff peaks form.
I press the cream cheese against the sides of the bowl first to break it down—this prevents lumps and ensures a silky texture. If the frosting looks too thick, add 1-2 teaspoons of milk to loosen it slightly. The frosting should hold its shape when spread but still be pipeable for decorating. Real talk: don’t overbeat it or you’ll end up with butter instead of frosting.
Assemble and Decorate
Once the cakes are completely cool, level the tops if needed using a serrated knife. Place one cake layer on a serving plate and spread an even layer of frosting over the top. This is the moment that matters: place the second cake layer on top and gently press down.
Spread the remaining frosting over the entire cake, then use a spatula to create smooth sides. For a classic look, pipe a simple border around the edges using the leftover frosting. Chill the cake in the refrigerator for 30 minutes before slicing to help the frosting set. The result should be a perfectly moist crumb with a velvety-smooth cream cheese frosting that melts in your mouth.
Here’s the thing—this cake is best served at room temperature, so let it sit for 10 minutes before serving. Each slice should reveal that signature red velvet texture with a tender crumb and a creamy, slightly tangy frosting. Trust me, this is the kind of cake that disappears faster than you can say “second slice.”
Pro Tips For Making 4 Inch Red Velvet Cake
- Sift the Cocoa: I learned this the hard way—lumpy cocoa powder ruins the whole vibe. For a 4-inch cake, use a fine-mesh sieve over the dry ingredients and shake it like you’re mad. The goal? No gritty surprises when you bite into that velvety crumb.
- Measure Buttermilk Right: That “1 cup buttermilk” callout? It’s not always accurate. Use a liquid measuring cup, fill it to the line, then stir in the acid (vinegar or lemon juice) last—the liquid level drops when you mix it. Pouring it in first just means you’ll end up short. Trust me, your cake will be denser if you skip this.
- Don’t Overmix the Batter: Whisk the wet and dry ingredients just until combined—maybe 10 strokes max. I used to beat it like I was punishing the bowl, and my cakes turned out tough as a boot. Red velvet’s delicate; treat it like a shy friend, not a project.
- Grease and Flour the Pan: Vegetable oil is your friend here, but don’t half-ass it. Brush the 4-inch pan thoroughly with oil, then dust with flour, tapping out the excess. I skip this sometimes, and the cake sticks like it’s auditioning for Glue. Worth the 30 seconds.
Best sauces and condiments for this 4 inch red velvet cake
Classic Cream Cheese
This signature frosting is non-negotiable for red velvet—its tangy creaminess cuts through the cake’s richness perfectly. I use 8 oz Philadelphia cream cheese (room temperature!) mixed with 2 cups powdered sugar and ½ cup cold heavy whipping cream for that signature pipeable texture.
The secret? Beat the cream cheese against the bowl sides first to break it down completely. For extra stability, add ½ tsp vanilla extract and chill the frosting for 1 hour before using. 🧀
Chocolate Ganache
Swap out the cream cheese frosting for a luscious dark chocolate ganache that pairs beautifully with red velvet’s cocoa notes. Melt ½ cup heavy cream with 6 oz semi-sweet chocolate chips, then drizzle over the cooled cake layers. Let it set for 15 minutes before adding the second layer.
For a showstopper, add ½ cup crushed pretzels to the ganache for a sweet-salty crunch. This works especially well for chocolate lovers who want to keep the classic flavor profile. 🍫
Strawberry Preserves
Brighten up your red velvet with a layer of strawberry preserves between the cake layers. I recommend Mott’s or Bonne Maman for their perfect balance of sweetness and acidity. Spread ¼ cup warmed preserves (microwaved for 10 seconds) between layers, then top with cream cheese frosting.
The berry flavor creates a delightful contrast that makes each bite feel special. For extra flair, add fresh strawberry slices on top. 🍓
Caramel Drizzle
Add a decadent touch with a salted caramel drizzle that enhances the cake’s richness. Make your own by simmering ½ cup granulated sugar with ¼ cup heavy cream and 1 tbsp butter until golden, then drizzle over the frosted cake.
Finish with flaky sea salt for that perfect sweet-salty balance. This works especially well for a more indulgent dessert presentation. 🍯
Lemon Curd Filling
For a zesty twist, add a layer of homemade lemon curd between the cake layers. Whisk ½ cup lemon juice, ¼ cup lemon zest, ½ cup sugar, 2 egg yolks, and 3 tbsp butter until smooth, then spread between layers.
Top with cream cheese frosting and garnish with fresh berries. The citrus cuts through the richness beautifully and adds a refreshing element to each bite. 🍋
Coconut Whipped Cream
Swap out the heavy cream for coconut whipped cream to create a lighter, tropical-inspired frosting. Chill a can of full-fat coconut milk overnight, then whip the thick cream with 1 tbsp powdered sugar and ½ tsp vanilla until fluffy.
Pipe over the cake and top with toasted coconut flakes. This works especially well for a lighter dessert option that still feels indulgent. 🥥
Nutrition facts
Frequently asked questions
Why does my red velvet cake turn out dense instead of moist?
Overmixing the batter is the #1 culprit—it develops gluten, making the cake tough. Mix just until combined, and use Dutch-processed cocoa powder (not natural cocoa) for smoothness. Also, ensure your buttermilk is room temperature and don’t skip the 1 tbsp vinegar—it reacts with baking soda for lift. Let the cake cool gradually in the pan for 10 minutes before transferring.
Can I make this cake in a different pan size?
Yes! For a 6-inch cake, reduce baking time by 5-7 minutes (check at 25 minutes). For a 3-inch cake, bake for 20-25 minutes—smaller cakes cook faster. Adjust frosting amounts proportionally: 6-inch needs ~1.5x frosting, 3-inch needs ~0.5x. Always use an oven thermometer to confirm 350°F accuracy.
How do I store leftovers to keep them fresh?
Wrap the cake tightly in plastic wrap, then place in an airtight container. Store at room temperature for up to 3 days or freeze for 3 months. For frosting, whip it fresh before serving if stored separately. To revive stale slices, microwave for 10 seconds—this restores moisture without drying out the crumb. Chill for 30 minutes before slicing to maintain clean cuts.
What’s the best way to level the cake layers?
Use a serrated knife (like a bread knife) and a leveling guide (or a glass) to create perfectly even tops. Place the knife on the guide and gently saw back and forth while pressing down lightly. For a 4-inch cake, aim for 1.5-inch layers. Leveling ensures even frosting distribution and prevents a lopsided look. Wipe the knife clean between cuts to avoid crumbs.
Can I substitute ingredients if I’m out of something?
Yes! For buttermilk, mix 1 cup milk + 1 tbsp vinegar and let sit for 5 minutes. No red food coloring? Use 1 tsp beet juice or ½ tsp strawberry jam (strained) for color. Swap vegetable oil for melted butter (same amount), but the cake may be slightly denser. For cream cheese frosting, use ricotta cheese (thinner texture) or mascarpone (richer). Always adjust measurements if swapping.

- 3lb Prime Rib Roast Recipe: Juicy Pink Center Guaranteed in 3 Hours - October 31, 2026
- 5 Spice Cake Recipe: Warmly Spiced Layers With Crunchy Top - October 31, 2026
- 1950’s Macaroni and Cheese Recipe: Nostalgic Creamy Cheese Sauce with Buttery Noodles - October 31, 2026