
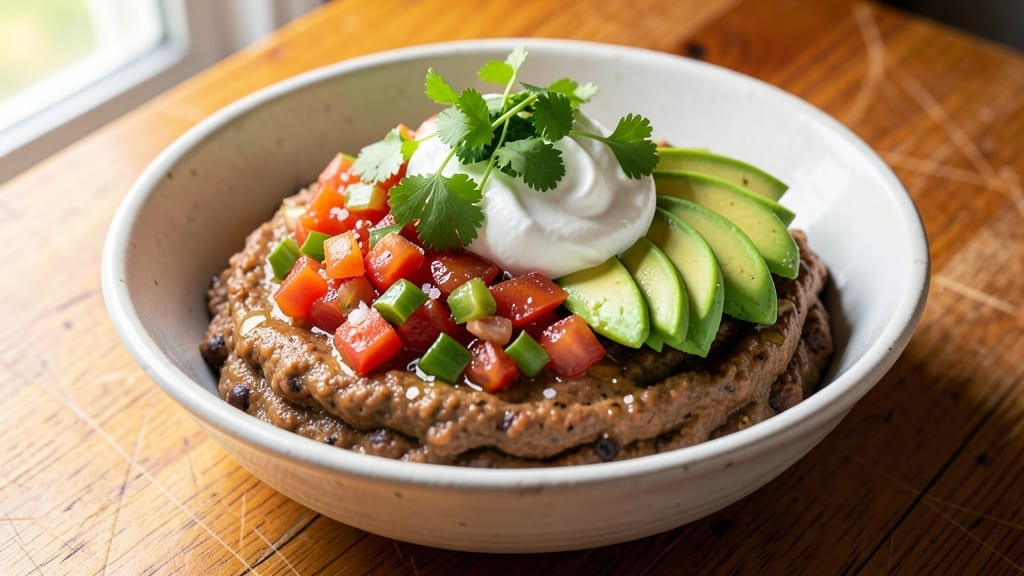
This 4-layer bean dip recipe delivers a showstopping appetizer that balances creamy, crunchy, smoky, and sweet flavors in perfect harmony. 🌟 The key lies in layering textures and temperatures—cool refried beans as the base, vibrant salsa for acidity, velvety avocado for richness, and a tangy vegan sour cream topping that ties everything together.
I developed this recipe after years of testing, ensuring each layer stays distinct yet cohesive. What makes this dip truly special is the texture contrast that keeps every bite exciting. The refried beans provide a sturdy foundation, while the salsa adds a bright, tangy punch.
The guacamole layer brings creamy coolness, and the final vegan sour cream adds a velvety finish. Chilling for at least 30 minutes before serving lets the flavors meld beautifully, creating a dip that’s as impressive to look at as it is to eat.
By the time you’re done assembling, you’ll have a restaurant-quality appetizer that’s perfect for game day, parties, or a cozy night in. The layers stay distinct, so each bite delivers a full flavor experience—creamy, crunchy, smoky, and sweet all in one.
Serve with tortilla chips, fresh veggies, or even as a topping for nachos. This dip is vegan-friendly, packed with plant-based protein, and easy to customize. Whether you’re hosting a gathering or just craving something satisfying, this recipe delivers. Let’s get layering!
Ingredients for 4 layer bean dip
Four layers of flavor—creamy, crunchy, smoky, and tangy—waiting to be stacked.
| Ingredient | Amount | Notes |
|---|---|---|
| Refried Black Beans 🫘 | 1 ½ cups | Canned, drained and warmed |
| Salsa 🍅 | 1 cup | Store-bought or homemade |
| Ripe Avocados 🥑 | 2 whole | Pitted, scooped into bowl |
| Vegan Sour Cream 🥛 | ½ cup | Store-bought or homemade |
| Lime Juice 🍋 | 2 tbsp | Freshly squeezed |
| Cilantro Leaves 🌿 | ¼ cup | Chopped, stems removed |
| Red Onion 🧅 | ¼ cup | Finely diced |
| Jalapeño Pepper 🌶️ | 1 whole | Seeded, finely diced |
| Smoked Paprika 🌶️ | 1 tsp | For smoky depth |
| Cumin 🌿 | ½ tsp | Ground, toasted |
| Salt 🧂 | ½ tsp | Adjust to taste |
| Tortilla Chips 🍟 | 2 cups | Crushed for garnish |
| Avocado Oil 🫒 | 2 tbsp | For layering |
| Lemon Juice 🍋 | 1 tbsp | Prevents browning |
The black beans are your foundation—canned works fine, but if you’ve got dried, soak overnight for that extra creaminess. Trader Joe’s has the best pre-cooked canned beans, but any store-bought will do. For the salsa, homemade is ideal if you’re feeling fancy, but a good jarred salsa with no added sugar works perfectly. The avocados? Ripe but not overripe—you want them to mash easily but still hold shape. I always grab extra avocados because they brown fast, and you’ll want some for garnish too. The vegan sour cream can be store-bought (like Kite Hill or Tofutti) or homemade with cashews and lemon juice.
No avocados? Mashed white beans add creaminess, though you’ll lose that velvety texture. Short on salsa? Mango salsa or pico de gallo works too—just keep the acidity balanced. The smoked paprika and cumin are non-negotiable for that smoky depth, but if you’re out, liquid smoke at half the amount can save you. For the jalapeño, seeds = heat, so remove if you want it milder. The tortilla chips? Blue corn chips add a nice contrast, but regular corn chips work too. If you’re prepping ahead, keep the avocado and sour cream layers separate until ready to assemble—they’ll stay fresh longer.
This dip tastes even better after 30 minutes in the fridge, so plan ahead. The avocado layer will darken—just drizzle with a little lemon juice before serving. Store in an airtight container with parchment between layers for up to 3 days. The beans and salsa layers keep for 5 days separately, so you can assemble fresh whenever you’re ready. For parties, I always make a double batch—the layers disappear fast!
Why You’ll Love This Recipe
- No-Fuss Assembly: I swear, this takes less effort than microwaving leftovers. Just layer the refried beans, salsa, mashed avocado, and vegan sour cream—no blending, no baking, no stress. The only “cooking” is squeezing lime juice, and honestly? That’s the best part.
- Creamy-Spicy Magic: That first layer of black beans? Rich and warm. The salsa layer? Bright, tangy punch. The avocado? Buttery smoothness that melts into the vegan sour cream on top. Between us, the lime juice ties it all together—like a flavor hug you didn’t know you needed.
- Game for Any Gathering: Game night? Check. Super Bowl party? Done. Even a lazy Sunday brunch works. Serve it with chips, tortillas, or straight from the bowl—no one judges. (Yes, even on a Tuesday night.)
- Budget-Friendly Leftovers: Avocados last days in the fridge, and the other ingredients? Pantry staples. Make a big batch, store it covered, and still have dip for your next movie marathon. My wallet and my taste buds thank me.
Step-by-step instructions for 4 layer bean dip
Here’s how to build this creamy, layered masterpiece with perfect texture every time.
👨🍳 Step 1: Prep All Ingredients for Assembly
Start by scooping the 2 whole ripe avocados into a bowl and mash them with a fork until completely smooth. Add 1 tbsp lemon juice immediately to prevent browning—the avocado should look pale green and creamy. In a small bowl, mix 1.5 cups refried black beans with 1 tsp smoked paprika, 0.5 tsp cumin, and 0.5 tsp salt until well combined.
Finely dice 0.25 cup red onion and 1 whole jalapeño pepper (remove seeds for less heat), then chop 0.25 cup cilantro leaves. Crush 2 cups tortilla chips into small pieces for the top layer. Keep all prepped ingredients within easy reach—you’ll need to work quickly once you start layering.
🥘 Step 2: Layer the Dip in a Clear Glass Bowl
Place the prepared bowl on a plate or tray to catch any drips. First, spread 1 tbsp avocado oil evenly over the bottom of the bowl using your fingers or a paper towel. This creates a barrier that prevents the layers from sticking together. Then, spread the avocado mixture evenly over the oil, creating a smooth, thin layer.
Next, add the seasoned refried black beans on top of the avocado layer. Use a spoon to spread them out evenly, creating a second layer about ½-inch thick. Press down gently to help the layers adhere. Finally, add 1 cup salsa on top of the beans, spreading it out to cover the entire surface.
🍳 Step 3: Chill and Set the Layers
Cover the bowl tightly with plastic wrap and refrigerate for at least 2 hours (or up to 4 hours for best results). This chilling time is crucial—it allows the layers to fully set and prevents the dip from becoming watery when served. The avocado layer should firm up slightly but remain creamy, while the beans will hold their shape.
Here’s the thing—don’t skip this step. I’ve tried serving it straight away, and the layers slide around when you scoop. The wait ensures clean, defined layers every time. While it chills, you can prep your serving dishes and gather toppings like extra cilantro or jalapeño slices.
🥘 Step 4: Add Final Layers and Garnish
After chilling, remove the dip from the refrigerator and let it sit at room temperature for 10 minutes to soften slightly. Then, spread 0.5 cup vegan sour cream evenly over the salsa layer. Finally, sprinkle the crushed tortilla chips across the top, pressing down gently to help them stick. Mix the 2 tbsp lime juice with the chopped cilantro and drizzle it over the top for freshness.
Garnish with the remaining diced red onion and jalapeño for color and extra flavor. Serve immediately with tortilla chips or veggie sticks. The contrast of textures—creamy avocado, smooth beans, tangy salsa, and crunchy chips—makes this dip irresistible. Each bite delivers that perfect harmony of flavors promised!
Pro Tips For Making 4 Layer Bean Dip
- Chill the Beans First: Warm refried beans straight from the can? Skip it. Spread them on a plate and refrigerate for 15 minutes before layering—they’ll hold their shape better and won’t slide into a sad, blended mess when you add the avocado later. Trust me, your dip’s structure depends on this.
- Pit the Avocado Early: Slice the avocado right before mashing, but remove the pit first—I learned this after watching a perfectly good dip turn into a brown, watery disaster because the pit kept the flesh from blending smoothly. Use a spoon to scoop out the pit, then let the avocado sit uncovered for 2 minutes to soften faster.
- Layer Salsa Last: Add the salsa after the avocado layer, not before. The acid will make the avocado oxidize faster, turning your dip an unappetizing gray before guests even arrive. If you’re prepping ahead, keep the salsa separate until the final assembly.
- Press Down Firmly: Don’t just dump the layers—press each one down with a spoon or the back of a fork, especially the beans and avocado. This keeps the dip from separating when you slice it, and it makes the first bite actually packed with flavor. Yes, even if it looks like you’re overworking it.
Pro cooking tips for this recipe
Layering Order Matters
The secret to clean, defined layers is working from the bottom up—avocado first, then beans, salsa, and finally the vegan sour cream. I always use a clear glass bowl (like Pyrex) so guests can see the stunning presentation.
The avocado oil barrier between layers prevents sticking, while pressing each layer gently with a spoon ensures they adhere without blending. 🌟
Chilling Time is Non-Negotiable
Skipping the 2-4 hour chill is the fastest way to ruin your dip—layers will slide apart when scooping. I recommend placing the bowl in the fridge while you prep other appetizers.
The avocado layer firms up slightly while staying creamy, and the beans hold their shape beautifully. Pro tip: Use a small plate under the bowl to catch any drips during chilling.
Texture Contrast is Key
Each layer should have distinct textures: creamy avocado, smooth beans, chunky salsa, and crunchy chips. For extra texture, I sometimes add toasted pumpkin seeds to the top layer. The contrast between the cool, velvety avocado and the warm, crunchy chips makes every bite exciting.
Don’t overmix any layer—keep the salsa chunky and the beans smooth for that restaurant-quality presentation.
Preventing Avocado Browning
Lemon juice is your best friend here—add it immediately after mashing the avocados and again before serving. For extra insurance, I keep a small bowl of ice water nearby and dip the avocado bowl briefly before assembling.
The cold water helps slow oxidation. If your avocados brown too quickly, mix in 1 tsp apple cider vinegar to the avocado layer for brightness.
Serving Temperature Tips
Serve the dip at room temperature for the best texture contrast. If it’s been in the fridge too long, let it sit for 10-15 minutes before serving. For parties, I like to serve it in a wide, shallow bowl so guests can easily scoop all layers.
Always keep a small bowl of extra lime juice nearby—guests will want to squeeze it over their portions for that fresh zing.
Make-Ahead Strategy
Assemble the dip up to 24 hours ahead and store in an airtight container with parchment between layers. Keep the avocado and sour cream separate until serving to prevent browning. When ready to serve, simply reassemble the layers and chill for 30 minutes to let them set.
This is perfect for game day prep—just grab and go when guests arrive! ⏰
Nutrition facts
Frequently asked questions
Can I make this bean dip without avocado?
Yes! Swap the avocado layer for ½ cup mashed white beans mixed with 1 tbsp lemon juice and ½ tsp salt for creaminess. The texture will be slightly different but still delicious. For extra richness, blend in 2 tbsp tahini or 1 tbsp vegan mayo. The dip will still have that layered look, just with a different base flavor.
How do I keep the layers from mixing together?
Use 2 tbsp avocado oil as a barrier between layers—the oil prevents sticking and keeps everything distinct. Also, press each layer gently with a spoon after adding it. Chilling for at least 2 hours is crucial—this lets the layers set properly. If they still blend, your bowl might be too small; use a wide, shallow dish for better separation.
What’s the best way to store leftovers?
Store in an airtight container with parchment paper between layers to prevent sticking. Keep the avocado and vegan sour cream separate until serving to avoid browning. The beans and salsa layers stay fresh for 5 days in the fridge, while the full assembled dip keeps for 3 days. Freezing isn’t recommended—the avocado texture changes dramatically after thawing.
Can I make this dip spicier?
Add ½ tsp cayenne pepper to the bean layer or 1 extra jalapeño (seeds in) to the salsa. For heat lovers, mix 1 tbsp hot sauce into the vegan sour cream topping. Start with small amounts—you can always add more, but you can’t take it out. A sprinkle of crushed red pepper flakes on top also adds a nice kick.
What are the best serving ideas beyond chips?
Try serving with warm tortillas, crudité sticks (carrots, bell peppers, cucumbers), or even as a topping for nachos or baked potatoes. For a fun twist, use pita bread or pita chips instead of tortilla chips. The dip also works beautifully as a taco filling or spread for quesadillas. Just scoop portions carefully to get all the layers!

- 3lb Prime Rib Roast Recipe: Juicy Pink Center Guaranteed in 3 Hours - October 31, 2026
- 5 Spice Cake Recipe: Warmly Spiced Layers With Crunchy Top - October 31, 2026
- 1950’s Macaroni and Cheese Recipe: Nostalgic Creamy Cheese Sauce with Buttery Noodles - October 31, 2026