
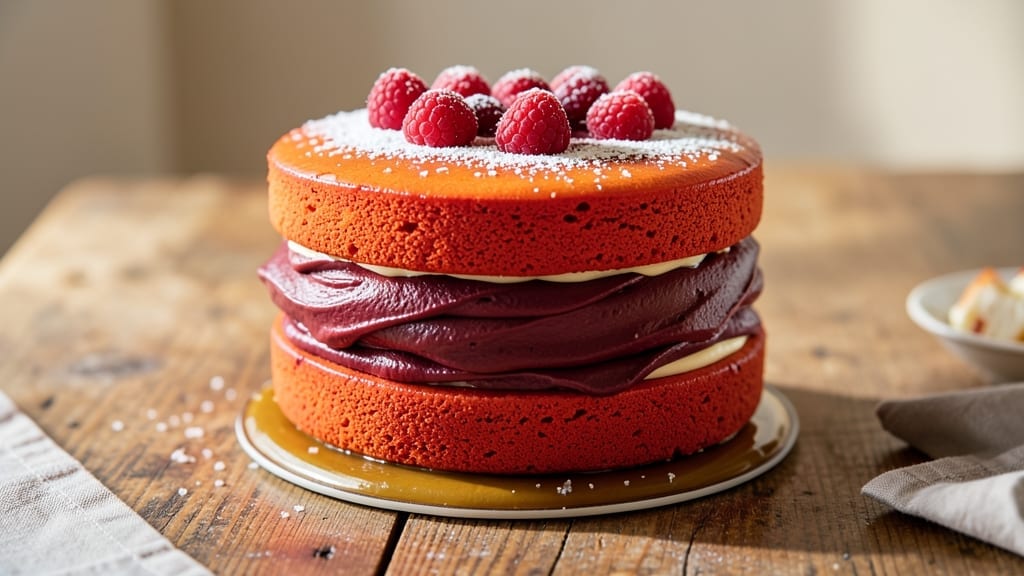
This 4-layer red velvet cake recipe delivers the moist, velvety texture and rich cream cheese frosting that make it a showstopper. The secret lies in precise baking techniques and a foolproof assembly method that ensures each layer stays tender and the filling stays luscious.
I’ve perfected this version over years of baking, and it’s become my go-to for celebrations—whether it’s a birthday, anniversary, or just a reason to indulge.
The cake layers bake up with a perfect balance of moisture and structure, thanks to a combination of buttermilk and precise oven temperature control. Meanwhile, the cream cheese frosting is silky and sweet, with just the right tang to complement the cake’s deep red hue.
No one will guess it’s not from a bakery—it’s that good. The layers are stacked with a thin layer of buttercream between each for stability, while the cream cheese frosting on top adds that signature velvety finish.
What sets this recipe apart is how it maintains its moisture without becoming dense. The cake layers are baked just until a toothpick comes out clean, and they’re cooled completely before assembly to prevent sogginess.
The frosting is spread smoothly, and the cake is chilled before serving to let the flavors meld. The result? A cake that’s as impressive to look at as it is to eat, with every bite delivering that perfect harmony of red velvet and cream cheese.
For those who love tradition, this recipe stays true to classic red velvet flavors, but it’s also adaptable—add a hint of bourbon for depth or swap in vegan butter and cream cheese for a plant-based version.
The possibilities are endless, but the foundation remains the same: moist layers and irresistible cream cheese bliss. Let’s get baking!
Ingredients for 4 layer red velvet cake
These 15 ingredients create a showstopping 4-layer red velvet cake with moist layers and velvety cream cheese frosting.
| Ingredient | Amount | Notes |
|---|---|---|
| All-Purpose Flour 🌾 | 4 ½ cups | Sifted for even texture |
| Granulated Sugar 🍚 | 2 ½ cups | Divided for cake and frosting |
| Unsalted Butter 🧈 | 2 cups | Room temperature, full-fat |
| Buttermilk 🥛 | 2 cups | Fresh, not powdered |
| Vegetable Oil 🫒 | 1 cup | Light, neutral flavor |
| Red Food Coloring 🎨 | 1 tbsp | Liquid, gel-free |
| White Vinegar 🍶 | 1 tbsp | For tangy balance |
| Cocoa Powder 🍫 | ¾ cup | Natural, unsweetened |
| Baking Soda 🧂 | 2 tsp | Freshly opened |
| Salt 🧂 | ½ tsp | Fine sea salt |
| Vanilla Extract 🌿 | 2 tsp | Pure, high-quality |
| Large Eggs 🥚 | 4 whole | Room temperature |
| Cream Cheese 🧀 | 16 oz | Full-fat, room temp |
| Powdered Sugar 🍚 | 4 cups | Sifted for smooth frosting |
| Heavy Cream 🥛 | 1 cup | Cold, whipped stiff |
The buttermilk and vegetable oil combo is non-negotiable for that signature moisture—Kroger or Whole Foods carry reliable brands. For the red food coloring, Wilton liquid dye is my go-to—it blends seamlessly without altering flavor. Natural cocoa powder (like Hershey’s Special Dark) delivers deeper flavor than Dutch-processed. Pre-sift your flour and powdered sugar—this eliminates lumps and ensures silky frosting. The cream cheese should be full-fat (like Philadelphia) and room temperature—cold lumps ruin the texture.
No buttermilk? Substitute 2 cups milk + 2 tbsp vinegar (let sit 5 minutes). Red velvet without coloring? Use 1 tbsp beet juice (blend cooked beets) for subtle hue. Vegetarian? Swap butter for Earth Balance vegan butter—it mimics texture well. Gluten-free? Use King Arthur 1:1 flour blend (adjust baking soda to 1.5 tsp). The cocoa powder can be swapped for melted dark chocolate (½ cup) if needed, but it’ll be richer. Whipped cream too sweet? Reduce powdered sugar to 3 cups and add ½ tsp vanilla to the frosting.
Store cake layers wrapped in parchment at room temp for 2 days or refrigerate for 5 days. The frosting keeps 3 days in an airtight container—parchment between layers prevents sogginess. For make-ahead magic, bake layers 3 days ahead, freeze fully frosted cake (minus final decor) for up to 2 months. Bring to room temp before serving. Pro tip: Chill 1 hour before slicing—this keeps the cream cheese frosting from sliding off.
Why You’ll Love This Recipe
- No Pansy Fuss: I swear by this recipe because it’s actually simple—just two bowls, one mixer, and no fancy techniques. The buttermilk and vegetable oil keep the layers moist without needing a fancy stand mixer, and the cocoa powder does all the work.
- Velvet Magic: That perfect tangy-sweet balance? It’s the buttermilk cutting through the sugar while the butter keeps it rich but never heavy. Honestly, the first bite makes me want to skip dessert and just eat the whole cake.
- Party in a Box: This isn’t just a birthday cake—it’s my go-to for potlucks, office celebrations, or even a lazy Sunday. The layers stack like a dream, and the cream cheese frosting (yes, it’s included) makes it feel fancy without the stress.
- Budget-Friendly Luxury: Uses pantry staples—flour, sugar, butter—and stretches for a crowd. My college roommate still talks about the time I made this for 12 people using store-brand ingredients. Leftovers? They disappear faster than I can say “second slice.”
Step-by-step instructions for 4 layer red velvet cake
Here’s how to build layers of velvety texture and creamy perfection—every step designed for moisture and stability.
Prepare the Cake Batter for Perfect Moisture
Preheat your oven to 350°F and grease four 6-inch round cake pans. Line the bottoms with parchment circles for easy removal. In a medium bowl, whisk together the 2 cups buttermilk and 1 tbsp white vinegar—this creates a tangy base that reacts with the baking soda for lift. Let it sit for 5 minutes to curdle slightly.
In a large mixing bowl, combine the 2 cups unsalted butter and 1 cup vegetable oil until smooth. Gradually add the 2.5 cups granulated sugar while mixing on medium speed until fully incorporated. This butter-oil-sugar blend ensures tender crumb by preventing gluten development. Add the 4 whole large eggs, one at a time, mixing well after each addition.
Combine Dry Ingredients for Even Texture
In a separate bowl, sift together the 4.5 cups all-purpose flour, 0.75 cup cocoa powder, 2 tsp baking soda, and 0.5 tsp salt. This sifting prevents lumps and ensures even distribution of leavening agents. With the mixer on low speed, gradually add the dry ingredients to the wet mixture, alternating with the curdled buttermilk mixture.
After combining, mix in the 2 tsp vanilla extract and 1 tbsp red food coloring until the batter is smooth and vibrant red. The batter should be thick but pourable—if it’s too stiff, add 1-2 tablespoons milk (though we’re not using milk in this recipe, this is a general guideline for red velvet batter consistency). Divide the batter evenly among the prepared pans.
Bake for Evenly Moist Layers
Bake the cakes for 25-30 minutes, or until a toothpick inserted into the center comes out clean. The edges should be set but the centers should still be slightly springy to the touch—this ensures moisture retention. Rotate the pans halfway through baking for even browning. Let the cakes cool in the pans for 10 minutes before transferring to a wire rack to cool completely.
Here’s the thing—don’t overbake. The cakes will continue cooking slightly as they cool, and any dryness will be masked by the cream cheese frosting. If the tops brown too quickly, loosely tent them with foil after 15 minutes of baking to prevent over-browning while maintaining doneness.
Prepare the Cream Cheese Frosting
In a large mixing bowl, beat the 16 oz cream cheese and 2 cups unsalted butter (softened) together until smooth and creamy. This step is crucial—don’t rush it. The mixture should be completely homogeneous before adding any other ingredients. Gradually add the 4 cups powdered sugar, mixing on low speed until combined, then increase to medium speed and beat for 2-3 minutes until light and fluffy.
In a separate bowl, whip the 1 cup heavy cream to stiff peaks. Gently fold about one-third of the whipped cream into the cream cheese mixture to lighten it, then fold in the remaining whipped cream until fully incorporated. This creates a stable frosting that won’t slide off the layers. Taste and adjust sweetness if needed—red velvet often benefits from a touch more sugar to balance the tang.
Assemble and Chill for Stability
Place the first cake layer on a serving plate. Spread a thin layer of frosting (about ¼ cup) over the top, then repeat with the remaining layers, frosting each layer completely before adding the next. This crumb coat technique prevents frosting from seeping into the cake layers. Once all layers are stacked, apply the remaining frosting to the sides and top, smoothing with a spatula.
Refrigerate the cake for at least 4 hours (or overnight) before serving. This chilling time is essential—it allows the flavors to meld and the frosting to set properly. The cakes will hold their shape better, and each bite will deliver that perfect balance of moist red velvet and tangy cream cheese. For best results, serve at room temperature after removing from the fridge.
Pro Tips For Making 4 Layer Red Velvet Cake
- MEASURE BUTTERMILK PRECISELY: Red velvet cake lives or dies by the buttermilk. Use a kitchen scale or a measuring cup that actually measures liquid volume—not the “scoop and eyeball” method. Too little, and your cake turns dense; too much, and it’s gummy. I learned this after a batch where I eyeballed it and ended up with a brick.
- STOP WHEN CENTERS JIGGLE: Ovens lie. Your cake’s done when the edges pull away from the pan and the center jiggles like Jell-O (about 1-2 minutes after the toothpick test). Overbaking dries out the layers, and no amount of frosting can fix that. Pull it early—your future cream cheese filling will thank you.
- WHISK DRY INGREDIENTS FIRST: Sift the flour, cocoa, and salt together in the bowl before adding wet ingredients. This prevents lumps and ensures the cocoa dissolves evenly—no streaks, no bitter surprises. I used to dump everything in at once, and half the time, I’d get a weirdly colored bite.
- USE COLD BUTTER FOR LAYERS: Cut the butter straight from the fridge and let it sit just until it’s soft enough to cream (about 15 minutes). Cold butter creates tender layers, while room-temperature butter makes them greasy. Trust me, your cake will be fluffier if you skip the “perfectly softened” temptation.
Pro cooking tips for perfect results
Batter Temperature Control
Room-temperature ingredients are non-negotiable for this cake. Let your butter, eggs, and cream cheese sit out for 1-2 hours before mixing—cold fats create dense layers. I place my eggs in warm water for 5 minutes to speed this up.
The buttermilk should be at room temperature too; cold buttermilk can cause uneven baking. Pro tip: Use a candy thermometer to check butter temp—it should read 65-68°F before mixing. 🌡️
Precision Baking Time
Every oven behaves differently, so I recommend baking one test layer first to dial in your time. The cakes are done when a toothpick comes out with moist crumbs (not wet batter). For my 350°F oven, they take 27-29 minutes, but yours might need 25 or 30.
If the edges brown too fast, tent with foil after 15 minutes—this keeps the centers moist while the tops finish. Never overbake; the cakes firm up as they cool.
Layering Technique
Use a serrated knife to level the tops of each cake layer for even stacking. Spread ¼ cup frosting on the first layer, then place the second layer on top—press down gently to create adhesion.
Repeat for all layers, then apply the remaining frosting to the sides. For extra stability, chill the stacked cake for 1 hour before adding final decorations. This prevents frosting from sliding off when sliced. ✨
Frosting Consistency
The secret to smooth frosting lies in the whipped cream. It should be stiff but not dry—like thick whipped cream that holds its shape. Over-whipping adds air but can make the frosting too light.
Fold the cream into the cream cheese mixture gently in two additions to maintain stability. If your frosting is too thick, add 1 tsp milk at a time until it reaches a spreadable consistency. For extra shine, brush the top with simple syrup (equal parts sugar and water) before decorating.
Chilling Strategy
Never skip the 4-hour chill—this is when the magic happens. The frosting sets properly, the layers firm up, and flavors meld. I place my cake in the fridge covered loosely with parchment to prevent drying.
For a cleaner slice, run a hot knife through the cake just before serving—this melts any frosting on the blade and gives you a perfect edge. Let the cake sit at room temperature for 10 minutes before cutting to enjoy it at its best texture.
Decorating Like a Pro
For a bakery-worthy finish, use a piping bag with a star tip to create swirls on the sides. Dust with powdered sugar or add red velvet crumbs (crush leftover cake) for texture. I love adding fresh raspberries or white chocolate shavings for a pop of color.
If you’re feeling fancy, pipe cream cheese rosettes around the base. The key is patience—work quickly but carefully to avoid smudging the frosting. 💫
Nutrition facts
Frequently asked questions
Can I make this red velvet cake without food coloring?
For a natural red hue, replace the 1 tbsp red food coloring with 1 tbsp beet juice (blend cooked beets and strain). The flavor will be slightly earthier but still delicious. For a deeper red, add ½ tsp raspberry powder—it blends well and intensifies the color without altering the taste.
How do I prevent the frosting from sliding off the layers?
Chill the stacked cake for at least 4 hours before serving—this lets the frosting set properly. For extra stability, spread a thin crumb coat (thin layer of frosting) between each layer and on the outside before adding the final frosting. Press each layer gently as you stack them to create adhesion. A hot knife trick also works: Run a knife through the cake just before slicing to get clean edges.
Can I use boxed red velvet mix for this recipe?
Yes, but with adjustments! Most boxed mixes are designed for 2-layer cakes, so you’ll need to halve the mix to make 4 layers. Replace the buttermilk with water (as directed on the box) and add 1 tbsp vinegar to mimic the tang. For moisture, increase the vegetable oil to ½ cup per layer. The frosting recipe remains the same, but you may need to adjust sweetness since boxed mixes are often sweeter.
Why did my cake layers turn out dry?
Overbaking is the most common cause—stop when a toothpick comes out with moist crumbs (not wet batter). Another culprit? Cold ingredients (like butter or eggs) or using too much flour. To fix it, brush the layers with simple syrup (equal parts sugar and water) before frosting. For prevention, always use room-temperature ingredients and don’t overmix the batter. The buttermilk and oil combo is key for moisture!
How far ahead can I bake the layers?
Bake the layers up to 3 days ahead and store them wrapped tightly in plastic at room temperature. For longer storage, freeze the unfrosted layers for up to 2 months. Thaw overnight in the fridge before assembling. The frosting should be made fresh or stored separately in an airtight container for 3 days**. Never frost the cake ahead of time—it’ll get soggy!

- 3lb Prime Rib Roast Recipe: Juicy Pink Center Guaranteed in 3 Hours - October 31, 2026
- 5 Spice Cake Recipe: Warmly Spiced Layers With Crunchy Top - October 31, 2026
- 1950’s Macaroni and Cheese Recipe: Nostalgic Creamy Cheese Sauce with Buttery Noodles - October 31, 2026