
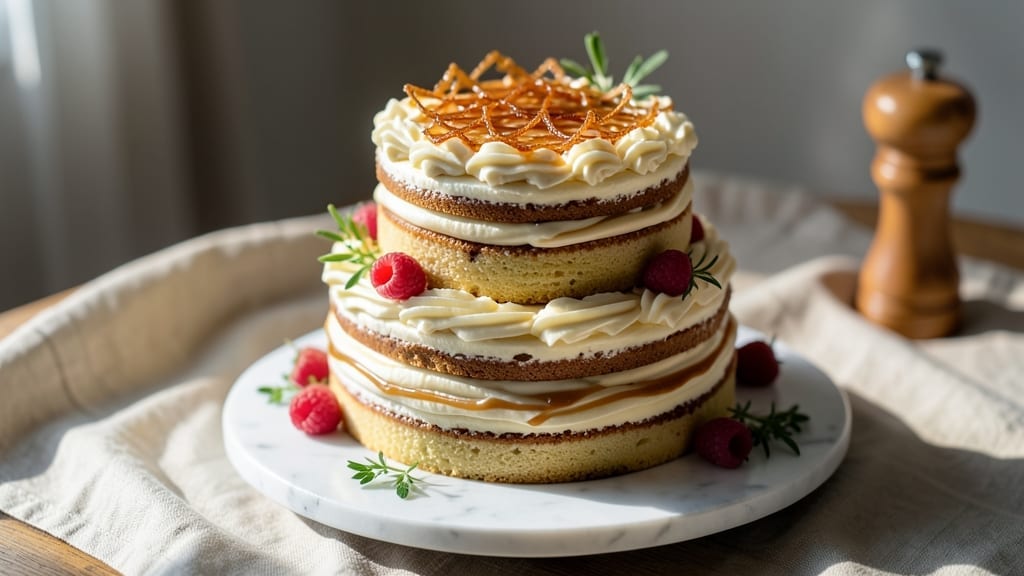
This 4-tier vanilla cake recipe delivers the kind of showstopping dessert that makes every celebration feel extra special. ✨ The secret lies in perfectly balanced layers—light, airy, and stacked with precision—so each slice reveals that signature cloud-like texture we all crave.
I’ve baked dozens of these cakes for weddings, birthdays, and holidays, and this method ensures every tier holds its shape while staying tender enough to cut cleanly.
The foundation starts with a foolproof vanilla cake batter that’s neither too dense nor too dry, baked in specific sizes to create stable tiers. Between each layer, we’ll build with buttercream that’s rich but not heavy, ensuring each bite stays moist.
What sets this apart is the assembly technique—using dowels and weights to prevent collapsing—so your cake stands proudly, even when sliced.
By the time you’re done, you’ll have a 4-tier vanilla cake that’s as beautiful as it is delicious: golden layers of vanilla cake, smooth buttercream swirls, and optional fondant or fresh flowers for that final touch of elegance.
The result? A dessert that looks like it belongs on a magazine cover but tastes like home.
Perfect for weddings, anniversaries, or any occasion where you want to impress, this recipe includes pro tips for leveling, filling, and decorating—so you can focus on the fun part: serving slices to admiring guests. Let’s get started!
Ingredients for 4 tier vanilla cake
Golden layers and velvety buttercream—these ingredients create showstopping elegance.
| Ingredient | Amount | Notes |
|---|---|---|
| All-Purpose Flour 🌾 | 6 cups | Sifted for light texture |
| Granulated Sugar 🍚 | 3 ½ cups | Divided for cake and buttercream |
| Unsalted Butter 🧈 | 2 cups | Room temperature, full-fat |
| Vanilla Extract 🌸 | 3 tbsp | Pure Madagascar preferred |
| Large Eggs 🥚 | 8 whole | Room temperature, separated |
| Baking Powder 🧂 | 2 ½ tsp | Diamond Crystal preferred |
| Salt 🧂 | ½ tsp | Fine sea salt |
| Milk 🥛 | 1 ½ cups | Room temperature, whole preferred |
| Powdered Sugar 🍚 | 4 cups | For buttercream, sifted |
| Heavy Cream 🥛 | 1 ½ cups | Cold, for buttercream stability |
| Vanilla Bean Paste 🌸 | 2 tbsp | For buttercream depth |
| Baking Parchment 📄 | 1 sheet | For cake tiers |
| Wooden Dowels 🪵 | 4 pieces | 1/2 inch diameter, 12 inches long |
| Fresh Flowers 🌸 | 1 bunch | Edible variety, optional garnish |
The flour and sugar are your foundation. King Arthur or Gold Medal flour gives the lightest texture, but any all-purpose will work. Sugar matters too—Domino or C&H brands stay consistent. For the butter, Plugrá or Land O’Lakes are reliable, but never use margarine. Room temperature is key—press a thumbprint that stays. Eggs should be large, fresh, and separated carefully—the whites whip up to hold those tiers. If you’re nervous about separation, buy pre-separated eggs at the store. Vanilla extract? Madagascar Bourbon has the best depth, but imitation works in a pinch.
No vanilla bean paste? Double the extract and add a pinch of ground vanilla bean seeds if you have them. Buttercream too sweet? Add 1 tbsp milk at a time until it balances. For the tiers, 8-inch and 6-inch pans work best—check your local baking supply store for the right sizes. Fresh flowers can be swapped for edible pearls or sprinkles if you’re not decorating. The dowels? Woodcraft or Michaels sell them in packs—just sand any rough edges. Pro tip: Chill your cake tiers for 10 minutes before assembling to prevent smudging.
Store cake tiers in an airtight container with parchment between layers for up to 3 days. Buttercream keeps 5 days in the fridge—bring to room temp before using. For the full cake, assemble the day before and cover loosely. Flowers? Use edible glue or water in a spray bottle to keep them fresh. Freeze unfrosted tiers for 2 months—thaw overnight in the fridge. The buttercream? Beat in 1 tbsp lemon juice if it hardens in the fridge for easier spreading.
Why You’ll Love This Recipe
- No Fussy Layers: I swear, the tiers don’t require perfect precision—just level pans and a steady hand. The buttercream between layers is forgiving, and even if my cake looks slightly uneven, the vanilla flavor makes it feel like a pro bake.
- Vanilla Bliss: That rich, buttery vanilla flavor? It’s the kind of simple deliciousness that makes you pause mid-slice. The eggs add just enough structure so every bite stays moist, while the sugar keeps it perfectly sweet—not cloying, just right.
- Party Ready: Birthdays, showers, or just because—this cake handles any celebration. The four tiers let you customize (add sprinkles, drizzle chocolate, or keep it classic), and it stays fresh for days if stored properly. (Yes, even my picky uncle asked for seconds.)
- Budget-Friendly Luxury: Four tiers for the price of one fancy cake? The pantry staples here—flour, sugar, butter—stretch far, and the recipe scales easily. Leftovers? I freeze slices and reheat them for breakfast—trust me, they’re even better the second time.
Step-by-step instructions for 4 tier vanilla cake
Let’s create a showstopper cake that’s as delicious as it is beautiful.
👨🍳 Step 1: Prepare the Cake Batter for Perfect Layers
Preheat your oven to 350°F and grease four 8-inch round cake pans with butter or baking spray, then line the bottoms with the baking parchment. Sift together the 6 cups all-purpose flour, 2.5 tsp baking powder, and 0.5 tsp salt in a large bowl. Set aside.
In a separate large bowl, cream together the 2 cups unsalted butter and 1.75 cups granulated sugar (reserve the remaining 1.75 cups for later) on medium-high speed for 3-5 minutes until light and fluffy. Add the 8 whole large eggs, 1 at a time, beating well after each addition. Mix in the 3 tbsp vanilla extract and 1.5 cups milk until combined.
Gradually add the dry ingredients to the wet mixture, mixing on low speed just until combined—don’t overmix. Divide the batter evenly among the four prepared pans. Here’s the thing—tap each pan gently on the counter to remove air bubbles and ensure even baking.
🔥 Step 2: Bake Even Layers for Consistent Height
Bake the cakes for 25-30 minutes or until a toothpick inserted into the center comes out clean. I check at 25 minutes—if the tops look golden but the centers still jiggle slightly, that’s perfect. Rotate the pans halfway through for even baking.
Let the cakes cool in their pans for 10 minutes before transferring to a wire rack to cool completely. This gradual cooling prevents cracking. While they cool, I like to make the buttercream—it’s best to let it rest before assembling.
🥘 Step 3: Make the Vanilla Bean Buttercream
In a stand mixer fitted with the paddle attachment, beat the 2 cups unsalted butter (yes, we’re using all of it) until smooth and creamy, about 2-3 minutes. Gradually add the 4 cups powdered sugar, mixing on low speed until combined.
Add the 1.5 cups heavy cream and mix until smooth. Finally, incorporate the 2 tbsp vanilla bean paste and remaining 1.75 cups granulated sugar, mixing until fully combined and fluffy. Here’s the trick—I like to chill the buttercream for 30 minutes before assembling to make it easier to work with and pipe cleanly.
👨🍳 Step 4: Level and Stack the Cake Layers
Once completely cool, trim the tops of the cakes to create even surfaces. I use a serrated knife and a ruler to guide me—this is crucial for perfect tiers. Place each cake layer on a cake board or plate, with the wooden dowels inserted into the centers from the bottom up.
Spread a thin layer of buttercream (about ¼ inch) on the first cake layer, then place the second layer on top. Repeat this process, adding more buttercream between each layer. The dowels will keep everything stable while we build. Here’s where precision matters—use a bench scraper to create clean, straight edges between layers.
🎨 Step 5: Decorate and Finish with Elegant Touches
Once all layers are stacked, spread the remaining buttercream over the entire cake, creating a smooth base for decoration. Use an offset spatula to achieve clean, even coverage. For the final touch, pipe swirls or rosettes around the top edge using a piping bag fitted with a star tip.
Gently place the fresh flowers on top and around the cake as edible garnishes. Let the cake sit at room temperature for 1 hour before slicing to allow the buttercream to set slightly. This creates that professional finish where the cake holds its shape beautifully. Serve with pride—your guests will be amazed by both the taste and presentation!
Pro Tips For Making 4 Tier Vanilla Cake
- Weigh Your Butter: I learned this the hard way—measuring butter by volume (that little scoop-and-sweep method) throws off your cake’s structure. For a 4-tier vanilla cake, use a kitchen scale: 227 grams (1 cup) of softened unsalted butter, not packed. The difference in texture is night and day, especially when baking four layers.
- Room-Temp Eggs Matter: Cold eggs from the fridge won’t mix smoothly and can create dense layers. Take your eggs out 30 minutes before starting—just set them in a warm (not hot) water bath if you’re in a rush. Smooth batter = even baking, and that’s critical when you’re stacking four tiers.
- Don’t Overmix the Batter: After adding the flour, mix just until combined—no streaks, no overworking. I used to beat it like I was punishing the bowl, and my cakes turned out tough. A spatula and 10-12 strokes max keep the gluten relaxed. This is especially true for vanilla cake, which relies on tenderness.
- Bake One Tier at a Time: I know, I know—you’re eager to get all four layers done. But if you overcrowd your oven, the tiers will bake unevenly, and your cake might collapse under its own weight when stacked. Bake one, let it cool completely (20 minutes in the pan, then transfer to a rack), then move to the next. Patience here saves you from a wobbly tower.
Perfect pairings for this 4 tier vanilla cake
Wedding Cake Essentials
For weddings, pair this vanilla cake with classic white roses or pearl sprinkles for timeless elegance. I recommend using edible gold leaf on the top tier for a luxurious touch—it adds instant sophistication.
Serve with mini vanilla bean ice cream scoops on the side for a creamy contrast that complements the cake’s richness. 🌸
Birthday Party Vibes
Transform your cake into a birthday showstopper with pastel fondant accents in shades of pink, blue, or yellow. Add colorful sprinkles between tiers for a playful look.
Serve with strawberry shortcake bites on the side to create a dessert duo that’s both fun and balanced. Kids will love the vibrant colors! 🎉
Coffee Pairings
Serve slices with espresso martinis or a strong dark roast coffee to cut through the sweetness. I love pairing this cake with cold brew concentrate drizzled over vanilla ice cream for a refreshing contrast. For a non-alcoholic option, try chilled chai tea—the spices complement the vanilla beautifully. ☕
Seasonal Adaptations
In summer, top the cake with fresh berries like raspberries or blackberries for a fruity twist. For fall, swap the flowers for cinnamon sticks and crushed pecans—the warm spices add depth.
Winter calls for edible silver dragées and holly berries for a festive touch. Each season brings a new way to elevate this classic! ❄️
Make-Ahead Tips
Assemble the cake 24 hours ahead and store it in an airtight container at room temperature. Refrigerate for up to 3 days if needed—just bring it to room temp before serving.
For extra stability, place the fully assembled cake in the fridge for 1 hour before decorating. This helps the buttercream set and keeps tiers from shifting. 💡
Presentation Perfection
Use a marble cake stand for a refined look, or elevate the cake on a wooden cake board with lace doilies underneath for a vintage charm. For a modern twist, add geometric cake toppers or minimalist line art with edible markers.
Always slice from the center outward to maintain symmetry. Your guests will notice the care in every detail! ✨
Nutrition facts
Frequently asked questions
How do I prevent my 4-tier cake from collapsing?
Use wooden dowels (½-inch diameter) inserted through the center of each tier before assembling. Chill the cake for 10 minutes before adding each layer, and spread a thin ¼-inch buttercream layer between tiers. This creates structural support while keeping the cake stable.
Can I make this cake gluten-free or vegan?
For gluten-free, substitute 1:1 gluten-free flour blend and add ½ tsp xanthan gum to the dry ingredients. For vegan, replace butter with coconut oil and eggs with flax eggs (1 tbsp ground flax + 3 tbsp water per egg). Adjust baking times as needed—GF cakes may require 5-10 extra minutes.
How do I level the cake layers perfectly?
Use a serrated knife and a leveling guide (like a ruler or cake leveler). Place the pan on the guide and trim the top until it’s perfectly even. For extra precision, use a cake scraper to smooth the edges. This ensures each tier sits flat and stable.
How long does the buttercream keep?
Unused buttercream stays fresh in an airtight container in the fridge for 5 days. If it hardens, beat in 1 tbsp lemon juice to soften it back to piping consistency. For longer storage, freeze portions in 1-tbsp servings for up to 3 months. Thaw at room temperature.
What’s the best way to transport a 4-tier cake?
Assemble the cake on a sturdy cake board and place it in a large cake carrier box with dividers. Secure it with bubble wrap around the sides to prevent shifting. Keep it at room temperature if transporting for under 2 hours—never refrigerate before serving. For longer trips, use a cooling box with ice packs (not touching the cake).

- 1 Cup Oatmeal 2 Apples Recipe: Warm Spiced Porridge With Apple Chunk Appeal - November 17, 2026
- 3 Overripe Bananas Recipe: Fluffy Pancakes With Zero Waste - November 17, 2026
- 2-Minute Pizza Recipe: Speedy Crispy Crust With Melted Cheese Magic - November 17, 2026