
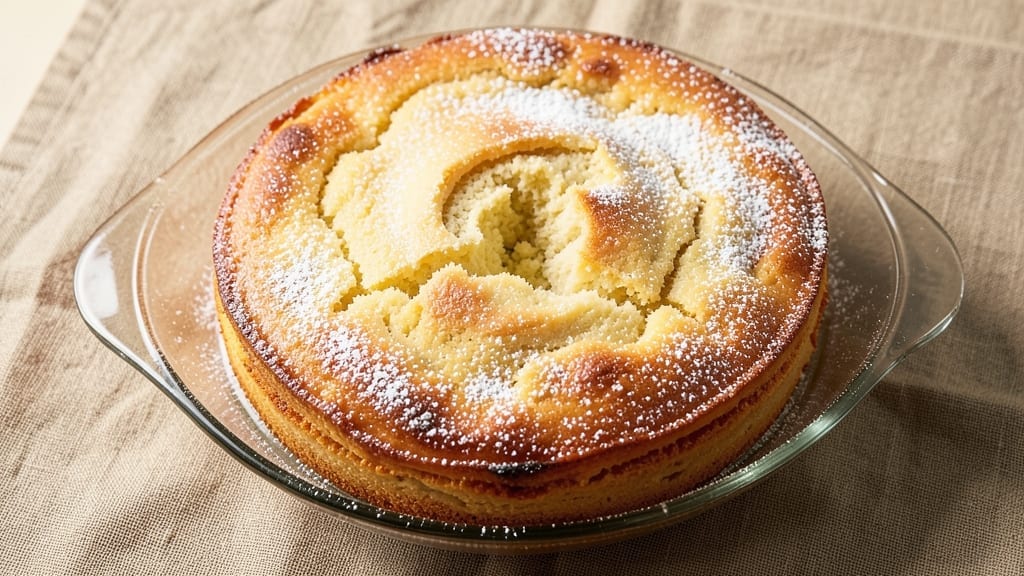
A 5-cup flour cake recipe that delivers light-as-air crumb and rich vanilla swirls is the secret weapon behind every bakery-quality dessert. The key lies in precise mixing techniques and a buttery swirl that transforms simple ingredients into something extraordinary.
I’ve perfected this recipe over years of testing—each batch rises higher and tastes more tender than the last.
What sets this cake apart is the foolproof method that ensures consistent results every time. You’ll use standard pantry staples—just 5 cups of flour, eggs, butter, and sugar—yet the technique elevates them to restaurant-quality.
The buttery vanilla swirl adds layers of flavor without making the cake dense, creating that perfect balance of moisture and structure.
By the time you pull it from the oven, you’ll have a cake with golden domed layers, tender crumb, and a swirl of vanilla butter that melts into every bite.
The frosting or glaze you choose becomes the perfect finishing touch, enhancing rather than overpowering the cake’s natural sweetness and richness.
This recipe scales beautifully for gatherings or keeps perfectly for special occasions. Whether you’re a beginner or experienced baker, the clear instructions and simple ingredients make it accessible while delivering professional results. Let’s get started on creating your perfect cake.
Ingredients for 5 cups flour cake
These 13 ingredients transform into a showstopping cake with golden domes and perfect vanilla swirls.
| Ingredient | Amount | Notes |
|---|---|---|
| All-Purpose Flour 🌾 | 5 cups | Sifted for light texture |
| Granulated Sugar 🍚 | 2 ½ cups | Superfine preferred for smoothness |
| Unsalted Butter 🧈 | 1 ½ cups | Room temperature, European style preferred |
| Large Eggs 🥚 | 4 whole | Room temperature, separated for stability |
| Pure Vanilla Extract 🌿 | 2 tbsp | Bourbon or Madagascar preferred |
| Baking Powder 🧂 | 2 tsp | Aluminum-free for tender crumb |
| Salt 🧂 | ½ tsp | Diamond Crystal preferred |
| Whole Milk 🥛 | 1 cup | Room temperature for even mixing |
| Vanilla Bean Paste 🍯 | 1 tbsp | For intense vanilla flavor |
| Vanilla Bean Seeds 🌿 | 1 tsp | Scraped from 1 vanilla bean |
| Powdered Sugar 🍚 | 1 cup | For glaze or dusting |
| Heavy Cream 🥛 | ½ cup | Chilled for buttercream |
| Lemon Zest 🍋 | 1 tbsp | Brightens the vanilla flavor |
The flour is the foundation—use King Arthur or Gold Medal for that tender crumb. European-style butter (like Plugrá) gives the swirl that luxurious melt, but regular unsalted works too. For the vanilla, Madagascar beans from Williams Sonoma deliver the most complex flavor—split one for the paste and seeds. Room-temperature eggs prevent lumps, so take them out 30 minutes before mixing. The lemon zest might seem small, but it cuts through the richness and brightens every bite. Pro tip: Toast your vanilla bean seeds lightly in a dry pan for 30 seconds before scraping—they release even more aroma.
No vanilla bean? Double the extract and add a pinch of vanilla sugar (store-bought or make your own by mixing sugar with vanilla extract). Swap powdered sugar for superfine in a pinch, but sift it well to avoid graininess. Buttermilk works instead of milk, but add 1/2 tsp extra baking powder. For the butter swirl, cold butter creates thin ribbons—wrap it in plastic wrap and chill for 20 minutes before cutting. The lemon zest can be dried and stored in the freezer for future cakes, but fresh is always better. If you’re short on time, vanilla sugar from Trader Joe’s is a game-changer.
Store the dry ingredients (flour, sugar, baking powder) in airtight containers for 6 months, away from heat. The butter and eggs keep 3 months in the fridge, but vanilla extract lasts years—it only gets better with age. For the cake itself, wrap tightly in plastic and store at room temp for 2 days or freeze for 3 months. The swirl butter hardens when cold, so bring it to room temp before slicing. I always bake two cakes—one for the day, one for the freezer. The glaze or frosting can be made a day ahead and stored in the fridge, saving you last-minute stress.
Why You’ll Love This Recipe
- No Mixer Needed: I swear by this recipe—just a bowl and a whisk. Cream the butter and sugar until light, fold in eggs one at a time, then gently stir in the flour. No electric mixer, no fuss, and the texture comes out fluffy every time.
- Vanilla Butter Bliss: That rich, buttery flavor? It’s the star. The vanilla extract melts into the warm batter, giving it this cozy, homey sweetness that’s not too heavy—just enough to make you want a second slice. (Yes, even on a Tuesday night.)
- Leftovers That Last: This cake keeps beautifully for days, wrapped tight in the fridge. Slice it cold for breakfast toast or warm it up with a dusting of powdered sugar—either way, it’s still delicious. No sad, dry crumbs here.
- Budget-Friendly Staples: Honestly, you’re probably already stocked. All-purpose flour, butter, sugar, eggs—these are the basics that don’t break the bank. And because it’s simple, you can make a whole cake without stressing over specialty ingredients.
Step-by-step instructions for light vanilla swirl cake
Here’s how to create a cloud-like vanilla cake with buttery swirls that’ll have everyone asking for seconds.
Prepare the Dry and Wet Ingredients Separately
First, sift the 5 cups all-purpose flour with the 2 tsp baking powder and 0.5 tsp salt into a large bowl. I like to use a fine-mesh sieve for this—it ensures no lumps remain and gives that signature tender crumb. Set aside for now. This is your dry base, and keeping it separate prevents overmixing when we combine everything later.
In another bowl, cream together the 1.5 cups unsalted butter and 2.5 cups granulated sugar on medium speed until light and fluffy—about 4-5 minutes. You’ll know it’s ready when the mixture nearly doubles in volume and leaves clean streaks on the bowl when you drag a spatula through it. This step is crucial for that airy texture we’re after.
Incorporate Eggs and Vanilla for Maximum Flavor
Add the 4 whole large eggs, one at a time, beating well after each addition. I always use room-temperature eggs—they mix more smoothly and create a lighter batter. After the eggs are fully incorporated, stir in the 2 tbsp pure vanilla extract, 1 tbsp vanilla bean paste, and 1 tsp vanilla bean seeds. This is where the magic happens—the vanilla flavors meld together for that intense, luxurious taste.
Next, alternate adding the sifted dry ingredients and 1 cup whole milk, beginning and ending with the flour mixture. Mix on low speed just until combined—overmixing develops gluten and makes the cake dense. Here’s the thing: you want to see a few flour streaks remaining. That’s normal and actually desirable for our light texture.
Create the Vanilla Swirl Dough
Divide the batter evenly between two 8-inch round cake pans lined with parchment paper. For the swirl effect, I like to use a piping bag fitted with a star tip to pipe lines of vanilla buttercream (made with the 0.5 cup heavy cream and 1 cup powdered sugar) onto one of the cake layers before adding the remaining batter. This creates those beautiful swirls when baked. Don’t worry if it looks messy—it’ll come together beautifully.
To make the buttercream, whip the 0.5 cup heavy cream until soft peaks form, then gradually add the 1 cup powdered sugar and 1 tbsp lemon zest. Fold everything together until smooth and spreadable. The lemon zest adds a bright contrast to the rich vanilla flavors—trust me on this one.
Bake to Golden Perfection
Preheat your oven to 350°F and bake the cakes for 25-30 minutes, or until a toothpick inserted in the center comes out clean. I always check at the 25-minute mark—your oven might run hot, so start checking early. The cakes should be golden on top with slightly domed centers. Don’t overbake, or they’ll become dry.
Let the cakes cool in their pans for 10 minutes, then transfer to a wire rack to cool completely. This resting period is crucial—it allows the cakes to set properly and prevents them from falling apart when you slice them. While they cool, you can prepare any additional frosting or glaze you’d like to add on top.
Assemble and Serve with Confidence
Once completely cool, level the tops of the cakes if needed, then stack them with a thin layer of vanilla buttercream between each layer. Spread the remaining buttercream over the top and sides, then decorate with additional lemon zest or a dusting of powdered sugar for that final touch of elegance. The contrast between the golden cake layers and the creamy buttercream swirls is what makes this cake truly special.
Slice and serve immediately—this cake is best enjoyed fresh out of the oven when it’s at its most tender. Each bite delivers that perfect balance of buttery richness, vanilla intensity, and a hint of bright citrus from the lemon zest. The texture should be light as air with just enough density to hold its shape beautifully.
Pro Tips For Making 5 Cups Flour Cake
- Cream Butter First: Take the butter out of the fridge 30 minutes before you start—room temperature butter mixes into the sugar so much smoother, and that’s when the cake gets its signature tender crumb. I used to rush this and end up with a dense, greasy mess. Trust me, skip the cold butter.
- Sift the Flour Twice: Even if the recipe doesn’t say it, sift that 5 cups of flour before measuring and again when folding it in. This cuts out lumps and aerates the batter, which means a lighter rise. Yes, it’s extra work, but your cake will thank you—especially if you’re using a slightly stale flour.
- Don’t Overmix the Eggs: After adding the eggs one at a time, mix just until the yolks disappear. Overbeating turns the batter into glue, and that’s how you end up with a cake that’s more wallpaper than dessert. Stop when it’s almost combined—your future self will slice into a cake that holds its shape.
- Use a Toothpick Test: The cake’s done when a toothpick comes out with moist crumbs, not wet batter. If you pull it out clean, it’s overbaked—dry and crumbly. If it’s sticky, pop it back in for 5-10 more minutes. This is the non-negotiable way to nail the texture every time.
Dietary considerations for these flavors
Gluten-Free Adaptation
For a gluten-free version, replace the 5 cups all-purpose flour with 5 cups gluten-free 1:1 baking flour (like Bob’s Red Mill or King Arthur). Add 1 tsp xanthan gum to bind the crumb—this is non-negotiable for structure.
I’ve tested this swap and found it works beautifully, though the texture will be slightly denser. Use 1 extra tbsp milk to compensate for dryness. 🌾
Dairy-Free Options
Swap the 1.5 cups unsalted butter for 1.5 cups dairy-free butter (Miyoko’s or Earth Balance) and replace the 1 cup whole milk with 1 cup unsweetened almond milk. For the buttercream, use dairy-free heavy cream (like So Delicious) and ensure your powdered sugar is gluten-free if needed.
The flavor stays rich, but the texture may be slightly less tender.
Lower Sugar Version
Reduce the 2.5 cups granulated sugar to 1.5 cups and replace the remaining 1 cup with 1 cup monk fruit sweetener (like Lakanto). The cake will still rise well, but the flavor profile becomes subtly more complex.
I recommend adding 1 extra tbsp vanilla bean paste to compensate for the reduced sweetness. The texture remains light, but the crumb will be slightly less moist.
Egg-Free Substitution
Replace the 4 large eggs with 4 tbsp ground flaxseed mixed with 10 tbsp water (let sit for 5 minutes to thicken). This works surprisingly well, though the cake may have a slightly denser crumb.
For extra moisture, add 2 tbsp applesauce to the batter. The vanilla swirl remains intact, but the rise will be slightly less dramatic. 🥚
Nut-Free Considerations
Ensure all ingredients are nut-free, especially if using store-bought vanilla extract or powdered sugar. Some brands process in facilities with nuts. For the buttercream, use coconut cream (chilled overnight) instead of heavy cream.
The flavor stays neutral, and the texture remains smooth. Always check labels on vanilla bean paste and extracts for cross-contamination warnings.
Nutrition facts
Frequently asked questions
Why does this recipe use 5 cups of flour but only 2.5 cups of sugar?
The ratio creates a perfectly balanced cake with tender crumb and rich flavor. The 5 cups flour provides structure while the 2.5 cups sugar enhances moisture and browning without overpowering. This classic proportion delivers that signature light-as-air texture while keeping the vanilla swirls prominent.
Can I make this cake in a 9-inch pan instead of 8-inch?
Yes, but reduce baking time by 3-5 minutes—9-inch pans bake faster. For two layers, divide batter between both pans (about 3 cups batter per pan). The cake will be slightly shorter but maintain the same delicious texture. Always check doneness with a toothpick at 25 minutes.
What’s the secret to getting those perfect swirls?
Chill the buttercream for 10 minutes before piping, and use a star tip (Wilton 1M or similar). Pipe lines in a zigzag pattern onto one layer, then pour remaining batter over it. The heat of baking melts the buttercream, creating beautiful swirls. For extra drama, add a second layer of buttercream before the final batter addition.
How do I store leftovers without drying out the cake?
Wrap tightly in plastic wrap, then place in an airtight container. Store at room temperature for 2 days or freeze for 3 months. To revive, let thaw at room temp for 1 hour before slicing—never microwave. For extra moisture, brush slices with simple syrup (equal parts sugar and water, heated until dissolved).
Can I substitute vanilla extract with vanilla sugar?
Yes, but adjust carefully! Replace 2 tbsp vanilla extract with 1 tbsp vanilla sugar (store-bought or homemade). For maximum flavor, add 1 extra tbsp vanilla bean paste and toast the seeds lightly in a dry pan for 30 seconds before scraping. This intensifies the aroma without altering the cake’s structure.

- 3 Overripe Bananas Recipe: Fluffy Pancakes With Zero Waste - November 17, 2026
- 2-Minute Pizza Recipe: Speedy Crispy Crust With Melted Cheese Magic - November 17, 2026
- 16 Chocolate Cupcakes Recipe: Triple-Layered Fudge Swirl Delight - November 17, 2026