
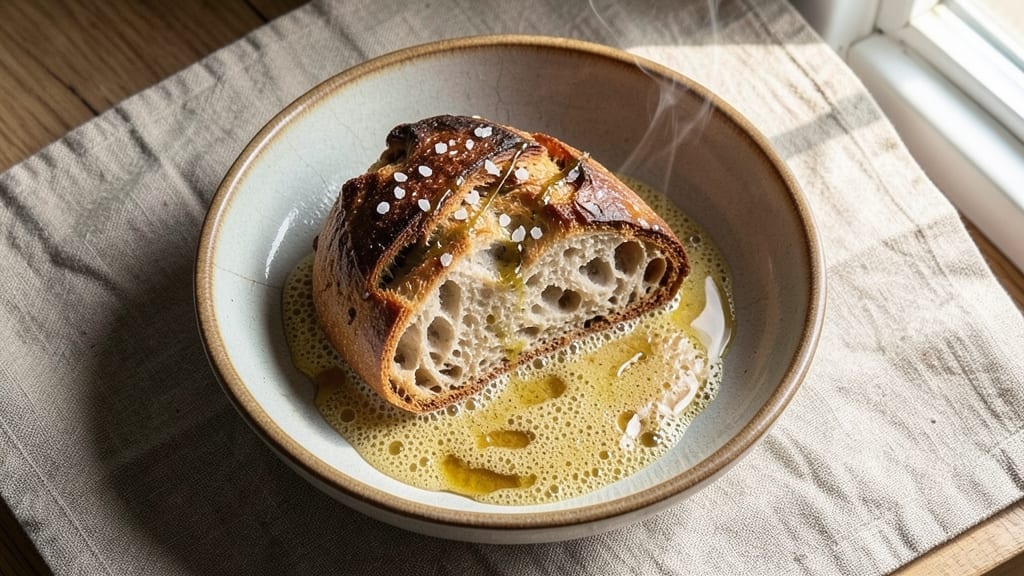
This 5-hour bread recipe transforms your kitchen into a bakery with a loaf that rivals artisan bakeries—crisp crust, airy crumb, and a golden-brown finish that’s impossible to resist. The secret lies in slow fermentation, which develops deep flavor and structure while you go about your day.
I perfected this method after years of experimenting with sourdough techniques, and it’s now my go-to for weekend baking projects that deliver restaurant-quality results.
What sets this recipe apart is the autolyse technique, where flour and water rest before adding yeast, creating a lighter, more extensible dough. Bulk fermentation lasts 4 hours at room temperature, allowing gluten to fully develop and flavors to mature.
The shaping and final proofing ensure an open crumb structure, while a steam bath in the oven creates that coveted crisp crust. No special equipment is needed—just time and patience.
By the time you pull that loaf from the oven, you’ll have a golden, crackling crust with an interior so tender it practically melts in your mouth.
The aroma alone will have everyone gathering in the kitchen, and the flavor—complex, slightly tangy, with a perfect balance of sweetness—makes every slice worth the wait. This isn’t just bread; it’s a centerpiece for any table.
Perfect for breakfast, sandwiches, or simply enjoying with butter and jam, this bread keeps well for 3-4 days at room temperature or frozen for up to 3 months.
The method is forgiving enough for beginners but refined enough to impress seasoned bakers. Let’s get started on creating your best loaf yet.
Ingredients for 5 hour bread
Transform your kitchen into an artisan bakery with these eleven essential ingredients for restaurant-quality bread.
| Ingredient | Amount | Notes |
|---|---|---|
| Bread Flour 🌾 | 5 cups | High-protein for structure, not all-purpose |
| Water 💧 | 3 ½ cups | Lukewarm, ~85°F for ideal yeast activation |
| Active Dry Yeast 🍞 | ¼ oz | Or 2.25 tsp, fresh yeast preferred |
| Kosher Salt 🧂 | 1 ½ tsp | Diamond Crystal preferred for accuracy |
| Honey 🍯 | 1 tbsp | For yeast activation and subtle sweetness |
| Olive Oil 🫒 | 1 tbsp | Extra-virgin for rich flavor development |
| Instant Vital Wheat Gluten 🌾 | 1 tbsp | Boosts protein for improved oven spring |
| Cornmeal 🌽 | ¼ cup | For dusting and crisp crust foundation |
| Ice Water ❄️ | ½ cup | For final dough shaping and tension |
| Coarse Sea Salt 🧂 | 1 tsp | For final crust scoring and flavor |
| Egg Wash 🥚 | 1 whole | Optional for ultra-glossy crust finish |
Bread flour is non-negotiable here—its high protein content (12-14%) develops that signature open crumb structure. King Arthur or Caputo are my go-tos, but any high-protein brand works. The yeast? Fresh is better—it activates faster and gives more reliable fermentation. If using active dry, make sure it’s not expired (test in warm water first). For the honey, raw Manuka adds subtle antibacterial properties, but any liquid honey will do. The olive oil should be extra-virgin—its fruity notes translate beautifully into the finished loaf. Store your flour in the freezer to prevent rancidity, and keep yeast in the fridge for up to 3 months past its date.
No bread flour? All-purpose plus 1 tbsp vital wheat gluten gets you close, though texture won’t be identical. Substituting honey? Maple syrup works 1:1, but it’s heavier and may darken the crust. Running low on olive oil? Avocado oil has a neutral flavor and similar smoke point. The cornmeal is crucial—it creates that perfect golden crust when baked on top. For scoring, a razor blade gives the cleanest cuts, but a sharp serrated knife works too. The egg wash is optional but worth it for that bakery-fresh shine. If you skip it, brush with water and a little more olive oil instead.
This dough is a patience game—plan ahead. The autolyse alone needs 30 minutes, then 4 hours bulk fermentation at room temp (75-78°F ideal). Shape the dough gently—overworking it collapses the gluten. For the steam bath, place a metal tray with boiling water on the oven rack below your bread. The loaf keeps best 3-4 days wrapped in a cotton towel at room temp, or 3 months frozen. Slice before serving—it stales faster than you’d think. The first loaf might not be perfect, but each attempt gets better
Why You’ll Love This Recipe
- No-Fuss Mix: The dough comes together in five minutes—just flour, water, yeast, and a drizzle of honey. Honestly, I’ve made bread with more steps that still turned out gummy, but this? It’s foolproof even when I’m distracted.
- Honey-Kissed Crust: That touch of honey isn’t just for sweetness—it caramelizes into a golden, crackly crust while keeping the inside soft and pillowy. Between us, it’s the kind of bread I’ll eat straight from the pan, no butter needed.
- Meal Prep MVP: Slice it fresh or freeze the whole loaf—it thaws in minutes and toasts like it’s day one. I keep a batch in the freezer for lazy mornings or last-minute sandwiches when the kids forget their lunches.
- Budget Bread: Five ingredients, zero waste. The yeast stretches every dollar, and kosher salt (not fancy seasoning) keeps costs low. It’s the kind of bread that makes grocery day feel like a win, not a chore.
Step-by-Step instructions for slow-rise artisan bread
Here’s how to transform simple ingredients into a loaf with crackling crust and airy crumb—no fancy equipment needed.
Activate the Yeast with Honey and Warm Water
In a large mixing bowl, combine the 3.5 cups lukewarm water (about 85°F) with the 1 tablespoon honey and 0.25 oz active dry yeast. Let this mixture sit for 10-15 minutes until it becomes frothy and bubbles vigorously at the surface. This confirms your yeast is alive and ready to work.
If the mixture doesn’t bubble after 15 minutes, your yeast may be dead. In that case, start fresh with a new packet—this is the foundation of your bread’s rise. The honey here serves a dual purpose: it feeds the yeast while adding a subtle sweetness that enhances the bread’s flavor profile later.
Mix the Dough with Bread Flour and Vital Wheat Gluten
Add the 5 cups bread flour and 1 tablespoon instant vital wheat gluten to the yeast mixture. Using a wooden spoon or dough whisk, stir until a shaggy dough forms. Then add the 1.5 teaspoons kosher salt and 1 tablespoon olive oil, mixing until just combined.
The vital wheat gluten is crucial here—it boosts protein content, giving your bread that professional bakery-style structure. You’ll notice the dough will be sticky at this stage, but that’s exactly what we want. Kneading isn’t necessary for this method, which makes it perfect for beginners or those short on time.
Develop the Dough Through Slow Fermentation
Cover the bowl with a damp kitchen towel and let the dough ferment at room temperature for 4 hours. You’ll see it gradually rise, with bubbles forming on the surface and along the sides of the bowl. This slow fermentation builds complex flavors and creates that signature open crumb structure.
After 4 hours, the dough should have roughly doubled in size. If it hasn’t risen much, give it another 30-60 minutes—patience is key here. The longer the fermentation, the more flavorful your bread will be, but don’t exceed 5 hours total or the yeast may overproof.
Shape and Final Proof with Ice Water
Lightly dust a clean work surface with ¼ cup cornmeal. Turn out the dough and gently shape it into a round boule by pulling the edges toward the center and tucking them under. This creates surface tension that helps maintain the shape during baking.
Place the shaped dough seam-side up in a lightly greased bowl, cover with a damp towel, and refrigerate for 12 hours or overnight. Before baking, remove the dough from the fridge and let it come to room temperature for 1 hour. Then brush the surface with the 1 whole egg wash and sprinkle with 1 teaspoon coarse sea salt for that signature crust finish.
Bake for Maximum Crust Development
Preheat your oven to 450°F with a Dutch oven inside for 30 minutes. Carefully transfer the dough (still in its bowl) to the hot Dutch oven and bake covered for 25 minutes. Then remove the lid and bake uncovered for another 15-20 minutes until the crust is deep golden brown and sounds hollow when tapped.
The Dutch oven creates steam that develops that coveted crust while keeping the crumb tender. For an even deeper flavor, you can bake the bread directly on the oven rack for the final 5 minutes to get those beautiful blisters and crisp spots. Let it cool on a wire rack for at least 1 hour before slicing—this allows the crumb to set properly.
Pro Tips For Making 5 Hour Bread
- Use Lukewarm Water: I learned this the hard way—yeast hates extremes. Fill your measuring cup with water straight from the tap, then let it sit for 10 minutes until it’s warm to the touch (like bathwater, not scalding). Cold water kills yeast; hot water cooks it before it even starts. Trust me, your dough will thank you with better rise and flavor.
- Salt the Dough Early: Don’t wait until the end—sprinkle that kosher salt directly into the flour when mixing. It dissolves better and distributes evenly, so every bite gets that balanced flavor. I used to add it later, and half the time, I’d forget or overdo it in spots.
- Let the Honey Bloom: Mix the honey into the water first, then let it sit for 2 minutes before adding yeast. This gives the sugar time to dissolve fully, which helps the yeast activate faster and more evenly. Skipping this step can leave you with a sluggish rise—no one wants a 5-hour wait for underwhelming results.
- Punch Down Gently: After the first rise, resist the urge to deflate the dough with brute force. Use your knuckles to press down slowly in the center, then let the sides fold in naturally. Rough handling tears the gluten, which makes the final loaf dense. Think “coax” instead of “smash.”
Creative variations of this 5 hour bread
Sourdough Twist
Transform this recipe into a sourdough loaf by replacing the commercial yeast with ¼ cup active sourdough starter (fed and bubbly). Add the starter to the water and honey mixture, then proceed with the autolyse and fermentation steps.
The fermentation time will extend to 6-8 hours at room temperature—monitor closely for proper rise. Brush the baked loaf with olive oil instead of egg wash for that classic sourdough shine. 🌾
Herb & Garlic Infusion
Boost flavor by adding 1 tablespoon dried rosemary and 2 minced garlic cloves to the dough during Step 2. For extra depth, mix 1 teaspoon garlic powder into the flour before combining.
These herbs pair beautifully with the bread’s natural tang, making it perfect for garlic bread or dipping in soups. Store herbs in airtight containers to preserve freshness.
Seeded Whole Grain Loaf
For a nutrient-packed variation, replace 1 cup bread flour with 1 cup whole wheat flour and fold in ¼ cup sunflower seeds or pumpkin seeds during Step 2. The seeds add crunch and nutrients while keeping the dough manageable.
Reduce fermentation time slightly to 3.5 hours—whole grains absorb moisture faster. Brush the baked loaf with a honey-mustard glaze (mix 1 tbsp honey with 1 tsp Dijon mustard) for a sweet-tangy finish.
Sweet Brioche Adaptation
Create a rich brioche-style loaf by adding ¼ cup granulated sugar and 2 extra egg yolks to the dough in Step 2. Replace ½ cup water with ½ cup whole milk for extra tenderness. The dough will be stickier, so use wet hands when shaping.
Bake as directed, but increase the uncovered time to 25 minutes for a deeper caramelization. This version is perfect for French toast or dessert bread. 🍯
Gluten-Free Option
For a gluten-free version, swap bread flour for a 1:1 gluten-free flour blend (like King Arthur Measure for Measure) and omit the vital wheat gluten. Add 1 extra teaspoon xanthan gum to improve structure.
Fermentation may take 5-6 hours—monitor closely. The crust will be slightly denser, but the crumb remains tender. Store in an airtight container to maintain freshness longer.
Meal Prep Variations
Make two loaves at once by doubling the recipe and using two Dutch ovens. Shape one as a boule and the other as a batard (oval loaf) for variety.
Freeze one loaf immediately after baking—wrap tightly in plastic wrap followed by a towel, then place in a freezer bag. Thaw at room temperature for 4 hours before toasting. This ensures you always have fresh bread on hand. ✨
Nutrition facts
Frequently asked questions
Can I make this bread without a Dutch oven?
Yes! If you don’t have a Dutch oven, use a heavy oven-safe pot with a lid or even a baking stone. For extra crust development, place a metal tray filled with boiling water on the oven rack below your bread to create steam. The bread may have slightly less oven spring but will still turn out delicious.
Why does my dough look flat after 4 hours of fermentation?
Flat dough after fermentation usually means the yeast didn’t activate properly or the environment was too cold. Check your yeast first—it should bubble within 10 minutes when mixed with warm water. Keep your dough in a 75-78°F area (use a warm oven with the light on if needed). If it’s still flat after 5 hours, your yeast may be dead—start fresh with new yeast.
How do I know when the bread is fully baked?
Your bread is done when the crust is deep golden brown and sounds hollow when tapped on the bottom. The internal temperature should reach 190-200°F. For a foolproof test, insert a thermometer—if it reads 190°F, it’s perfect. The bread will continue cooking as it cools, so don’t overbake!
Can I make this bread in a smaller loaf pan?
Yes, but expect a denser texture. For best results, shape the dough into a boule or batard and bake in a Dutch oven. If using a loaf pan, grease it well and bake at 375°F for 30-35 minutes covered, then 15 minutes uncovered. The steam from the Dutch oven creates that signature open crumb structure that’s harder to replicate in pans.
What’s the best way to store leftover bread?
Wrap cooled bread tightly in a cotton towel or beeswax wrap, then place in a paper bag at room temperature for 3-4 days. For longer storage, freeze sliced bread in an airtight container for up to 3 months. To revive frozen bread, warm slices in a 350°F oven for 5-10 minutes or toast directly. Never refrigerate—it dries out bread faster!

- 3lb Prime Rib Roast Recipe: Juicy Pink Center Guaranteed in 3 Hours - October 31, 2026
- 5 Spice Cake Recipe: Warmly Spiced Layers With Crunchy Top - October 31, 2026
- 1950’s Macaroni and Cheese Recipe: Nostalgic Creamy Cheese Sauce with Buttery Noodles - October 31, 2026