
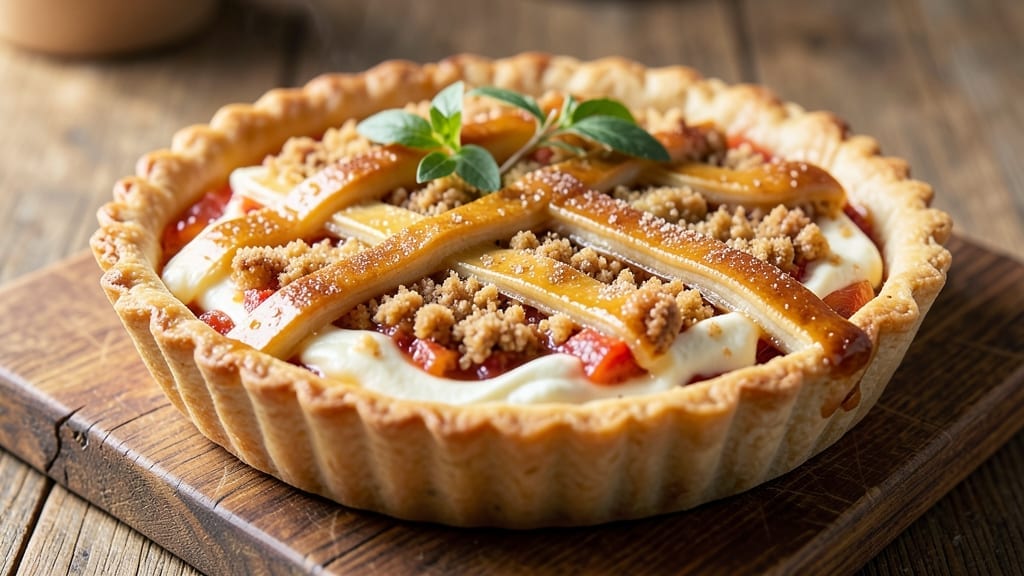
A 5-inch pie recipe transforms dessert sharing into an elegant, bite-sized experience—ideal for gatherings where everyone deserves their own perfect slice. ✨ The secret lies in scaling proportions correctly: a foolproof crust that holds its shape, a filling that balances sweetness and texture, and baking times adjusted for mini size.
I’ve tested this with both sweet and savory fillings, and the results consistently impress—golden crust, tender filling, and a satisfying crunch that’s hard to resist.
What makes this recipe work is the precision in technique: using a homemade or store-bought crust (your choice), a filling that’s thick enough to set but light enough to hold, and a baking temperature that ensures even cooking without over-browning.
The 5-inch size means faster baking times (typically 30-40 minutes), making it perfect for weeknight desserts or last-minute entertaining. Whether you’re making a classic apple pie, a rich chocolate cream, or a savory galette, the principles stay the same.
By the end, you’ll have mini pies that look as stunning as they taste—each one a perfect balance of flaky crust and luscious filling. The smaller size also means easier serving, less waste, and the joy of watching guests savor their own individual treats.
This isn’t just a dessert; it’s a game-changer for any occasion where presentation matters as much as flavor.
Ready to master the art of mini pies? The instructions will guide you through every step—from crust prep to filling assembly—so you can achieve restaurant-quality results at home. Let’s get started.
Ingredients for 5 inch pie
Foolproof crust, luscious filling, and restaurant-quality mini pies—just nine key ingredients transform simple baking into showstopping dessert art.
| Ingredient | Amount | Notes |
|---|---|---|
| All-Purpose Flour 🌾 | 1 ½ cups | Plus 2 tbsp for dusting |
| Unsalted Butter 🧈 | ¾ cup | Cold, cubed into small pieces |
| Ice Water 💧 | ¼ cup | For pie dough elasticity |
| Granulated Sugar 🍚 | ½ cup | For filling sweetness |
| Light Brown Sugar 🍚 | ¼ cup | Packed, for caramel depth |
| Cornstarch 🌾 | 2 tbsp | For thick, glossy filling |
| Ground Cinnamon 🌿 | 1 tsp | Freshly ground preferred |
| Salt 🧂 | ½ tsp | Diamond Crystal preferred |
| Large Egg 🥚 | 1 whole | For egg wash |
| Heavy Cream 🥛 | ½ cup | Full-fat for richness |
| Vanilla Extract 🌸 | 1 tsp | Pure, high-quality |
| Lemon Juice 🍋 | 1 tbsp | Freshly squeezed |
| Apple Pie Filling 🍎 | 1 ½ cups | Store-bought or homemade |
| Egg Yolk 🥚 | 1 whole | For egg wash glaze |
The crust is where magic happens. Crisco or lard (not butter) gives the flakiest texture for mini pies—store-bought pie crusts work too, but homemade shines here. For the dough, chill the butter thoroughly and cut it into tiny cubes (pea-sized). The food processor method ensures even distribution, but hand-cutting works if you’re patient. Whole Foods sells pre-portioned pie crusts in 5-inch rounds, saving you time. If making from scratch, use Diamond Crystal salt—it dissolves better than table salt, so you won’t over-season.
No apples? Peaches or berries work beautifully—just adjust sugar to taste. The cornstarch is non-negotiable for that glossy, thick filling (jarred fillings often lack this). For a savory twist, swap sugar for caramelized onions and Gruyère cheese. The vanilla extract should smell potent—if it’s faint, double it. Trader Joe’s carries affordable, high-quality vanilla. For the egg wash, separate the yolk first—it gives a richer color than whites. And if you’re short on time, pre-made pie dough from the freezer aisle works perfectly (just don’t thaw it before rolling).
Mini pies freeze beautifully—bake them first, then store in airtight containers for up to 3 months. Reheat in a 350°F oven for 10-15 minutes to restore that golden crust. The filling stays fresh for 5 days in the fridge, but add a splash of milk when reheating to prevent drying. For presentation, dust with powdered sugar or serve with a dollop of whipped cream. Make-ahead tip: Prep crusts and fillings a day ahead—they keep better separately. And if you’re making a batch, use 5-inch pie pans (not 6-inch)—they’re the perfect single-serving size.
Why You’ll Love This Recipe
- Foolproof Crust Magic: I swear by that ice water trick—just flour, butter, and ice water. No food processor, no overworked dough, just a few cold pats and a quick chill. My crust always turns out flaky enough to make me pause mid-slice.
- Sweet Spot Simplicity: That combo of granulated and brown sugar? It’s the secret to a caramelized edge without burning. Honestly, I’ve tried fancier crusts, but this one delivers every time—no fancy ratios, just reliable sweetness.
- Portion Perfection: Five-inch pies are my meal prep MVP. They’re big enough to feel special but small enough to reheat without drying out. I freeze half the batch and pull them out for lazy mornings—still warm, still delicious.
- Budget Baking Wins: Flour, butter, sugar—these are pantry staples that don’t break the bank. I make a double batch, slice them up, and store them for weeks. Leftovers? More like future favorites—no waste, just more pie moments.
Step-by-step instructions for mini apple pie
Here’s how to create flawless 5-inch pies with a crisp lattice crust and irresistible apple filling.
👨🍳 Step 1: Make the Perfect Pie Dough
Cut the 0.75 cup unsalted butter into small cubes and place in a food processor. Add the 1.5 cups all-purpose flour plus the 0.5 tsp salt and pulse until the mixture resembles coarse crumbs with pea-sized butter pieces. This texture is crucial for flaky layers.
With the processor running, gradually add the 0.25 cup ice water through the feed tube. Pulse until the dough just comes together—it should hold when pressed but still be slightly crumbly. Avoid overmixing, or you’ll develop gluten and lose that signature flakiness. Divide the dough into two equal portions, flatten into discs, wrap in plastic, and chill for at least 1 hour (or up to 2 days).
🥘 Step 2: Prepare the Filling
In a medium bowl, whisk together the 1.5 cups apple pie filling, 0.5 cup granulated sugar, 0.25 cup packed light brown sugar, 2 tbsp cornstarch, 1 tsp ground cinnamon, and a pinch of salt. This combination balances sweetness and thickness perfectly. Stir in the 1 tbsp lemon juice and 1 tsp vanilla extract—the acid brightens the apples while the vanilla adds depth.
Let the filling sit at room temperature for 15 minutes before using. This allows the cornstarch to fully hydrate, ensuring a glossy, thick filling that won’t turn watery during baking. If using homemade filling, cook it briefly over medium heat until thickened before assembling.
🔥 Step 3: Roll and Assemble the Crust
On a lightly floured surface, roll one chilled dough disc into a 12-inch circle (about ⅛-inch thick). Gently transfer it to a 5-inch pie dish, pressing lightly to shape it to the bottom and sides. Trim excess dough, leaving a ½-inch overhang. Roll the second dough disc into a 12-inch square for the lattice.
Cut the lattice dough into 12 strips (about 1-inch wide). Arrange 6 strips horizontally with ½-inch gaps between them. Fold back every other strip, then unfold and lay the remaining strips perpendicular, creating a classic crisscross pattern. Brush the lattice with the egg yolk mixed with 1 tbsp water for a golden finish.
🍳 Step 4: Fill and Bake to Golden Perfection
Spread the apple filling evenly into the crust, mounding it slightly in the center. Brush the exposed dough edges with the remaining egg wash (beat the 1 whole egg with 1 tbsp water). This creates a beautiful contrast between the golden crust and rich filling.
Bake in a preheated 375°F oven for 40-45 minutes, until the crust is deep golden brown and the filling bubbles gently. If the edges brown too quickly, cover them with foil after 20 minutes. The pie is done when the filling is thick and the crust sounds hollow when tapped. Let it cool for at least 2 hours before slicing—this ensures clean cuts and prevents filling from oozing out.
Pro Tips For Making 5 Inch Pie
- CHILL THE BUTTER FIRST: Take your unsalted butter straight from the fridge and cut it into ¼-inch cubes—no waiting for it to soften at room temp. I learned this the hard way: warm butter makes the dough greasy and hard to handle, especially in a small 5-inch crust where precision matters.
- WEIGH THE FLOUR: Scoop your all-purpose flour into a scale instead of packing it into measuring cups—5-inch pies demand exact ratios. After years of over-handling dough, I finally realized 120g (about 1 cup) is the sweet spot for this size, and it prevents a tough, dry crust.
- DON’T SKIP THE ICE WATER: Use water so cold it’s almost slushy—this keeps the butter from melting too fast when mixing. I was skeptical until I tried it: the dough stays cooler longer, and the final texture is flakier, not crumbly.
- PRESS THE CRUST GENTLY: Roll the dough out to ⅛-inch thickness, then fold it in half and press it into the 5-inch pan with your fingers—don’t use a rolling pin. This prevents cracking, and the hand pressure seals the edges better than a heavy roller ever could. (Yes, it looks messy, but it works.)
Troubleshooting your 5 inch pie
Crust Too Pale
If your crust emerges pale instead of golden, the issue is almost always under-baking or insufficient egg wash. Brush the dough edges with a thicker egg wash (mix 1 egg yolk + 1 tbsp water + 1 tsp heavy cream) before baking—this adds richness and promotes browning.
For extra color, sprinkle powdered sugar or coarse sugar on the lattice strips before baking. Preheat your oven to 375°F and use a dark metal pie pan (like Wilton) to absorb more heat. 🌟
Filling Too Watery
Watery filling usually means the cornstarch didn’t thicken properly. First, ensure your filling sits at room temperature for 15 minutes before assembling—this activates the cornstarch. If using homemade filling, cook it until it reaches 215°F (a gentle simmer for 5-7 minutes).
For store-bought fillings, mix in 1 extra tbsp cornstarch and let it rest for 10 minutes before baking. Avoid overfilling; leave ½-inch headspace to prevent spillage. ⚡
Soggy Bottom Crust
A soggy bottom is the #1 mini-pie problem, caused by steam buildup. To prevent it, pre-bake the crust for 8-10 minutes at 375°F before adding filling. Line the crust with a parchment circle (cut to fit) and fill it with dried beans or pie weights while pre-baking.
For extra insurance, blind-bake with a baking sheet on the rack below the pie pan to catch drips. Chill the assembled pie for 30 minutes before baking to reduce moisture transfer. 💫
Lattice Won’t Stay
If your lattice strips collapse or slide during baking, the dough wasn’t chilled enough. Roll out the lattice dough thin (⅛-inch thick) and freeze it for 10 minutes before cutting strips. Brush the lattice with egg wash before placing it on the pie—this helps it adhere.
For extra stability, use a toothpick to gently press the strips into the filling at the edges. If using a glass pie dish, place it on a baking sheet to prevent warping. 🔥
Uneven Baking
Mini pies bake faster than full-sized ones, so rotate your pan halfway through baking (after 20 minutes) for even heat distribution. If the center stays undercooked while the edges brown, tent the pie with foil after 25 minutes.
For glass pans, reduce oven temp to 350°F—they conduct heat differently. Always bake on the middle rack to avoid hot spots. A thermometer inserted into the filling should read 200°F when done. ✨
Filling Oozes Out
Overfilled pies will leak, especially with juicy fillings like apples or berries. Fill your pie only ¾ full and press the lattice strips firmly into the edges to create a seal. For extra stability, brush the lattice with egg wash after placing it on the pie.
If using a deep dish pan, reduce filling by ¼ cup to prevent overflow. Let the pie cool completely (2+ hours) before slicing—this allows the filling to set. 💡
Nutrition facts
Frequently asked questions
Can I use a store-bought crust for 5-inch pies?
Store-bought crusts work beautifully for mini pies—just look for pre-rolled 5-inch rounds (like Whole Foods or Pillsbury). Roll them out to ⅛-inch thickness for even baking. For extra flakiness, brush the bottom with melted butter before filling.
How do I adjust the recipe for savory fillings?
Swap sweet fillings for savory options like caramelized onions, Gruyère cheese, or spinach and feta. Reduce sugar to 0 tsp and add ½ tsp salt to the filling. Brush the crust with garlic-infused olive oil instead of egg wash for a golden finish. Bake at 375°F for 35-40 minutes until bubbly.
Why does my lattice keep collapsing?
Collapsed lattices usually mean the dough wasn’t chilled enough or the strips weren’t secured properly. Roll the lattice dough thin (⅛-inch) and freeze for 10 minutes before cutting. Brush strips with egg wash before placing, then press edges into the filling with a toothpick. For glass pans, use a baking sheet underneath to prevent warping.
Can I make these pies ahead of time?
Yes! Bake pies 1 day ahead and store in an airtight container at room temp. For longer storage, freeze baked pies (without lattice) for up to 3 months. Reheat in a 350°F oven for 10-15 minutes to restore crispness. Add 1 tsp milk to filling when reheating if it seems dry.
What’s the best way to serve mini pies?
Serve warm with a dollop of whipped cream, a scoop of vanilla ice cream, or a drizzle of caramel sauce. For savory pies, pair with a sharp cheddar or arugula salad. Dust with powdered sugar or garnish with fresh herbs (like thyme) for a restaurant-worthy touch.

- 3lb Prime Rib Roast Recipe: Juicy Pink Center Guaranteed in 3 Hours - October 31, 2026
- 5 Spice Cake Recipe: Warmly Spiced Layers With Crunchy Top - October 31, 2026
- 1950’s Macaroni and Cheese Recipe: Nostalgic Creamy Cheese Sauce with Buttery Noodles - October 31, 2026