
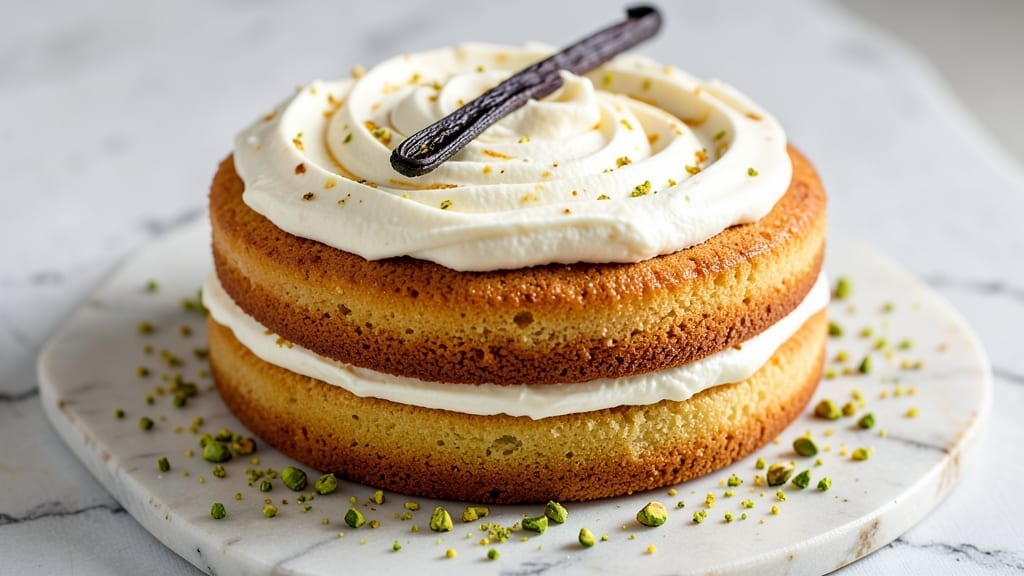
A 5-inch vanilla cake with delicate vanilla bean swirls delivers the perfect balance of lightness and rich flavor—ideal for special occasions or weekend treats. This recipe focuses on achieving a tender crumb and even bake, ensuring every slice is as beautiful as it is delicious.
The secret lies in proper mixing techniques and precise oven temperature control to avoid dryness.
What sets this cake apart is the subtle infusion of vanilla bean, which adds depth without overpowering the classic vanilla flavor. The recipe uses a simple batter that yields a moist, fluffy texture, while the swirls create elegant visual appeal.
Perfect for beginners or experienced bakers, this cake requires just 30 minutes of active prep and 30-35 minutes in the oven.
The result is a golden, domed cake with a tender crumb and delicate vanilla aroma that fills the kitchen. Whether served at a celebration or enjoyed with afternoon tea, this cake combines simplicity with professional-quality results. The frosting options—from buttercream to cream cheese—let you customize it to your taste.
For best results, use room-temperature ingredients and avoid overmixing the batter. Layering the cake with vanilla bean swirls adds both visual elegance and a burst of flavor in every bite. Let’s bake this perfect vanilla cake!
Ingredients for 5 inch vanilla cake
Twelve ingredients for a showstopping vanilla cake with swirls that steal the show.
| Ingredient | Amount | Notes |
|---|---|---|
| All-Purpose Flour 🌾 | 2 ½ cups | Sifted for lightness, plus extra for dusting |
| Granulated Sugar 🍚 | 2 cups | White sugar for classic sweetness |
| Unsalted Butter 🧈 | 1 ½ cups | Room temperature, cubed for easy mixing |
| Large Eggs 🥚 | 4 whole | Room temperature for even baking |
| Pure Vanilla Extract 🌿 | 2 tbsp | High-quality, not imitation |
| Vanilla Bean Paste 🌿 | 1 tbsp | For authentic vanilla bean flavor |
| Baking Powder 🍞 | 2 tsp | Freshly measured for lift |
| Salt 🧂 | ½ tsp | Fine sea salt for balance |
| Milk 🥛 | 1 cup | Room temperature, any variety |
| Vanilla Bean Seeds 🌿 | 2 whole | Scraped from 1 vanilla bean |
| Powdered Sugar 🍚 | 1 cup | For dusting between layers |
| Heavy Whipping Cream 🥛 | 1 cup | Cold for swirls, full-fat preferred |
The vanilla bean is non-negotiable here—Madagascar or Tahitian beans deliver the richest flavor. Trader Joe’s and Williams Sonoma carry high-quality pods year-round, but if you’re in a pinch, vanilla bean paste works beautifully (just scrape the seeds into the batter). For the butter, Plugrá or Land O’Lakes unsalted melt perfectly without overpowering. Room temperature is key—rub the cold butter between your fingers until it softens like clay. The flour? King Arthur or Gold Medal brands are your best bet for consistent results. Sift it first to avoid dense cake layers.
No vanilla bean? Double the pure vanilla extract and add a pinch of cinnamon for depth. Substituting milk? Almond or oat milk work, but reduce by 2 tbsp to account for their thinner consistency. For the swirls, heavy cream is ideal, but Greek yogurt thinned with milk creates a tangy alternative. The powdered sugar should be 10X sifted for smooth layers—skip the pre-sifted kind. If you’re short on time, microwave the butter 40 seconds to soften it, then let it cool slightly before mixing. The vanilla bean seeds? Split the pod lengthwise and scrape with a knife for maximum flavor extraction.
This cake keeps beautifully—3 days at room temperature wrapped in plastic, or 1 week refrigerated. For longer storage, freeze layers between parchment, then assemble when ready. The swirls add 24 hours of freshness, so layer them right before serving. To reheat slices, microwave 10 seconds to restore moisture. Pro tip: Warm the cake plates before slicing for cleaner cuts. The vanilla aroma intensifies as it cools, so let it rest 10 minutes before serving for the full experience.
Why You’ll Love This Recipe
- One-Bowl Wonder: I swear by this recipe when I’m in a rush—just toss everything into one bowl, mix it up, and bake. No fancy equipment, no stress, just pure vanilla perfection with minimal cleanup.
- Vanilla Magic: That rich, buttery flavor from the melted butter and pure vanilla extract? It’s like a warm hug in cake form. The sugar caramelizes just enough to give it a subtle depth without being overpowering.
- Party-Ready Slices: Cut into 5-inch rounds and you’ve got instant dessert for birthdays, potlucks, or even a quiet night in. Serve it plain or with whipped cream—I’ve even used the leftovers for cake pops (yes, really).
- Budget-Friendly Luxury: Uses pantry staples you already have, and the portions are perfect for sharing. Make it once, and you’ll have slices for days without breaking the bank or the fridge.
Step-by-step instructions for layered vanilla cake with swirls
Here’s how to create a delicate, moist vanilla cake with professional swirls—every layer perfect.
Prepare the Cake Pans and Preheat the Oven
Generously butter and flour the bottoms and sides of two 5-inch round cake pans, tapping out any excess. Line the bottoms with parchment circles cut to fit snugly. Preheat your oven to 350°F—this temperature ensures even baking without overbrowning. I like to place the pans on the middle rack where heat circulates most evenly.
While the oven heats, sift together the 2.5 cups all-purpose flour, 2 tsp baking powder, and 0.5 tsp salt into a medium bowl. This step removes lumps and ensures a light, airy crumb. Set aside—you’ll add the wet ingredients next. The reason for sifting is simple: it prevents dense pockets in your cake layers.
Cream Butter and Sugar to Light and Fluffy
In a stand mixer fitted with the paddle attachment, beat the 1.5 cups unsalted butter (cut into cubes) and 2 cups granulated sugar on medium-high speed for 3-4 minutes. You’re looking for a pale, fluffy mixture that nearly doubles in volume—this incorporates air, which creates that signature lightness. Scrape down the sides of the bowl with a spatula to ensure even mixing.
Add the 4 whole large eggs, one at a time, mixing well after each addition. Then stir in the 2 tbsp pure vanilla extract and 1 tbsp vanilla bean paste, scraping the bowl as needed. The paste adds depth of flavor that extract alone can’t match. Here’s the thing—room temperature eggs blend more smoothly, so if yours are cold, let them sit at room temperature for 15 minutes before using.
Alternate Dry and Wet Ingredients for Perfect Texture
With the mixer on low speed, add one-third of the flour mixture, mixing just until combined. Then pour in ½ cup of the milk, mixing until smooth. Repeat, ending with the last one-third of flour. This alternating method prevents dense layers by distributing fat evenly. Mix for 30 seconds after the final addition—just until the batter is homogeneous.
Divide the batter evenly between the prepared pans. Here’s a pro tip: use a kitchen scale or weigh the pans to ensure equal distribution. Tap each pan gently on the counter to release any air bubbles. Bake for 25-30 minutes, until a toothpick inserted into the center comes out clean. The cake should spring back slightly when pressed gently in the center.
Cool and Prepare the Vanilla Bean Swirl Filling
Remove the cakes from the oven and let them cool in their pans for 10 minutes. Then transfer to a wire rack to cool completely. Meanwhile, whip the 1 cup cold heavy whipping cream to soft peaks in a chilled bowl. Gradually add the 1 cup powdered sugar and 2 whole vanilla bean seeds, whipping until stiff peaks form. This filling needs to be thick enough to hold its shape when piped between layers.
For the swirl effect, I use a piping bag fitted with a star tip. Pipe diagonal lines across the first cake layer, then spread evenly with a spatula. Place the second layer on top, then pipe another layer of cream on top for decoration. Don’t skip this step—it’s what makes this cake truly special.
Assemble and Chill for Maximum Flavor
Press the second cake layer gently onto the first, then dust the top and sides with powdered sugar for a finished look. Wrap the cake tightly in plastic wrap and refrigerate for at least 4 hours—this allows the flavors to meld and the cream to set properly. The longer it chills, the more pronounced the vanilla flavor becomes.
Slice and serve at room temperature for the best texture. Each bite should reveal that perfect balance of tender crumb, creamy swirls, and rich vanilla flavor. This cake keeps well in the fridge for 3 days, though I doubt it’ll last that long!
Pro Tips For Making 5 Inch Vanilla Cake
- Cream Butter & Sugar Slowly: Ditch the food processor—use a sturdy hand mixer and beat the butter and sugar on medium-high for 3-4 minutes until it’s pale and ribbony. I learned this the hard way: rushing it leaves air pockets that collapse later, making your cake dense. (Yes, even if you’re impatient like me.)
- Sift That Flour: Sift the flour twice—once before mixing, once after adding baking powder—if your recipe calls for it. That extra step prevents lumps and ensures even distribution, so your cake rises smoothly. My grandmother swore by this, and she was right: the texture is noticeably lighter.
- Room-Temp Eggs Matter: Take your eggs out of the fridge 30 minutes before using them. Cold eggs won’t emulsify properly with the butter, leading to a cake that’s greasy or sinks in the middle. I was skeptical until I tried it—now I never skip this.
- Check Doneness with a Toothpick: Skip the timer. Insert a toothpick into the center—it should come out with moist crumbs, not wet batter or dry flour. Overbaking dries out the cake faster than you think, especially in a 5-inch pan. (Your future self will thank you.)
Storing and reheating this dish
Room Temperature Storage
This cake stays fresh for 3 days at room temperature when wrapped tightly in plastic wrap or stored in an airtight container. I always place it on a wire rack inside a cake carrier to prevent sogginess.
The vanilla flavor actually intensifies as it sits, so let it rest 10 minutes before slicing for cleaner cuts. For best results, store it in a cool, dry place away from direct sunlight. 🌟
Refrigerator Freshness
When refrigerated, your cake maintains its moisture for up to 1 week. Wrap each layer individually in plastic wrap before stacking to prevent drying. I like to place a piece of parchment between layers to absorb any excess moisture.
The cold temperature helps preserve the vanilla bean swirls’ creaminess. Let slices sit at room temperature for 5 minutes before serving to restore texture. ✨
Freezer Preservation
For longer storage, freeze the cake layers between parchment paper for up to 3 months. I recommend using freezer bags with the air squeezed out to prevent freezer burn.
Thaw in the refrigerator overnight before assembling. The texture remains tender, though the swirls may soften slightly. Rewhip the cream filling if needed before reassembling. 💫
Reheating Slices
For best results, I recommend serving cake slices at room temperature. If reheating is necessary, microwave individual portions for 10-15 seconds on 50% power to restore moisture.
Avoid conventional ovens as they can dry out the cake. A quick burst of microwave heat brings back that perfect vanilla aroma and tender crumb. 🔥
Make-Ahead Swirls
The vanilla bean swirls add 24 hours of freshness to your cake. Prepare them up to 1 day ahead and store in an airtight container in the fridge.
Rewhip briefly before assembling to maintain stiffness. This makes the cake perfect for celebrations you’re preparing for in advance. The flavors meld beautifully overnight. 💛
Serving Tips
Serve slices on warmed plates to maintain the cake’s structure. Dust with additional powdered sugar or garnish with fresh berries for presentation. The cake’s delicate texture pairs perfectly with tea or coffee.
I always serve it at room temperature for the best experience. The vanilla aroma will fill your kitchen and delight your guests. 🥂
Nutrition facts
Frequently asked questions
Can I bake this cake in a different-sized pan?
Yes! For a 6-inch cake, reduce baking time by 5-7 minutes (about 25 minutes total). For an 8-inch cake, increase time to 35-40 minutes. Always check doneness with a toothpick. The batter quantity here makes two 5-inch layers, so adjust accordingly—you may need to bake one layer at a time for larger pans.
How do I make this cake gluten-free?
Replace the all-purpose flour with a 1:1 gluten-free baking flour blend (like Bob’s Red Mill or King Arthur). Add ½ tsp xanthan gum to help bind the crumb. Reduce milk by 2 tbsp to compensate for the blend’s moisture difference. Test the batter consistency—it should be slightly thicker than the original.
Why did my cake sink in the middle?
This usually happens from overmixing the batter or opening the oven too soon. Mix just until combined (about 30 seconds after final flour addition). Avoid opening the oven during the first 20 minutes of baking. If your oven runs hot, reduce temperature to 340°F for more even baking.
Can I use this recipe for a single-layer cake?
For a single 5-inch layer, use the full batter in one pan. Bake for 25-30 minutes until a toothpick comes out clean. The swirls work beautifully on top—pipe them directly onto the cooled cake before frosting. This makes a stunning single-serving cake perfect for special occasions.
What’s the best frosting alternative to the vanilla swirls?
Try a vanilla buttercream (mix ½ cup softened butter, 2 cups powdered sugar, and 2 tbsp milk), or a cream cheese frosting (blend 8 oz cream cheese, ½ cup butter, and 3 cups powdered sugar). For a lighter option, whip 1 cup heavy cream with 2 tbsp powdered sugar for a cloud-like finish.

- 3lb Prime Rib Roast Recipe: Juicy Pink Center Guaranteed in 3 Hours - October 31, 2026
- 5 Spice Cake Recipe: Warmly Spiced Layers With Crunchy Top - October 31, 2026
- 1950’s Macaroni and Cheese Recipe: Nostalgic Creamy Cheese Sauce with Buttery Noodles - October 31, 2026