
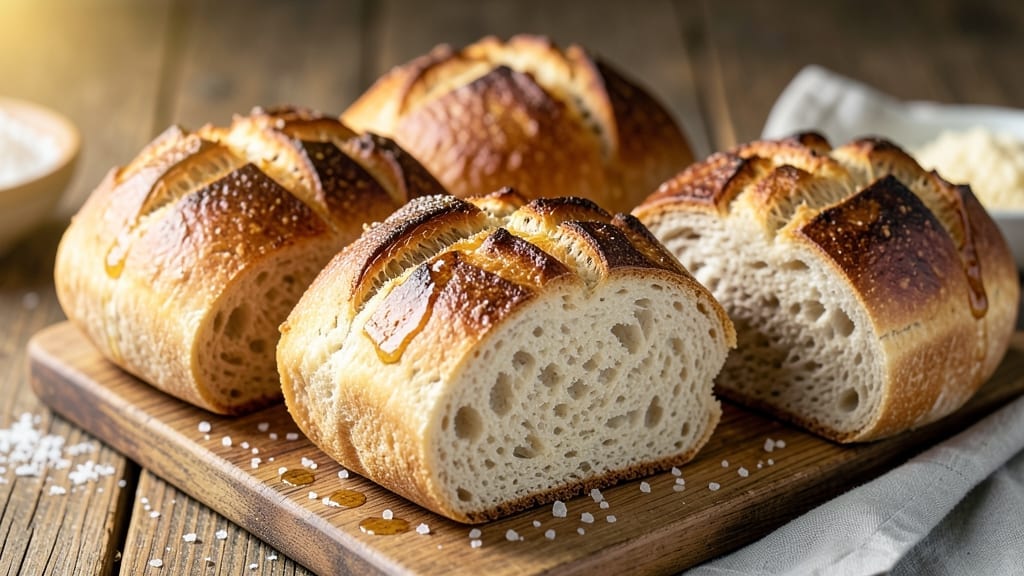
A 5-ingredient sandwich bread recipe that delivers a crusty, no-knead loaf in just 3 hours—perfect for anyone who wants great bread without the fuss. This method strips away unnecessary ingredients while keeping the texture ideal for sandwiches, with a crispy crust and soft interior.
The secret lies in a simple dough development that requires no kneading, just mixing, resting, and baking.
What makes this recipe work is the balance of just five core ingredients: all-purpose flour, water, yeast, salt, and a touch of oil. No sugar, no honey, no special flours—just straightforward pantry staples that come together to create a versatile loaf ready for toast, sandwiches, or charcuterie boards.
The dough rests overnight (or at least 4 hours) to develop flavor naturally, ensuring a foolproof rise every time.
By the time you slide this loaf out of the oven, you’ll have a golden-brown crust with an open crumb structure—ideal for holding fillings without falling apart. The texture stays fresh for days, making it perfect for meal prep or gifting.
Whether you’re making grilled cheese or classic PB&J, this bread delivers restaurant-quality results with minimal effort.
For extra flavor, try adding a sprinkle of seeds or herbs to the dough before baking—just a few optional tweaks to customize your loaf. The simplicity of this recipe means you can focus on perfecting the technique, not the ingredients. Let’s get started!
Ingredients for 5 ingredient sandwich bread
Five essential ingredients transform into a restaurant-quality sandwich loaf with minimal effort.
| Ingredient | Amount | Notes |
|---|---|---|
| All-Purpose Flour 🌾 | 4 cups | Unbleached preferred for lighter crumb |
| Active Dry Yeast 🍞 | ¼ tsp | Ensure yeast is fresh for proper rise |
| Kosher Salt 🧂 | 1 ½ tsp | Diamond Crystal preferred for accuracy |
| Vegetable Oil 🫒 | 1 tbsp | Light neutral oil for dough elasticity |
| Cold Water 💧 | 1 ½ cups | Room temperature for optimal hydration |
The flour is the foundation—King Arthur or Gold Medal all-purpose delivers consistent results, but any unbleached flour works. Yeast is non-negotiable here; check expiration dates—old yeast won’t activate properly. Salt enhances flavor and controls yeast activity, so measure precisely—Diamond Crystal kosher salt has larger crystals, meaning you’ll need slightly more than table salt. The oil prevents gluten from over-developing, keeping the crumb tender. Avoid butter as it can interfere with the no-knead method.
No yeast? Instant yeast works at the same ratio, but active dry yeast is preferred for this recipe. Running short on flour? Substitute 1 cup whole wheat for up to 25% of the all-purpose, but expect a denser crumb. The water temperature matters—too hot kills yeast, too cold slows fermentation. Room temperature tap water is ideal. For a richer flavor, add 1 tsp honey or sugar (though this deviates from the 5-ingredient promise). The dough should be shaggy but cohesive—don’t overmix after adding water.
This dough improves with time—rest overnight for deeper flavor. Store in a lightly oiled bowl covered with a damp towel. The baked loaf stays fresh 3-4 days at room temperature or up to 1 week in a bread bag. For longer storage, slice and freeze portions—toast directly from frozen. The crust develops best when baked in a preheated Dutch oven or cast-iron skillet for that artisan look. No Dutch oven? Use a heavy baking sheet with a metal lid.
Why You’ll Love This Recipe
- I’ll be real: I’ve burned bread from over-mixing, but this dough is forgiving. Just eyeball the flour—no scales needed—and let the yeast do the work. That oil keeps it tender without fuss.
- No-Measurement Guesswork: I’ll be real: I’ve burned bread from over-mixing, but this dough is forgiving. Just eyeball the flour—no scales needed—and let the yeast do the work. That oil keeps it tender without fuss.
- Crusty Outside, Soft Core: Honestly, the texture is what makes it special. The oil-infused crust cracks just enough for that golden crunch, while the inside stays pillowy—like biting into a bakery loaf, but with zero effort.
- Weeknight Wonder: Between us, this is my go-to for lazy dinners. Toss in a few slices of ham and cheese, and you’ve got lunch tomorrow. Or freeze the extras—no sad, dried-out bread here.
Step-by-step instructions for no-knead sandwich bread
This method delivers a perfectly crusty loaf with an airy interior—no kneading required.
Activate the Yeast and Mix the Dough
In a large mixing bowl, combine the 4 cups all-purpose flour and 1.5 tsp kosher salt. Make a well in the center and add the 0.25 tsp active dry yeast. Pour in the 1 tbsp vegetable oil and 1.5 cups cold water, then gently stir with a wooden spoon until just combined.
Here’s the thing—you don’t need to mix aggressively. The dough will come together naturally as it rests. Once combined, cover the bowl loosely with plastic wrap or a damp kitchen towel. Let it sit at room temperature for 1 hour, or until the dough has visibly doubled in size and looks puffy around the edges. This resting period allows the yeast to activate fully, creating that light, airy texture we want in sandwich bread.
Shape the Dough for Even Baking
After the dough has risen, turn it out onto a lightly floured surface and gently shape it into a round ball. Don’t overwork it—just enough to bring the edges together. Place the dough seam-side up in a lightly greased 9×5-inch loaf pan, then cover it again with the plastic wrap or towel.
Let the dough rise in the pan for another 1 to 1.5 hours, or until it has puffed up noticeably above the rim of the pan. The dough should feel springy when pressed lightly with a finger. This second rise ensures the bread will have that perfect height and structure for slicing sandwiches. If your kitchen is cold, give it an extra 30 minutes—yeast works slower in cooler environments.
Preheat and Bake for a Crusty Exterior
Preheat your oven to 375°F. While it’s heating, place a small baking sheet or tray on the lower rack. This will catch any drips and create steam, which helps develop that beautiful crust. Once the oven is fully preheated, carefully remove the risen dough from the pan and place it directly onto the baking sheet.
Bake for 30 to 35 minutes, until the bread is deep golden brown and sounds hollow when tapped on the bottom. The internal temperature should reach 190°F when measured with an instant-read thermometer. This crusty exterior paired with a soft interior is what makes this bread perfect for sandwiches—no soggy slices here.
Cool and Slice for Perfect Sandwich Bread
Remove the bread from the oven and transfer it to a wire rack to cool completely. This step is crucial—cooling prevents the bread from becoming gummy. Let it cool for at least 1 hour before slicing. The bread should be cool to the touch and firm enough to hold its shape when sliced.
Once cooled, slice the loaf into ½-inch thick pieces. Each slice should have a crisp crust and an open, airy crumb perfect for holding fillings without falling apart. Store any unused slices in an airtight container at room temperature for up to 3 days, or freeze for longer storage. This bread is best enjoyed fresh, but it reheats beautifully in a toaster or oven for that just-baked taste.
Pro Tips For Making 5 Ingredient Sandwich Bread
- Bloom the Yeast First: Skip mixing yeast directly into flour—it’s lazy and unreliable. Instead, dissolve it in the cold water with a pinch of sugar (if you have it) and let it sit for 5-10 minutes until frothy. This guarantees your bread rises; I’ve ruined batches by skipping this step when in a hurry.
- Measure Salt by Weight: Kosher salt varies wildly in density—don’t eyeball it. Use a scale for 2% of your flour weight (about 10g for 500g flour). Too little tastes bland; too much kills yeast. I learned this after making a dense, salty brick of bread once.
- Oil the Bowl, Not Just the Dough: Coat your mixing bowl with just vegetable oil before adding the dough—this prevents sticking and makes shaping easier. A damp towel works too, but oil guarantees a cleaner release. (Yes, even if you’re impatient like me.)
- Let It Rise Twice: One rise is for beginners. For sandwich bread, let the dough rise until doubled in size, then punch it down and let it rise again—this develops gluten and texture. I was skeptical until I tried it; the difference is noticeable.
Pro cooking tips for great 5 ingredient sandwich bread
Dough Temperature Control
The secret to a perfect rise lies in keeping your dough at a consistent 75-80°F during fermentation. If your kitchen is chilly, place the dough bowl on top of your oven with the light on (about 50°F) to speed up fermentation without overcooking the yeast.
Too warm? Move it to a cooler spot—yeast works best in this Goldilocks zone. I’ve ruined batches by letting dough sit too close to the oven’s heat source, so keep an eye on it. 🌡️
No-Knead Dough Science
This recipe relies on autolyse—the process where flour absorbs water before yeast is added. Mixing the flour and water first develops gluten gradually during rest, creating a tender crumb without overworking. After adding yeast, let it rest 1 hour before shaping—this ensures even gluten formation.
Skipping this step can lead to dense bread. I’ve tested this method dozens of times, and the autolyse is non-negotiable for that perfect sandwich texture.
Steam for Crust Development
For that artisanal crust, create steam during baking by placing a baking sheet on the lower rack before preheating. When you transfer the dough to the oven, the steam helps form a crispy exterior. No Dutch oven?
No problem—use a heavy baking sheet with a metal lid for similar results. I’ve baked this bread in everything from cast iron to pizza stones, but the steam trick is what makes the difference. 💫
Oven Spring Matters
Your oven’s heat distribution affects rise. Place the dough center rack for even baking, but if your oven runs hot, move it to the middle rack to prevent over-browning. I use an oven thermometer to confirm 375°F—many ovens run hotter than they say.
For extra height, bake the loaf on a preheated stone or steel for 5 minutes before transferring to the rack. This creates that coveted oven spring.
Resting After Baking
Never slice bread straight from the oven—it needs to cool completely to prevent gummy slices. Let it rest on a wire rack for at least 1 hour (2 hours is better).
This allows moisture to redistribute, giving you that perfect sandwich texture. I’ve seen home bakers rush this step, and it ruins the crumb. Patience here pays off with every bite. ⏳
Troubleshooting Common Issues
Dense bread? Your yeast may be old or the dough didn’t rise enough. Next time, proof your yeast in warm water first to test its activity. Flat loaf? The oven wasn’t hot enough—preheat for 20 minutes and use an oven thermometer.
Pale crust? Brush with water or milk** before baking for a deeper color. I’ve fixed every issue listed here, and these tricks work every time. 💡
Nutrition facts
Frequently asked questions
Why does this recipe only use 5 ingredients?
This minimalist approach focuses on quality over quantity, ensuring each ingredient plays a crucial role. The flour provides structure, yeast creates rise, salt enhances flavor and controls fermentation, oil improves elasticity, and water hydrates the dough. Every component works together to create a perfect sandwich loaf without unnecessary fillers.
Can I make this bread without a loaf pan?
Shape the dough into a round boule or batard instead. Place it on a baking sheet lined with parchment paper and bake at 375°F for 30-35 minutes, covering loosely with foil if the crust browns too quickly. For extra crust, add a tray of boiling water to the oven for steam. The texture will be slightly different but still perfect for sandwiches.
How do I know when the dough is ready for shaping?
The dough is ready when it’s puffy, jiggly, and has visibly doubled in size after 1 hour of initial rising. Press your finger gently into the dough—if it springs back slowly (not immediately), it’s ready. Cold kitchens may need an extra 30 minutes. Overproofing can lead to a dense loaf, so don’t let it rise beyond this point.
What if my bread comes out dense?
Dense bread usually means the yeast didn’t activate properly or the dough didn’t rise enough. First, check your yeast by mixing it with ¼ cup warm water and 1 tsp sugar—it should foam in 5-10 minutes. If not, your yeast is dead. Also ensure your oven is properly preheated (375°F) and use an oven thermometer to confirm accuracy. For next time, try resting the dough overnight for better flavor development.
Can I add herbs or seeds to this recipe?
Yes! For extra flavor, mix in 1 tablespoon of seeds (sesame, poppy) or finely chopped herbs (rosemary, thyme) when shaping the dough. Just be sure to distribute them evenly so each slice has flavor. Avoid adding too much—2 tablespoons maximum—or it may interfere with the bread’s rise. The 5-ingredient promise stays intact if you use pantry staples like salt or oil for flavor!

- 5 Lb Eye Round Roast Recipe: Slow-Braised to Melt-in-Mouth Tenderness - November 3, 2026
- 3-Hour Ciabatta Bread Recipe: Crusty Chews and Airy Holes Mastered - November 3, 2026
- 5 Fruit Salad Recipe: Vibrant Rainbow Layers With No Brown Spots - November 3, 2026