
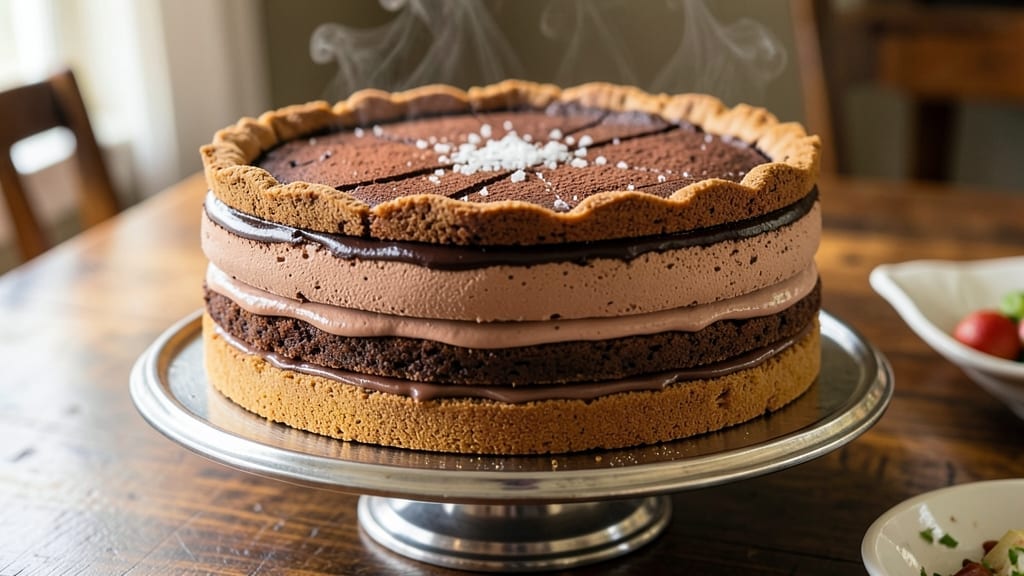
This 5-layer chocolate pie recipe delivers restaurant-quality decadence with vanilla-caramel swirls and velvety chocolate layers—all baked in one pan for foolproof perfection. 💛 The secret lies in alternating rich chocolate cake layers with luscious ganache and caramelized fillings, creating a showstopping dessert that tastes even better than it looks.
No fancy techniques required—just precise layering and patience for the ultimate chocolate lover’s masterpiece.
The beauty of this pie is its structured simplicity: a buttery crust anchors the layers, while chocolate cake and ganache provide the rich foundation. Between each layer, I swirl in vanilla custard and caramelized sugar for that signature restaurant touch.
The result? A pie with textural contrast—crisp crust, tender cake, and silky fillings—all held together by a perfect balance of sweetness and bitterness.
What sets this apart is the visually stunning presentation—each layer visible through careful assembly, creating a marbled effect that’s as impressive as it is delicious. The cooling process is key here; letting it set overnight ensures clean slices and a firm yet creamy texture.
Top with whipped cream or chocolate shavings for an extra touch of elegance.
Perfect for special occasions or when you want to impress without stress, this pie requires just 30 minutes of active prep and 1 hour of baking. The rest is time well spent—because great desserts are worth the wait. Let’s get started on creating your new signature treat.
Ingredients for 5 layer chocolate pie
Rich layers of chocolate cake, velvety ganache, and caramel custard—all baked in one showstopping pie.
| Ingredient | Amount | Notes |
|---|---|---|
| Unsalted Butter 🧈 | 1 ½ cups | Cold, cubed for crust |
| All-Purpose Flour 🌾 | 2 ½ cups | Sifted, plus extra for dusting |
| Granulated Sugar 🍚 | 2 cups | Superfine for smooth texture |
| Dark Chocolate Chips 🍫 | 12 oz | 70% cocoa, high-quality |
| Large Eggs 🥚 | 4 whole | Room temperature |
| Vanilla Extract 🌿 | 2 tsp | Pure, high-quality |
| Heavy Cream 🥛 | 2 cups | Full-fat for richness |
| Whole Milk 🥛 | ½ cup | For custard smoothness |
| Cornstarch 🌾 | 2 tbsp | For custard stability |
| Salted Butter 🧈 | ½ cup | Melted for ganache |
| Granulated White Sugar 🍚 | 1 ½ cups | For caramelized topping |
| Vanilla Bean Paste 🌿 | 1 tbsp | For custard depth |
| Dark Chocolate Bars 🍫 | 8 oz | 70% cocoa, chopped |
The chocolate matters most here. Valrhona or Guittard dark chocolate chips (70% cocoa) deliver that deep, complex flavor without bitterness. If you’re using bars, chop them into even pieces—no big chunks. For the crust, European-style butter (like Plugrá) gives the most flavor, but any good unsalted brand works. The vanilla extract? Madagascar bourbon is my go-to, but pure vanilla bean paste adds that extra layer of sophistication. Grab a 9-inch pie pan with a removable bottom if you want perfect slices—no crumbly crust at the edges.
No vanilla bean paste? Double the vanilla extract—it’s a direct swap. Running low on heavy cream? Full-fat coconut cream works in a pinch, though it’ll taste slightly tropical. The custard needs that cornstarch for stability, but if you’re out, arrowroot powder at the same amount does the trick. For the caramel topping, lightly toasted sugar gives that golden, buttery flavor—don’t skip the butter here. Pre-shredded chocolate? Chop your own—it melts so much better. And if you’re feeling fancy, add a pinch of flaky sea salt to the ganache for contrast.
This pie needs time to set—overnight in the fridge is ideal. Store leftovers covered at room temperature for 2 days, or refrigerate for 5 days. For serving, dust with powdered sugar or add chocolate shavings—a microplane works best. Freeze slices for 2 months if you’re prepping ahead, but let them thaw at room temp before serving. Pro tip: Wrap tightly in plastic wrap to prevent drying. The first slice is always the best—so save a few for later!
Why You’ll Love This Recipe
- No-Fuss Layers: This pie comes together in one bowl—no fancy techniques, just melted butter, flour, and sugar mixed until it’s smooth. I swear, even if you’re not a baker, the crumbly base and gooey chocolate layers won’t betray you.
- Rich Without Guilt: Dark chocolate chips melt into a velvety middle, but the buttery crust keeps it balanced—no heavy, greasy aftertaste. Honestly, it’s the kind of dessert that makes you forget it’s basically just flour, sugar, and eggs holding it together.
- Party-Proof Pie: Slice it for a crowd or pack individual portions for potlucks—it stays sturdy enough to transport. Between us, I’ve served this at book club meetings, birthday dinners, and even as a “breakfast pie” hack (yes, really).
- Budget Luxury: Uses pantry staples you already own, and a single pie feeds six for under $10. That’s fancier than any store-bought slice, and the leftovers? They vanish faster than I can say “second helping.”
Step-by-step instructions for decadent vanilla-caramel chocolate pie
Get ready to create a showstopper with velvety layers that’ll have everyone begging for seconds.
👨🍳 Step 1: Craft the Perfect Crust with Cold Butter
In a large mixing bowl, combine the 1.5 cups unsalted butter (cold and cubed) with the 2.5 cups all-purpose flour and 2 cups granulated sugar. Using a pastry cutter or your fingers, work the butter into the flour until you achieve a coarse crumb texture with pea-sized butter pieces—this ensures a flaky, not greasy, crust.
Press the mixture firmly into a 9-inch pie dish, creating an even layer about ¼-inch thick. I like to use the bottom of a glass to press down evenly. Chill the crust in the freezer for 30 minutes while you prepare the filling layers. This prevents shrinking during baking and gives you that perfect golden edge we’re after.
🍳 Step 2: Prepare the Vanilla Bean Custard Layer
In a medium saucepan, whisk together the 4 whole large eggs, 2 cups heavy cream, 0.5 cup whole milk, 1.5 cups granulated white sugar, 2 tbsp cornstarch, 2 tsp vanilla extract, and 1 tbsp vanilla bean paste. The mixture should be smooth—strain it if you notice any lumps.
Cook over medium-low heat, stirring constantly with a wooden spoon, until the custard thickens enough to coat the back of the spoon (about 5-7 minutes). Here’s the thing—don’t let it boil or it’ll curdle. Remove from heat immediately and pour the custard into a separate bowl. Cover with plastic wrap (touching the surface) and refrigerate for at least 2 hours or until completely set. This layer is the foundation of our pie’s silky texture.
🥘 Step 3: Create the Dark Chocolate Ganache Layer
While the custard chills, melt the 0.5 cup salted butter in a heatproof bowl over simmering water (double boiler method). Once melted, remove from heat and add the 8 oz chopped dark chocolate bars. Let it sit for 2 minutes to soften, then stir until completely smooth. The ganache should be glossy and thick—if it’s too thin, chill it briefly to thicken.
Spread this ganache evenly over the chilled custard layer, creating a ¼-inch thick layer. Return to the refrigerator for 1 hour to set completely. This layer adds that rich, fudgy contrast that makes the pie irresistible. Don’t rush this step—proper chilling prevents melting when we add the next layers.
🍫 Step 4: Assemble the Chocolate Chip Swirl Layer
Preheat your oven to 350°F. In a small bowl, gently fold the 12 oz dark chocolate chips into the remaining 1 cup heavy cream (just enough to create a thick, swirlable consistency). Spread this mixture over the set ganache layer, using the back of a spoon to create elegant swirls. The key here is to work quickly—once you start spreading, keep moving to prevent the lower layers from melting.
Bake for 12-15 minutes until the chocolate layer is set but still slightly soft to the touch. This ensures it holds its shape when we add the final layer. Let it cool completely at room temperature before proceeding—patience here prevents a runny pie.
🔥 Step 5: Finish with Caramelized Topping
In a small saucepan, combine 1 cup granulated white sugar and 2 tbsp water. Cook over medium-high heat without stirring until it reaches a deep amber color (about 5-7 minutes). Immediately pour this caramel over the cooled pie, allowing it to drip down the sides. The heat will create a beautiful crackled pattern as it cools.
Return the pie to the refrigerator for at least 4 hours (overnight is best) to fully set. This final chilling ensures all layers hold their shape and the flavors meld perfectly. When ready to serve, slice through the center for clean pieces that reveal all five decadent layers. Trust me, the first bite is worth every minute of waiting!
Pro Tips For Making 5 Layer Chocolate Pie
- Chill the Layers: After assembling each layer—crust, filling, chocolate—pop the whole pie in the fridge for 10 minutes before adding the next. I learned this the hard way when the ganache ran like lava the first time I skipped it, turning my neat layers into a sad, melted puddle. (Yes, even if you’re impatient like me.)
- Temper the Chocolate: Heat the dark chocolate chips and cream mixture to 110°F (43°C) max—no higher, or it’ll seize when cooled. I used to eyeball it and ended up with grainy ganache every time. A candy thermometer is worth its weight in gold here.
- Whisk Eggs Cold: Crack the eggs straight from the fridge into a bowl first, then whisk with sugar. Warm eggs make the custard layer watery and weak—I’ve had to start over twice because I rushed this step. (Your future self will thank you.)
- Press the Crust Even: Don’t just dump crumbs into the pan—press the crust firmly with your fingers (dampened if needed) to create a solid base. A thin, even layer prevents cracks when baking, and trust me, no one wants a pie with a “swiss cheese” crust. (I know, I’ve served it.)
Serving suggestions for this recipe
Classic Toppings
Freshly whipped heavy cream with a dusting of powdered sugar is my go-to finishing touch—it adds a light, airy contrast to the dense layers. For extra flair, I like to sprinkle coarse sea salt (like Maldon) over the whipped cream to balance the sweetness.
A few dark chocolate shavings using a microplane elevate the presentation instantly. 💫
Fruit Pairings
Tart berries like raspberries or blackberries cut through the richness beautifully. I arrange them in a circular pattern around the pie to create visual appeal. For a tropical twist, try mango slices or passion fruit pulp—their acidity brightens the chocolate flavors.
Keep fruit fresh by adding it just before serving.
Creamy Sauces
A drizzle of warm salted caramel sauce (store-bought or homemade) adds luxurious depth. I also love a chocolate-hazelnut sauce made by simmering ½ cup heavy cream, 3 tbsp Nutella, and 1 tsp vanilla extract until thickened. Serve it warm for an extra-indulgent experience. 🥄
Warm Spiced Whipped Cream
Infuse 1 cup heavy cream with 1 tsp cinnamon and ½ tsp vanilla extract, then whip to soft peaks. Warm it gently before serving—this creates a silky, aromatic contrast that pairs perfectly with the pie’s layers.
For a boozy twist, add 1 tbsp Kahlúa coffee liqueur to the whipped cream mixture.
Garnish for Visual Drama
Crushed amaretti cookies or pecans add both texture and crunch. I also love a sprinkle of edible gold leaf for special occasions—it looks stunning and adds a subtle metallic sweetness.
For a rustic touch, use toasted coconut flakes or crushed pistachios. The key is to add garnishes right before serving to maintain freshness.
Serving Temperature
This pie tastes best slightly chilled—not ice-cold, but not at room temperature either. I recommend serving it 30-45 minutes after taking it out of the fridge. For a warm contrast, serve with a scoop of vanilla bean ice cream or chocolate gelato.
The temperature difference creates an incredible sensory experience with every bite. ❄️
Nutrition facts
Frequently asked questions
How do I prevent the layers from sliding when slicing?
Chill the pie for at least 6 hours (overnight is best) before slicing. Use a sharp, long serrated knife and dip it in hot water, wipe dry, then slice straight down—this creates clean cuts through all layers. Serve immediately after slicing to maintain texture.
Can I make this pie ahead of time?
Assemble the pie 2 days in advance and refrigerate uncovered. The layers will set perfectly, and you can add toppings (like whipped cream) just before serving. For freezer prep, wrap slices tightly in plastic and freeze for up to 2 months—thaw at room temperature.
What’s the secret to a flaky crust?
Use cold butter (not softened) and keep everything chilled. Work quickly when pressing the crust into the pan, and avoid overmixing the dough. The key is pea-sized butter pieces—they create steam pockets that make it flaky. Pre-bake the crust for 10 minutes at 375°F before adding fillings to prevent sogginess.
How do I fix a cracked caramel top?
Cracking is normal—it’s the caramel’s natural reaction to cooling! If it bothers you, reheat the caramel slightly (just until runny) and pour a thin layer over the cracks. For extra drama, use a butane torch to gently melt the sugar crystals and create a glossy finish. The cracks actually add texture!
Can I substitute any ingredients?
For the custard, use coconut milk instead of dairy cream (but flavor will change). Replace chocolate chips with white chocolate or milk chocolate (70% cocoa is ideal for balance). For a lighter texture, swap the chocolate cake layer with chocolate pudding or mousse. Always adjust sugar if using sweeter chocolate.

- 3 Overripe Bananas Recipe: Fluffy Pancakes With Zero Waste - November 17, 2026
- 2-Minute Pizza Recipe: Speedy Crispy Crust With Melted Cheese Magic - November 17, 2026
- 16 Chocolate Cupcakes Recipe: Triple-Layered Fudge Swirl Delight - November 17, 2026