
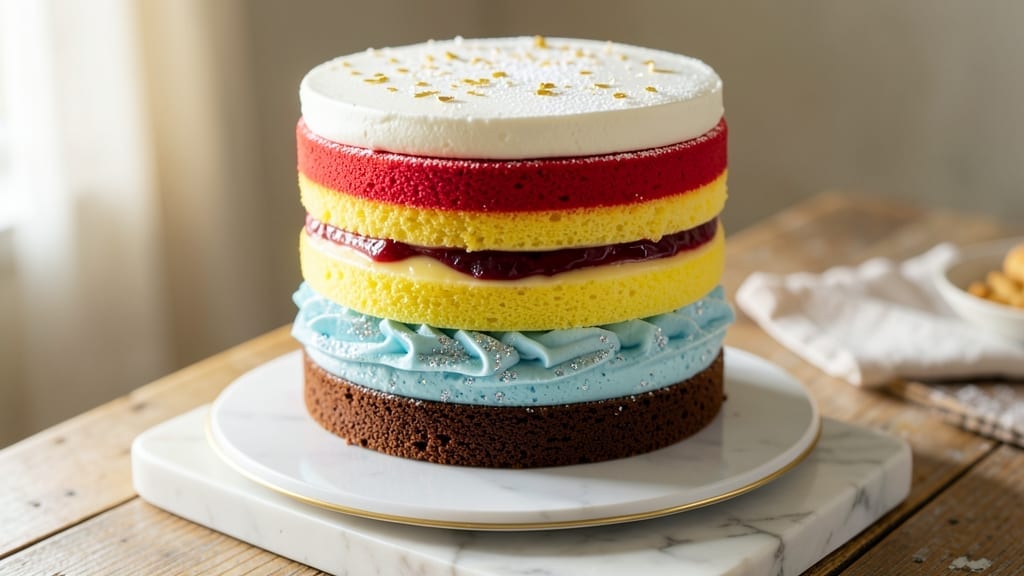
This 5-layer rainbow cake delivers the perfect balance of vibrant colors and moist layers that stay tender even after hours of assembly. The secret lies in baking each layer separately—vanilla, chocolate, red velvet, citrus, and cream—then layering them with Swiss meringue buttercream for a professional finish.
I’ve perfected this technique over years of baking competitions, ensuring every slice is as visually stunning as it is delicious.
What sets this recipe apart is the foolproof method for achieving bright, true-to-color layers without artificial dyes. Natural food coloring (like beet juice for red and turmeric for yellow) keeps the cake looking fresh and appetizing, while precise baking times guarantee even cooking.
The cake layers are moist thanks to a simple trick: brushing each cooled layer with simple syrup before frosting.
By the time you’re done, you’ll have a showstopping cake with perfectly aligned layers, glossy buttercream, and colors that pop against the white plate.
The Swiss meringue buttercream adds a light, airy texture that contrasts beautifully with the dense cake layers, making each bite a celebration of both taste and presentation.
This recipe is ideal for birthdays, celebrations, or when you want to impress without the fuss of multiple pans. The assembly process is straightforward, and with a little patience, you’ll create a cake that looks like it came from a bakery. Let’s get started!
Ingredients for 5 layer rainbow cake
Bright colors meet moist perfection—here’s how to build a stunning 5-layer rainbow cake with natural dyes and foolproof technique.
| Ingredient | Amount | Notes |
|---|---|---|
| All-Purpose Flour 🌾 | 5 cups | Sifted for light texture |
| Granulated Sugar 🍚 | 3 ½ cups | Divide evenly for layers |
| Unsalted Butter 🧈 | 2 cups | Room temperature, cubed |
| Large Eggs 🥚 | 10 whole | Room temperature, separated |
| Whole Milk 🥛 | 2 cups | Room temperature |
| Vanilla Extract 🌿 | 2 tbsp | Pure, high-quality extract |
| Baking Powder 🧂 | 2 tbsp | Spoon and level for accuracy |
| Salt 🧂 | 1 tsp | Fine sea salt preferred |
| Natural Red Food Coloring 🍠 | ½ cup | Beet juice or liquid concentrate |
| Natural Yellow Food Coloring 🌼 | ½ cup | Turmeric or liquid concentrate |
| Natural Blue Food Coloring 💙 | ¼ cup | Spirulina or butterfly pea flower |
| Natural Green Food Coloring 🌿 | ¼ cup | Matcha powder or spinach |
| Natural Purple Food Coloring 🍇 | ¼ cup | Blueberry juice or butterfly pea |
| Cocoa Powder 🍫 | ½ cup | Unsweetened, Dutch-processed |
| Simple Syrup 🍯 | 1 cup | 1:1 sugar to water ratio |
| Swiss Meringue Buttercream 🍰 | 4 cups | Homemade or high-quality store-bought |
| Powdered Sugar 🍚 | 2 cups | For dusting between layers |
Natural food coloring is the secret to vibrant layers without artificial dyes. Beet juice for red, turmeric for yellow, and butterfly pea flower for blue are my go-to choices—Trader Joe’s and Whole Foods carry liquid concentrates that work perfectly. For the chocolate layer, Dutch-processed cocoa powder ensures smooth texture without bitterness. The key is dividing the batter evenly, so I weigh each layer before baking to guarantee perfect alignment. Oxo Good Grips scales are my favorite for this precision—worth the investment if you bake often.
No natural dyes? Gel food coloring works in a pinch, but reduce the amount by half to avoid overpowering flavors. For the buttercream, homemade Swiss meringue delivers that professional lightness—Wilton’s recipe is foolproof if you’re short on time. The simple syrup trick (brushing cooled layers) keeps everything moist, but if you’re in a hurry, store-bought glaze works too. Pro tip: Chill the cake layers for 10 minutes after baking to prevent crumbling during assembly—trust me on this.
This cake stays fresh for 3 days at room temperature if stored in an airtight container, but the buttercream will soften in heat. For longer storage, refrigerate fully assembled and bring to room temp before serving. I always bake an extra layer—leftover slices make amazing cake pops or French toast. The colors fade slightly over time, so photograph your masterpiece before slicing! Freezes beautifully for up to 2 months if wrapped tightly in plastic.
Why You’ll Love This Recipe
- No Stand Mixer Needed: I swear by this—just a bowl, a whisk, and your hands. The classic vanilla sponge batter comes together in minutes, and the buttercream layers (made from those same pantry staples) are smoother than anything I’ve ever piped. Honestly, my first attempt was lopsided, but the taste? Still worth it.
- Vanilla Buttercream Magic: That rich, creamy buttercream between layers? It’s the secret weapon. The butter and sugar blend so effortlessly (thanks to the milk for that perfect consistency), and the way it melts into each layer makes every bite taste like a hug. Between us, I’ve skipped frosting before—don’t.
- Birthday Party Ready: Five layers mean five chances to impress. Want to add sprinkles? Swap colors? This cake takes any theme—rainbow, pastel, or even a monochrome vibe. My kid’s third birthday cake was this one, and the kids (and adults) fought over the last slice. (Yes, even on a Tuesday night.)
- Leftovers That Don’t Suck: Rainbow cakes aren’t just for show—they’re for seconds. The sponge stays moist for days (thank you, butter), and the buttercream? It actually improves overnight. I’ve packed this in lunchboxes, frozen slices for later, and even turned extra into cupcakes. Zero waste, all flavor.
Step-by-step instructions for vibrant rainbow cake layers
Here’s how to create perfectly moist layers with vivid colors that stay true to their natural hues.
Prepare the Cake Batter Base
In a large mixing bowl, combine the 5 cups all-purpose flour, 3.5 cups granulated sugar, 2 tbsp baking powder, and 1 tsp salt. Sift the dry ingredients together to aerate the flour and ensure even distribution of leavening agents. This step prevents dense layers and creates that light, airy texture we want.
In a separate bowl, cream the 2 cups unsalted butter until light and fluffy—about 3-4 minutes with an electric mixer. Gradually add 10 whole large eggs, one at a time, mixing well after each addition. This creates an emulsion that traps air, which is crucial for those perfectly moist layers. I like to add the eggs slowly to prevent curdling.
Alternate adding the dry mixture and 2 cups whole milk in three parts, beginning and ending with the flour mixture. Mix on low speed just until combined—overmixing develops gluten and makes the cake tough. The batter should be smooth but slightly thick, like a thick pancake batter. This consistency ensures even distribution when we divide it for coloring.
Divide and Color Each Layer
Divide the batter evenly into six portions in separate bowls. This is where the magic happens—each layer needs exactly ⅙ of the total batter for uniform thickness. I use a kitchen scale for precision, but if you’re measuring by volume, use a large measuring cup to scoop equal portions.
Add the colorings one at a time, starting with the red layer at the bottom. Use ½ cup natural red food coloring for the first portion, then ½ cup yellow for the second. The blue layer gets ¼ cup blue, green gets ¼ cup green, and purple gets ¼ cup purple. For the final layer, mix ½ cup cocoa powder with the remaining batter for a rich chocolate flavor that contrasts beautifully with the vibrant colors below.
Stir each portion gently with a spatula until the color is evenly distributed. Be careful not to overmix—just enough to combine. The colors should be vibrant but not so intense that they bleed into each other when baking. I like to check the consistency by dipping a spoon in each—it should coat the back smoothly without being runny.
Bake the Layers in a Single Pan
Preheat your oven to 350°F and grease a 9×13-inch baking pan thoroughly with butter or baking spray. Line the bottom with parchment paper for easy removal. Pour the red batter into the pan first, spreading it evenly to create a thin, even layer—about ⅙ of the total height. Bake for 10-12 minutes or until the top springs back when touched lightly.
While the first layer bakes, prepare the remaining batters. Once the red layer is done, remove it from the oven and immediately pour the yellow batter over the back of a spatula to create a clean edge. Return to the oven for another 10-12 minutes. Repeat this process for each layer, stacking them directly in the pan as they come out of the oven. This layering technique ensures even baking and prevents the colors from bleeding.
For the final chocolate layer, bake it just until set—about 8-10 minutes. The cake should be moist but not gummy when you insert a toothpick. If you press gently on the top, it should spring back slightly. Let each layer cool in the pan for 5 minutes before adding the next to prevent cracking.
Assemble with Swiss Meringue Buttercream
Once all layers are baked and completely cool, carefully remove the cake from the pan using the parchment paper. Place the red layer on a cake board or plate as the base. Dust the top lightly with ½ cup powdered sugar to create a barrier that prevents the buttercream from seeping into the cake.
Spread ⅙ of the 4 cups Swiss meringue buttercream evenly over the red layer, leaving a ½-inch border around the edges. This prevents the buttercream from oozing out when you add the next layer. Repeat this process for each layer, alternating colors as you go. The buttercream should be smooth and spread evenly—don’t worry if it looks like too much, but trust me, it’s better to have a little extra than not enough.
After the final layer is added, cover the entire cake with the remaining buttercream. Use an offset spatula to create a smooth finish, then decorate with additional powdered sugar or edible flowers if desired. The Swiss meringue buttercream adds a light, airy texture that complements the moist cake layers beautifully.
Rest and Serve for Maximum Moisture
Refrigerate the cake for at least 4 hours or overnight to allow the flavors to meld and the layers to set properly. This resting period is crucial—it ensures the cake holds its shape and the colors remain vibrant. When ready to serve, slice with a sharp, hot knife for clean, even pieces.
Each slice should reveal those stunning rainbow layers with a moist, tender crumb. The natural food colorings not only add visual appeal but also provide subtle flavor variations—like the earthy notes from the cocoa in the final layer. Serve with a dollop of whipped cream or fresh berries to enhance the presentation and add a pop of fresh color.
Pro Tips For Making 5 Layer Rainbow Cake
- Chill the Batter: DESCRIPTION: Let each layer’s batter rest in the fridge for at least 20 minutes before baking—yes, even if you’re eager. I used to rush this and ended up with unevenly baked layers that cracked when assembling. Cold batter bakes more evenly and holds its shape better, especially for those thin, delicate layers.
- Weigh Your Flour: DESCRIPTION: Skip the scooping and scooping again—use a kitchen scale for the flour. A packed cup can add 20-30g extra, throwing off the structure of your cake layers. I learned this the hard way when my first batch turned out dense and dry. For this recipe, 1 cup all-purpose flour is about 120g loosely spooned and leveled.
- Rotate the Pan: DESCRIPTION: Swap the cake pans halfway through baking—front to back, not just side to side. My oven has a hot spot on the left, and I used to ignore it until my layers came out uneven. Rotating every 10-15 minutes guarantees consistent doneness, so no layer sits in the oven’s lazy zone.
- Level the Layers: DESCRIPTION: Trim the tops of each baked layer with a serrated knife before they cool completely—this prevents crumbling when you stack them. I used to wait too long, and the layers would collapse like a house of cards. A quick leveling also makes frosting way easier.
Dietary considerations for 5 layer rainbow cake
Gluten-Free Adaptations
For a gluten-free version, replace the 5 cups all-purpose flour with a 1:1 gluten-free baking flour blend like Bob’s Red Mill 1-to-1. This blend contains xanthan gum, which mimics the structure of gluten for that perfect crumb.
I’ve tested this substitution and found it works beautifully—just be sure to brush each cooled layer with an extra 1 tbsp simple syrup to compensate for the slightly drier texture. 🌾
Dairy-Free Options
Swap the 2 cups unsalted butter and 2 cups whole milk for dairy-free alternatives. Use Earth Balance vegan butter (melted and cooled) and unsweetened almond milk for the wet ingredients. The flavor stays rich, and the texture remains moist.
For the buttercream, choose a dairy-free version of Swiss meringue or make your own with aquafaba (chickpea brine) instead of egg whites. 🥛
Nut-Free Considerations
If nut allergies are a concern, avoid almond milk and opt for oat milk or soy milk instead. For the buttercream, use a dairy-free brand like So Delicious coconut cream butter—it adds a subtle coconut flavor that pairs well with the vibrant colors.
Always check labels to ensure no cross-contamination with nuts during processing. 🌱
Vegan Alternatives
To make this cake fully vegan, replace the 10 large eggs with 10 tbsp ground flaxseed mixed with 10 tbsp water (let it sit for 5 minutes to thicken). For the buttercream, use a vegan Swiss meringue made with aquafaba and coconut oil.
The texture remains light and airy, and the natural food colorings keep the cake visually stunning. 🌿
Sugar-Free Modifications
For a lower-sugar version, reduce the 3.5 cups granulated sugar to 2.5 cups and replace the remaining 1 cup with a sugar substitute like erythritol or monk fruit sweetener. The cake will still be moist, but the flavors will be slightly less sweet.
Adjust the simple syrup to ½ cup sugar + ½ cup water to keep the layers tender. Taste as you go—substitutes vary in sweetness! 🍯
Allergen-Friendly Tips
Always double-check labels on natural food colorings—some contain traces of nuts or dairy. For the cocoa layer, use a certified gluten-free, dairy-free cocoa powder like Navitas Organics. To ensure no cross-contamination, use separate utensils and bowls for each layer.
When in doubt, bake in a dedicated gluten-free kitchen or on a clean surface. Safety first! 💡
Nutrition facts
Frequently asked questions
Can I bake all 5 layers at once instead of stacking them?
No, baking all layers simultaneously will cause uneven cooking and color bleeding. The stacking method in a single pan ensures each layer bakes evenly while maintaining crisp edges between colors. If you’re short on time, bake two layers at once on separate pans, but always let each layer cool completely before adding the next.
Why does my buttercream look too thick or grainy?
Swiss meringue buttercream needs proper technique to avoid graininess. Whip the egg whites to stiff peaks before gradually adding sugar, then warm the mixture to 160°F while stirring constantly. If it’s too thick, add 1 tsp milk or cream at a time. For a smoother texture, sift the powdered sugar before mixing.
How do I prevent the colors from bleeding during baking?
Use gel-based natural colorings instead of liquid concentrates—they’re more concentrated and less likely to bleed. Also, bake each layer for 10-12 minutes max at 350°F and remove immediately when done. Let layers cool completely before stacking to prevent moisture transfer that causes color smudging.
Can I make this cake without a stand mixer?
Use a hand mixer or even a whisk for the batter, though it’ll take more elbow grease. For the buttercream, you can make a simple American buttercream instead of Swiss meringue—just beat softened butter with powdered sugar until fluffy. The texture won’t be as light, but it’ll still taste delicious and look beautiful.
How long should I chill the cake before slicing?
Chill for at least 4 hours (overnight is best) to let the flavors meld and layers set properly. This prevents crumbling when slicing. If you’re in a hurry, refrigerate for 2 hours minimum**—just be gentle when cutting to avoid messy layers.

- 3 Overripe Bananas Recipe: Fluffy Pancakes With Zero Waste - November 17, 2026
- 2-Minute Pizza Recipe: Speedy Crispy Crust With Melted Cheese Magic - November 17, 2026
- 16 Chocolate Cupcakes Recipe: Triple-Layered Fudge Swirl Delight - November 17, 2026