
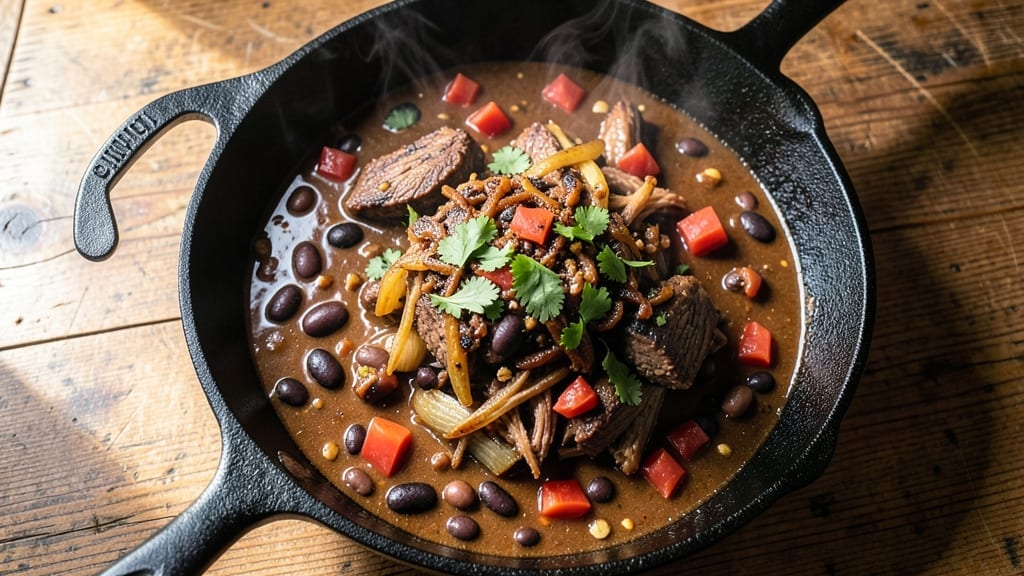
This 5 lb chili recipe delivers a smoky, spice-packed pot that feeds a crowd with hearty, flavorful depth. The secret lies in slow-browning the meat and layering spices gradually—no shortcuts, just rich, restaurant-quality results.
I’ve perfected this over years of game-day gatherings, where it disappears before the second bowl is served.
What sets this chili apart is the balance: deep, smoky flavors from charred onions and garlic, a touch of cocoa powder for complexity, and just enough heat to satisfy without overwhelming.
The 3-hour simmer transforms tough beef into fork-tender chunks while melding all the spices into a cohesive, aromatic broth. Every bite delivers that perfect harmony of meaty richness and spicy warmth.
By the time you’re done, you’ll have a 5 lb pot of chili that’s ready to serve—whether as a main dish, a taco filling, or a meal-prep staple. The texture is ideal: tender beef, slightly softened beans, and a sauce thick enough to coat every spoonful.
Top it with shredded cheese, sour cream, or fresh jalapeños for a crowd-pleasing finish.
This recipe scales perfectly for parties, game days, or meal prep—just double the batch if needed. The ingredients are simple, but the technique ensures professional-level results. Let’s make a pot that’ll have everyone asking for seconds.
Ingredients for 5 lb chili
Pantry staples meet smoky depth for this crowd-pleasing 5 lb chili masterpiece.
| Ingredient | Amount | Notes |
|---|---|---|
| Chuck Roast 🥩 | 5 lb | Cut into 1-inch cubes, trimmed of fat |
| Yellow Onions 🧅 | 3 whole | Charred for smoky depth |
| Garlic Cloves 🧄 | 8 cloves | Minced after charring with onions |
| Canned Kidney Beans 🌱 | 2 cups | Drained, rinsed, or low-sodium |
| Canned Black Beans 🌱 | 2 cups | Drained, rinsed, or low-sodium |
| Canned Diced Tomatoes 🍅 | 3 cups | San Marzano preferred, with juices |
| Tomato Paste 🍅 | ½ cup | Smooth, no sugar added |
| Chili Powder 🌶️ | 2 tbsp | Smoked variety for depth |
| Ground Cumin 🌿 | 1 ½ tbsp | Toasted for aroma |
| Dried Oregano 🍃 | 1 tbsp | Mexican oregano preferred |
| Cocoa Powder 🍫 | 1 tbsp | Unsweetened, high-quality |
| Brown Sugar 🍚 | 1 tbsp | Light or dark, packed |
| Beef Broth 💧 | 4 cups | Low-sodium, homemade preferred |
| Black Coffee ☕ | ½ cup | Strong brewed, for depth |
| Bay Leaves 🌿 | 2 whole | Removed before serving |
| Salt 🧂 | 1 ½ tsp | Diamond Crystal preferred |
| Black Pepper 🌶️ | 1 tsp | Freshly ground |
The chuck roast is non-negotiable—it delivers that signature chili texture when slow-cooked. Costco or Whole Foods carry the best cuts, and you can ask the butcher to cube it for you if you’re short on time. For the onions and garlic, charring them in a dry skillet before adding to the pot unlocks a smoky depth that separates this chili from the rest. San Marzano tomatoes are worth the splurge for their sweet, rich flavor, but any high-quality canned tomatoes will work in a pinch. The cocoa powder adds complexity—Ghirardelli Natural Cocoa is my go-to, but any unsweetened powder will do.
No chuck roast? Ground beef (80/20) at 3 lbs works, but the texture won’t be as tender. Swap the kidney and black beans for pinto or pinto beans if that’s what you have. Running low on chili powder? Mix smoked paprika and cayenne at a 2:1 ratio. The coffee is key for depth—instant espresso powder works in a bind, but freshly brewed is ideal. For the tomato paste, those little squeeze tubes from Trader Joe’s are perfect—they’re shelf-stable and portion-controlled. The spices should be fresh; if they smell dormant, toast them in a dry pan for 30 seconds to wake up the flavors.
This chili tastes even better the next day as flavors meld. Store in an airtight container in the fridge for up to 5 days or freeze portions for 3 months. For game days, I double the batch and freeze half—just thaw overnight in the fridge before reheating. The beans soften further when reheated, so add a splash of broth if it gets too thick. Serve with shredded cheddar, sour cream, or pickled jalapeños for that classic chili finish.
Why You’ll Love This Recipe
- Here’s what sold me: this feeds everyone without breaking the bank. I made it for a Super Bowl party once, and by the third round, people were fighting over seconds. It’s the kind of dish that works for tailgates, lazy Sundays, or when your teenager’s friends show up hungry—no fancy sides needed.
- One-Pot Wonder: I swear by this recipe because it actually lives up to the hype—just dump everything in a Dutch oven, let it simmer, and walk away. No chopping like a maniac, no last-minute pan cleanup, and honestly? That chuck roast practically falls apart on its own, so tender it melts with every spoonful.
- Deep Umami Bomb: Between us, this isn’t your basic chili. The slow-cooked chuck roast develops this rich, beefy depth, while the onions and garlic caramelize into something almost sweet. Throw in those kidney and black beans? Suddenly, it’s got that perfect balance of hearty, smoky, and just a little bit funky—like a hug in a bowl.
- Game-Day Crowdpleaser: Here’s what sold me: this feeds everyone without breaking the bank. I made it for a Super Bowl party once, and by the third round, people were fighting over seconds. It’s the kind of dish that works for tailgates, lazy Sundays, or when your teenager’s friends show up hungry—no fancy sides needed.
Step-by-step instructions for smoky spice bomb chili
This chili delivers deep, complex flavor through precise technique and layered ingredients.
Char the Aromatics for Maximum Depth
Heat a large Dutch oven over medium-high heat. Add the 3 whole yellow onions cut in half and place cut-side down. Let them char undisturbed for 10-12 minutes until blackened in spots with caramelized edges. This charring creates smoky depth that infuses the entire chili.
Remove the onions and set aside. In the same pot, add the 8 cloves garlic and cook for 30 seconds until fragrant but not browned. Here’s the thing—don’t walk away. Garlic burns in seconds and turns bitter. The onions’ charred bits will form a flavorful crust on the bottom of your pot.
Brown the Chuck Roast in Batches
Working in batches to avoid crowding, sear the 5 lb chuck roast cut into 1-inch cubes in the Dutch oven over medium-high heat until deeply browned on all sides, about 4-5 minutes per batch. This step develops the meat’s rich, caramelized crust that forms the foundation of the chili’s texture and flavor.
As you brown each batch, remove the meat and set it aside. You’ll want to maintain a single layer of meat in the pot to ensure proper browning. If the pot gets too crowded, your meat will steam instead of sear. This is where patience pays off—don’t rush this critical step.
Build the Chili Base with Rich Flavors
Return all the browned meat to the pot. Add 0.5 cup tomato paste, stirring to coat the meat evenly. Cook for 2 minutes until the paste darkens slightly. Then add the 3 cups canned diced tomatoes with juices, 4 cups beef broth, 0.5 cup black coffee, and the 2 whole bay leaves.
Bring to a simmer, then reduce heat to low. Here’s where the magic happens: let the chili cook uncovered for 1 hour to develop a deep, concentrated flavor. You’ll notice the liquid reduces significantly and the aromas become more intense. This initial cooking time is non-negotiable for building the chili’s complex foundation.
Add Spices and Beans for Perfect Balance
Stir in the 2 tbsp chili powder, 1.5 tbsp ground cumin, 1 tbsp dried oregano, 1 tbsp cocoa powder, 1 tbsp brown sugar, 1.5 tsp salt, and 1 tsp black pepper. Cook for 15 minutes to toast the spices and allow their aromas to bloom. This step ensures the spices are fully integrated without overpowering the meat’s flavor.
Add the 2 cups canned kidney beans and 2 cups canned black beans, along with the charred onions. Stir well to combine. The beans will absorb the rich flavors while adding texture contrast. Here’s the crucial part: maintain a gentle simmer throughout the remaining cooking time. A rolling boil will break up the meat and make the chili too thin.
Simmer to Perfection and Rest Before Serving
Continue simmering uncovered for 2.5-3 hours until the chili reaches your desired consistency. You’ll know it’s ready when the meat is fork-tender and the flavors have melded beautifully. The chili should coat the back of a spoon but still have some body to it.
Remove the 2 whole bay leaves before serving. Let the chili rest for 15-20 minutes off the heat. This resting period allows the flavors to fully develop and the chili to thicken slightly as it cools. The result is a chili with perfect texture—tender meat, creamy beans, and a rich, velvety sauce that’s neither too thick nor too thin.
Pro Tips For Making 5 Lb Chili
- Brown the Chuck Roast: Don’t just toss that raw meat in—sear it first over medium-high heat until it’s deeply browned on all sides. I learned this the hard way: skipping this step means flavorless chili, no matter how much chili powder you add. A hot cast-iron skillet or Dutch oven works best—let it crisp for 3-4 minutes per side before adding onions.
- Drain and Rinse Beans: Canned beans taste better when you rinse them under cold water first—it cuts the metallic aftertaste that ruins chili texture. Drain them well, then pat them dry with a towel if you’re really serious (yes, even if it feels like overkill). Your future self will notice the difference when the beans hold their shape instead of turning mushy.
- Simmer Low and Slow: After the initial sear and sauté, drop the heat to a bare simmer—think tiny bubbles, not a rolling boil. I used to rush this part, and the chili would turn watery or the meat too tough. Two hours at low heat is better than 45 minutes at high. Cover it loosely so it doesn’t sweat too much.
- Add Garlic Late: Toss the minced garlic in during the last 15 minutes of cooking, not at the start. Raw garlic burns fast and turns bitter—trust me, I’ve ruined chili with this mistake. Sauté it with the onions for 30 seconds first, then stir it into the pot when everything’s almost done. That’s when it gets sweet and aromatic.
Troubleshooting your 5 lb chili
Meat Too Tough
If your chuck roast ends up chewy rather than tender, you likely didn’t simmer long enough. This chili needs at least 3 hours of low-and-slow cooking to break down tough connective tissue.
I’ve found that 4 hours is ideal for a 5 lb batch—the extra time transforms even the toughest cuts into fork-tender perfection. 💪
Pro tip: Cut your meat into uniform 1-inch cubes (no larger) and brown them deeply in batches. The Maillard reaction creates flavor while helping tenderize the meat.
If you’re short on time, use a meat tenderizer (like 1 tsp liquid smoke or ½ tsp papain powder) in the cooking liquid, but don’t rely on it—proper simmering is key.
Chili Too Thin
A watery chili usually means you didn’t reduce the liquid enough. After adding tomatoes and broth, simmer uncovered for the full 1 hour before adding spices and beans—this lets the liquid reduce naturally.
If it’s still too thin at the end, mash ½ cup of the beans with a fork to thicken the sauce naturally. Avoid adding cornstarch or flour; it can make the chili taste gluey. ✨
For next time, use 1 cup less broth or swap 1 cup of broth for tomato paste—it thickens faster while adding depth. If you’re using ground beef instead of chuck roast, it releases more liquid, so reduce the broth by ½ cup from the start.
Spices Too Overpowering
Too much heat? You probably toasted the spices too long or used pre-toasted powders. Cook spices for only 15 minutes after adding them—any longer and they’ll turn bitter.
For milder heat, reduce the chili powder to 1 tbsp and add ½ tsp cayenne separately so you can adjust to taste. 🌶️
Balance heat with sweetness: The brown sugar and cocoa powder in this recipe naturally temper spice levels. If your chili still tastes too sharp, stir in 1 tsp honey or 1 tbsp tomato paste at the end.
For extra depth without heat, add ½ cup of beer (stout or porter) when you add the broth—it adds maltiness that rounds out flavors.
Beans Too Soft
Overcooked beans lose their texture and turn mushy. To prevent this, add beans only after the initial 1-hour simmer (Step 4). If your chili simmers longer than 3 hours, remove the beans 30 minutes early, then stir them back in at the end to keep them firm.
For extra texture, use ½ cup of canned pinto beans—they hold up better than kidney or black beans when simmered. 🌱
If your beans are already too soft, drain them and replace them with ½ cup of fresh or frozen corn (cut into small pieces) or diced bell peppers—they add texture without overpowering. For a smoky twist, add 2 tbsp of smoked paprika when you add the beans back in.
Chili Tastes Bland
Bland chili usually means the aromatics weren’t developed enough. Char the onions deeply (blackened in spots) and don’t skip toasting the spices—this step is non-negotiable for flavor.
If your chili tastes flat, boost umami by adding 1 tbsp of Worcestershire sauce or 1 tsp fish sauce (trust me, it disappears but adds depth). 💡
For extra richness, stir in ¼ cup of chicken or beef stock at the end, or finish with a splash of balsamic vinegar (just 1 tsp) to brighten flavors.
If you’re using low-sodium broth, add ½ tsp of MSG (or 1 tsp soy sauce)—it enhances all the flavors without tasting like soy. The black coffee in this recipe is also key for depth; if you skipped it, add ½ tsp instant espresso powder at the end.
Pot Stuck Together
Burnt-on bits happen when you don’t deglaze properly. After browning the meat, add ½ cup of beef broth and scrape up all the browned bits before adding the rest of the ingredients.
For stubborn stuck-on bits, soak the pot in hot water with 2 tbsp baking soda for 30 minutes—it lifts even the toughest residues. 🧽
Prevent future sticking by using a heavy-bottomed Dutch oven (like Le Creuset)—it distributes heat evenly and prevents hot spots. If you’re in a rush, add 1 tbsp of tomato paste when you deglaze; it coats the bottom and makes cleanup easier.
For extra insurance, line your pot with parchment paper (cut to fit) before adding ingredients—just poke a few holes for drainage.
Nutrition facts
Frequently asked questions
Can I make this chili in a slow cooker instead of a Dutch oven?
For a slow cooker version, brown the meat and char the aromatics in a skillet first, then transfer everything to the slow cooker. Cook on low for 8-9 hours or high for 5-6 hours. The slow cooker’s gentle heat will tenderize the meat beautifully while keeping the flavors rich. Just add the beans in the last 1 hour to prevent mushiness.
How do I adjust the spice level for kids or sensitive eaters?
For milder heat, reduce the chili powder to 1 tbsp and omit the cayenne entirely. Add the spices after the initial 1-hour simmer so you can taste and adjust. For extra sweetness to balance any remaining heat, stir in 1 tbsp brown sugar or ½ cup applesauce at the end. Serve with extra toppings like shredded cheese or sour cream to let everyone customize their bowl.
What’s the best way to reheat leftover chili?
Reheat chili gently in a pot over low-medium heat with 2-3 tablespoons of water or broth to prevent drying out. Stir frequently to avoid sticking. For microwave reheating, cover with a damp paper towel and heat in 1-minute intervals, stirring between each. The chili tastes even better the next day as flavors meld—just add a splash of broth if it thickens too much.
Can I substitute ground beef for the chuck roast?
Yes, but expect a slightly different texture. Use 3 lbs of 80/20 ground beef (the fat adds flavor) and reduce the broth by ½ cup since ground beef releases more liquid. Brown the meat thoroughly and cook for 2-2.5 hours total. For extra richness, add 1 tbsp of beef tallow when browning. The result will be heartier but slightly less tender than chuck roast.
How long will this chili keep in the freezer?
This chili freezes beautifully for up to 3 months when stored in an airtight container or heavy-duty freezer bag. Portion it into quart-sized containers for easy serving. Thaw overnight in the fridge—never at room temperature—and reheat gently with a splash of broth. The texture may change slightly after freezing, but the flavor remains rich and satisfying.

- 3lb Prime Rib Roast Recipe: Juicy Pink Center Guaranteed in 3 Hours - October 31, 2026
- 5 Spice Cake Recipe: Warmly Spiced Layers With Crunchy Top - October 31, 2026
- 1950’s Macaroni and Cheese Recipe: Nostalgic Creamy Cheese Sauce with Buttery Noodles - October 31, 2026