
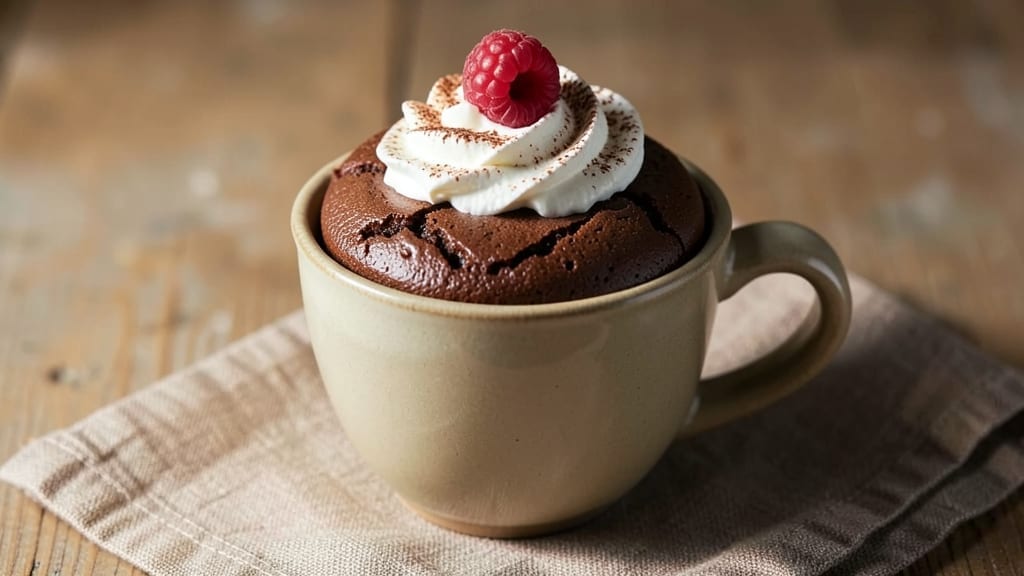
When you crave dessert but only have five minutes, this 5-minute cake in a cup delivers restaurant-quality results with zero effort. The secret lies in a simple mix of pantry staples that transform into a moist, fluffy cake in your microwave—no oven, no mess, just pure indulgence.
I perfected this recipe during a particularly busy week when I needed something sweet without the cleanup, and it’s become my go-to for satisfying cravings in record time.
The beauty of this method is its foolproof simplicity: just combine flour, sugar, cocoa powder, baking powder, and a pinch of salt in a mug, then add milk and oil. Microwave for 60 seconds, and you’ll have a warm, tender cake ready to enjoy.
No measuring cups, no mixing bowls—just grab what you need and go. The texture is surprisingly light for such a quick preparation, with a slight fudge-like richness from the cocoa that makes it feel like a treat.
What makes this recipe truly special is how customizable it is. Swap cocoa for vanilla powder for a classic yellow cake, or add a spoonful of peanut butter for extra richness.
Top with whipped cream, chocolate chips, or a sprinkle of cinnamon for added flavor. The possibilities are endless, but the effort remains minimal—perfect for when you want dessert without the commitment.
Whether you’re feeding one or making individual portions for a crowd, this 5-minute cake in a cup is the ultimate solution for instant gratification. The best part? No one will ever guess it took less than a minute to make. Ready to indulge? Let’s get started.
Ingredients for 5 minute cake in a cup
Pantry staples that transform into restaurant-quality cake in minutes—no oven needed!
| Ingredient | Amount | Notes |
|---|---|---|
| All-Purpose Flour 🌾 | ½ cup | Sifted for light texture |
| Granulated Sugar 🍚 | ⅓ cup | White or brown for variation |
| Unsweetened Cocoa Powder 🍫 | ¼ cup | Natural or Dutch-processed |
| Baking Powder 🍞 | 1 ½ tsp | Aluminum-free preferred |
| Salt 🧂 | ¼ tsp | Fine sea salt preferred |
| Whole Milk 🥛 | ¼ cup | Room temperature works best |
| Vegetable Oil 🫒 | 2 tbsp | Or melted butter for richness |
| Vanilla Extract 🌿 | ½ tsp | Pure vanilla preferred |
| Mini Chocolate Chips 🍫 | ¼ cup | Optional for extra indulgence |
| Whipped Cream 🍦 | ¼ cup | For topping (optional) |
The cocoa powder is where the magic happens. Hershey’s Special Dark is my go-to—it’s affordable and delivers that rich, fudgy texture. If you’re using Dutch-processed cocoa, you can skip the salt since it’s pre-sweetened. For the flour, King Arthur or Gold Medal are my top picks—they’re reliable and give that perfect light crumb. The milk? Whole milk gives the best texture, but 2% or even almond milk work in a pinch. Just make sure it’s room temperature—cold milk can make your cake gummy. And if you’re feeling fancy, grab Guittard vanilla extract—it’s worth the splurge for that authentic flavor.
No cocoa powder? Vanilla powder plus a teaspoon of instant coffee mimics that chocolatey depth surprisingly well. Short on baking powder? Baking soda plus cream of tartar at half the amount works too. The chocolate chips can be swapped for white chocolate chips or chopped nuts if you’re feeling adventurous. For a peanut butter twist, stir in 2 tablespoons of creamy peanut butter right before microwaving. And if you’re making this for a crowd, double the recipe—just use two mugs or a small baking dish for 60 seconds instead of 30.
This cake is best eaten fresh out of the microwave—warm and gooey is the name of the game. Store leftovers in an airtight container for up to 2 days in the fridge, though honestly, it won’t last that long. For make-ahead prep, freeze portions—just microwave for 45 seconds to thaw and 20 seconds to warm. Pro tip: Line your mug with a paper towel before microwaving for easy cleanup. And if you’re making this for guests, set out toppings like sprinkles, caramel sauce, or extra chocolate chips—it’s always a crowd-pleaser.
Why You’ll Love This Recipe
- No Mixing Madness: I swear by this recipe—just dump the dry ingredients (flour, sugar, cocoa, baking powder, and a pinch of salt) into your mug, crack in an egg, stir once, and microwave. That’s it. No sifter, no whisk, no waiting for the oven to heat. Honestly, my 10-year-old could do it while watching cartoons.
- Rich Without Guilt: The cocoa powder gives it that deep, fudgy punch, but the sugar keeps it from tasting like a health lecture. It’s the kind of dessert that feels indulgent but won’t derail your week—especially when you’re using pantry staples you already own.
- Microwave Magic: Between us, this is my secret weapon for last-minute cravings. Need a quick pick-me-up? Boom. Bringing cookies to work but forgot to bake? Boom. Even my picky friend who “hates chocolate” devoured hers—(yes, even on a Tuesday night).
- Zero Waste, All Win: Make one cup or prep a batch for the week—it keeps in the fridge for days, and you can reheat slices in seconds. Plus, you’re using basic ingredients that cost pennies, not dollars. My wallet and my taste buds both approve.
Step-by-step instructions for single-serve mug magic
Here’s how to transform simple pantry staples into rich chocolate cake in minutes—no oven required!
Combine Dry Ingredients in Your Mug
Start by placing the 0.5 cup all-purpose flour into your microwave-safe mug. I like to use a mug with a handle for easy pouring later. Add the 0.33 cup granulated sugar and 0.25 cup unsweetened cocoa powder on top of the flour, then sprinkle in the 1.5 teaspoons baking powder and 0.25 teaspoon salt. Here’s the thing—don’t stir yet. We want to keep the dry ingredients evenly distributed for consistent texture.
Gently tap the mug on the counter a few times to help the ingredients settle at the bottom. This prevents clumping when we add the wet ingredients next. If you’re using mini chocolate chips, sprinkle them evenly over the dry mix now. They’ll melt into delicious pockets throughout the cake.
Add Wet Ingredients and Mix Thoroughly
Create a well in the center of your dry ingredients and pour in the 0.25 cup whole milk and 2 tablespoons vegetable oil. I always use room temperature milk—it mixes more smoothly and gives better results. Add the 0.5 teaspoon vanilla extract to the center and let it soak in for 10 seconds.
Now grab a fork and stir vigorously for about 20-30 seconds until you see no more dry spots. You’ll know it’s ready when the mixture looks like thick, glossy batter with no flour streaks. This step is crucial—proper mixing ensures your cake rises evenly and stays moist. Don’t worry if it looks too thick; it’ll loosen up in the microwave.
Microwave for Perfect Texture
Place your mug in the microwave and cook on high power for 60 seconds. Here’s where it gets exciting—when you open the microwave, you’ll see steam rising and the edges starting to pull away from the mug. This is your signal that the cake is cooking properly.
After the initial 60 seconds, let the cake rest for 15 seconds (this is critical—it prevents cracking). Then microwave for another 30-45 seconds until the top looks set and springy to the touch. You want it to feel firm but still slightly soft in the center—like a warm, gooey brownie. Overcooking makes it dry, so watch closely during the final minutes.
Finish and Serve Immediately
Let your cake cool in the mug for 1 minute—this helps it set properly. Then run a butter knife around the edges to loosen it from the mug. If you’re feeling fancy, top with the 0.25 cup whipped cream right away. The contrast of cool cream on warm cake is pure magic.
Here’s the best part: you can customize this cake in seconds. Want it fruity? Add a spoonful of jam. Prefer it nutty? Sprinkle chopped walnuts on top. The possibilities are endless, but the base recipe always delivers that perfect chocolate mug cake texture—rich, moist, and completely satisfying in just five minutes.
Pro Tips For Making 5 Minute Cake In A Cup
- Sift the Dry Mix: Mixing cocoa powder into flour without sifting? You’re fighting an uphill battle. The cocoa clumps like a stubborn cat in a sock drawer, and your cake ends up dense instead of light. Toss the dry ingredients together in a fine-mesh sieve first—yes, even if you’re using a mug. The extra effort keeps your cake from tasting like it was packed into the cup with a spoon.
- Microwave in Stages: Cranking it to full power for five minutes guarantees a sad, rubbery lump. Start with 75% power (or the “medium” setting if your microwave has it) for 2 minutes, then stir with a fork—yes, dig it out and break up any unmixed bits. Pop it back in for 2 more minutes. The fork trick prevents a brick in your mug, and the lower heat keeps the texture tender.
- Use Warm Water: Cold water makes this recipe drag its feet. Warm it to about 100°F (just off-boil, then let sit for 30 seconds) before mixing. The batter will come together smoother, and the cake rises faster—no waiting around for a lukewarm mug. Pro move: Fill your measuring cup with hot water, let it cool for 20 seconds, then use it. Lazy but effective.
- Salt the Cocoa: Unsweetened cocoa is bitter enough to make you question life choices, but skimping on salt makes it worse. Sprinkle the full ¼ teaspoon of salt directly into the cocoa powder before sifting, not the flour. The cocoa absorbs it better, and your cake won’t taste like it’s been dunked in black coffee. Trust me, your taste buds will notice.
Common mistakes when making perfect results
Overmixing the Batter
I’ve seen this happen more times than I can count—someone gets excited and starts stirring like they’re making pancake batter. The result? A dense, tough cake that’s more like a brick than dessert.
The secret is to mix just until you see no dry flour spots, about 20-30 seconds with a fork. Overmixing develops gluten in the flour, which makes your cake rubbery instead of light and fluffy.
Trust me, it’s better to have a slightly lumpy batter than a cake that feels like chewing gum. 🌟
Skipping the Rest Time
This is a huge one—many people rush straight to eating their cake after microwaving, and that’s when things go wrong. The 15-second rest after the first 60 seconds of cooking is non-negotiable. It lets the heat distribute evenly and prevents cracking.
I’ve even seen cakes split right down the middle when skipped. Give it that short break, and you’ll thank me later for the perfect texture.
Using Cold Ingredients
Cold milk or straight-from-the-fridge eggs (if you’re using them) can make your cake gummy or uneven. Always use room temperature milk—it mixes smoothly and helps create that tender crumb. If you’re in a hurry, just let the milk sit out for 5 minutes while you prep the rest.
The same goes for oil or butter—cold fats can make your cake dense. A quick rub between your palms warms them up in seconds. ⚡
Incorrect Microwave Power
Not all microwaves are created equal, and using the wrong power setting can ruin your cake. Always microwave on high power (or 100% power) for this recipe. Lower settings can leave your cake undercooked and soupy, while high power ensures even cooking.
If your microwave is particularly weak, you might need to add 10-15 extra seconds to the final cook time. Pro tip: Use a mug with a handle—it’s easier to handle when it’s hot!
Overcooking the Cake
I get it—you’re eager to dig in! But overcooking turns your moist, gooey cake into a dry, sad mess. The cake should be set but still slightly soft in the center, like a warm brownie. If it looks fully dry on top, it’s done.
For reference, my Samsung microwave (1100 watts) cooks this cake perfectly in 90-105 seconds total. If yours is different, start checking at 90 seconds and go from there. 💡
Wrong Mug Material
Not all mugs are microwave-safe, and using the wrong one can be a disaster. Stick to glass or ceramic mugs—these distribute heat evenly. Metal or plastic mugs can cause hot spots, leading to uneven cooking or even melting.
If you’re unsure, check the bottom of the mug for a microwave-safe symbol (usually a microwave icon). And if you’re worried about cleanup, line the mug with a paper towel—it makes removing the cake a breeze. Trust me, your mug (and your cake) will thank you.
Nutrition facts
Frequently asked questions
Can I make this cake without cocoa powder?
For a vanilla version, replace the 0.25 cup cocoa powder with 0.25 cup vanilla powder plus 1 teaspoon instant coffee to mimic chocolate depth. The texture stays the same, but the flavor transforms into a classic yellow mug cake. You can also add a pinch of cinnamon for warmth.
Why did my cake come out gummy?
Gummy texture usually means undercooking or cold ingredients. Always use room temperature milk and microwave on high power for the full 90-105 seconds. If your microwave is weak, add 10-15 extra seconds. Let the cake rest 1 minute after microwaving before eating—this helps it set properly.
Can I make this recipe in a regular oven?
Yes! Preheat your oven to 350°F (175°C) and pour the batter into a greased 6-ounce ramekin. Bake for 12-15 minutes until a toothpick comes out clean. The texture will be slightly denser than microwave version but still delicious. Perfect for when you want to avoid microwave cleanup!
How do I make individual portions for a party?
Double the recipe and divide evenly among 4 microwave-safe mugs. Cook each for 60 seconds, rest 15 seconds, then finish with 30 seconds. Serve with toppings like whipped cream, sprinkles, or caramel sauce. For presentation, use clear mugs so guests can see the beautiful layers.
What if I don’t have baking powder?
Use 0.5 teaspoon baking soda plus 0.5 teaspoon cream of tartar as a substitute. This combo mimics baking powder’s leavening power. Just be sure to use it immediately after mixing, as the reaction starts right away. The cake will still rise, but it might be slightly denser.

- 5 Lb Eye Round Roast Recipe: Slow-Braised to Melt-in-Mouth Tenderness - November 3, 2026
- 3-Hour Ciabatta Bread Recipe: Crusty Chews and Airy Holes Mastered - November 3, 2026
- 5 Fruit Salad Recipe: Vibrant Rainbow Layers With No Brown Spots - November 3, 2026