
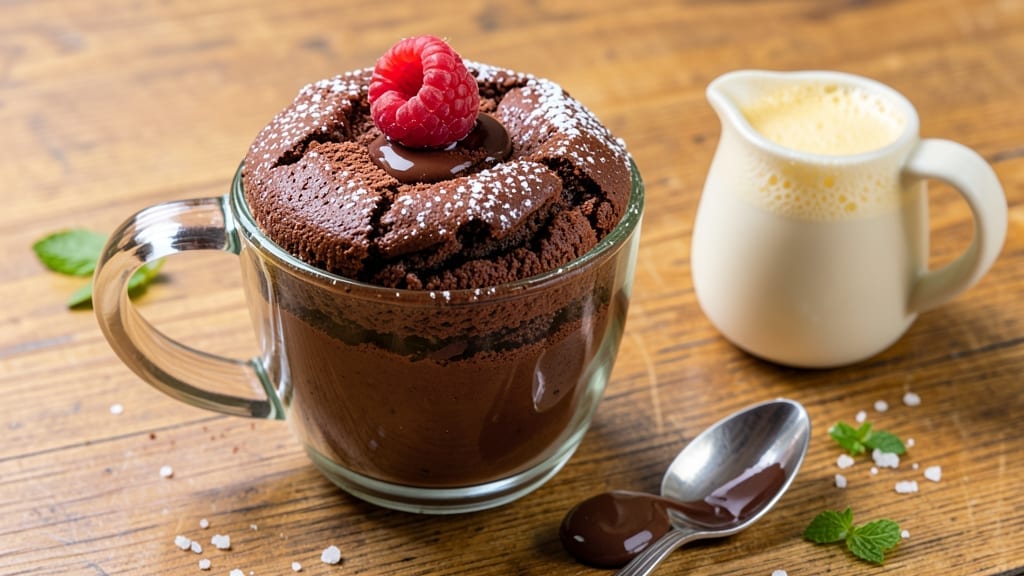
This 5-minute chocolate mug cake recipe delivers restaurant-quality dessert with zero cleanup—just a mug, microwave, and 5 ingredients. 💛 The secret lies in the perfect balance of cocoa powder, melted butter, and a touch of vanilla that transforms simple pantry staples into a rich, fudgy cake in minutes.
I developed this after burning through three separate batches of overmixed mug cakes (yes, it happens), and this version never fails.
The beauty of this recipe is its adaptability—whether you’re craving a quick after-dinner treat or need a single-serving dessert for one, it delivers foolproof results every time. No measuring cups, no mixing bowls, and no waiting for an oven to preheat.
The microwave does all the work while you sip your coffee or tea, making this the ultimate lazy dessert solution. For extra indulgence, top with whipped cream or a sprinkle of chocolate chips before microwaving.
What you’ll end up with is a warm, moist chocolate cake with a slightly crispy top, served directly from the mug. The texture is perfectly dense yet tender, with deep chocolate flavor that satisfies any sweet tooth.
The best part? No dishes to wash—just enjoy your dessert straight from the microwave, guilt-free. This recipe is your new go-to for instant chocolate cravings.
Perfect for satisfying a late-night chocolate fix, packing for a picnic, or surprising someone with a spontaneous dessert. The instructions are straightforward, and the ingredients are simple—making this the ultimate 5-minute dessert that never disappoints. Let’s get started!
Ingredients for 5 minute chocolate mug cake
Five simple ingredients transform into a decadent mug cake in minutes—no oven, no dishes, just pure chocolate bliss.
| Ingredient | Amount | Notes |
|---|---|---|
| All-Purpose Flour 🌾 | ¼ cup | Sifted for smooth texture |
| Unsalted Butter 🧈 | 3 tbsp | Melted, full-fat preferred |
| Granulated Sugar 🍚 | ¼ cup | White or brown works |
| Cocoa Powder 🍫 | ¼ cup | Natural or Dutch-processed |
| Vanilla Extract 🌸 | ½ tsp | Pure extract, not imitation |
| Milk 🥛 | ¼ cup | Any kind, room temperature |
| Pinch of Salt 🧂 | ⅛ tsp | Enhances chocolate flavor |
| Mini Chocolate Chips 🍫 | ⅛ cup | Optional for extra indulgence |
| Whipped Cream 🍦 | ¼ cup | For topping, optional |
The cocoa powder is where the magic happens—Hershey’s Special Dark or Dutch-processed brands like Ghirardelli give the deepest flavor. I always grab the bulk bins at Whole Foods for the freshest cocoa, but any quality brand works. The butter needs to be melted just until it’s liquid—microwave it for 40 seconds and stir once. For the milk, any kind is fine, but whole milk gives the richest texture. The vanilla extract? Pure Madagascar bourbon is my go-to, but imitation works in a pinch. Pro tip: measure the flour by spooning it into the cup and leveling it off—don’t scoop directly from the bag or you’ll pack it too tightly.
No cocoa powder? Melted dark chocolate (2 oz) works as a 1:1 swap—just chop it finely first. Out of butter? Coconut oil melts the same way and works perfectly. The chocolate chips are totally optional, but if you’re adding them, toss them in after microwaving so they stay melty on top. Want extra richness? Swap half the milk for heavy cream. The salt might seem like a tiny amount, but it amplifies the chocolate flavor—don’t skip it. And if you’re feeling fancy, add a pinch of espresso powder to deepen the chocolate notes even more.
This cake is best eaten fresh, but if you have leftovers (unlikely, it disappears fast), it keeps for 2 days in the fridge wrapped tightly. Microwave it again for 20-30 seconds to restore that warm, gooey texture. For make-ahead prep, store the dry ingredients (flour, sugar, cocoa, salt) in a jar and the wet ingredients (butter, milk, vanilla) separately. Mix them right before microwaving—the batter should be thick but pourable. The mug? Any microwave-safe one works, but dark ceramic mugs give the best crispy top. Line it with parchment paper for easy removal if you’re feeling extra.
Why You’ll Love This Recipe
- I’ll be real: the ingredients are things I already have. Flour, sugar, butter—basic stuff that doesn’t break the bank. And if I make extra batter, I’ll stash it in the fridge for 2-3 days (just reheat for 10 seconds). It’s my secret weapon for when I’m too tired to shop or too broke to order takeout.
- Mug Magic: I swear by this recipe when I’ve got three minutes and a craving—just toss flour, sugar, and cocoa into a mug with melted butter and vanilla, microwave, and boom. No bowls, no mess, no waiting for an oven to heat. Honestly, it’s the closest thing to chocolate therapy I’ve found.
- Rich Without Effort: That cocoa powder and butter combo? It’s like a decadent shortcut. The cake turns out fudgy and dense—no dry crumb here—because the sugar and cocoa melt together in the microwave, giving it that almost bakery-quality taste. (Yes, even on a Tuesday night.)
- Craving Catcher: Between us, this is my go-to for late-night munchies, last-minute dessert dates, or when I need to bribe my kid to eat veggies. Double the batter, split it into two mugs, and suddenly you’ve got two portions for the price of one. Plus, it’s the only dessert that feels special without requiring a party.
Step-by-step instructions for 5-Minute chocolate mug cake
Here’s how to whip up decadent mug cake in record time—no mixer, no oven, just pure indulgence.
🍳 Step 1: Melt Butter and Mix Dry Ingredients
Place the 3 tbsp unsalted butter in a microwave-safe mug. Microwave for 30 seconds until completely melted. Here’s the thing—don’t stir it yet. The butter needs to be fully liquid and smooth for that perfect cake texture.
While the butter melts, sift the 0.25 cup all-purpose flour and 0.25 cup cocoa powder together in a small bowl. I always sift these dry ingredients because it prevents lumps and gives that ultra-smooth finish. Add the 0.125 tsp pinch of salt and mix gently with a fork until evenly combined. Set this aside—it’s your dry ingredient base.
🍳 Step 2: Combine Wet Ingredients
Once the butter is fully melted, add the 0.25 cup granulated sugar and stir until dissolved. The mixture should look glossy and uniform. Here’s where it gets fun—pour in the 0.25 cup milk and 0.5 tsp vanilla extract, then stir vigorously for 10 seconds. You’ll see the sugar dissolve completely, creating a smooth batter base.
Now add the dry ingredient mixture you prepared earlier. Stir with a fork for 15 seconds until just combined—you should still see a few flour streaks. Overmixing develops gluten and makes the cake dense. The batter should be thick but pourable, like heavy pudding.
🔥 Step 3: Microwave to Golden Perfection
Fold in the 0.125 cup mini chocolate chips using a spoon—don’t overmix or they’ll sink to the bottom. Pour the batter into a 12-ounce microwave-safe mug (the larger size prevents overflow). Place the mug in the microwave and cook on high for 60 seconds—don’t peek! The cake needs that full minute to rise properly.
When you remove it, you’ll see a slight dome in the center—that’s perfect. The edges should be set but still slightly soft to the touch. If it looks underdone, microwave for 10 more seconds. The cake will continue cooking slightly as it rests, so don’t worry about overcooking.
🍽️ Step 4: Top and Serve Immediately
Let the cake cool for 30 seconds—this prevents the whipped cream from melting instantly. Top generously with 0.25 cup whipped cream and watch it melt beautifully into the warm cake. I like to add a sprinkle of cocoa powder on top for that classic chocolate cake look.
Serve immediately while still warm. The texture should be moist and fudgy on the inside with a slightly crisp exterior. Each bite delivers rich chocolate flavor balanced by the sweetness of the sugar and the creaminess of the whipped topping. Real talk: this is the perfect dessert when you’re craving something sweet but don’t want to wait!
Pro Tips For Making 5 Minute Chocolate Mug Cake
- Melt Butter First: Use a 10-second microwave zap (just until liquid) instead of trying to melt it in the mug—this saves time and prevents clumping that’ll make your batter lumpy. I learned this the hard way after scraping half my first batch out of the microwave.
- Sift the Cocoa: Dust that cocoa powder into the mug before adding wet ingredients—it dissolves smoother and avoids those stubborn clumps that ruin texture. Yes, even if you’re in a rush, skip the spoon-scooping shortcut.
- Fill to the Brim: Pack the mug tight with batter—no air gaps. A full mug = a domed, restaurant-style cake instead of a sad, flat pancake. (Pro move: Use a spoon to press the center down once.)
- Add a Pinch Salt: Unsalted butter + sugar? Add ¼ teaspoon salt—it balances the sweetness and makes the chocolate taste richer. I was skeptical until I tried it; now I never skip it.
Essential equipment for 5 minute chocolate mug cake
Microwave Essentials
Your microwave is the star of this recipe, so invest in a reliable model with even heat distribution—I swear by the Breville Fast Crisp for its consistent performance. A mug that’s 12-ounce or larger prevents overflow and ensures even cooking.
Dark ceramic mugs create a better crispy top, but any microwave-safe mug works. Pro tip: Place a paper towel under the mug to catch any potential drips during microwaving. 🔥
Mixing Tools
A small mixing bowl (6-8 inches wide) is perfect for combining dry ingredients—glass or ceramic works best. Use a fork or small whisk to sift and mix the flour and cocoa powder, then a spoon for folding in chocolate chips.
I keep a dedicated mug just for baking—it’s worth it to avoid cross-contamination with coffee mugs. A measuring spoon set ensures accuracy, especially for the vanilla extract and salt.
Optional Extras
For the whipped cream, I recommend Cool Whip for convenience or homemade whipped cream with heavy cream and powdered sugar for a lighter texture. A small offset spatula helps spread the whipped cream evenly.
Chocolate lovers should stock mini chocolate chips—I prefer Hershey’s Special Dark for their rich flavor. Keep a fine-mesh sieve handy for dusting cocoa powder on top. 🍫
Storage Containers
Store leftovers in an airtight container with parchment paper between layers to prevent sogginess. I use glass Pyrex containers because they’re microwave-safe and easy to clean. For the dry ingredients, a small mason jar keeps them fresh and ready to mix.
Label containers with dates—this cake stays fresh for 2 days in the fridge. A microwave-safe plate helps when reheating portions.
Pro Upgrades
For a stand mixer attachment, the Kitchenaid 4.5-quart bowl works perfectly for pre-mixing dry ingredients in batches. A digital kitchen scale ensures precise measurements for the flour and sugar. My favorite non-stick silicone spatula makes scraping every last bit of batter from the bowl effortless.
For presentation, a small serving spoon helps portion the whipped cream neatly. These upgrades turn a simple mug cake into a gourmet experience. ✨
Nutrition facts
Frequently asked questions
Can I make this mug cake without a microwave?
If you don’t have a microwave, you can bake it in a 350°F (175°C) oven for 12-15 minutes in a greased ramekin or small oven-safe mug. Use the same ingredients but reduce the milk to 2 tablespoons to prevent overflow. The texture will be slightly denser but still delicious.
Why did my mug cake come out flat instead of domed?
This usually happens when the batter is overmixed or the mug is too small. Stir the batter just until combined (15 seconds max) and use a 12-ounce mug for proper rise. If your microwave isn’t powerful enough, try 70 seconds instead of 60. The cake should puff slightly in the center when done.
Can I substitute any of the ingredients?
Yes! Swap the butter for 3 tbsp coconut oil (melted) or 2 oz melted dark chocolate for a richer flavor. Use almond milk for dairy-free or Greek yogurt for extra moisture. For a lighter cake, replace 2 tbsp flour with 2 tbsp cake flour. Always keep the total liquid-to-dry ratio balanced.
How do I make this mug cake gluten-free?
Replace the all-purpose flour with 0.25 cup gluten-free 1:1 baking flour (like Bob’s Red Mill) and add 0.5 tsp xanthan gum to improve texture. Sift the gluten-free flour and cocoa powder together as directed. The cake will be slightly denser but still moist and delicious. Always check your gluten-free flour brand’s instructions.
Can I make this mug cake ahead of time?
For best results, make it fresh, but you can prep the dry ingredients (flour, sugar, cocoa, salt) in a jar and store them for 1 week. Keep the wet ingredients (butter, milk, vanilla) separate in the fridge for 3 days. Mix right before microwaving. If you make the cake ahead, store it in an airtight container for 2 days and reheat for 20 seconds to restore warmth.

- 3lb Prime Rib Roast Recipe: Juicy Pink Center Guaranteed in 3 Hours - October 31, 2026
- 5 Spice Cake Recipe: Warmly Spiced Layers With Crunchy Top - October 31, 2026
- 1950’s Macaroni and Cheese Recipe: Nostalgic Creamy Cheese Sauce with Buttery Noodles - October 31, 2026