
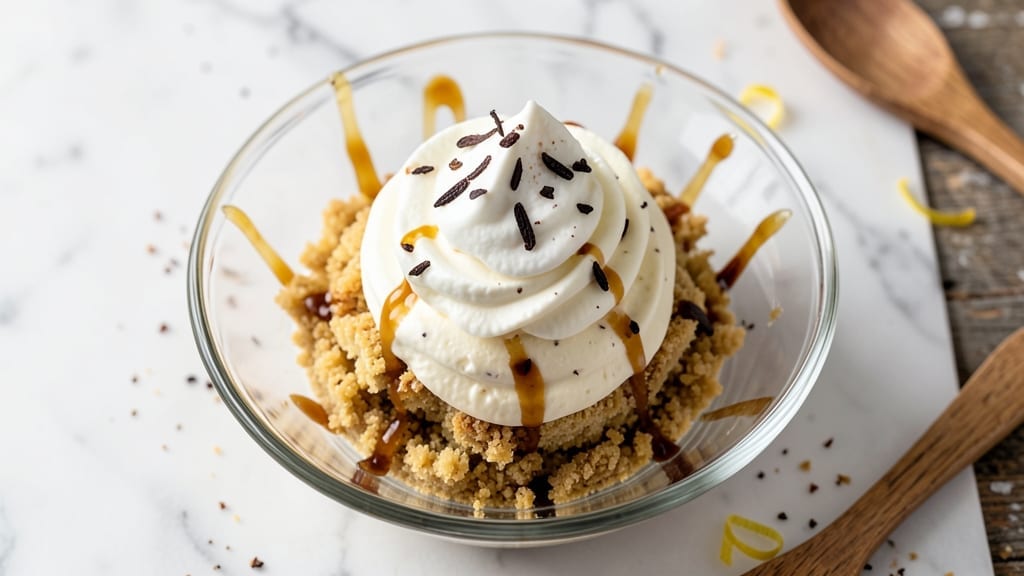
When you need a 5-minute ice cream cake that feels like a dessert chef’s secret, this no-churn bowl recipe delivers restaurant-quality results without the fuss.
The magic lies in layering store-bought cake mix, ice cream, and whipped cream in a bowl—no baking, no waiting, just pure indulgence that comes together faster than you can say “dessert time.”
I developed this during a particularly busy week when I needed something impressive with zero effort, and it became an instant family favorite.
What makes this recipe truly special is its foolproof technique: simply mix cake mix with melted butter, let it cool slightly, then layer it with ice cream and whipped cream in a bowl.
The cake mix transforms into a soft, moist base that holds up perfectly, while the ice cream and whipped cream create a creamy, dreamy texture. The best part? No special equipment—just a bowl, spoon, and a little patience for chilling.
By the time you’re done, you’ll have a decadent ice cream cake that looks like it came from a bakery, complete with layers of cake, ice cream, and whipped cream. The contrast of textures—soft cake, creamy ice cream, and fluffy whipped cream—makes every bite feel like a celebration.
It’s the kind of dessert that feels special without requiring hours in the kitchen.
Serve it immediately for a warm, gooey experience or chill for 30 minutes for a firmer texture. Top with sprinkles, chocolate sauce, or fresh fruit to elevate it even further. This is dessert made easy—no stress, no mess, just pure joy in a bowl.
Ingredients for 5 minute ice cream cake
Four simple ingredients transform into a showstopping dessert in minutes—no baking required.
| Ingredient | Amount | Notes |
|---|---|---|
| Vanilla Cake Mix 🍰 | 1 box | Any brand for convenience |
| Unsalted Butter 🧈 | ½ cup | Melted, full-fat preferred |
| Vanilla Ice Cream 🍦 | 2 cups | Store-bought or homemade |
| Heavy Whipping Cream 🥛 | 1 cup | Cold for best whipping |
| Granulated Sugar 🍚 | 2 tbsp | For sweetening whipped cream |
| Vanilla Extract 🌿 | ½ tsp | Pure extract for flavor |
| Chocolate Syrup 🍫 | ¼ cup | For optional drizzle |
| Sprinkles 🎉 | ¼ cup | Colorful for topping |
| Large Mixing Bowl 🍽️ | 1 whole | For layering |
| Plastic Wrap 📄 | 1 sheet | For chilling |
The cake mix is the secret weapon here. Betty Crocker or Duncan Hines work perfectly, but any vanilla boxed mix will do. Butter matters—full-fat gives the cake mix that rich, moist texture. I always grab the store-brand butter at Walmart or Target—it’s cheaper and melts beautifully. For the ice cream, store-bought vanilla is fine, but if you’ve got homemade, use it! Just make sure it’s fully softened before scooping. The whipped cream should be cold—pop it in the fridge for 10 minutes before whipping if it’s room temperature.
No vanilla extract? Almond extract at half the amount works in a pinch. Short on sprinkles? Crushed cookies or chopped nuts add crunch. Chocolate syrup? Melted chocolate chips are a great swap. If your whipped cream isn’t holding its shape, add another 0.5 tsp vanilla extract and whip again. The cake mix layer should be thick but pourable—if it’s too stiff, microwave the butter for 20 seconds to help it blend smoothly. And trust me, the plastic wrap trick for chilling is genius—no bowls needed!
This dessert is all about timing. The cake mix layer needs 10 minutes to set in the fridge before adding ice cream. Once assembled, it’s best eaten immediately for that warm, gooey texture, but it keeps for 2 hours in the fridge if you need to prep ahead. For a firmer texture, chill for 30 minutes—it’ll hold its shape better. Portion into individual bowls if serving a crowd, and always keep the whipped cream cold until the last minute. Leftovers? Freeze for up to 1 month—just let it thaw for 10 minutes before serving.
Why You’ll Love This Recipe
- No Mixer Needed: Mixing the cake batter is just folding ice cream into softened butter—no electric mixer required. I’ve done this with my hands in the sink (yes, really) and still ended up with a crumb-free, creamy texture every time.
- Two-Ingredient Magic: Vanilla cake mix and ice cream? That’s the secret weapon here. The cake stays moist without drying out, and the ice cream melts just enough to create a rich, dessert-like center that’s shockingly sophisticated for five minutes of work.
- Birthday or Boredom: This cake is my go-to for last-minute celebrations—no one will guess it’s basically a deconstructed sundae. Honestly, I’ve served it at potlucks, kids’ parties, and even as a “fancy” dessert when I forgot to bake something.
- Pantry Staple Hack: You’re already using stuff you have: butter, sugar, and heavy cream. The cake mix is the only splurge, but it’s a small one that stretches for multiple servings. Leftovers? Freeze slices for grab-and-go treats later—no thawing needed.
Step-by-step instructions for no-churn ice cream cake
Here’s how to create a creamy, dreamy dessert in minutes—no baking required!
Prepare the Cake Base
In the large mixing bowl, combine the 1 box vanilla cake mix with the 0.5 cup melted unsalted butter. Using a sturdy spoon or rubber spatula, mix until the mixture becomes crumbly and evenly moistened. You’ll see the butter incorporate into the cake mix, creating a sandy texture—this is perfect for our no-bake approach.
Press the mixture firmly into the bottom of the bowl, using the back of the spoon to create an even, compact layer. Gently tap the bowl on the counter a few times to help settle the mixture. This step ensures your cake holds its shape and doesn’t crumble when you add the ice cream later. Don’t worry if it looks uneven—we’ll fix that next!
Freeze the Cake Base
Cover the bowl tightly with the sheet plastic wrap, pressing it directly against the surface to eliminate air pockets. Place the bowl in the freezer for exactly 15 minutes. This brief chilling period firms up the cake base, making it sturdy enough to hold the ice cream layer without collapsing.
While it freezes, prepare the ice cream topping by placing the 2 cups vanilla ice cream in the bowl. Let it soften slightly at room temperature for about 5 minutes—this makes it easier to spread and prevents melting too quickly. The ice cream should be soft enough to scoop but still hold its shape when spread.
Assemble the Ice Cream Layer
Remove the frozen cake base from the freezer and carefully peel away the plastic wrap. Spread the softened 2 cups vanilla ice cream evenly over the chilled cake base, using the back of a spoon to create a smooth, level layer. Press down gently with the spoon to help the ice cream adhere to the cake.
Return the bowl to the freezer for another 10 minutes while you prepare the whipped cream topping. This second freezing step ensures the ice cream sets properly and creates a clean separation between layers. If you notice any soft spots in the ice cream, give it a quick tap on the counter to help it firm up.
Create the Whipped Cream Topping
In a separate chilled bowl, combine the 1 cup cold heavy whipping cream with the 2 tablespoons granulated sugar and 0.5 teaspoon vanilla extract. Using a hand mixer or stand mixer, beat on medium-high speed until soft peaks form. Increase the speed to high and continue beating for about 1 minute until the cream holds stiff peaks—it should look thick, glossy, and hold its shape when the whisk is lifted.
Spread the whipped cream evenly over the ice cream layer, using the back of a spoon to create smooth, gentle swirls. This step adds that classic ice cream cake texture and prevents a heavy, compact top layer. For extra flavor, you can fold in a tablespoon of chocolate syrup into the whipped cream before spreading.
Final Touches and Chill
Drizzle the 0.25 cup chocolate syrup over the whipped cream in zigzag patterns or small dollops, letting it pool naturally. Immediately sprinkle the 0.25 cup sprinkles evenly over the top, pressing them lightly into the syrup so they stick. Return the bowl to the freezer for 5-10 minutes to allow everything to set completely.
To serve, run a knife around the edges of the bowl, then invert onto a plate. The cake should release cleanly if properly chilled. Slice with a warm knife for clean pieces, and serve immediately for the perfect balance of creamy cake base, rich ice cream, and light whipped cream. This dessert stays fresh in the freezer for up to 2 weeks, making it perfect for quick celebrations!
Pro Tips For Making 5 Minute Ice Cream Cake
- MIX DRY FIRST: DESCRIPTION: I learned this the hard way—whisking wet ingredients into cake mix last makes a huge difference. The butter and ice cream blend smoother when the dry mix is already combined, and you’ll avoid lumps that turn your cake into a sad, dense brick.
- SOFTEN BUTTER FAST: DESCRIPTION: Skip the microwave—rub the cold butter in a bowl with your fingers for 30 seconds. It’ll soften just enough to mix with the cake batter without melting into a greasy mess (yes, I’ve done that too).
- CHILL THE CREAM: DESCRIPTION: Whip the heavy cream cold—straight from the fridge—otherwise, it’ll take forever to stiffen. If it’s warm, add a few ice cubes to the bowl while whipping, or you’ll be at it for 10 minutes instead of 2.
- PRESS FIRM, NOT HARD: DESCRIPTION: When layering the cake mix over ice cream, press it down gently but firmly—like you’re tucking in a blanket, not compacting soil. Too light, and it’ll crumble; too hard, and you’ll squeeze out all the ice cream (and everyone’s hopes).
Common mistakes when making great 5 minute ice cream cake
Skipping the Chill
One of the biggest mistakes is rushing the chilling steps. The cake mix layer needs that 15-minute freeze to set properly—skipping this will cause it to crumble when you add ice cream.
I’ve seen people try to save time by just pressing it into the bowl, but trust me, the freezer step is non-negotiable. If you’re in a real hurry, pop the bowl in the freezer while you prep the other layers, but don’t skip it entirely. 🧊
Overmixing the Cake Base
Once you mix the cake mix with melted butter, stop stirring as soon as it looks crumbly and moist. Overmixing develops gluten, making the base tough instead of tender. I’ve made this mistake and ended up with a dense, cake-like layer that didn’t hold together.
Use a spoon or spatula to gently press it into the bowl—no need to overwork it. 🍰
Room-Temperature Ingredients
Cold ingredients are key for this recipe. If your heavy whipping cream isn’t chilled, it won’t whip properly, and your ice cream might melt too fast. I always keep my cream in the fridge until the last minute and use a chilled bowl when whipping.
For the ice cream, let it soften at room temperature for just 5 minutes—any longer and it’ll turn into a soupy mess. ❄️
Uneven Layers
Uneven layers can make your ice cream cake look sloppy and collapse when sliced. Take your time spreading the ice cream and whipped cream—use the back of a spoon to smooth out any lumps or uneven spots.
I like to tap the bowl gently on the counter after each layer to help everything settle. If the ice cream layer is too thick, spread it thinner and add an extra 5 minutes in the freezer before adding the whipped cream. 🎨
Not Pressing Layers Together
After adding each layer, press it down gently with the spoon or your fingers. This helps the layers adhere and prevents them from sliding around when you invert the bowl. I’ve seen people skip this step, and their ice cream cake ends up with gaps or a wobbly texture.
A quick press ensures everything stays in place for clean slices. 💪
Using Warm Tools
Warm spoons, bowls, or knives can cause the ice cream to melt prematurely. Always use chilled tools when assembling your dessert. I keep a bowl of ice water nearby to dip my spoon in between layers if it gets too warm.
A warm knife can also make slicing messy—run it under hot water for a second before cutting to get clean pieces. 🔥
Nutrition facts
Frequently asked questions
Can I use this recipe with store-bought cake layers instead of cake mix?
Swap the cake mix for 2 store-bought vanilla cake layers (about 1-inch thick). Place one layer in your bowl, spread 1 cup ice cream on top, then add the second cake layer. Top with remaining 1 cup ice cream and whipped cream. Chill for 30 minutes before serving for firmer layers.
How do I make this recipe without heavy whipping cream?
Use 1 cup cold coconut cream (from a can of full-fat coconut milk) or 1 cup whipped topping (like Cool Whip). For coconut cream, chill the can overnight first, then scoop out the thick cream from the top. Whip it with 1 tbsp powdered sugar and 0.5 tsp vanilla until stiff peaks form. Note: Texture will be slightly different but still delicious!
Can I make this ahead of time for a party?
Yes! Assemble the entire cake in the bowl, cover tightly with plastic wrap, and freeze for up to 2 weeks. To serve, let it thaw for 10-15 minutes at room temperature. For a firmer texture, chill in the fridge for 1 hour before serving. The flavors actually improve after chilling overnight!
Why did my ice cream cake collapse when I tried to invert it?
This usually happens when layers aren’t properly chilled or pressed together. Make sure to: 1) Freeze the cake base for 15 minutes 2) Press each layer gently with a spoon 3) Chill the final assembly for 10 minutes before inverting Run a knife around the edges first to loosen it. If it still collapses, try using a deeper bowl for better support.
What’s the best way to serve this to a crowd?
For easy serving, divide the mixture among 4 individual bowls (about 1 cup per bowl). Assemble each one separately, then chill. Serve with: – Mini scoops of ice cream on the side – Chocolate sauce for drizzling – Fresh berries or crushed cookies for topping This makes it perfect for parties—each person gets their own perfect portion!

- 3lb Prime Rib Roast Recipe: Juicy Pink Center Guaranteed in 3 Hours - October 31, 2026
- 5 Spice Cake Recipe: Warmly Spiced Layers With Crunchy Top - October 31, 2026
- 1950’s Macaroni and Cheese Recipe: Nostalgic Creamy Cheese Sauce with Buttery Noodles - October 31, 2026