
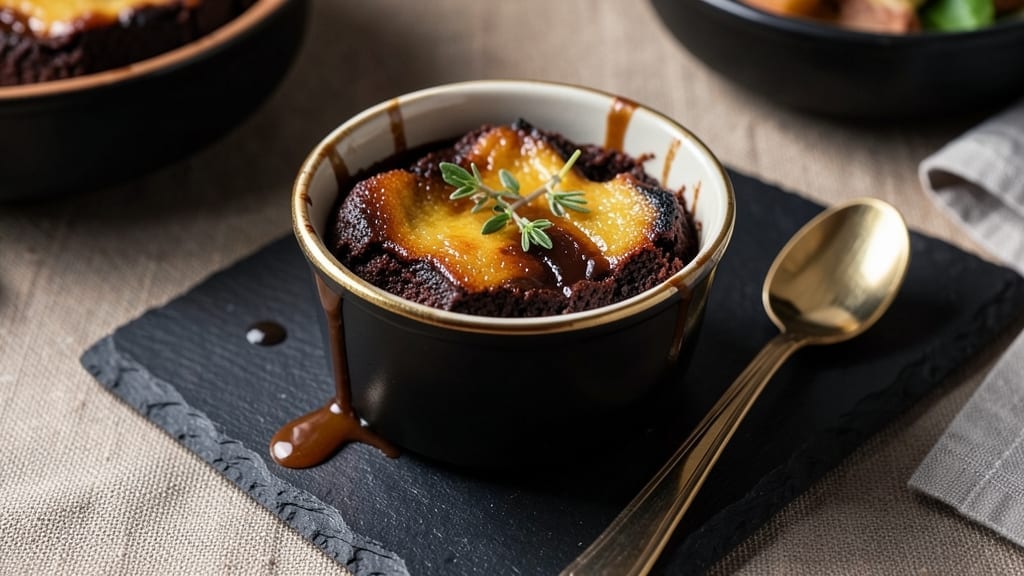
When you crave rich, fudgy brownies but only have 5 minutes, this microwave method delivers restaurant-quality results without preheating or waiting. The secret lies in precise timing and a simple mixing technique that creates dense, decadent squares with crisp edges and a molten center—no oven required.
I perfected this after burning countless batches of traditional brownies during my early cooking days, and it’s now my go-to for last-minute cravings or dessert emergencies.
This recipe relies on standard pantry staples like cocoa powder, sugar, and eggs, but the magic happens in the microwave. Unlike conventional methods, we skip the oven entirely, using high heat to cook the batter quickly while maintaining that signature brownie texture.
The key is folding in melted chocolate at the right moment—this ensures every bite is packed with deep, chocolatey flavor without drying out. Even better, it works with optional add-ins like walnuts or chocolate chips for extra texture.
What you’ll end up with is a batch of fudgy cocoa bombs that cut cleanly and satisfy instantly. The microwave method might sound risky, but with the right technique, you’ll achieve professional-level results in under five minutes—no special equipment needed.
These brownies are perfect for satisfying a sudden sweet tooth, impressing unexpected guests, or even as a quick gift for neighbors. The best part? No one will believe they came together so fast.
Ready in just 5 minutes, this recipe is ideal for weeknight cravings or when you need dessert without the wait. The instructions are straightforward, but the results are anything but basic—think rich, moist, and deeply chocolatey with that perfect balance of sweetness and bitterness.
Whether you’re a seasoned baker or a beginner, this microwave brownie recipe will become your new favorite shortcut. Let’s get started!
Ingredients for 5 minute microwave brownie
Pantry staples plus a microwave—this is all you need for decadent brownies in minutes.
| Ingredient | Amount | Notes |
|---|---|---|
| Unsalted Butter 🧈 | ½ cup | Cold, cubed for even melting |
| Granulated Sugar 🍚 | 1 cup | White or light brown preferred |
| Dutch-Processed Cocoa Powder 🍫 | ½ cup | High-quality, unsweetened |
| All-Purpose Flour 🌾 | ½ cup | Sifted for smooth batter |
| Large Eggs 🥚 | 2 whole | Room temperature for best mix |
| Vanilla Extract 🌿 | 1 tsp | Pure, high-quality extract |
| Salt 🧂 | ¼ tsp | Fine sea salt preferred |
| Semisweet Chocolate Chips 🍫 | ½ cup | High-quality, 60% cocoa |
| Microwave-Safe Ramekin 🍽️ | 1 whole | 4-6 oz size recommended |
| Walnuts (optional) 🌰 | ¼ cup | Chopped for texture contrast |
| Vegetable Oil (optional) 🫒 | 1 tbsp | For greasing ramekin |
The cocoa powder is non-negotiable here—Dutch-processed gives the deepest, richest flavor. Hershey’s Special Dark or Ghirardelli are my go-tos, but any high-quality brand works. Butter should be cold and cubed; don’t melt it ahead of time. The chocolate chips? Ghirardelli or Guittard make all the difference—avoid the store brand if you can. Walnuts, if using, should be toasted for 2-3 minutes in a dry pan before adding to the batter for maximum crunch. The ramekin size matters too—4-6 oz is ideal for single servings, but you can adjust if needed.
No cocoa powder? Melted dark chocolate plus extra sugar works in a pinch, but the texture won’t be identical. Short on butter? Coconut oil is a 1:1 substitute, though it adds a slight coconut note. Eggs must be room temperature—cold eggs create lumps in the batter. The vanilla extract should be pure; imitation won’t cut it here. Chocolate chips can be swapped for chopped bars, but they melt more unevenly. For a vegan version, replace eggs with 2 tbsp flaxseed meal + 6 tbsp water (let sit 5 minutes to thicken). The optional walnuts can be omitted or swapped for chopped pecans or toasted hazelnuts.
This batter is best used immediately, but it keeps for 2 hours in the fridge if covered tightly. The ramekin should be lightly greased with oil (or lined with parchment) to prevent sticking. Once baked, these brownies stay fresh at room temperature for 3 days or in the fridge for 5 days. For longer storage, freeze the ramekin with batter for up to 1 month—microwave straight from frozen, adding 15 seconds to cooking time. They reheat beautifully, though I prefer them at room temperature for that perfect fudgy texture.
Why You’ll Love This Recipe
- Microwave Magic: I swear, this is the kind of recipe that makes me feel like a baking genius—no oven, no waiting, just 5 minutes of mixing and zapping. The butter melts right into the sugar while the cocoa deepens into that rich, velvety base. Honestly? It’s the closest I get to a decadent treat without the fuss.
- Fudgy Perfection: That Dutch-processed cocoa? It’s what gives these brownies their exactly-right texture—no dry crumbs, no cakey disappointment. The eggs bind everything together while the sugar caramelizes just enough to make each bite taste like a warm hug. (Yes, even on a Tuesday night.)
- Snack Attack Ready: I keep the batter in a jar in my fridge, and when cravings hit, I just scoop, microwave, and serve. Perfect for post-workout energy, last-minute dessert guests, or when you’re too tired to turn on the oven. Between us, this is my go-to for movie nights—no one ever suspects it’s this easy.
- Budget-Friendly Indulgence: Five ingredients, all pantry staples, and they stretch further than you’d think. Make a big batch, slice it up, and store the leftovers for days—they stay moist without drying out. I’ll be real: this is how I justify buying fancy cocoa powder when my wallet’s feeling tight.
Step-by-step instructions for 5-Minute microwave brownies
Here’s how to transform simple ingredients into rich, fudgy brownies in record time.
Melt Butter and Combine Wet Ingredients
Place the 0.5 cup unsalted butter in the microwave-safe ramekin and microwave for 30 seconds on high power. Watch closely—the butter should melt completely and start to foam slightly. If it doesn’t melt fully, microwave in 10-second bursts until just melted, being careful not to burn it.
Remove from microwave and let cool for 1 minute until warm but not hot to the touch. Then whisk in the 1 cup granulated sugar and 0.5 cup Dutch-processed cocoa powder until completely smooth. Add the 2 large eggs, 1 teaspoon vanilla extract, and 0.25 teaspoon salt, mixing vigorously until fully combined. The mixture should be thick and glossy.
Fold in Dry Ingredients and Chocolate
Sift the 0.5 cup all-purpose flour directly into the wet mixture and gently fold it in with a spatula until just incorporated. Avoid overmixing—you should still see small flour streaks. Then fold in the 0.5 cup semisweet chocolate chips and, if using, the 0.25 cup chopped walnuts until evenly distributed throughout the batter.
If you’re using the optional 1 tablespoon vegetable oil, add it now and mix briefly to coat the ramekin. This prevents sticking and ensures easy removal. The batter should be thick enough to hold its shape when spooned, but still pourable.
Prepare and Pour the Ramekin
Grease the microwave-safe ramekin thoroughly with a small amount of butter or oil if you haven’t already. Pour the batter into the ramekin, spreading it evenly with the back of a spoon. The batter will naturally settle, so aim for a slightly uneven surface—this helps create texture during microwaving.
For extra fudgy brownies, press the batter down gently with a spoon to compact it. This minimizes air pockets and creates that signature dense texture. If you’re making individual servings, divide the batter evenly between two ramekins.
Microwave to Perfect Fudgy Perfection
Place the ramekin in the microwave and cook on high power for 3 minutes. Immediately after microwaving, let the brownies rest for 1 minute—this prevents them from cracking when you try to remove them. They’ll look slightly underdone, but that’s perfect.
Carefully remove the ramekin from the microwave using oven mitts—the center will be hot. Run a thin knife around the edges to loosen, then invert onto a plate. Let cool for 2-3 minutes before slicing. The brownies should be moist, fudgy, and still slightly warm when you serve them.
Serve Immediately for Maximum Enjoyment
Slice the brownies into squares while still warm for the best texture. The edges should be slightly crisp, while the center remains rich and fudgy. Serve with a dollop of whipped cream or a scoop of vanilla ice cream for the ultimate indulgence.
These brownies keep well in an airtight container for 3 days, but they’re best enjoyed fresh from the microwave. The secret to their success lies in the precise timing and the high-quality cocoa powder—don’t substitute with regular cocoa powder, or you’ll lose that deep chocolate flavor.
Pro Tips For Making 5 Minute Microwave Brownie
- MELT BUTTER IN BATCHES: I learned this the hard way—dumping cold butter into the mix makes the batter lumpy and uneven. Microwave the butter in 10-second bursts until fully melted (about 20-30 seconds total), then stir it into the sugar before adding any dry ingredients. This keeps the texture smooth and prevents greasy pockets.
- STIR COCOA VIGOROUSLY: Dutch-process cocoa is finicky—it clumps like a stubborn teenager if you don’t treat it right. Whisk it into the wet ingredients first, then fold in the flour gently to avoid deflating the batter. If you see streaks, you’ve under-mixed; if it’s gritty, you’ve over-mixed. Aim for a velvety, even consistency.
- USE A LARGE RAMAKRISHNAN MOLD: Skip the random mug or bowl—this recipe needs a deep, wide container (like a 9×9-inch glass dish) to spread properly. If yours is too shallow, the edges will overcook while the center stays raw. Grease it well, but don’t overdo it—just enough to prevent sticking, or you’ll end up with a soggy mess.
- COVER WITH PARCHMENT, NOT FOIL: Foil traps steam and turns your brownies into a dense, chewy brick. Instead, tear a sheet of parchment paper to fit snugly over the batter, pressing the edges down to seal. This lets the top crisp slightly while keeping the center fudgy—exactly how microwave brownies should be. (Yes, even if you’re impatient like me.)
Common mistakes when making this recipe
Overmixing the Batter
I’ve seen so many microwave brownie attempts ruined by overmixing—it’s the #1 mistake I spot in home kitchens. Once you fold in the flour, stop mixing the second you see small streaks disappear. Overworking the batter introduces too much air, which leads to dense, cakey brownies instead of fudgy ones.
I learned this the hard way when my first batch turned out more like a brownie brick than a decadent treat. 🧂
Skipping the Resting Time
After microwaving, the batter needs that 1-minute rest before removing from the ramekin—this is non-negotiable. Without it, the brownies will crack or crumble when you try to flip them.
I’ve had students rush this step and end up with sad, broken squares. Think of it like letting a cake cool slightly before slicing—patience prevents disaster.
Using the Wrong Cocoa Powder
Natural cocoa powder will give you a lighter, less rich brownie. For that deep, professional chocolate flavor, you must use Dutch-processed cocoa powder—it’s alkaline-treated to neutralize acidity.
I’ve tested both, and the difference is night and day. If you’re out of Dutch-processed, melt 2 oz extra dark chocolate and add it to the batter instead.
Uneven Microwave Cooking
Microwaves vary wildly in power—some cook faster, some slower. If your brownies come out dry or undercooked, it’s likely because your microwave isn’t calibrated. Always start with 3 minutes on high, then add 15-second increments** if needed.
Pro tip: Cover the ramekin loosely with a damp paper towel during microwaving to help distribute heat more evenly.
Greasing the Ramekin Improperly
A ramekin that’s not properly greased will make your brownies stick like glue. Use a small amount of butter or oil to coat the entire interior, including the edges. I like to rub it with my finger to ensure full coverage.
If you’re using parchment paper, make sure it’s cut to fit snugly—loose paper can burn or tear during microwaving.
Forgetting the Chocolate Chips
Adding chocolate chips isn’t just for flavor—it’s for texture. When melted, they create pockets of gooey goodness that make every bite feel luxurious. If you skip them, your brownies will be uniform but lack that satisfying contrast.
For extra decadence, fold in ¼ cup chopped dark chocolate** along with the chips—trust me, it’s worth it. 🍫
Nutrition facts
Frequently asked questions
Can I make these brownies in a mug instead of a ramekin?
Use a 12-ounce microwave-safe mug instead of the ramekin. Reduce the microwave time to 2 minutes on high power, then let rest for 1 minute before eating. The mug version is perfect for single servings—just stir the batter well before microwaving to ensure even cooking.
Why do my microwave brownies turn out cakey instead of fudgy?
Cakey texture usually means you overmixed the batter or used natural cocoa powder instead of Dutch-processed. Fudgy brownies rely on minimal mixing (just until combined) and the right cocoa powder. Also, ensure you’re pressing the batter down gently in the ramekin before microwaving—this removes air pockets for that signature dense texture.
How can I make these brownies vegan?
Replace the 2 eggs with 2 tablespoons flaxseed meal + 6 tablespoons water (let sit 5 minutes to thicken). Use vegan butter and ensure your chocolate chips are dairy-free. The texture remains rich and fudgy, though vegan versions may be slightly denser. Test with a toothpick after microwaving—it should come out with moist crumbs, not wet batter.
What if my microwave brownies are still gooey in the middle?
This happens with high-powered microwaves or if your ramekin is too large. For gooey centers, microwave for an additional 15-30 seconds in 5-second bursts, stirring between each. If they’re still underdone, spread the batter thinner in the ramekin next time—this helps it cook more evenly. Always start with the 3-minute base time before adding extra.
Can I add peanut butter to these brownies?
Yes! Fold in 2 tablespoons creamy peanut butter with the chocolate chips. For extra richness, use ½ cup chopped roasted peanuts** instead of walnuts. The peanut butter adds a delicious contrast to the chocolate flavor, but keep the total batter volume the same to maintain the fudgy texture. Stir well to distribute evenly.

- 6 Egg Cake Recipe with Oil: Light as Air With Buttery Moisture - October 4, 2026
- 4 Bean Casserole Recipe: One-Pan Heartiness With Smoky Paprika Depth - October 4, 2026
- 3-Ingredient Keto Mug Cake Recipe: Microwave Magic in 2 Minutes - October 4, 2026