
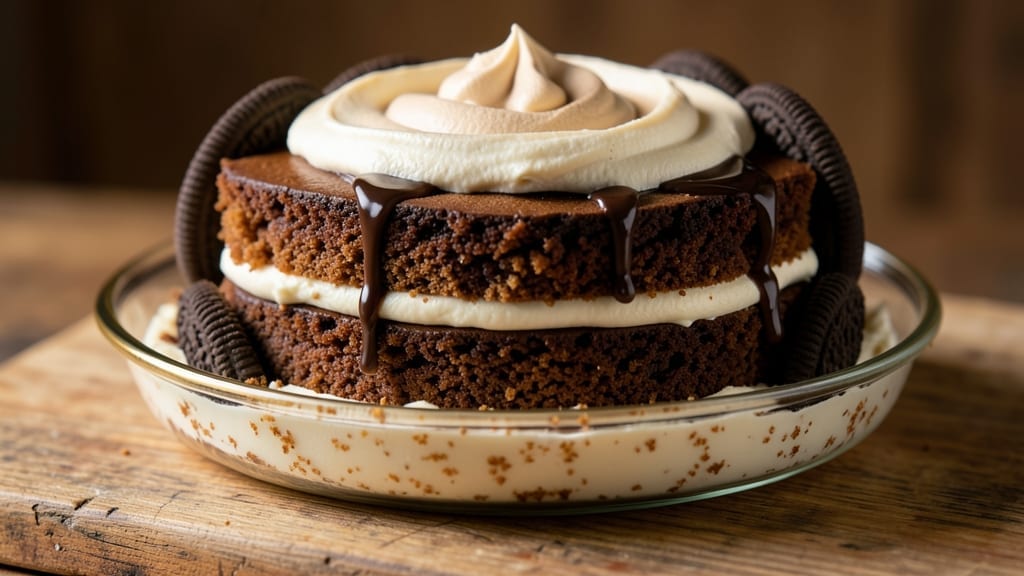
This 5-minute Oreo cake recipe delivers restaurant-worthy layers of chocolatey goodness without the hours of baking or frosting.
The secret lies in a simple, no-fuss method that transforms crushed Oreos, cream cheese, and butter into a rich, velvety cake with crispy edges—all in just five minutes of active prep and 15 minutes in the oven.
Perfect for last-minute cravings or unexpected guests, this recipe proves you don’t need elaborate techniques to create a showstopping dessert.
The beauty of this cake is its simplicity: three key ingredients (Oreos, cream cheese, and butter) combine to form a moist, fudgy interior with a crispy, cookie-like exterior.
The layers are stacked quickly, and the cake bakes up golden brown with minimal effort, ensuring every bite is packed with that signature Oreo flavor. No frosting required—just serve it warm with a scoop of vanilla ice cream for the ultimate indulgence.
What makes this recipe truly special is how it balances speed with restaurant-quality results. The cream cheese base adds a tangy richness that cuts through the sweetness of the Oreos, while the butter ensures a tender crumb.
By the time you’re done, you’ll have a decadent, layered cake that looks and tastes like it took hours to make—all while keeping your kitchen mess to a minimum.
Ideal for parties, potlucks, or satisfying a sudden chocolate craving, this cake is as versatile as it is quick. Double the batch for a crowd, or keep it small for a personal treat.
The best part? You’ll have time to enjoy it instead of spending hours in the kitchen. Let’s get started!
Ingredients for 5 minute oreo cake
Three ingredients, five minutes, and a dessert that tastes like it took hours.
| Ingredient | Amount | Notes |
|---|---|---|
| Oreos (Classic) 🍪 | 2 ½ cups | Crushed into fine crumbs |
| Cream Cheese (Full-Fat) 🧀 | 8 oz | Room temperature for mixing |
| Unsalted Butter (Cold) 🧈 | ½ cup | Cut into small cubes |
| All-Purpose Flour 🌾 | ¼ cup | For crispy edges (optional) |
| Granulated Sugar 🍚 | ¼ cup | For extra sweetness |
| Vanilla Extract 🌸 | 1 tsp | Pure extract preferred |
| Vanilla Ice Cream 🍦 | 1 ½ cups | For serving (optional) |
| Powdered Sugar 🍚 | 2 tbsp | For dusting (optional) |
| Milk (Whole) 🥛 | ¼ cup | For creaminess (optional) |
The Oreos are the star—Classic flavor only. Grab the big tub from Costco or the 18-count packs at Walmart for the best crumb texture. Freshly crushed is key—don’t use pre-crushed from a bag, it gets stale fast. The cream cheese? Full-fat Philly brand is my go-to—it’s rich enough to stand up to the Oreos. Butter should be cold but not frozen—just take it out of the fridge while you prep. Pro tip: Warm your mixing bowl first so the cream cheese softens faster.
No vanilla extract? Vanilla sugar works in a pinch—just halve the amount. Running low on Oreos? Double Stuf or Mint Oreos change the flavor profile but still work. The optional flour and sugar? Skip them if you’re in a rush—the cake still turns out amazing. For the ice cream, Häagen-Dazs or Breyers add that premium touch, but any vanilla brand does the trick. Milk is only for adjusting consistency if needed—most times, you won’t even miss it.
This cake keeps 3 days in the fridge, wrapped tightly in foil. Reheat slices in the microwave for 10-15 seconds to bring back that warm, gooey magic. Freezes beautifully for up to 2 months—just thaw at room temp before serving. I always make a double batch because it disappears faster than you can say ‘chocolate craving.’ Store leftovers in an airtight container with a slice of bread on top to keep it fresh longer.
Why You’ll Love This Recipe
- No Mixing Needed: I swear, this recipe is one of those “how did I live without this?” moments. You just crush Oreos, fold in softened cream cheese, and press it into a pan—no eggs, no baking powder, no fuss. My lazy Sunday mornings just got a serious upgrade.
- Rich Twist on Classic: That first bite? It’s like a grown-up cookie dough cake, but better. The full-fat cream cheese gives it a velvety depth, while the crushed Oreos add that perfect crunch—no one will guess it’s basically dessert for breakfast.
- Party in a Pan: Honestly, this is my secret weapon for last-minute gatherings. Double the batter for a crowd, or make individual mug cakes. It’s the kind of thing people will ask for the recipe after they’ve had their first slice.
- Budget-Friendly Magic: You’re using pantry staples here—flour, sugar, butter—and a pack of Oreos lasts forever. I’ve made this for under $3 a serving, and it still feels like a treat. Leftovers? They disappear faster than I can say “second helping.”
Step-by-step instructions for 5 minute Oreo cake
Here’s how to create this dreamy dessert in record time—no baking required!
👨🍳 Step 1: Crush the Oreos into Fine Crumbs
Place the 2.5 cups of Oreos (Classic) in a resealable plastic bag. Using a rolling pin or heavy pan, crush them into fine, even crumbs—think sand-like texture, not coarse chunks. This ensures your cake layers stay together beautifully. I press down firmly and roll over the bag in sections to get consistent coverage. If you spot any large pieces, crush them further—they’ll make the cake too crumbly.
Here’s the thing—don’t skip this step. Pre-crushed Oreos from packages often have uneven textures, and that can lead to messy layers. Freshly crushed crumbs give you that perfect balance of structure and crunch in every bite. Once crushed, set the crumbs aside in a medium bowl—they’ll be ready for the next step.
🍳 Step 2: Whip the Cream Cheese Mixture
In a separate large bowl, beat the 8 oz of Cream Cheese (Full-Fat) and 0.5 cup of Unsalted Butter (Cold) with an electric mixer on medium speed until smooth and creamy—about 2-3 minutes. The butter should be fully incorporated, leaving no lumps. I like to scrape down the sides of the bowl with a spatula every 30 seconds to ensure everything blends evenly.
Once smooth, gradually add the 0.25 cup of All-Purpose Flour, 0.25 cup of Granulated Sugar, 1 tsp of Vanilla Extract, and 0.25 cup of Milk (Whole). Mix on low speed until just combined—you’re looking for a thick, spreadable consistency, not a runny batter. This mixture is the glue that holds your cake together, so don’t overmix. The perfect texture should coat the back of a spoon but still hold its shape.
🥘 Step 3: Assemble the Cake Layers
Take half of the crushed Oreos and press them firmly into the bottom of a 9-inch round cake pan (or similar size). Use the back of a spoon to create an even layer—this is your foundation. Then spread about half of the cream cheese mixture evenly over the Oreo layer. Press down gently with the spoon to help it adhere.
Repeat with the remaining Oreos and cream cheese mixture, creating a second layer. The top should be smooth but not overly compacted—you want that signature layered look. For extra decadence, I like to sprinkle 2 tbsp of Powdered Sugar over the top layer before serving. This adds a lovely dusting of sweetness that contrasts beautifully with the rich Oreo flavor.
⏰ Step 4: Chill and Serve (The Most Important Part!)
Cover the assembled cake with plastic wrap and refrigerate for at least 15 minutes—this is crucial for setting the layers properly. The cold temperature helps the cream cheese mixture firm up slightly, making it easier to slice and serve. I know it’s tempting to dig in immediately, but trust me on this step—it makes all the difference.
When ready to serve, top with 1.5 cups of Vanilla Ice Cream and enjoy immediately. The contrast of the creamy ice cream against the crispy, crumbly cake layers is what makes this dessert truly magical. For an extra touch, I like to garnish with additional crushed Oreos around the edges—it looks stunning and adds that perfect crunch with every bite.
Pro Tips For Making 5 Minute Oreo Cake
- Crush Oreos Coarse: Mix the crushed Oreos with the flour before adding wet ingredients—this keeps the crumbs from turning to paste when the butter melts. I learned this after my first batch ended up with a weird, gluey texture that stuck to the pan like regret.
- Chill Butter First: Take the cold butter straight from the fridge and cut it into tiny cubes—this prevents the batter from getting greasy and ensures the cake holds its shape. I used to just soften it, and the result was always too dense, like a sad, flat pancake.
- Skip the Overmixing: Stir the batter just until the dry ingredients disappear—any more and you’ll end up with a tough, chewy mess instead of a light, crumbly cake. I’ve ruined more batches than I’ll admit by turning the mixer into a blender.
- Use Room-Temp Cream Cheese: Let the cream cheese sit out for 10 minutes before mixing—it blends smoother and gives the cake a richer texture. Cold cream cheese makes the batter lumpy, and nothing ruins a 5-minute dessert like lumps.
Serving suggestions for leftovers
Warm Ice Cream Topping
Serve this cake warm for a luxurious experience—simply slice and microwave for 10-15 seconds before adding a scoop of vanilla ice cream. The heat melts the ice cream slightly, creating a gooey contrast with the crispy Oreo layers.
I love this approach for parties because it feels special without requiring extra effort. 🍦
Chocolate Sauce Drizzle
Heat ½ cup heavy cream with ¼ cup chocolate chips in a small saucepan until smooth. Drizzle over individual slices before serving for a decadent touch. This works especially well if you’re serving the cake at room temperature.
For a quicker option, microwave 1 tbsp chocolate chips with 1 tsp cream for 10 seconds and drizzle immediately.
Fruit Garnishes
Add fresh berries like raspberries or strawberries for a pop of color and acidity that balances the richness. I slice strawberries into thin rounds and arrange them around the edges of the cake.
For extra flair, add a few mint leaves—they complement the chocolate beautifully and add a refreshing note. 🍓
Coffee or Espresso Pairing
Serve with a shot of espresso or a small cup of coffee to enhance the chocolate flavors. The bitterness of coffee cuts through the sweetness, creating a sophisticated dessert experience. I often recommend a dark roast like Starbucks Sumatra or Peet’s Major Dickason’s Blend for the best pairing.
Mini Cake Presentation
For individual servings, press the cake mixture into 4-ounce ramekins and chill for 15 minutes. Top each with a scoop of ice cream and a drizzle of chocolate sauce.
This makes for perfect single servings at gatherings or when you want to impress guests with minimal effort. The smaller portions also help control portions for those watching sugar intake.
Seasonal Variations
In summer, add whipped cream and fresh peaches or mango for a lighter twist. During the holidays, sprinkle with crushed peppermint Oreos and serve with eggnog. For a winter touch, dust with cinnamon sugar and serve with hot chocolate. These variations keep the cake exciting year-round! ❄️
Nutrition facts
Frequently asked questions
Can I make this cake with other types of cookies?
While Classic Oreos are ideal, you can experiment with other chocolate sandwich cookies like Double Stuf (for extra filling) or Mint Oreos (for a refreshing twist). Avoid thick cookies like graham crackers—they won’t crush finely enough. For non-chocolate options, try chocolate chip cookies or peanut butter cookies, but expect a slightly different flavor profile.
Why does my cake fall apart when slicing?
This usually happens if the layers weren’t chilled long enough or if the cream cheese mixture wasn’t thick enough. Always refrigerate for at least 15 minutes—this lets the layers set properly. For extra stability, press the Oreo crumbs more firmly into the pan before adding the cream cheese filling. If it still crumbles, try adding 1 extra tablespoon of flour to the mixture next time.
Can I bake this cake instead of chilling it?
Yes! For a warm cake, spread the layers in a 9-inch round pan and bake at 350°F (175°C) for 12-15 minutes until the edges are golden. Let it cool slightly before serving—this prevents the filling from oozing out. The baked version has a slightly crispier texture, perfect for pairing with warm ice cream or caramel sauce.
How do I make this cake gluten-free?
Replace the all-purpose flour with ½ cup gluten-free 1:1 baking flour (like Bob’s Red Mill) and ensure your Oreos are gluten-free. For extra binding, add 1 tablespoon cornstarch to the cream cheese mixture. The texture will be slightly denser, but still delicious! Always check labels on cream cheese and butter for hidden gluten.
Can I prep this cake ahead of time?
Yes! Assemble the cake layers up to 24 hours ahead and store them in the fridge. When ready to serve, let them sit at room temperature for 10 minutes before slicing. For make-ahead parties, even the crushed Oreos can be stored in an airtight container for 3 days—just mix with the cream cheese mixture right before assembling.

- 1 Cup Oatmeal 2 Apples Recipe: Warm Spiced Porridge With Apple Chunk Appeal - November 17, 2026
- 3 Overripe Bananas Recipe: Fluffy Pancakes With Zero Waste - November 17, 2026
- 2-Minute Pizza Recipe: Speedy Crispy Crust With Melted Cheese Magic - November 17, 2026