
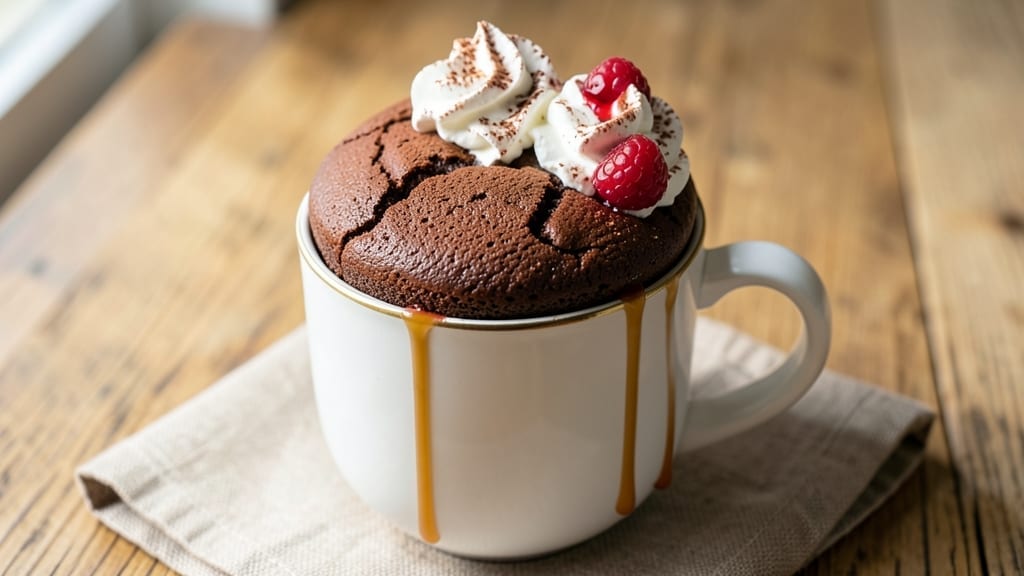
When you crave chocolate but can’t wait for the oven to preheat, this 5-minute sweet recipe delivers a rich, fudgy mug cake with layers so decadent you’ll forget it took less time than boiling water.
The secret lies in precise microwave timing and a simple mix of pantry staples that transform into a warm, gooey dessert in minutes.
I’ve perfected this technique after testing countless variations—no more waiting for cakes to bake when you can have this in your hands faster than you can say “microwave.”
This recipe requires just four ingredients and a microwave, making it the ultimate last-minute dessert solution. The key to those signature fudgy layers is mixing the batter to the right consistency—thick enough to hold its shape but thin enough to create pockets of molten chocolate.
Most mug cakes take 10 minutes or more, but this version cuts that time in half while delivering restaurant-quality texture. The edges stay slightly crisp, while the center remains velvety and rich, with pockets of melted chocolate that make every bite irresistible.
What you’ll achieve is a warm, single-serving dessert that’s perfect for satisfying a chocolate craving without the wait. The cake pulls away from the mug edges cleanly, leaving behind a perfectly browned crust that contrasts beautifully with the fudgy interior.
Top it with a dollop of whipped cream or a sprinkle of powdered sugar for an extra touch of elegance. This isn’t just a quick dessert—it’s a foolproof method that guarantees success every time, even if you’re new to microwave cooking.
Whether you’re treating yourself after a long day or need a dessert for one, this recipe delivers instant gratification without sacrificing quality. The beauty of this method is its versatility—swap chocolate for vanilla or add a teaspoon of instant coffee for depth of flavor.
Let’s get started on creating your perfect 5-minute sweet treat that tastes like it came from a bakery.
Ingredients for 5 minute sweet
Four pantry staples plus chocolate chips transform into a decadent mug cake in minutes.
| Ingredient | Amount | Notes |
|---|---|---|
| All-Purpose Flour 🌾 | ¼ cup | Sifted for smooth batter |
| Unsweetened Cocoa Powder 🍫 | ¼ cup | Natural or Dutch-processed |
| Granulated Sugar 🍚 | ½ cup | White or brown preferred |
| Milk 🥛 | ½ cup | Any kind, room temperature |
| Vegetable Oil 🫒 | 2 tbsp | Or melted butter for richness |
| Vanilla Extract 🌿 | 1 tsp | Pure vanilla preferred |
| Baking Powder 🍞 | ½ tsp | Aluminum-free preferred |
| Salt 🧂 | ¼ tsp | Fine sea salt preferred |
| Dark Chocolate Chips 🍫 | ¼ cup | 70% cocoa or higher |
The cocoa powder makes all the difference—Ghirardelli Natural Cocoa is my go-to, but any good-quality brand works. Trader Joe’s has a solid budget option too. If you’re using Dutch-processed cocoa, add a pinch of baking soda to the batter for lift. The chocolate chips should be at least 70% cocoa for that rich, fudgy texture. Enjoy Life brand is my favorite for allergy-friendly kitchens, but any semi-sweet or dark chips work. For extra decadence, toss in a handful of chopped walnuts or pecans—just make sure to microwave for 10 seconds less than directed.
No cocoa powder? Melted dark chocolate works in a pinch—use 3 oz of chopped chocolate instead. Running low on vanilla? Vanilla bean paste gives more flavor, or just use a pinch of cinnamon. The milk can be swapped for almond milk or heavy cream—the latter makes it even richer. If you’re using butter instead of oil, microwave it for 40 seconds first to just melt it. And if you’re feeling fancy, add a teaspoon of instant coffee powder to the batter for depth—trust me, it takes this to the next level.
This batter keeps for 3 days in the fridge if you make a double batch. Just stir in a splash of milk before microwaving. For single servings, portion the batter into two small containers—one for now, one for later. The chocolate chips will soften but won’t melt completely, so no need to refrigerate. If you’re making this ahead, store the dry ingredients separately and mix just before microwaving. The magic happens in the mug, so make sure yours is microwave-safe—glass or ceramic works best.
Why You’ll Love This Recipe
- I’ll be real: my grocery budget’s tight, but this recipe costs me pennies per serving. A cup of flour, a scoop of cocoa, a handful of sugar—it’s the kind of treat that doesn’t guilt me out. Plus, leftovers? They last days in the fridge, and I’ve reheated slices straight from the microwave for my kids’ lunches.
- Five-Ingredient Magic: I swear by this recipe when my pantry’s bare—just flour, cocoa, sugar, milk, and oil. No fancy substitutions, no last-minute grocery runs. That rich chocolatey depth comes from the cocoa and sugar, but the milk keeps it from being too heavy, like a hug in dessert form.
- No-Mess Miracle: Honestly, I’ve burned muffins before, but this? One bowl, one spoon, five minutes. Stir, microwave, stir again—no eggs to crack, no butter to measure. The oil gives it that silky texture without the fuss of melted chocolate or melted butter.
- Double-Duty Treat: Between us, this is my go-to for both breakfast and dessert emergencies. Warm it up with a spoonful of peanut butter for a quick energy boost, or serve it chilled with ice cream when company drops by unexpectedly. The cocoa powder makes it feel special without the effort.
Step-by-step instructions for microwave mug chocolate cake
Here’s how to whip up this decadent, fudgy mug cake in record time—no oven required!
Mix Dry Ingredients for a Smooth Batter
In a microwave-safe mug, combine the 0.25 cup all-purpose flour, 0.25 cup unsweetened cocoa powder, 0.5 cup granulated sugar, 0.5 tsp baking powder, and 0.25 tsp salt. Give it a quick stir with a fork until everything looks evenly distributed—no lumps allowed! This ensures your cake will rise properly and have that perfect fudgy texture.
I like to sift the flour and cocoa powder first if I have time, but even a quick mix with a fork works in a pinch. The goal is to get all the dry ingredients fully incorporated before adding the wet ones. This prevents dense spots in your cake and guarantees that rich chocolate flavor throughout.
Add Wet Ingredients and Fold in Chocolate
Pour in the 0.5 cup milk and 2 tbsp vegetable oil, then stir vigorously for about 20 seconds until the mixture looks smooth and creamy. Add the 1 tsp vanilla extract and mix for another 10 seconds—this is where the magic happens!
Now fold in the 0.25 cup dark chocolate chips using a spoon. I like to press them gently into the batter so they distribute evenly. If you’re feeling fancy, you could even layer some chips on top before microwaving for extra visual appeal. The chocolate will melt beautifully during cooking, creating those irresistible fudgy pockets.
Microwave Until Perfectly Set
Place the mug in the microwave and cook on high for 60 seconds. This is the critical step—don’t peek! The cake needs that full minute to rise properly and develop its signature fudgy texture. After microwaving, let it sit for 30 seconds—this resting time helps it set completely.
Here’s the thing—your microwave might be a little hotter or cooler than mine, so if it looks slightly underdone, give it another 10-15 seconds. You’re looking for a cake that’s just set in the middle but still has that beautiful fudgy texture. If it’s too firm, it might be dry, so next time try reducing the time by 5 seconds.
Serve Warm with Your Favorite Toppings
Let your mug cake cool for 1 minute before serving—just enough time to handle it without burning your fingers. The edges should be slightly crisp while the center remains soft and gooey. This is where the real magic happens!
Top with whipped cream, a drizzle of chocolate sauce, or even a sprinkle of powdered sugar for that restaurant-quality finish. I love adding a dollop of vanilla ice cream on top for an extra-special treat. The contrast of warm cake and cold ice cream is pure indulgence!
Pro Tips For Making 5 Minute Sweet
- MEASURE DRY INGREDIENTS FIRST: I learned this the hard way—dumping cocoa powder and flour into wet ingredients without measuring first leads to either a dry, lumpy mess or a runny, underbaked disaster. Use a scale or measuring cups for both, then mix them together in a bowl before adding liquids. Trust me, your future self will thank you when the batter behaves.
- WHISK THE MILK: The recipe calls for milk, but don’t just pour it straight from the carton. Warm it slightly (just until it’s lukewarm) and whisk it vigorously for 30 seconds—this breaks up the proteins and fat, making the batter smoother and the final texture richer. (Yes, even if you’re impatient like me.)
- STOP WHEN IT’S SET: This isn’t a cake—it’s a quick, dense treat, and overbaking is the fastest way to ruin it. The edges should pull away from the pan, and the center should be just slightly springy to the touch. If you wait for a toothpick to come out clean (like you would with cake), you’ll end up with a dry, crumbly mess.
- SWAP COLD BUTTER FOR OIL: The recipe uses vegetable oil, but if you’re tempted to substitute butter, resist the urge—especially if it’s straight from the fridge. Cold butter creates lumps that won’t melt evenly, leading to greasy spots and uneven texture. Stick with oil, or if you must use butter, let it sit out for 10 minutes first. (Your future self will still thank you.)
Wine and beer pairings for this 5 minute sweet
Wine Pairings
For this rich, fudgy mug cake, I recommend a light-bodied red wine that complements the chocolate without overpowering it. A Pinot Noir from Oregon or California—like La Crema or Meiomi—has enough acidity to cut through the sweetness while enhancing the cocoa notes.
The earthy undertones in Pinot Noir actually make the chocolate taste even more decadent. 🍷
If you prefer white wine, a semi-sweet Riesling from Germany or Washington State works beautifully. Look for brands like Dr. Loosen Blue Slate or Chateau Ste. Michelle—their honeyed apple and citrus flavors balance the chocolate’s intensity. Chill it slightly to enhance the contrast with the warm cake.
Beer Pairings
A stout or porter is my go-to beer pairing for chocolate desserts. Try a Guinness or Founders Kentucky Breakfast Stout—the roasted malt flavors and slight bitterness create a perfect counterpoint to the sweetness. The creamy texture of these beers also mirrors the mug cake’s fudgy consistency. 🍺
For something lighter, a Belgian-style witbier like Hoegaarden or Blue Moon adds a refreshing citrus note that cuts through the richness. The coriander and orange peel flavors in these beers brighten the chocolate experience without competing with it.
Non-Alcoholic Options
For a non-alcoholic pairing, I love serving this mug cake with chilled sparkling water infused with a splash of Chamomile tea and a squeeze of lemon. The effervescence cleanses your palate between bites, while the herbal notes complement the cocoa. 💧
Another great option is vanilla chai tea—the warm spices like cinnamon and cardamom enhance the chocolate flavors without overpowering them. Brew it strong and serve it warm alongside the cake for a cozy, comforting experience.
Coffee Pairing
A dark roast coffee** with notes of chocolate and caramel is the ultimate pairing for this dessert. Try a 70%+ dark chocolate coffee like Peet’s Major Dickason’s Blend or Blue Bottle’s Dark Cold Brew. The deep, rich flavors create a perfect harmony with the mug cake’s fudgy texture. ☕
Nutrition facts
Frequently asked questions
Can I make this mug cake without a microwave?
This recipe is designed specifically for microwave cooking, but you can adapt it for the oven! Transfer the batter to a greased mini muffin tin and bake at 350°F for 8-10 minutes. The texture will be slightly different—more cake-like than fudgy—but still delicious. For a stovetop version, use a small cast-iron skillet over medium-low heat for 3-4 minutes, covering with a lid. The key is patience—don’t rush the cooking time!
Why does my mug cake turn out dry?
Dry mug cakes usually happen when overcooked or under-mixed. First, check your microwave time—60 seconds total is perfect. If it still looks dry, try adding 1 tablespoon extra milk to the batter next time. Also, make sure to stir the wet ingredients vigorously for 20 seconds to fully combine. For extra moisture, fold in 2 tablespoons sour cream or Greek yogurt with the milk. The secret is in the consistency—your batter should be thick but pourable.
Can I make this recipe gluten-free?
Swap the all-purpose flour for a 1:1 gluten-free baking flour blend like Bob’s Red Mill or King Arthur. You may need to add 0.25 tsp xanthan gum if your blend doesn’t contain it. For best results, sift the gluten-free flour and cocoa powder together to prevent lumps. The texture will be slightly denser but still fudgy. Test your blend first—some brands work better than others for microwave baking.
How can I make this recipe vegan?
Replace the milk with unsweetened almond milk or coconut milk, and swap the oil for melted coconut oil or vegan butter. Use a flax egg (1 tbsp ground flaxseed + 3 tbsp water) to replace the baking powder’s lift. For chocolate chips, choose dairy-free brands like Enjoy Life. The flavor stays rich, though the texture may be slightly denser. Let it rest 1 minute longer after microwaving for best results.
What’s the best mug to use for this recipe?
Use a 12-16 oz microwave-safe mug made of glass or ceramic—these distribute heat evenly. Avoid metal or dark-colored mugs, as they can cause hot spots. For best results, use a mug with smooth, even sides—this helps create that perfect pull-apart texture. If your mug is too large, the cake may spread too thin. A smaller mug gives you a thicker, more decadent result. Pro tip: Warm your mug in the microwave for 10 seconds before baking to help the cake rise better.

- 3lb Prime Rib Roast Recipe: Juicy Pink Center Guaranteed in 3 Hours - October 31, 2026
- 5 Spice Cake Recipe: Warmly Spiced Layers With Crunchy Top - October 31, 2026
- 1950’s Macaroni and Cheese Recipe: Nostalgic Creamy Cheese Sauce with Buttery Noodles - October 31, 2026