
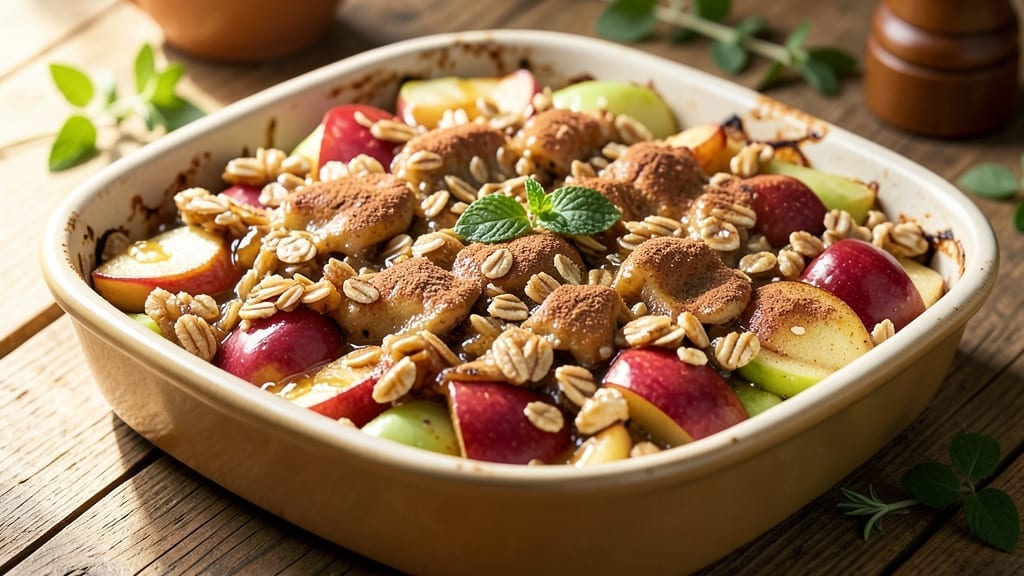
This 5-star apple crisp recipe with oats delivers the perfect balance of warm, spiced apple filling and a golden-brown oat crumble that’s crispy enough to stand up to a scoop of ice cream. 🌟 The secret lies in thinly sliced apples that soften just enough to release their natural sweetness while maintaining texture, all topped with a buttery, cinnamon-kissed oat mixture that caramelizes into a crunchy blanket.
What sets this recipe apart is the foolproof technique for achieving that signature restaurant-quality crust—no soggy bottoms here. The oat topping isn’t just a topping; it’s a textural experience that contrasts beautifully with the tender apples beneath.
We’ll use a mix of rolled oats, brown sugar, and melted butter to create that perfect crunchy-yet-melting contrast that makes every bite irresistible.
The filling starts with a blend of tart and sweet apples (like Honeycrisp and Granny Smith) tossed in cinnamon, lemon juice, and just enough sugar to enhance their natural flavor.
As it bakes, the apples release their juices, creating a caramelized sauce that pools at the bottom of the dish—ideal for dipping that first spoonful of ice cream.
Serve this warm apple crisp straight from the oven with a scoop of vanilla ice cream or a dollop of whipped cream for the ultimate dessert experience.
The combination of warm, spiced apples and that perfectly crisp oat topping makes this the kind of dessert that earns five-star reviews every time.
Ingredients for 5 star apple crisp recipe with oats
Golden-brown oats, caramelized apples, and cinnamon-spiced magic—this is your 5-star dessert lineup.
| Ingredient | Amount | Notes |
|---|---|---|
| Honeycrisp Apples 🍎 | 4 medium | Peeled, cored, sliced thin |
| Granny Smith Apples 🍎 | 2 medium | Peeled, cored, sliced thin |
| Rolled Oats 🌾 | 2 cups | Old-fashioned, not quick oats |
| Light Brown Sugar 🍚 | 1 cup | Packed firmly into measuring cup |
| Unsalted Butter 🧈 | ¾ cup | Cold, cubed for even melting |
| Ground Cinnamon 🌶️ | 2 tbsp | Freshly ground for best flavor |
| Granulated Sugar 🍚 | ½ cup | For filling sweetness balance |
| Lemon Juice 🍋 | 2 tbsp | Freshly squeezed from 1 lemon |
| Vanilla Extract 🥛 | 1 tsp | Pure vanilla extract preferred |
| Salt 🧂 | ½ tsp | Kosher or sea salt preferred |
| Chopped Walnuts 🥜 | ½ cup | Optional for extra crunch |
The apples are everything here. Honeycrisp for that perfect sweet-tart balance and Granny Smith to keep things bright and tangy. I always grab the organic variety at Whole Foods—they hold up better during slicing and stay crisp longer. Thin slices are key: about 1/4-inch thick so they soften but don’t turn to mush. If you’re short on time, a mandoline makes quick work of it. The lemon juice is non-negotiable—it keeps the apples from browning while adding that bright pop of flavor that makes this crisp sing.
No rolled oats? Quick oats work in a pinch, but they won’t give you that same perfect crunch. Brown sugar is better than white here—it adds moisture and caramelizes beautifully. Butter matters too: use European-style butter if you can find it, or at least unsalted for better flavor control. The walnuts are optional but add that restaurant-quality texture. No walnuts? Toasted pecans or even extra oats work just fine. For the cinnamon, Penzeys or McCormick are my go-tos—they’ve got that rich, warm flavor that store brands sometimes miss. And if you’re wondering about the vanilla, imitation vanilla extract is a crime—splurge for the good stuff.
This keeps beautifully for 4-5 days in the fridge if you can resist eating it all at once. The topping stays crispy for about 2 days before it softens, so make it fresh if you can. For freezing, wrap tightly in foil and freeze the whole pan—up to 3 months. Just reheat at 350°F for 15 minutes to restore that perfect crunch. Leftovers? Ice cream topping game-changer. Serve warm with vanilla ice cream and watch it disappear.
Why You’ll Love This Recipe
- No-Fuss Assembly: I swear by this recipe because it’s literally three bowls and a pan. Toss sliced Honeycrisp and Granny Smith with cinnamon, then dump oats, brown sugar, and cold butter on top—no mixing, no stress. The apples caramelize while the oat topping stays perfectly crispy, even if I forget to preheat the oven for five minutes.
- Sweet-Tart Magic: That combo of juicy Honeycrisp and tangy Granny Smith? It’s a flavor explosion. The brown sugar and butter in the oat topping add a caramelized depth that makes every bite feel like dessert, but somehow still tastes like home. (Yes, even on a Tuesday night.)
- Crowd-Pleaser Flex: This dish works for anything—weeknight dinners, potlucks, or as a last-minute dessert when guests show up. Serve it warm with vanilla ice cream, let it cool for a crunchy snack, or pack leftovers for lunch the next day. My kids beg for it, my partner steals seconds, and my in-laws ask for the recipe every time.
- Budget Win: Honestly, this recipe costs me less than $10 to feed six people. Honeycrisp and Granny Smith are often on sale, oats are a pantry staple, and butter stretches further than you’d think. Plus, the leftovers reheat beautifully—just toss them in the oven for five minutes, and it’s like it came straight out of the pan.
Step-by-step instructions for apple crisp with oats
Here’s how to create a golden, crunchy topping over warm spiced apples—every bite is pure comfort.
🍳 Step 1: Prepare the Apple Filling
In a large mixing bowl, combine the 4 medium Honeycrisp Apples and 2 medium Granny Smith Apples that you’ve peeled, cored, and sliced thin. The Granny Smith adds tartness to balance the sweetness of the Honeycrisp. Toss them with 2 tbsp Lemon Juice, 1 tsp Vanilla Extract, and 0.5 tsp Salt—this brightens the apples and prevents browning.
Transfer the apple mixture to a 9×13-inch baking dish and spread it out evenly. The apples should be in a single layer, not overlapping. Press down gently to help them release their juices. This step ensures even cooking and maximum flavor infusion.
👨🍳 Step 2: Make the Crisp Topping
In a separate large bowl, mix the 2 cups Rolled Oats, 1 cup Light Brown Sugar, 0.5 cup Granulated Sugar, 2 tbsp Ground Cinnamon, and 0.5 cup Chopped Walnuts (if using). The walnuts add a delightful crunch, but you can skip them if you prefer. Rub the mixture between your fingers to evenly distribute the cinnamon and sugars—this creates that perfect spiced crunch.
Cut the 0.75 cup Unsalted Butter into small cubes and add them to the dry mixture. Use your fingers to work the butter into the oats until it resembles coarse crumbs with some pea-sized butter pieces remaining. This texture is key for a crispy topping—don’t overmix or the butter will melt too soon.
🥘 Step 3: Assemble and Bake
Sprinkle the oat mixture evenly over the apple filling in the baking dish. Press down lightly with your fingers so it sticks together—this helps create one cohesive crispy layer. The topping should cover the apples completely, with no gaps where filling might peek through.
Bake in a preheated 375°F oven for 35-40 minutes until the topping is golden brown and the filling is bubbling around the edges. The apples should be tender but not mushy—you want that perfect balance of soft filling and crisp topping. If the edges brown too quickly, tent loosely with foil.
⏰ Step 4: Rest and Serve
Remove the apple crisp from the oven and let it cool for 10-15 minutes before serving. This resting time allows the filling to set slightly and the flavors to meld together. The crisp will be warm and gooey inside with a perfectly crunchy topping—exactly what you want!
Serve warm with a scoop of vanilla ice cream or a dollop of whipped cream. The contrast of warm crisp and cold ice cream is what makes this dessert truly special. Store any leftovers in the refrigerator for up to 3 days—it actually tastes even better the next day!
Pro Tips For Making 5 Star Apple Crisp Recipe With Oats
- Prep Apples Like a Pro: Core those Honeycrisp and Granny Smith apples—all the way—and slice them into even ½-inch chunks. Uneven pieces mean uneven cooking, and you’ll end up with some mushy bottoms while others stay crunchy. (Yes, it’s tedious, but trust me: the texture payoff is worth it.)
- Toast the Oats: Spread your rolled oats on a dry baking sheet and toast them in a 350°F oven for 5–7 minutes until they’re golden and smell nutty. Cold oats absorb moisture differently, leading to a soggy topping. Toasted oats add crunch and depth of flavor—don’t skip this, even if you’re in a hurry.
- Butter the Dish First: Before adding the apple filling, spread a thin layer of softened butter over the bottom and sides of your baking dish. This creates a barrier so the crisp doesn’t stick, and it adds a buttery richness that makes every bite taste like a restaurant dessert. (Pro move: use the butter you’d normally mix into the topping.)
- Bake Until Golden, Not Just Bubbly: Your crisp is done when the topping is deep golden brown—almost caramelized—not when it’s just set. If it looks pale, tent it with foil for 10 minutes, then uncover and bake another 5–10 minutes. Pale topping = bland topping; golden means flavor. (And yes, it’s worth the extra time.)
Storing and reheating your leftovers
Refrigerator Storage
Store your apple crisp in an airtight container for up to 4-5 days—the flavors actually deepen overnight as the spices meld. Let it cool completely before covering to prevent condensation, which can make the oat topping soggy.
I use glass Pyrex containers because they keep the crisp tasting fresh longer than plastic. 🍎
Freezer-Friendly Tips
For long-term storage, wrap the baked crisp tightly in aluminum foil and then place it in a freezer bag with all the air squeezed out. This prevents freezer burn and keeps the oat topping crispy.
Freeze for up to 3 months—just thaw at room temperature for 1-2 hours before reheating.
Reheating for Crunch
To restore that perfect golden-brown crunch, reheat the crisp at 350°F for 15-20 minutes until the topping is crispy again. Cover loosely with foil if the edges brown too quickly.
A quick stovetop method works too: Place the crisp in a skillet over medium heat for 5-7 minutes per side until warmed through.
Serving Leftovers
Leftovers taste even better the next day—especially with a scoop of vanilla ice cream or a dollop of whipped cream. For extra indulgence, drizzle with caramel sauce or sprinkle with powdered sugar before serving.
The contrast of warm filling and cold ice cream is what makes this dessert unforgettable! ✨
Microwave Shortcut
If you’re in a hurry, microwave individual portions on medium power for 1-2 minutes, stirring halfway. Add a splash of water or apple juice to the container to help steam and prevent drying.
The topping won’t be as crispy as oven-reheated, but it’s a great quick fix for a dessert craving.
Preventing Sogginess
To keep the oat topping crispy when reheating, avoid overcrowding the pan or container. If storing for more than 2 days, place a paper towel on top of the crisp before sealing to absorb any excess moisture. This simple trick keeps the texture perfect for days! 💫
Nutrition facts
Frequently asked questions
Can I use quick oats instead of rolled oats for the topping?
Rolled oats give the best texture for a crispy topping, but you can substitute quick oats in a pinch. The result will be slightly less crunchy, so consider adding 1-2 extra tablespoons of brown sugar to help with caramelization. For maximum crunch, pulse the quick oats in a food processor for 10-15 seconds before mixing with other ingredients.
Why did my apple crisp topping turn out mushy?
A mushy topping usually means the butter melted too quickly during mixing or baking. To fix this, chill the topping mixture for 15 minutes before spreading it on the apples, and bake at 350°F instead of 375°F to slow down the butter melting. Also, make sure to press the topping down firmly before baking—this helps it hold its shape.
What’s the best way to make this crisp ahead of time?
You can assemble the crisp up to 24 hours ahead and refrigerate it before baking. Just add 10-15 extra minutes to the baking time since it’ll be cold. For a make-ahead dessert, bake it completely, then store in an airtight container at room temperature for 2 days or refrigerate for 4-5 days. The flavors actually improve overnight!
Can I use frozen apples instead of fresh?
Frozen apples work, but they’ll release more moisture during baking, which can make the topping soggy. If using frozen apples, thaw them first, drain well, and pat dry with a paper towel. You may also want to reduce the baking time by 5 minutes and check for doneness early. For best results, stick with fresh apples—they hold their shape better and taste more vibrant.
What’s the secret to getting that perfect golden-brown crust?
The golden-brown color comes from a mix of brown sugar and proper baking time. For extra browning, sprinkle the topping with 1 tablespoon of granulated sugar right before baking. Also, make sure your oven is fully preheated and bake on the middle rack—this ensures even heat distribution. If the edges brown too quickly, tent loosely with foil after 20 minutes.

- 3lb Prime Rib Roast Recipe: Juicy Pink Center Guaranteed in 3 Hours - October 31, 2026
- 5 Spice Cake Recipe: Warmly Spiced Layers With Crunchy Top - October 31, 2026
- 1950’s Macaroni and Cheese Recipe: Nostalgic Creamy Cheese Sauce with Buttery Noodles - October 31, 2026