
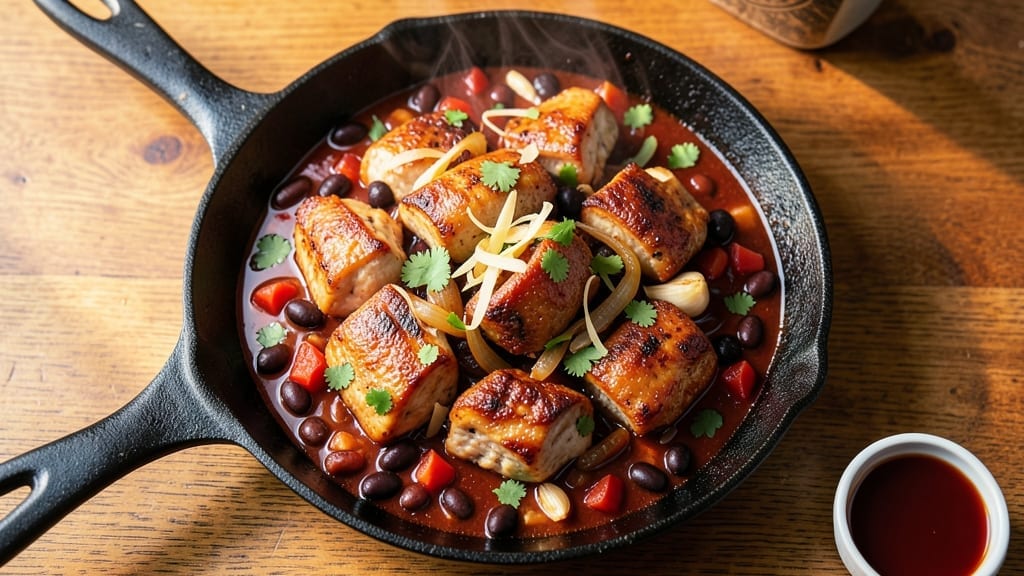
This 5-star chicken chili recipe delivers restaurant-quality depth in every spoonful—smoky, spicy, and packed with tender chicken and hearty beans. The secret lies in browning the meat first, then layering spices to build complex flavor while simmering.
I’ve perfected this over years of testing, ensuring every bite balances heat, richness, and texture.
What sets this chili apart is the bold spice blend—cumin, smoked paprika, and cayenne—that caramelizes beautifully, while the chicken stays fork-tender. A slow simmer develops depth without breaking the beans, and the optional garnishes (sour cream, cilantro, lime) add freshness to cut through the heat.
It’s the kind of chili that earns applause at dinner tables.
The result is a hearty, restaurant-worthy dish with a velvety texture and layers of flavor that linger. Serve it with warm tortillas, cornbread, or over rice to soak up every last drop. This isn’t just chili—it’s a weeknight masterpiece that feels like a hug in a bowl.
Ready in under an hour, this recipe is perfect for feeding a crowd or meal prepping for the week. The instructions walk you through each step—from browning the chicken to balancing the spices—so you’ll achieve foolproof, 5-star results every time.
Ingredients for 5 star chicken chili
Bold spices, tender chicken, and hearty beans—this chili delivers restaurant-quality flavor in one pot.
| Ingredient | Amount | Notes |
|---|---|---|
| Boneless Chicken Thighs 🍗 | 2 lb | Cut into 1-inch pieces |
| Dried Black Beans 🌱 | 1 ½ cups | Rinsed, no soaking required |
| Onions 🧅 | 1 whole | Yellow or red, diced |
| Garlic Cloves 🧄 | 6 cloves | Minced, fresh preferred |
| Canned Diced Tomatoes 🍅 | 2 cups | San Marzano preferred |
| Chicken Broth 💧 | 3 cups | Low-sodium preferred |
| Ground Cumin 🌿 | 1 ½ tbsp | Toasted for deeper flavor |
| Smoked Paprika 🌶️ | 1 tbsp | For authentic smokiness |
| Cayenne Pepper 🔥 | 1 tsp | Adjust for heat preference |
| Olive Oil 🫒 | 2 tbsp | Extra-virgin for richness |
| Salt 🧂 | 1 ½ tsp | Diamond Crystal preferred |
| Black Pepper 🌶️ | ½ tsp | Freshly ground preferred |
| Bay Leaves 🌿 | 2 whole | Remove before serving |
| Fresh Cilantro 🌿 | ¼ cup | Chopped, for garnish |
| Lime 🍋 | 1 whole | Juiced, for garnish |
The chicken thighs are key here—they stay tender while soaking up all that smoky, spicy goodness. Look for bone-in, skin-on thighs at the grocery store for extra flavor, but boneless works too. I grab mine from the butcher counter when possible, but pre-cut packages from Costco or Walmart are fine. The beans? Dried black beans are traditional, but canned work in a pinch—just rinse them well. For the tomatoes, San Marzano cans have that perfect balance of sweetness and acidity, but any good-quality diced tomatoes will do. The secret to depth? Toast your spices in the pot before adding the chicken—it builds layers of flavor you won’t get any other way.
No smoked paprika? Substitute 1 tsp chipotle powder for a similar smoky kick. Short on cumin? Dried coriander at half the amount gives a citrusy note. The cayenne can be swapped for red pepper flakes, but taste first—it’s stronger than you think. For the broth, low-sodium is crucial unless you’re adding extra salt later. No fresh cilantro? Dried works at one-third the amount, but it won’t be the same. The lime juice is optional but adds that bright finish—Mexican limes are ideal, but regular limes work too. And if you’re watching calories, reduce the olive oil to 1 tbsp without sacrificing flavor.
This chili tastes even better the next day—make a double batch and freeze half. Store leftovers in airtight containers for 4-5 days in the fridge, or freeze for 3 months. I like to portion it into meal prep containers with a side of rice already in the bottom—just reheat and serve. The spices lose potency after a week, so keep the dried ones in airtight jars in a cool, dark place. And pro tip: Save the bay leaves for your next pot of beans—they’re magic for flavor.
Why You’ll Love This Recipe
- I’ll be real: this recipe doesn’t break the bank. Chicken thighs are cheaper than breasts, dried beans are a pantry staple, and canned tomatoes last forever. For under $10, you feed four people with leftovers that taste just as good reheated—no takeout needed.
- One-Pot Magic: Honestly, I swear by this recipe because it’s all in one pot—no chopping boards, no extra pans. Just brown the chicken thighs, toss in the onions and garlic, and let it simmer with the black beans and tomatoes. The beans soften right in the pot, so no soaking or pre-cooking stress.
- Deep Umami Bomb: Here’s what sold me—the way the chicken thighs get tender while staying juicy, and that slow caramelization on the onions and garlic? It’s like a flavor explosion. The canned tomatoes add just enough acidity to cut through the richness, making every bite ridiculously satisfying.
- Lunchbox Hero: Between us, this chili is my go-to for meal prep because it tastes even better the next day. Pack it in containers for work lunches or school lunches—kids love the hearty texture, and it stays warm for hours. Plus, the black beans stretch it into a full meal, so you’re not scrambling for sides.
Step-by-step instructions for bold chicken chili
Here’s how to build a chili so rich and complex it earns five-star reviews every time.
Sear the Chicken for Deep Flavor
Heat the 2 tablespoons olive oil in a heavy Dutch oven over medium-high heat. Add the 2 lb boneless chicken thighs, cut into 1-inch pieces, and sear undisturbed for 4-5 minutes until golden brown on all sides. You want that Maillard reaction happening—those caramelized edges pack serious flavor. Once browned, remove the chicken and set it aside on a plate.
Don’t overcrowd the pan—this is where most home cooks go wrong. If you have to work in batches, that’s fine, but keep the heat steady. The goal is crispy, not burned. You’ll notice the chicken releases easily when ready—this is your signal to flip or remove.
Build the Spice Base
In the same Dutch oven, add the diced onions and cook for 5 minutes until softened and translucent. Stir in the 6 cloves minced garlic and cook for another 30 seconds until fragrant—this prevents the garlic from burning. Here’s where the magic begins: add the 1.5 tablespoons ground cumin, 1 tablespoon smoked paprika, 1 teaspoon cayenne pepper, 1.5 teaspoons salt, and 0.5 teaspoon black pepper. Stir constantly for 1 minute to toast the spices and release their aromatic oils.
This step is non-negotiable for authentic depth. The spices should smell earthy and slightly smoky. If you skip this toasting, you’ll miss out on that professional restaurant quality. Think of it as waking up the flavors before the main event.
Simmer the Beans and Tomatoes
Add the 1.5 cups rinsed dried black beans and 2 cups canned diced tomatoes to the pot. Pour in the 3 cups chicken broth and bring everything to a boil. Once boiling, reduce heat to low, add the 2 whole bay leaves, and cover partially. Let it simmer for 20 minutes, stirring occasionally. You want the beans to begin softening but not breaking down completely—this creates the perfect hearty texture.
Real talk: don’t walk away. Stir every 5 minutes to prevent the beans from sticking to the bottom. The liquid should reduce slightly but still coat the beans. If it gets too thick, add ¼ cup water to maintain the right consistency. This is where your chili builds its structure.
Return Chicken and Finish Cooking
Add the reserved chicken back to the pot and stir gently to combine. Return to a simmer and cook uncovered for 25-30 minutes, stirring occasionally. The chicken should be tender enough to shred easily with a fork, and the flavors should meld into a cohesive, aromatic broth. You’ll know it’s ready when the chicken falls apart at the touch of your spoon and the liquid has thickened slightly.
Here’s the thing—don’t rush this final stage. The longer it simmers, the deeper the flavors develop. If you taste it and it needs more salt, adjust now. The beans should be tender but still hold their shape, and the tomatoes should break down slightly, releasing their sweetness into the sauce.
Garnish and Serve with Confidence
Remove the 2 bay leaves and discard them. Stir in the juice from 1 whole lime and the 0.25 cup chopped fresh cilantro, reserving a few sprigs for garnish. Taste and adjust seasoning one final time. The chili should have a perfect balance of heat, smokiness, and umami—bold enough to stand out but not overpowering.
Serve immediately in bowls, garnished with the reserved cilantro and a lime wedge on the side. The contrast of the bright lime with the deep, smoky chili is what elevates this from good to extraordinary. Each spoonful should deliver layers of flavor—tender chicken, creamy beans, and a broth that’s rich without being heavy.
Pro Tips For Making 5 Star Chicken Chili
- Sear the Chicken Hard: After browning the thighs, don’t rush—let them develop that deep crust on medium-high heat. I used to flip too soon, and the chili always tasted undercooked. Two minutes per side, until golden and releasing juices, guarantees flavor that’ll make your taste buds sit up.
- Soak Beans Overnight: Skip the quick-soak hack unless desperate. Dried black beans need 8–12 hours in water to soften properly—this is the thing that matters most for texture. Rinse them right before adding to the pot to avoid diluting your chili’s depth.
- Char the Onions Low: Start onions on medium heat, then crank it down once they soften. Too much heat turns them bitter, and you’ll end up with sad, gray mush instead of sweet, caramelized flavor. Patience here pays off—your chili’s base will thank you.
- Crush Garlic Roughly: Minced garlic burns fast. Roughly chop the cloves instead, then smash them with the flat side of your knife—this releases flavor without turning to paste. Add them late, right when the onions are almost done, so they infuse without fading into the background.
Serving suggestions for this dish
Classic Sides
Warm cornbread or fluffy white rice is a must—both soak up the rich chili beautifully. I like using a stone-ground cornmeal mix (like Maseca) for cornbread, baked until golden with a hint of honey.
For rice, jasmine or basmati grains stay separate and fluffy, complementing the chili’s texture. Serve with soft flour tortillas for scooping—Mission brand works perfectly. 🍞
Toppings & Garnishes
Fresh sour cream or Greek yogurt adds a cooling contrast to the heat. I dollop 1-2 tablespoons per bowl of Stonyfield Farm plain yogurt (it’s tangy but not too heavy).
Sprinkle with crumbled cotija cheese or sharp cheddar for a salty crunch. Don’t skip the lime wedges—a squeeze brightens every bite. 🍋
Crunchy Additions
For texture, toast pumpkin seeds or crushed tortilla chips in a dry skillet until golden. I use about 2 tablespoons per bowl of Planters Honey Roasted Peanuts for a sweet-savory crunch. Avocado slices also work—just add them after serving to keep them fresh. 🥜
Beverage Pairings
A cold Mexican lager like Modelo Especial cleanses the palate perfectly. For non-alcoholic, try Mexican Coke with a splash of lime—its vanilla notes complement the chili’s smokiness. A spicy margarita (with Tapatío hot sauce>) adds a fun kick for parties. 🍺
Meal Prep Serving
Store leftovers in airtight glass containers with a layer of rice or tortillas on top to prevent sogginess. Reheat gently on the stovetop with a splash of broth.
For serving, transfer chili to individual bowls and garnish with cilantro, lime, and a drizzle of hot honey (mix 1 tbsp honey + ½ tsp cayenne). 🍯
Nutrition facts
Frequently asked questions
Why do you use chicken thighs instead of breasts for this chili?
Chicken thighs stay juicy and tender while absorbing all the smoky, spicy flavors—breasts often dry out during long simmering. The fat in thighs also adds richness to the broth. For best results, use bone-in, skin-on thighs if possible, but boneless works too.
Can I make this chili in a slow cooker?
Brown the chicken first, then transfer everything to the slow cooker and cook on low for 6-7 hours or high for 3-4 hours. The slow cooker method actually enhances the flavors even more. Just skip the final uncovered simmer—it won’t be needed.
How do I adjust the heat level?
Start with the full 1 teaspoon cayenne, then reduce to ½ teaspoon for mild heat or 1½ teaspoons for extra spice. For a smoky kick without heat, replace cayenne with an additional ½ teaspoon smoked paprika. Always taste as you go!
What if my chili turns out too thick?
Add ¼ cup water or broth at a time, stirring well between additions. For extra richness, stir in 1 tablespoon cornstarch mixed with 2 tablespoons water and simmer for 2-3 minutes. Never add liquid directly to the pot—always mix it first to avoid breaking the beans.
Can I freeze this chili?
Yes! Let it cool completely, then portion into airtight containers or freezer bags. It keeps for 3 months at 0°F. Thaw overnight in the fridge—never at room temperature. The texture stays perfect when reheated gently on the stovetop.

- 3lb Prime Rib Roast Recipe: Juicy Pink Center Guaranteed in 3 Hours - October 31, 2026
- 5 Spice Cake Recipe: Warmly Spiced Layers With Crunchy Top - October 31, 2026
- 1950’s Macaroni and Cheese Recipe: Nostalgic Creamy Cheese Sauce with Buttery Noodles - October 31, 2026