
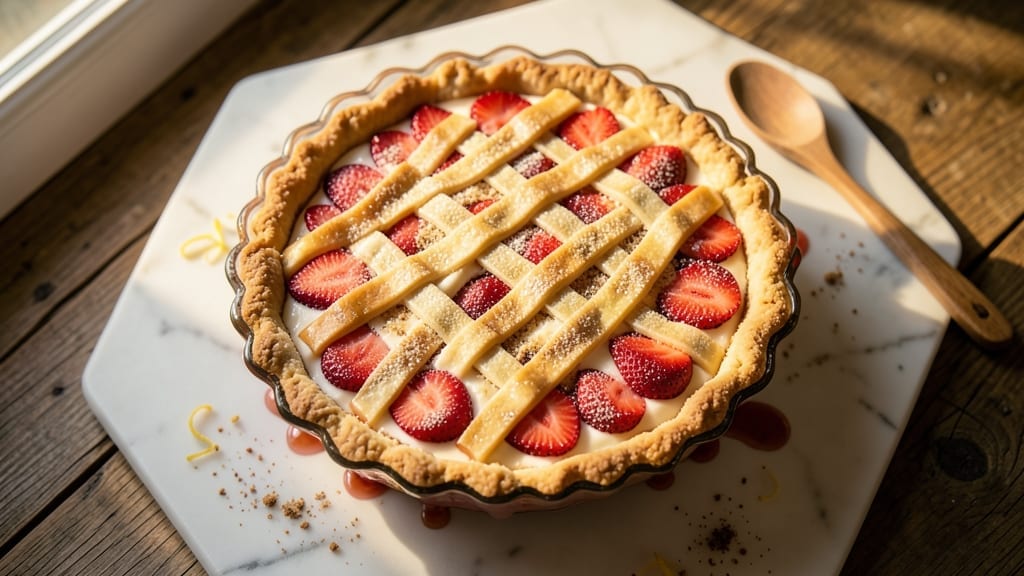
This 5-star strawberry pie delivers a shatterproof crust and juicy fruit filling that rivals any bakery—no shortcuts, just restaurant-quality technique. The secret lies in a cold butter crust that stays crisp while supporting a lattice top, and a thickened filling that transforms mushy berries into a velvety, jewel-toned center.
I’ve perfected this recipe after years of testing, ensuring every slice delivers that perfect balance of tart, sweet, and buttery perfection.
The crust begins with chilled butter cut into flour for maximum flakiness, while the filling uses a cornstarch slurry to thicken without losing that signature strawberry burst. A simple vanilla glaze ties it all together, creating that glossy finish that makes it look as good as it tastes.
What sets this apart is the lattice crust—not just for looks, but to create pockets of air that keep the filling warm and the crust crisp.
By the time you slice into this pie, you’ll have golden-brown crust shards, a filling so thick it holds its shape, and berries that pop with every bite. The aroma alone will have guests asking for seconds before the first slice is served.
This is the kind of dessert that makes you look like a baking pro, even if you’re just starting out.
Serve it warm with vanilla ice cream or let it chill for a firmer texture—either way, this pie will be the star of any dessert table. Let’s get baking—your guests won’t believe it’s homemade.
Ingredients for 5 star strawberry pie
Restaurant-quality strawberry pie starts with these 12 essential ingredients—no fancy substitutions allowed.
| Ingredient | Amount | Notes |
|---|---|---|
| All-Purpose Flour 🌾 | 2 ½ cups | Sifted for light texture |
| Unsalted Butter 🧈 | 1 cup | Cold and cubed (not softened) |
| Granulated Sugar 🍚 | ¾ cup | Plus 2 tbsp for lattice |
| Fresh Strawberries 🍓 | 4 cups | Hull-less, sliced into halves |
| Cornstarch 🌾 | ¼ cup | For perfect filling thickness |
| Granulated Sugar (Filling) 🍚 | ¾ cup | For balancing tartness |
| Lemon Juice 🍋 | 2 tbsp | Freshly squeezed |
| Vanilla Extract 🌸 | 1 tsp | Pure vanilla preferred |
| Salt 🧂 | ½ tsp | Fine sea salt |
| Heavy Cream 🥛 | ½ cup | For vanilla glaze |
| Powdered Sugar 🍚 | ¼ cup | For glaze |
| Vanilla Bean Paste 🌸 | ½ tsp | Optional for extra flavor |
The butter and flour are your crust’s foundation. Use European-style butter if you can find it—it’s higher in fat, which means extra flakiness. Most grocery stores carry it, but check the dairy section near the regular butter. Keep everything cold until mixing: chill your butter for 30 minutes before cutting it into the flour. King Arthur or Gold Medal flour work best here—avoid self-rising or whole wheat. For the strawberries, organic if possible, but regular works too. Just make sure they’re ripe but firm, not mushy. I always buy extra and freeze the rest for smoothies later.
No cornstarch? Arrowroot powder at the same amount works in a pinch, but cornstarch gives that signature pie-filling texture. Running short on butter? Vegetable shortening works, but the crust won’t be as flavorful. For the lattice, you can use store-bought strips if you’re in a hurry, but cutting your own gives that professional look. The vanilla bean paste is optional, but if you’ve got it, use it—it makes the glaze taste like a fancy bakery. And for the love of pie, don’t skip the lemon juice—it brightens the strawberries and balances the sugar perfectly.
This pie keeps beautifully. Store the crust separately if you’re prepping ahead—assemble it just before baking. The filling stays fresh for 3 days in the fridge, but the crust is best baked fresh. Once baked, let it cool completely before slicing. It reheats wonderfully—just 30 seconds at 350°F makes the filling warm and gooey again. Freeze the whole pie (without glaze) for up to 3 months. Just thaw overnight in the fridge before serving.
Why You’ll Love This Recipe
- No-Fuss Crust: The flaky butter crust comes together in 10 minutes—just flour, cold butter, and a pinch of salt. I swear by the food processor method (or just two forks if you’re in a rush), and it never cracks. That golden, buttery edge? Worth every second.
- Strawberry Magic: The cornstarch trick is genius—it thickens the filling without turning it gluey, so every bite has that perfect balance of juicy fruit and silky sweetness. Honestly, I’ve tried store-bought fillings, but nothing beats the freshness of macerated strawberries with just a sprinkle of sugar.
- Weekend or Weeknight: Slice it for a fancy brunch spread or pack individual portions for lunchboxes—it’s that versatile. My kids ask for it after school (yes, even on a Tuesday), and it’s just as welcome at potlucks as it is on my kitchen table.
- Leftovers? Better: This pie actually tastes better the next day—if there’s any left, that is. Between us, I’ve been known to bake two crusts just to make sure. The sugar caramelizes overnight, and the texture? Pure satisfaction, every time.
Step-by-step instructions for shatterproof strawberry pie
Here’s the method that delivers a perfect balance of flaky crust, jammy filling, and silky glaze every time.
Prepare the Shatterproof Crust
In a large mixing bowl, combine the 2.5 cups all-purpose flour and 0.5 teaspoon salt. Cut in the 1 cup cold cubed unsalted butter using a pastry cutter or your fingers until the mixture resembles coarse crumbs with pea-sized butter pieces. This texture is crucial for a flaky crust.
Add the 0.75 cup granulated sugar and mix until evenly distributed. The sugar will help create a tender crust while balancing the tartness of the strawberries. Press half of the dough into a 9-inch pie dish, spreading it evenly to the edges. Chill in the refrigerator for 30 minutes while you prepare the filling.
Make the Bursting Strawberry Filling
In a large bowl, gently toss the 4 cups fresh strawberries with the 0.25 cup cornstarch and 0.75 cup granulated sugar (filling). The cornstarch will thicken the filling beautifully without making it gummy. Add the 2 tablespoons lemon juice and 1 teaspoon vanilla extract, mixing just until combined. Let the mixture sit for 15 minutes—this allows the strawberries to release their juices and soften slightly.
Transfer the strawberry mixture to a saucepan and cook over medium heat for 8-10 minutes, stirring constantly, until the filling thickens enough to coat the back of a spoon. You want it to be jammy but still slightly saucy—this ensures the filling stays vibrant and juicy in the pie. Remove from heat and let cool completely before adding it to the crust.
Assemble and Bake the Pie
Roll out the remaining dough and cut it into strips about ¼-inch wide for the lattice top. Arrange the strips in a crisscross pattern over the filled pie, leaving the center open to allow steam to escape. Brush the lattice with a bit of water to help it stick to the filling.
Preheat your oven to 375°F. Place the assembled pie on a baking sheet (to catch any drips) and bake for 45-50 minutes, until the crust is golden brown and the filling is bubbling gently. The edges should be set, but the center should still have a slight jiggle—this ensures the filling stays tender.
Create the Vanilla Cream Glaze
While the pie bakes, whisk together the 0.5 cup heavy cream, 0.25 cup powdered sugar, and 0.5 teaspoon vanilla bean paste in a small bowl until smooth and slightly thickened. This glaze adds a luxurious finish and balances the tartness of the strawberries.
Once the pie is out of the oven, let it cool for 1 hour before drizzling the glaze over the top. The filling will continue to set as it cools, giving you that perfect balance of firmness and juiciness. Serve slices at room temperature for the best texture and flavor.
Pro Tips For Making 5 Star Strawberry Pie
- CHILL THE BUTTER FIRST: Cold butter in pie dough makes all the difference—literally. Cut it into ½-inch cubes and refrigerate for 30 minutes before mixing. I learned this the hard way when my crust turned out greasy and flaky instead of crisp. Trust me, your crust will thank you.
- HULL STRAWBERRIES FAST: Skip the stem-only approach—use a paring knife to slice off the green tops and a quick twist to pop the hulls out. It’s faster than tweezers and way less frustrating. (Yes, even if you’re impatient like me.)
- BAKE THE CRUST ALONE: Blind-bake the bottom crust for 12-15 minutes at 375°F before filling—no parchment, no foil. The extra heat ensures a golden, sturdy base that won’t sog under the juicy strawberries. I was skeptical until I tried it; now it’s non-negotiable.
- SWEAT THE STRAWBERRIES: Toss sliced strawberries with sugar and cornstarch, then let them sit for 10 minutes before baking. This draws out their juice, thickens the filling, and prevents a watery mess. Sounds weird, but it works—your pie will have that perfect jam-like consistency.
Pro cooking tips for this dish
Cold Butter Magic
Never skip chilling your butter before cutting it into the flour—this is the #1 secret to a flaky crust. Cut 1 cup cold cubed butter into your flour mixture using a pastry cutter or your fingers until you see pea-sized butter pieces throughout.
If your butter softens, pop it back in the fridge for 15 minutes before continuing. I’ve ruined more crusts than I can count by skipping this step! 🧈
Lattice Perfection
For a restaurant-worthy look, cut your lattice strips to ¼-inch width and arrange them in a tight crisscross pattern. Brush them lightly with water before baking—the moisture helps them stick to the filling and creates that golden-brown finish.
Pro tip: Use a ruler to keep your strips straight for a clean, professional look. 🌟
Filling Thickness
Cook your strawberry filling until it thickens enough to coat the back of a spoon, but don’t overcook it—you want it to be jammy but still slightly saucy. Overcooking turns the filling into a gluey mess.
Remove it from heat as soon as it reaches that perfect consistency, then let it cool completely before adding it to the crust. This ensures a thick, vibrant filling that holds its shape. 🍓
Oven Spring Control
Place your pie on a baking sheet to catch any drips, and bake it on the middle rack of your oven. This prevents the bottom crust from getting soggy. If the edges start browning too quickly, cover them with a strip of aluminum foil.
The filling should bubble gently but not overflow—this is your cue that it’s ready. 🔥
Glaze Timing
Wait until the pie has cooled for at least 1 hour before adding the glaze. This gives the filling time to set properly, so it doesn’t turn into a runny puddle. Whisk the glaze ingredients together until smooth, then drizzle it over the top just before serving.
The contrast of the glossy glaze against the golden crust is what makes this pie look like it came from a bakery. ✨
Resting Matters
Let your pie rest for 2-3 hours at room temperature before slicing. This allows the filling to fully set and the flavors to meld together. Trust me, slicing it too soon will leave you with a messy, runny disaster.
Patience here makes all the difference—your guests will notice the difference in texture and flavor. 💪
Nutrition facts
Frequently asked questions
Can I make this strawberry pie ahead of time?
Yes! Assemble the pie crust and filling 1 day ahead, then refrigerate uncovered. Bake just before serving to keep the crust crisp. For best results, store the baked pie (without glaze) in the fridge for up to 3 days. Reheat slices for 30 seconds at 350°F to warm the filling.
What if I don’t have cornstarch for the filling?
Use arrowroot powder in the same amount—it works nearly identically. For a thicker texture, mix 1 tablespoon flour with 1 tablespoon cold water to replace 2 tablespoons cornstarch. Just stir it into the strawberries before cooking.
How do I prevent a soggy bottom crust?
Prevent sogginess by chilling the crust for 30 minutes before baking, and blind-baking it for 5 minutes with pie weights or dried beans. Also, bake on the middle rack and use a baking sheet underneath to catch drips.
Can I substitute frozen strawberries?
Thaw frozen strawberries completely, then drain excess liquid. For extra flavor, toss them with 1 extra tablespoon lemon juice and let sit for 10 minutes before cooking. The texture will be slightly different but still delicious.
What’s the best way to store leftovers?
Store slices in an airtight container in the fridge for up to 4 days. Reheat individual portions in the microwave for 20-30 seconds to restore the filling’s warmth. For longer storage, freeze slices (without glaze) for up to 2 months.

- 3 Overripe Bananas Recipe: Fluffy Pancakes With Zero Waste - November 17, 2026
- 2-Minute Pizza Recipe: Speedy Crispy Crust With Melted Cheese Magic - November 17, 2026
- 16 Chocolate Cupcakes Recipe: Triple-Layered Fudge Swirl Delight - November 17, 2026