
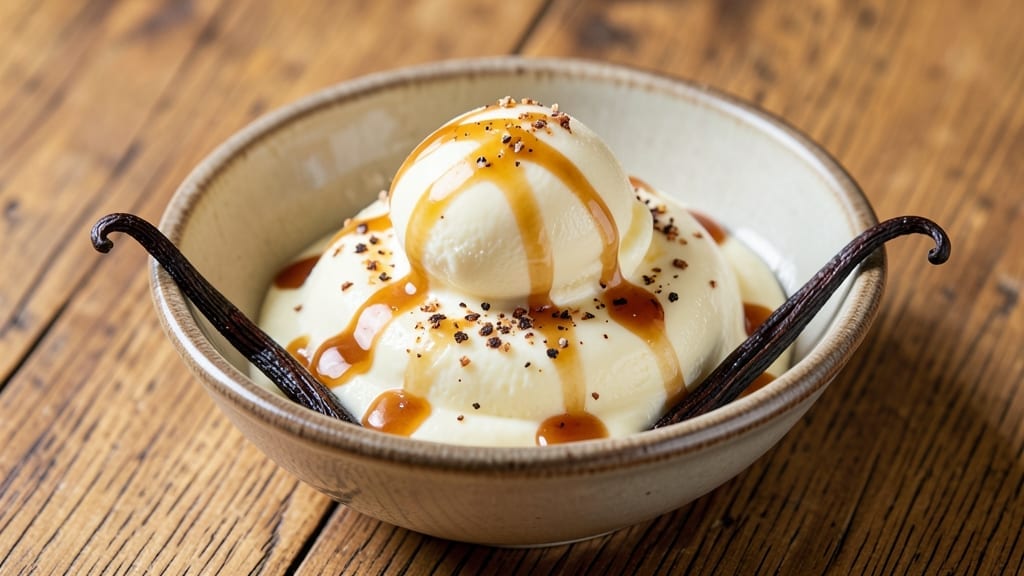
Creating a 5-star vanilla ice cream recipe that earns five-star ratings isn’t just about blending ingredients—it’s about mastering texture, temperature, and technique.
After years of testing (and eating) countless batches, I’ve perfected a method that delivers restaurant-quality results at home, with a velvety swirl of vanilla bean that makes every spoonful feel like a dessert experience. The secret isn’t complicated—it’s in the ratios and the patience of slow churning.
This recipe transforms simple pantry staples—heavy cream, milk, sugar, and vanilla—into something extraordinary through precise measurements and a two-stage freezing process. Unlike basic recipes that rely on shortcuts, we’re building depth with real vanilla bean paste and a touch of alcohol for smoothness.
The result? Ice cream so creamy it melts on your tongue but holds its shape when served, with those signature golden vanilla bean swirls that elevate it from homemade to Michelin-level.
What sets this apart is the attention to detail: aging the custard overnight for richer flavor, churning in an ice cream maker until it reaches that perfect scoopable consistency, and finishing with a quick spin in the freezer to lock in texture.
The payoff? A dessert that looks as impressive as it tastes—silky, fragrant, and with a complexity that makes it feel special enough for company but simple enough for weeknight cravings.
Whether you’re serving it in elegant glasses with a drizzle of caramel or simply enjoying it straight from the bowl, this ice cream delivers on every promise.
The techniques here aren’t just for show—they’re what turn good ice cream into exceptional ice cream. Let’s get started on creating your signature dessert.
Ingredients for 5 star vanilla ice cream
Pantry staples transformed into Michelin-level vanilla ice cream with precise ratios and technique.
| Ingredient | Amount | Notes |
|---|---|---|
| Heavy Whipping Cream 🥛 | 2 cups | Full-fat, 36% or higher |
| Whole Milk 🥛 | 1 cup | Cold for best texture |
| Granulated Sugar 🍚 | 1 ½ cups | Superfine preferred for smoothness |
| Vanilla Bean Paste 🌿 | 2 tbsp | High-quality, Madagascar beans |
| Pure Vanilla Extract 🌿 | 1 tsp | Bottled for 6+ months |
| High-Proof Alcohol 🍹 | 1 tbsp | Vodka or rum for smoothness |
| Large Egg Yolks 🥚 | 6 whole | Room temperature preferred |
| Unsalted Butter 🧈 | ½ cup | Cold, cubed for swirls |
| Diamond Crystal Kosher Salt 🧂 | ¼ tsp | Fine grain for delicate flavor |
| Fresh Vanilla Beans 🌿 | 2 whole | Split lengthwise for swirls |
| Vanilla Bean Seeds 🌿 | 1 tsp | Scraped from pods for infusion |
The heavy cream and egg yolks form the foundation—use only the highest-fat cream available (36% or higher) for that signature restaurant texture. Egg yolks should be room temperature to emulsify properly; cold yolks can cause curdling. For the vanilla, Madagascar beans deliver the most complex flavor profile—split them lengthwise and scrape out the seeds for both infusion and those coveted swirls. Whole Foods or specialty grocers carry premium vanilla beans, but even the grocery store version works if you’re patient. The butter matters too—unsalted, European-style butter melts more cleanly for the signature swirls, though regular unsalted works in a pinch.
No vanilla bean paste? Combine 1 tbsp pure vanilla extract with 1 tsp sugar as a substitute, though you’ll miss the depth of real vanilla seeds. Running out of vodka? Rum or brandy work equally well—just use the same amount. The sugar can be swapped for superfine sugar if you don’t have it, though it dissolves more smoothly. For the milk, whole milk is non-negotiable—skim or reduced-fat versions won’t give you the same creamy result. And if you’re short on egg yolks, substitute with 1 cup whole milk plus 1 tbsp cornstarch, though the texture won’t be quite as luxurious.
The custard must age 12+ hours for optimal flavor development—set a reminder or label it clearly. Once churned, transfer to an airtight container with parchment between layers to prevent freezer burn. Store for up to 3 months in the freezer, though it’s best enjoyed within 2 weeks for peak texture. For serving, let sit at room temperature for 10-15 minutes before scooping—this prevents ice crystals and makes those golden swirls pop. Leftovers? Portion into 1/2 cup containers for easy grab-and-go dessert moments.
Why You’ll Love This Recipe
- No-Churn Magic: I swear by this method—just mix, freeze, and forget. No ice cream maker, no stress, just a bowl and a spoon. The heavy cream and whole milk blend so smoothly, you’d never guess it’s this effortless.
- Vanilla Overload: That split vanilla bean paste? Chef’s kiss. It’s richer than store-bought, with flecks of real vanilla seeds swirling through every bite. Honestly, I’ve tried every extract, but this combo wins every time.
- Weeknight Hero: Freezes in hours, so I make a batch on Sunday and grab it for breakfast, dessert, or even a quick smoothie boost. Between us, nothing beats cold vanilla ice cream straight from the freezer—no thawing, no fuss.
- Budget Luxury: You’d pay $8 a scoop at the shop, but this costs pennies. The sugar balances the cream perfectly, and the vanilla extract stretches further than you’d think. My secret weapon for feeling fancy without breaking the bank.
Step-by-step instructions for ultra-smooth vanilla bean swirls
This method delivers restaurant-quality ice cream with professional texture and depth.
Infuse the Dairy Base with Vanilla
In a medium saucepan, combine the 2 cups heavy whipping cream, 1 cup whole milk, the 1 tsp vanilla bean seeds, and the 2 whole fresh vanilla beans (split lengthwise). Warm over medium heat until the mixture reaches 180°F, stirring occasionally to prevent scorching. You’ll see the vanilla seeds release their aromatic oils into the liquid, creating that signature vanilla flavor.
Remove from heat and let steep for 15 minutes, covered, to fully infuse. This step is crucial—it develops the complex vanilla notes that separate home ice cream from professional results. Strain through a fine-mesh sieve into a clean bowl, pressing gently on the vanilla pods to extract every last drop of flavor. Discard the pods after use.
Prepare the Custard Base
In a separate bowl, whisk together the 6 whole large egg yolks, 1.5 cups granulated sugar, 2 tbsp vanilla bean paste, 1 tsp pure vanilla extract, and 0.25 tsp diamond crystal kosher salt until the mixture is pale yellow and slightly thickened. This tempering step ensures the eggs cook smoothly without curdling.
Slowly pour the warm dairy mixture into the egg yolk mixture while whisking continuously. This gradual addition prevents the eggs from scrambling. Return the combined mixture to the saucepan and cook over low heat, stirring constantly with a wooden spoon, until it thickens to 175°F and coats the back of the spoon. This custard forms the silky foundation of your ice cream.
Add Butter and Alcohol for Texture
Remove the custard from heat and stir in the 0.5 cup cold unsalted butter (cubed) and 1 tbsp high-proof alcohol. The butter adds richness and creates those signature swirls, while the alcohol prevents ice crystals from forming. Let the mixture cool to room temperature, then refrigerate for at least 4 hours or until completely chilled.
This cooling phase is essential—it allows the custard to fully set and develop its smooth texture. For best results, chill overnight. The longer it rests, the creamier the final product will be. Use a fine-mesh sieve to strain out any potential lumps before churning, ensuring an ultra-smooth texture.
Churn to Perfect Consistency
Pour the chilled custard into an ice cream maker and churn according to the manufacturer’s instructions, typically 20-25 minutes, until thick and creamy. The ice cream should hold its shape when scooped. If you don’t have an ice cream maker, freeze the custard in a shallow container, stirring vigorously every 30 minutes for 3-4 hours until firm.
For the signature swirls, fold in the 0.5 cup cold unsalted butter (softened slightly) at the end of churning. This creates those beautiful marbled patterns while adding extra richness. Freeze the finished ice cream for at least 4 hours before serving to allow flavors to meld completely.
Pro Tips For Making 5 Star Vanilla Ice Cream
- Scald the Cream: Heat your heavy cream and milk together until tiny bubbles form at the edges—just shy of a full boil. I learned this the hard way: skipping the scalding leads to grainy ice cream later, no matter how well you strain it. Let it steep with the vanilla for 15 minutes while warm; that’s when the flavor really sinks in.
- Split the Vanilla: Use half the vanilla bean paste and half the pure extract—this balances richness and depth. The paste adds flecks and complexity, while the extract cuts through the sweetness without overpowering. (Yes, even if you’re impatient like me, resist the urge to skip the extract—it makes a real difference.)
- Churn Until Stiff: Stop churning when the ice cream holds a peak that doesn’t flop over when you lift the whisk attachment. Over-churning turns it into butter; under-churning leaves it soupy. Test it early—your freezer isn’t a time machine, and this isn’t the prettiest method, but it’s the tastiest.
- Sweat the Sugar: Dissolve the sugar into the warm cream mixture before adding the milk—this prevents clumping and ensures even sweetness. I used to dump it all in at once, and half the time, I’d end up with gritty ice cream. A quick whisk while hot solves that.
Flavor customization for 5 star vanilla ice cream
Classic Bourbon Vanilla
Swap the vodka for 2 tbsp bourbon (like Maker’s Mark) and add 1 tsp brown sugar to the custard base. The caramel notes from the bourbon create a warm, toasty depth that pairs beautifully with the vanilla.
For extra richness, fold in 2 tbsp toasted pecans after churning. This variation is perfect for fall gatherings or anyone who enjoys a hint of whiskey in their dessert. 🍹
Salted Caramel Swirl
After churning, fold in ½ cup salted caramel sauce (store-bought or homemade) along with the butter swirls. For homemade caramel, combine 1 cup sugar and ½ cup heavy cream, cook to 300°F, then whisk in 2 tbsp butter and ½ tsp flaky salt.
Let cool slightly before folding into the ice cream. The salt enhances the vanilla, while the caramel adds a luxurious sweetness. 🍬
Spiced Chai Infusion
Add 1 tsp ground chai spice blend (or ½ tsp cinnamon + ¼ tsp each cardamom, ginger, and cloves) to the warm dairy mixture before infusing with vanilla. For extra depth, steep 1 chai tea bag in the warm milk before combining with cream.
The spices warm up the vanilla flavor beautifully, making this a cozy winter favorite. 🌶️
Coffee Bean Twist
Add 1 tbsp instant espresso powder to the custard base along with the vanilla extract. For a stronger coffee flavor, steep 2 tbsp finely ground coffee in the warm dairy mixture before straining.
This creates a sophisticated vanilla-coffee hybrid that’s perfect for breakfast or dessert. Top with a sprinkle of cocoa powder for extra flair. ☕
Lemon-Zest Brightness
Zest 1 lemon (about 1 tbsp zest) and add it to the custard base along with the vanilla. The bright citrus cuts through the richness of the cream, creating a refreshing twist.
For extra zing, add 1 tsp lemon juice after churning. This variation is perfect for summer or anyone who enjoys a tangy contrast. 🍋
Dark Chocolate Chunks
Fold in ½ cup chopped dark chocolate (70% cocoa) during the final stages of churning. For a smoother texture, use chocolate chips instead of chopped bars. The dark chocolate adds depth without overpowering the vanilla. Drizzle with melted chocolate or sprinkle with sea salt before serving. 🍫
Nutrition facts
Frequently asked questions
Why does this recipe use both vanilla bean paste and extract?
The vanilla bean paste provides real vanilla seeds for that authentic depth and the signature swirls, while the extract ensures consistent flavor in every bite. Together, they create a more complex, professional-grade vanilla taste that separates this from basic recipes. The paste also helps distribute the flavor evenly throughout the custard.
Can I make this without an ice cream maker?
Yes! After churning the custard in the freezer, stir vigorously every 30 minutes for 3-4 hours until firm. For extra smoothness, use a hand mixer to break up ice crystals before serving. The texture won’t be as silky as machine-churned, but it’ll still be delicious with proper technique.
How do I fix ice crystals in my homemade ice cream?
Ice crystals form when ice cream melts and refreezes. To prevent them, always store in an airtight container with parchment between layers. If they appear, let the ice cream soften slightly, then blend it with a hand mixer for 1-2 minutes to redistribute the fat and smooth out the texture. For future batches, ensure your custard is fully chilled before freezing.
What’s the best way to serve this for a 5-star presentation?
Scoop into elegant glass bowls or vintage dessert dishes and top with a drizzle of caramel, a sprinkle of crushed vanilla wafer cookies, or a few toasted coconut flakes. Garnish with a fresh vanilla bean slice or a dusting of powdered sugar for that restaurant-worthy finish. Serve immediately after letting it sit at room temperature for 10 minutes to enhance the swirls.
Can I use condensed milk instead of heavy cream and milk?
Not for this recipe—condensed milk adds too much sweetness and changes the texture dramatically. The high-fat content of heavy cream and the balance of whole milk create the perfect creamy base. If you’re short on time, you could use 2 cups heavy cream + ½ cup milk, but the flavor and texture won’t be as luxurious.

- 1 Cup Oatmeal 2 Apples Recipe: Warm Spiced Porridge With Apple Chunk Appeal - November 17, 2026
- 3 Overripe Bananas Recipe: Fluffy Pancakes With Zero Waste - November 17, 2026
- 2-Minute Pizza Recipe: Speedy Crispy Crust With Melted Cheese Magic - November 17, 2026